Press ctrl+F12 to access the configuration system page. You will be asked to type the
password. Please refer to the frontdesk administrator for more information on how to obtain this
credential.
From this section you can customize a set of options related to the operating system, that will help you to better manage the frontdesk software in case of necessity.
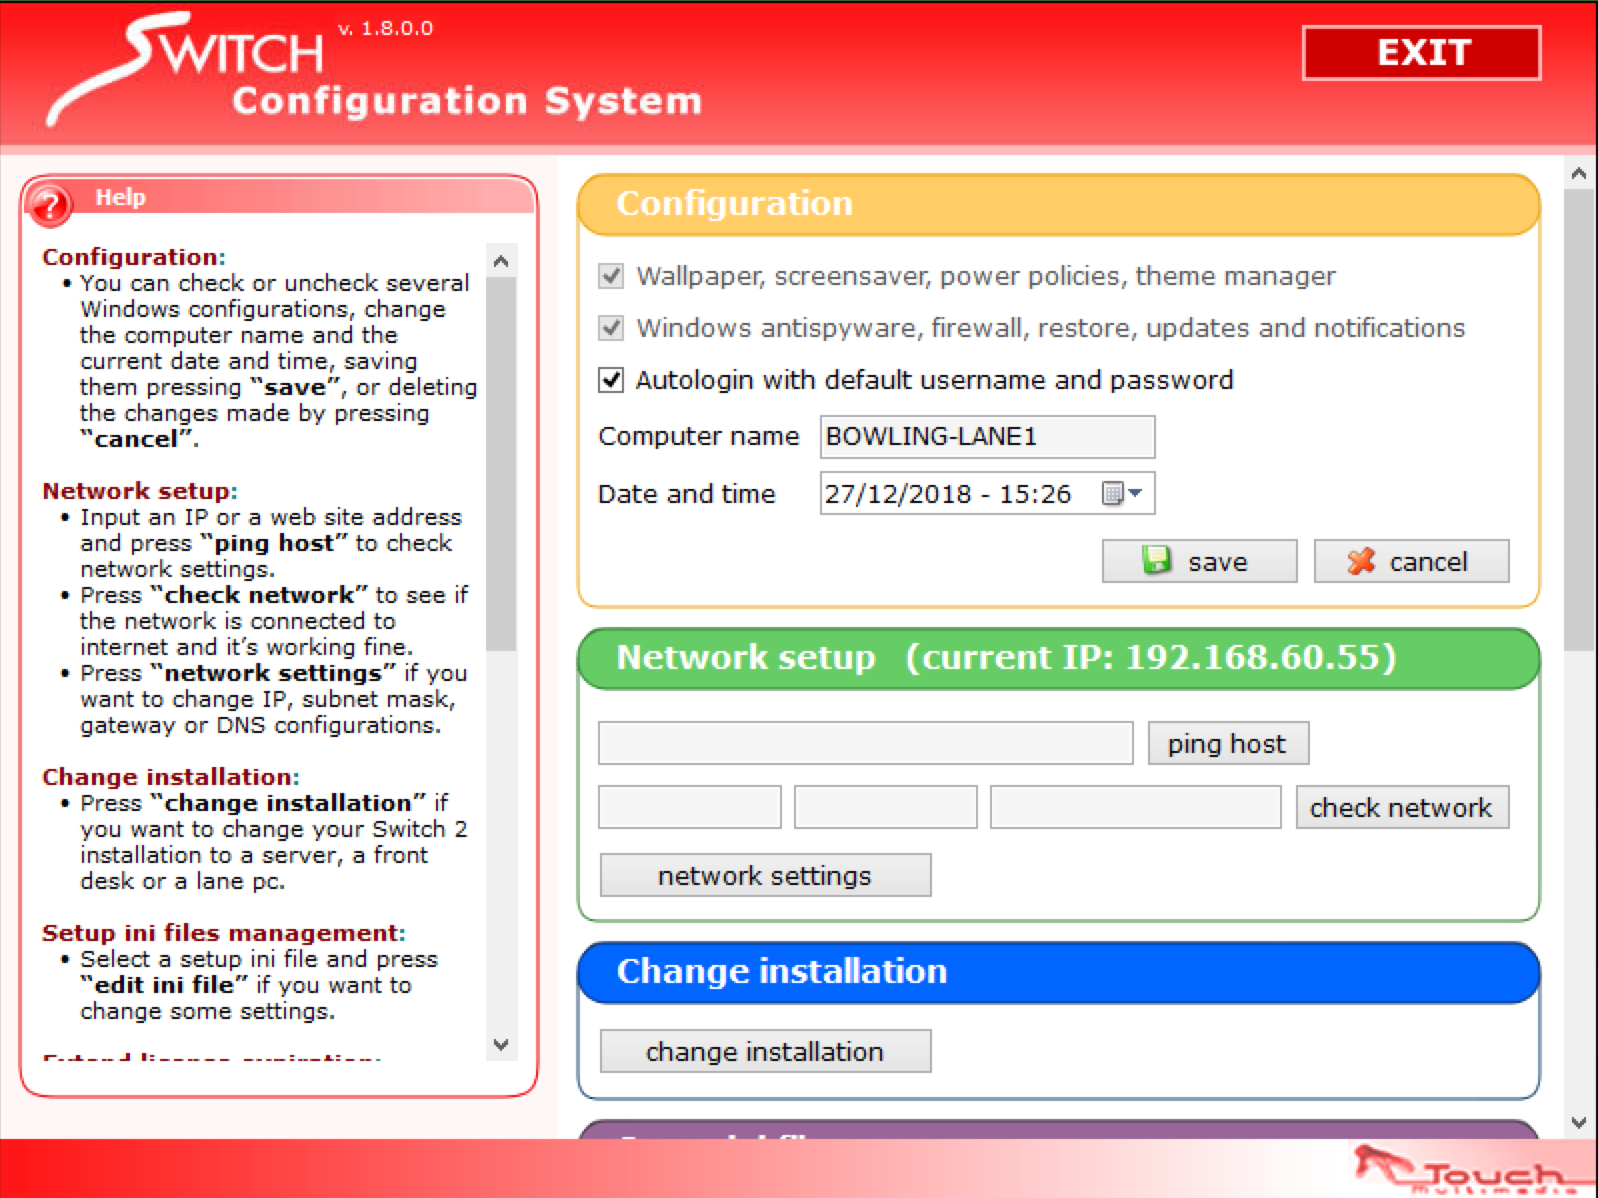
B.1 Configuration
From this section you can customize some specific settings for Microsoft Windows operating system.
-
Wallpaper, screensaver, power policies, theme manager: uncheck this option if you want to disable wallpapers, screensavers, power policies and theme manager from your distribution of Microsoft Windows
-
Windows antispyware, firewall, restore, updates and notifications: uncheck this option to disable antispyware, firewall, restores, updates and notifications from your distribution of Microsoft Windows
-
Autologin with default username and password: check this option if you want to auto login with default username and password when rebooting the operating system
-
Date and time: set the operating system date and time
Click on save button to save the current changes or cancel to discard them.
B.2 Network setup
From this section you can configure some network options:
-
Ping host: input an ip or website address and press the button the check if it is working
-
Check network: press this button to check if:
-
Internet is working
-
Google is reachable
-
Touch Multimedia services are reachable
-
-
Network settings: open a small window where you can set the parameters for your connection
-
Choose your network card (e.g. Ethernet)
-
Choose whether to use DHCP or configure ip manually. If you decide to configure manually then you will be asked to type your ip address, subnet mask and default gateway
-
Choose whether to obtain a DNS server automatically or specify it manually. In the second case you can type the primary DNS server plus the alternate
Once you are done with these settings simply click Save button to save the current changes or Restore to discard them and restore to the previous configuration
-
B.2.1 Change installation
If you click on Change installation button then the software setup wizard will be started and you can reinstall the software from scratch.
B.2.2 Extend license expiration
If you want to manually extend the license (maybe because you don’t have internet connection) you can click the extend license button. You can perform this operation only on server machines. Please make sure that the dongle is properly inserted on the computer and that its driver are installed. Once you have all the requirements click the button and perform the following steps:
-
Copy the machine code that appears on the window
-
Call the software support and tell them the machine code; they will give you a new license code
-
Paste the provided code on the new license code field
-
Press ok button to confirm and your license will be extended
B.2.3 Machine remote control
This feature allows you to remotely control a machine on your local area network. Select a machine by name from the list or type manually an ip address, then type the password and click on connect. A remote session with the selected machine will be started.
B.2.4 System utilities
This section allows you to perform some operation at operating system level:
-
Reboot: reboot the operating system
-
Restart applications: restart all software applications
B.2.5 Log viewer
This feature allows you to read the logs of all the machines on the system, including the server. Click on load button to start the application.
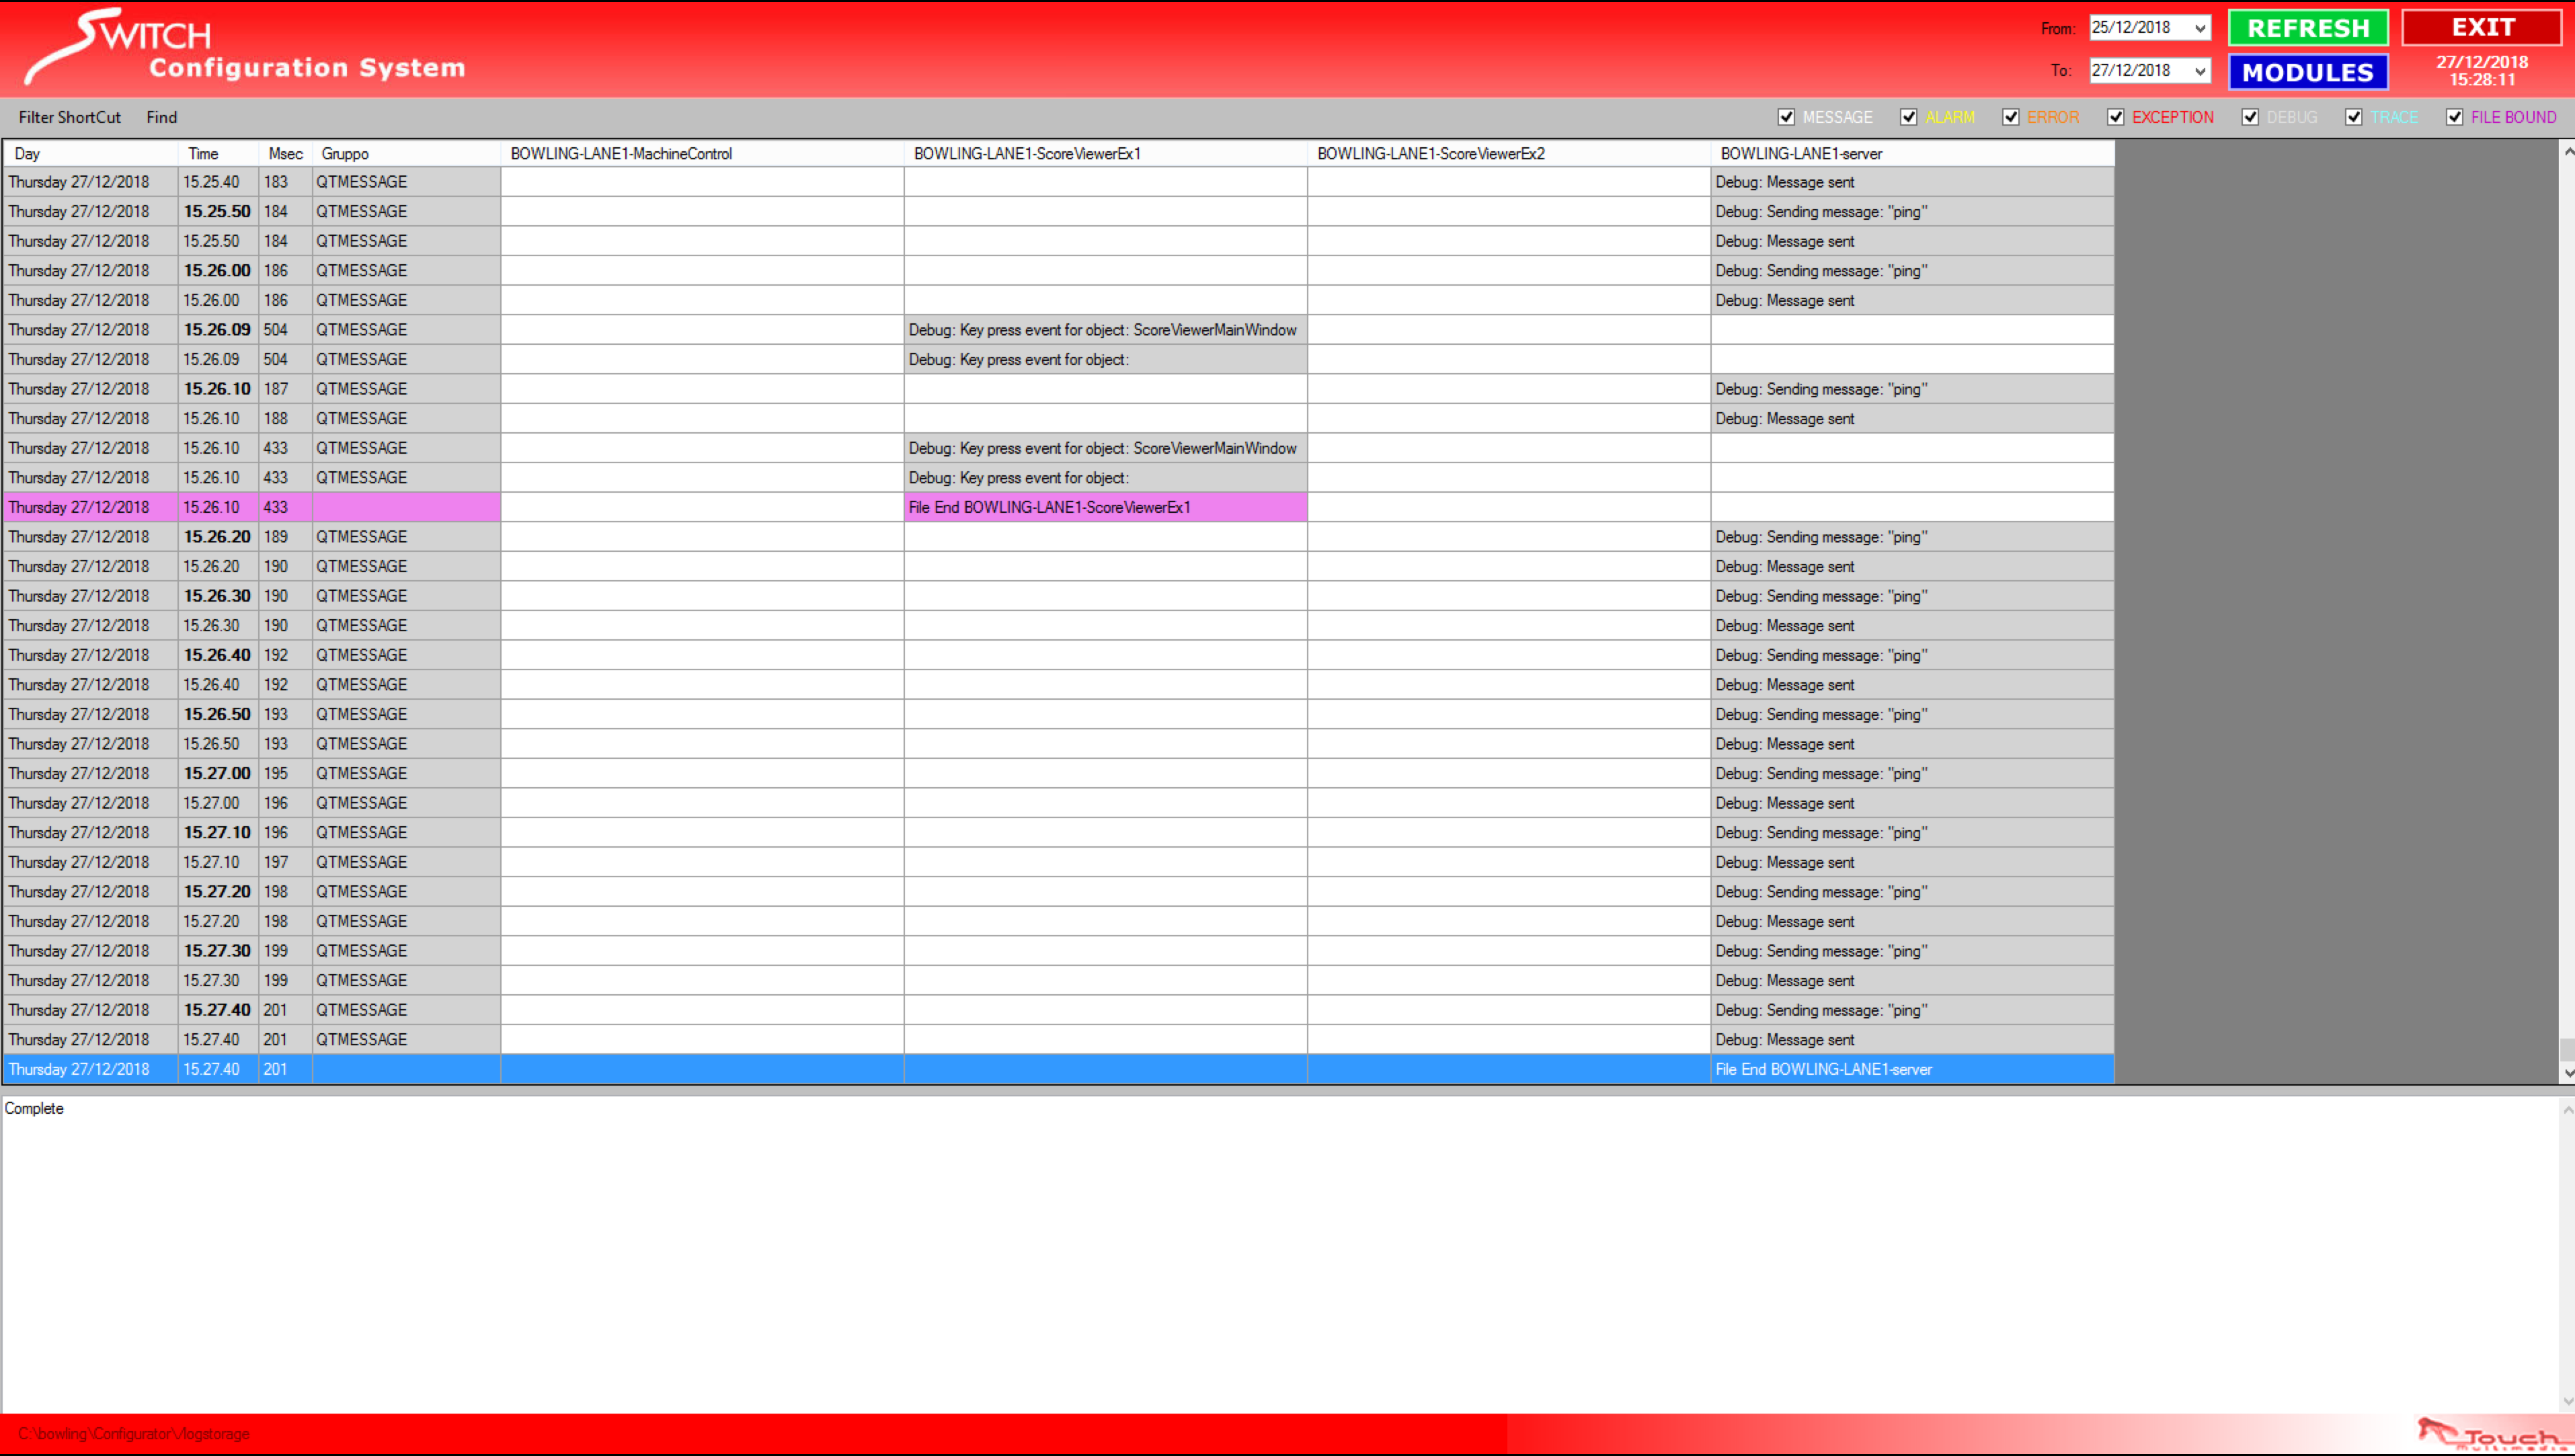
On the main table you can find different columns:
-
Day: the date when the event occurred (day of the week, month, day, year)
-
Time: the time when the event occurred (hour, minute, second)
-
Msec: the millisecond when the event occurred, related to the time column. The combination of day, time and msec will result in a timestamp
-
Group: the group to which the event belongs, useful in case you want to apply a filter
-
After the first four columns you can find a variable number of columns representing all the machines in the system that can produce some logs. Note that logs are centralized and constantly synchronized among all the components of the system
Click on any row of the table to see the complete log on the blank space below. Events are identified by a type, which can be:
-
Message: an information message that a component can send
-
Alarm: an error regarding components, with low severity
-
Error: an error regarding components, with medium/high severity
-
Exception: some unexpected behaviour of the software, useful for developers
-
Debug: debug messages, useful for developers
-
Trace: debug messages to trace software functions’ steps, useful for developers
-
File bound: useful to identify when a new log file is created
You can filter the log table by message type, clicking on the proper checkbox at the top right of the window.
You can set the period of the log, by selecting the start and the end date from the dropdowns at the top right of the window. Click on refresh button to update the view.
You can filter the table by selecting a specific module of the system. Click on modules button and a new window will appear, where you can select the module(s) you want to filter.
Press ctrl+F3 or open Find > Find to filter the messages by an arbitrary string that you can
type.
Once you have finished viewing the logs simply click on Exit button and you will be redirected to the previous window.