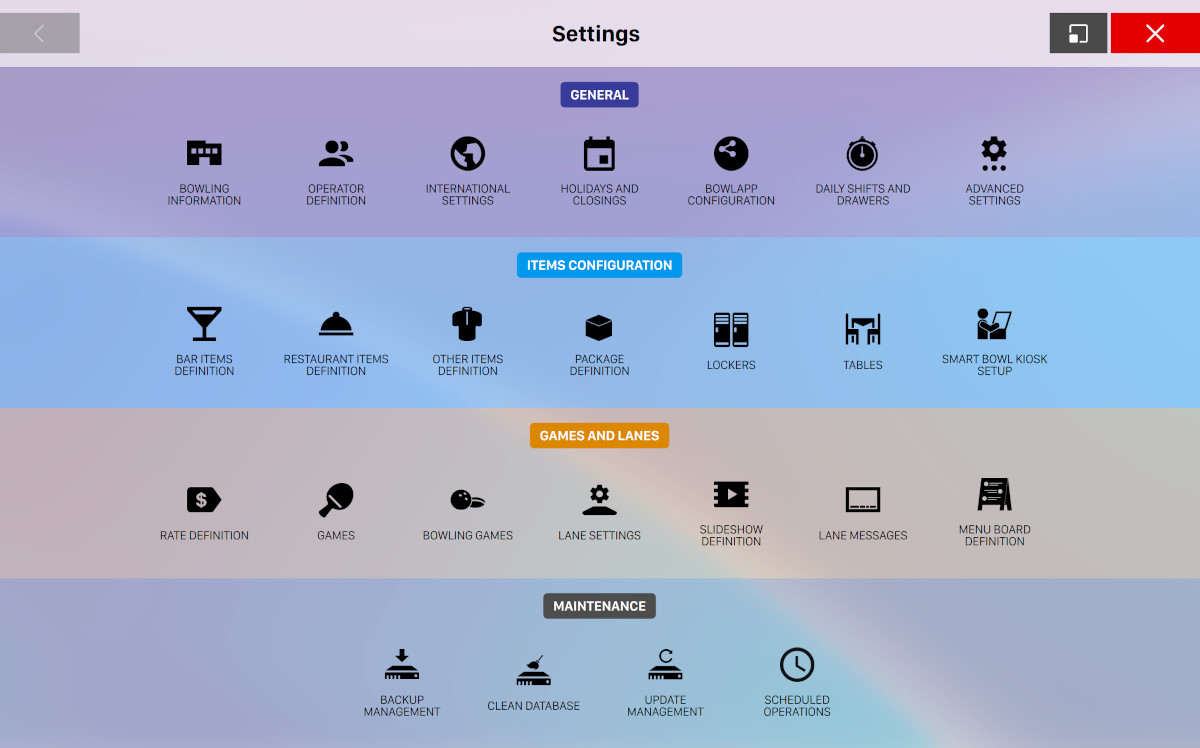
This window gives access to the configuration functions of the Genie software. Configurations are organized in categories, each of which contains different icons that take to specific configuration sections. Categories are:
-
General: contains general sections of configuration
-
Items configuration: contains configurations of for purchasable items
-
Games and lanes: contains the configurations of bowling games and lanes
-
Maintenance: contains sections for maintenance tools
You can navigate into each section and return back to the main page by clicking the left arrow button on the top left of the window. Note that with this navigation method, navigating back to the main page from a section will cause the loss of all the unsaved configurations within the section.
Sometimes it might be useful to navigate to back to the main page and then to another section without loosing the changes that you have made on the previous sections. In order to achieve this there is an additional button located right to the back button on the top left corner of the section:

By clicking on this button the page will be parked and all the changed and unsaved configurations will be kept. A parked section is surrounded by a black frame:
By clicking back on a parked section you will navigate back to it and you will find all the changes that you have previously made.
17.1 Bowling Information
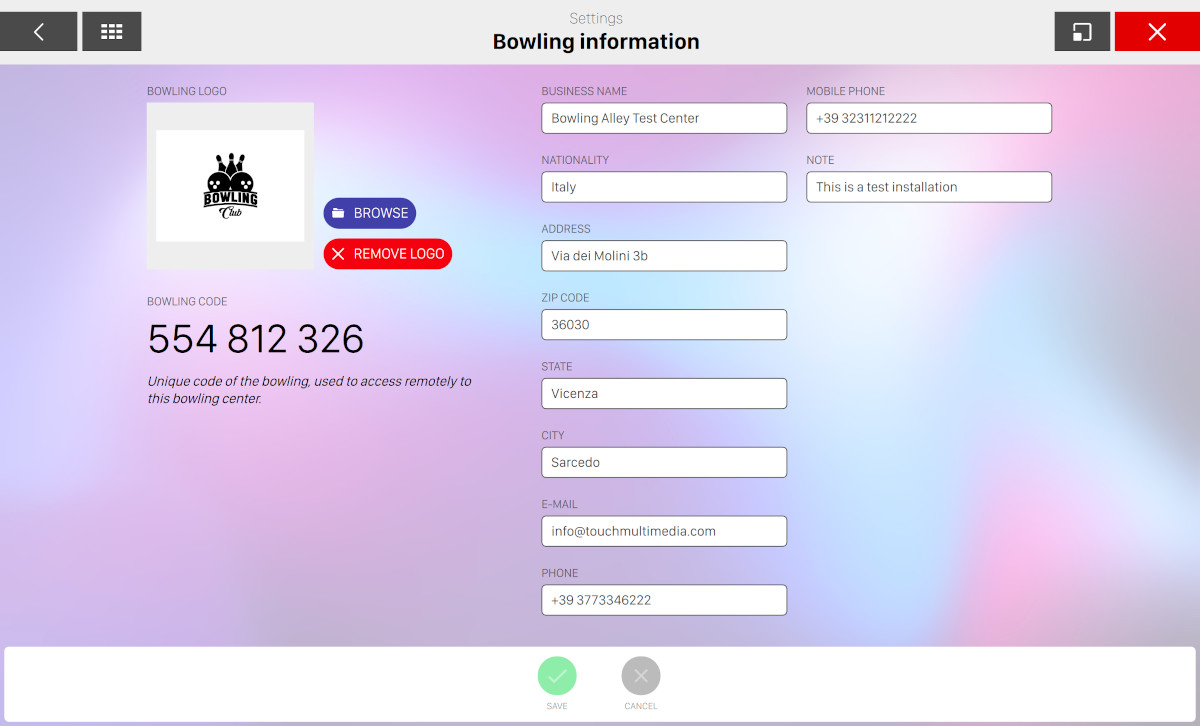
All the relevant information about the bowling center must be entered from this window. The fields are filled during the software installation or when changes to the existing information are required. The fields with the (*) are mandatory. These information will be sent to the Switch headquarters to be used, by the Switch Customer Service, in case of online assistance required by the customer. Information are:
-
Logo: a graphic logo that identifies the bowling center. This logo will also be included in the header of all printouts. To load an image click on Browse and select a file. To remove an existing image click on Remove logo
-
Bowling code: this is a unique code used to access from smartphone to the current bowling center. The field is a read-only information
-
Business name: this should be the corporate name of the business. This text is shown on the header of all printouts
-
Nationality: name of the country where the bowling center is installed
-
Address: the address of the bowling center
-
ZIP code: the zip-code of the bowling center
-
State: state or province name
-
City: the name of the city
-
E-mail: e-mail address of the person in charge of the management of the bowling center
-
Phone: landline number for direct contact with the bowling center
-
Mobile phone: a mobile phone number to contact the bowling center
-
Notes: Any useful information
Click on Save to save the current changes and Cancel to discard them.
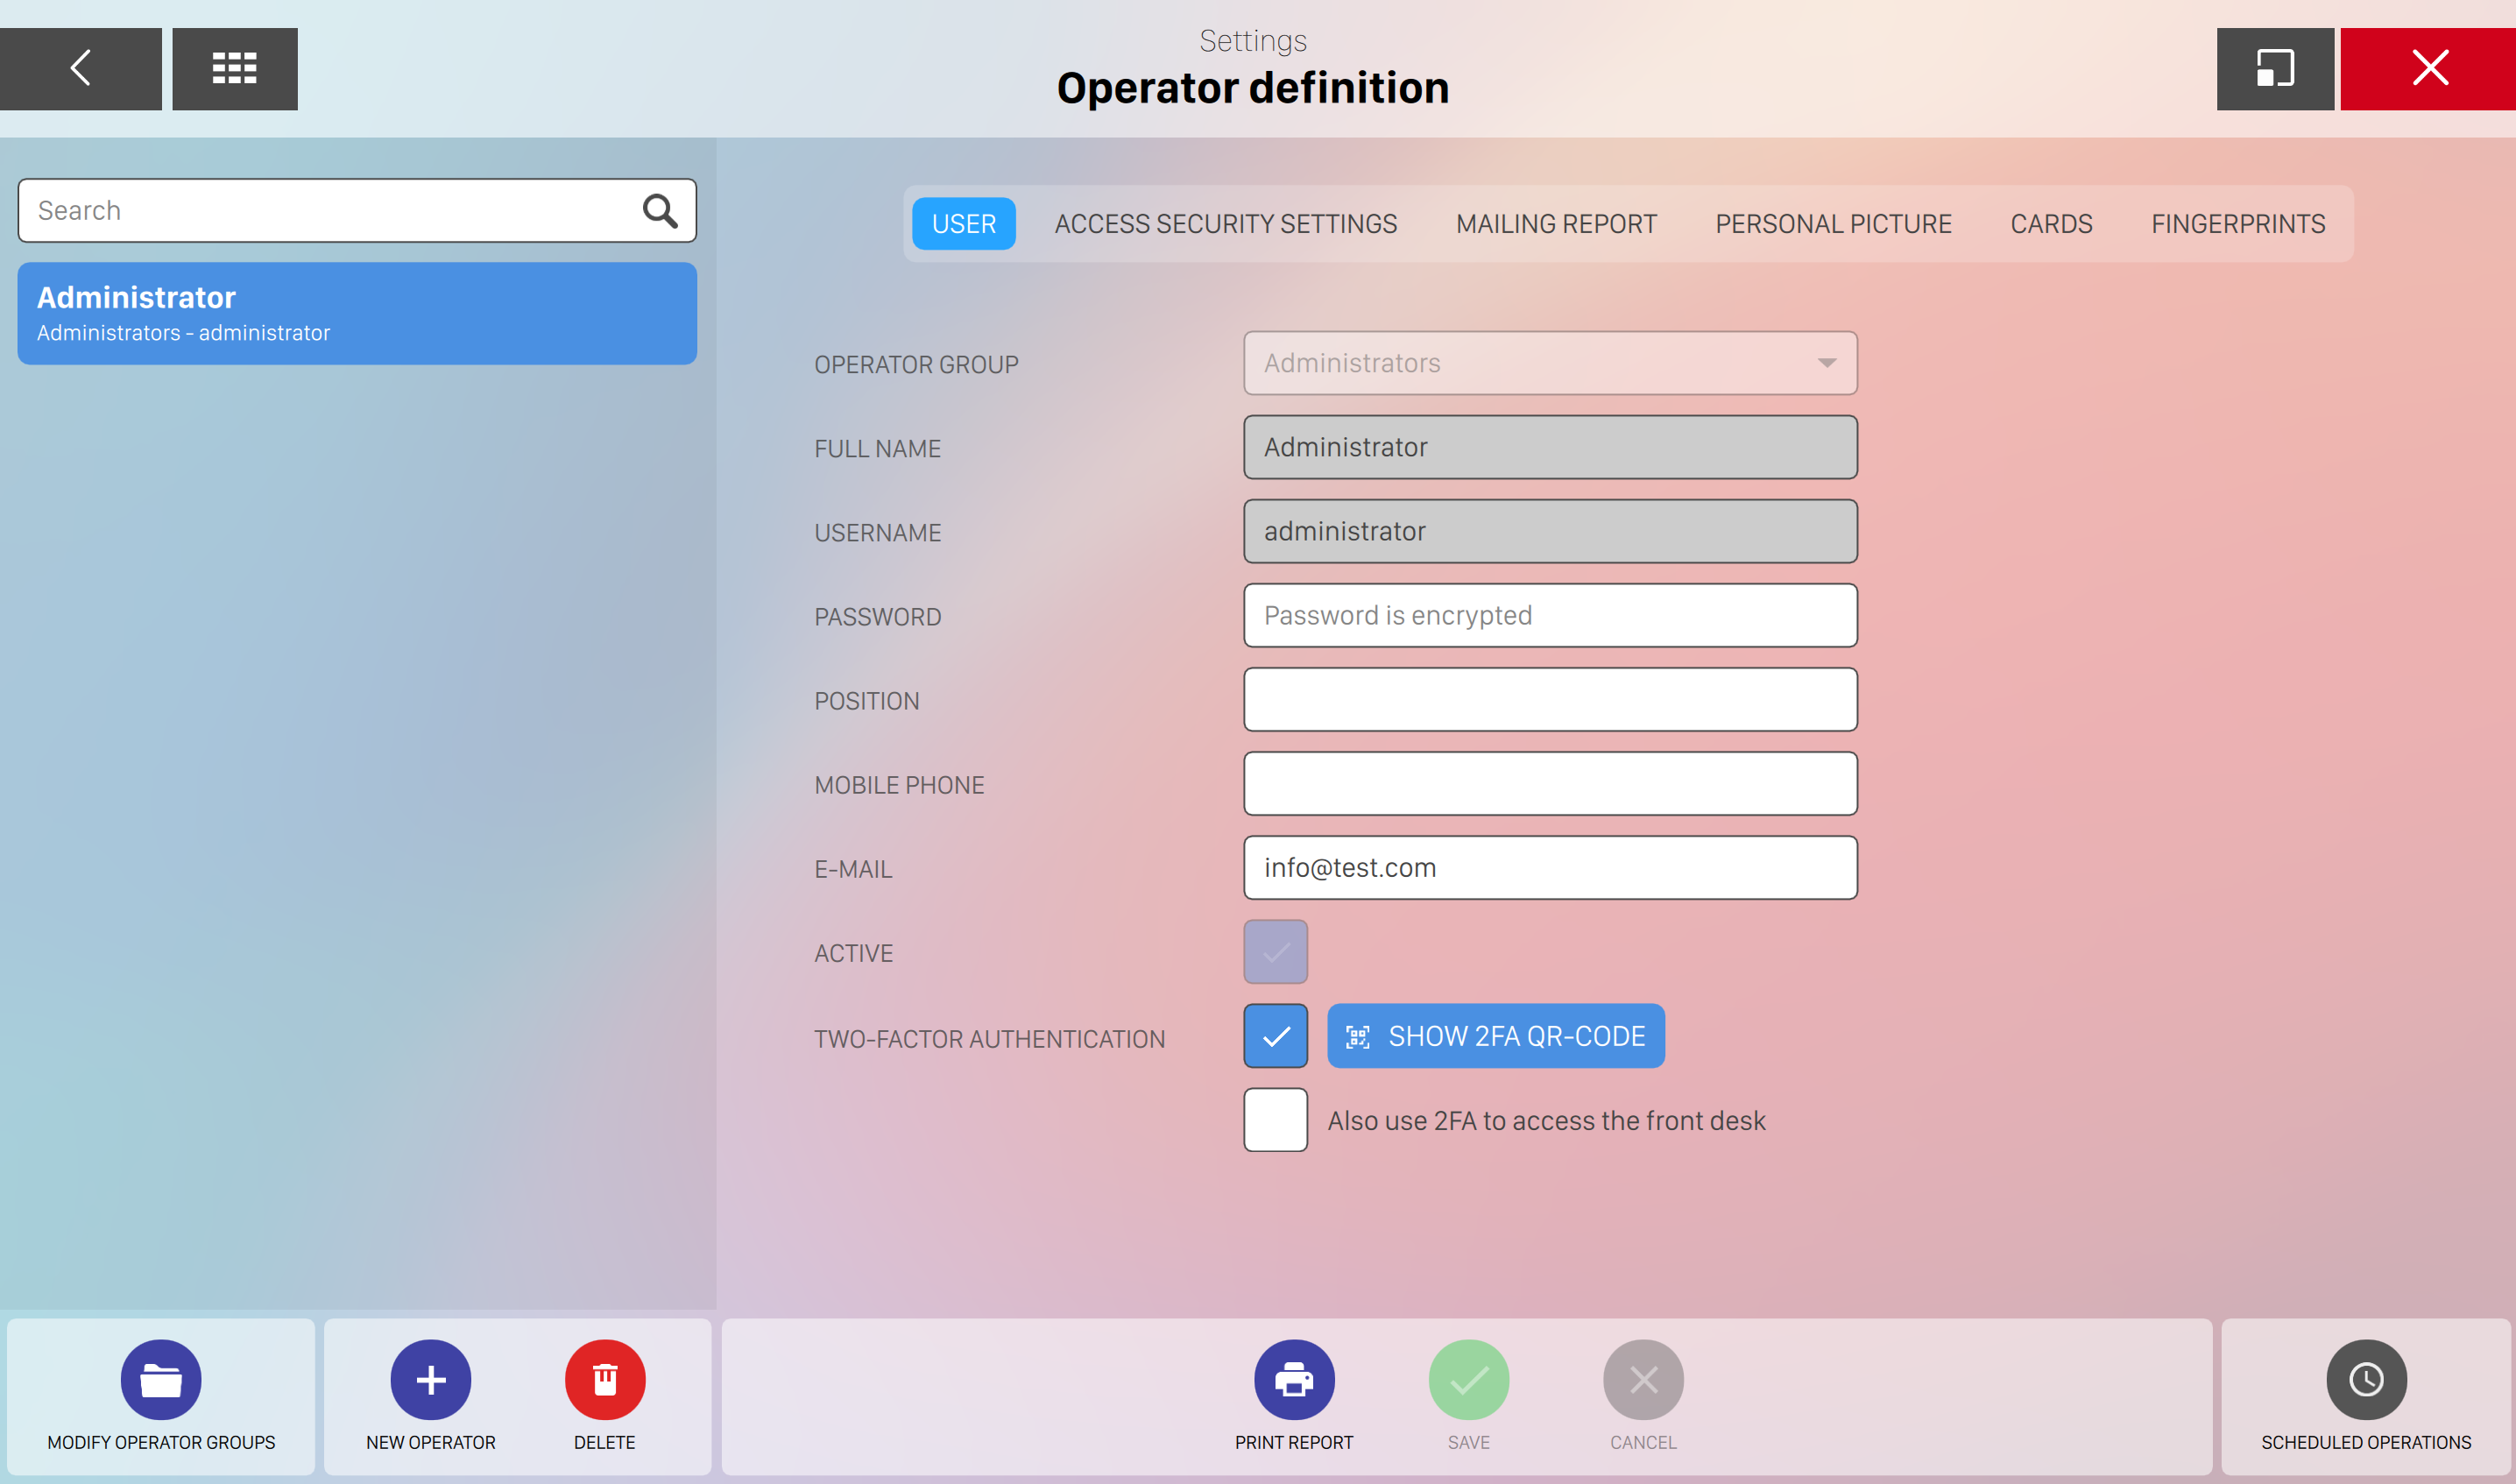
17.2 Operator Definition
Operators are divided in groups, this will make easy to give them the proper rights of access. Each group (cashiers, mechanics, bar staff, etc.) can have different access rights, and these will be inherited by the operators of that group. Operators who have already been assigned to a group are shown on the left side of the screen. To view or modify the information of any operator, click on the operator’s name. The Find field allows you to find an operator by typing the operator’s initials and pressing Enter. This is useful when the list is very long.
17.2.1 User
This tab allows you to update information about the operator:
-
Operator group: represents the group the operator is assigned to
-
Full name: represents the full name of the operator
-
Username: represents the username that the operator uses to login into the system
-
Password: allows the operator to enter the password used to login into the system. If strong validation password is required then you will have to enter a strong password
-
Position: represents the operator’s job
-
Mobile Phone: represents the operator’s mobile phone number
-
E-mail: represents the operator’s e-mail address
-
Time clock: enables or disable time clock feature for the current user
-
Active: indicates whether the operator is allowed to access the system or not
-
Two-factor Authentication: indicates whether the 2FA is enabled or not. Clicking on "Show 2FA QR-Code" will show the QR code to add the 2FA to any authenticator (like Google, etc.)

-
Also use 2FA to access the front desk: indicates whether the operator is required to pass the 2FA to access the system or not. Be sure to add the 2FA to an authentication app before activating this option.
17.2.2 Access Security Settings
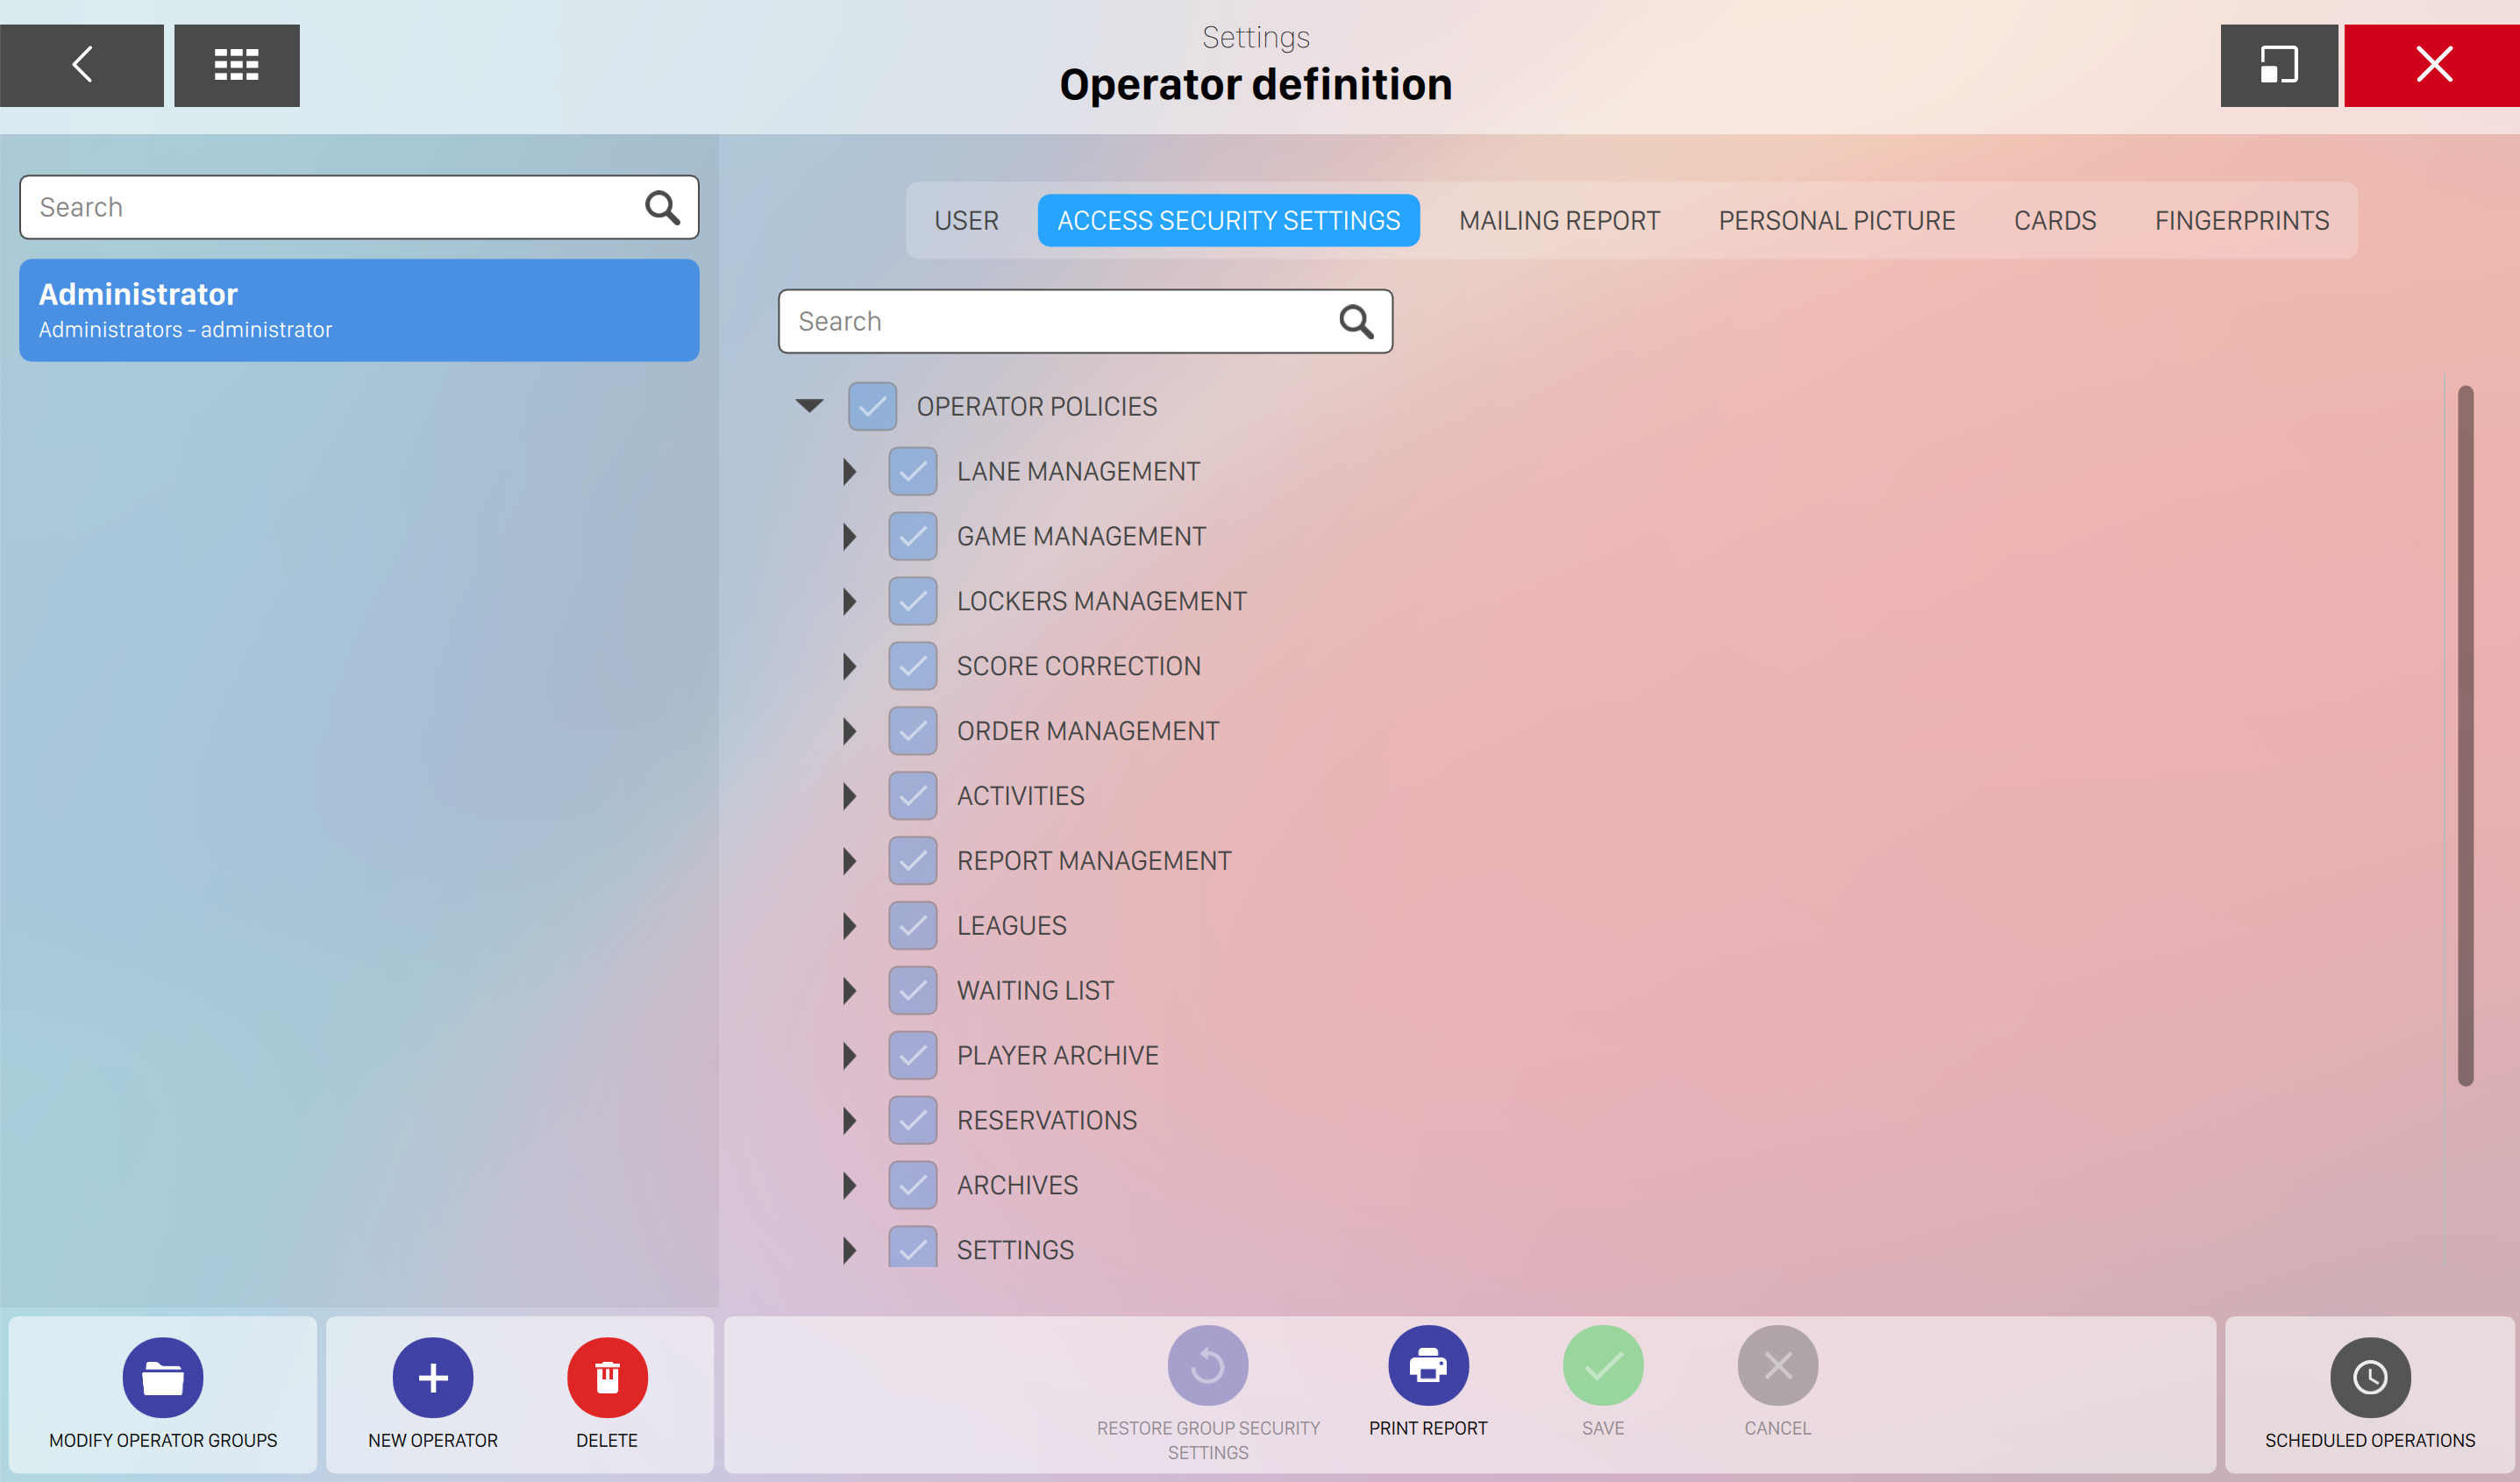
The levels of access are organized in a folder list, you can also search the policy using the search field. They allow you to access or not to a specific section or function of the software. Click on each folder to expand it. The access levels rights can be applied to every section or function of the system. The Restore group security settings button applies the level of access attributed to the group to whom the operator is assigned.
17.2.3 Mailing report
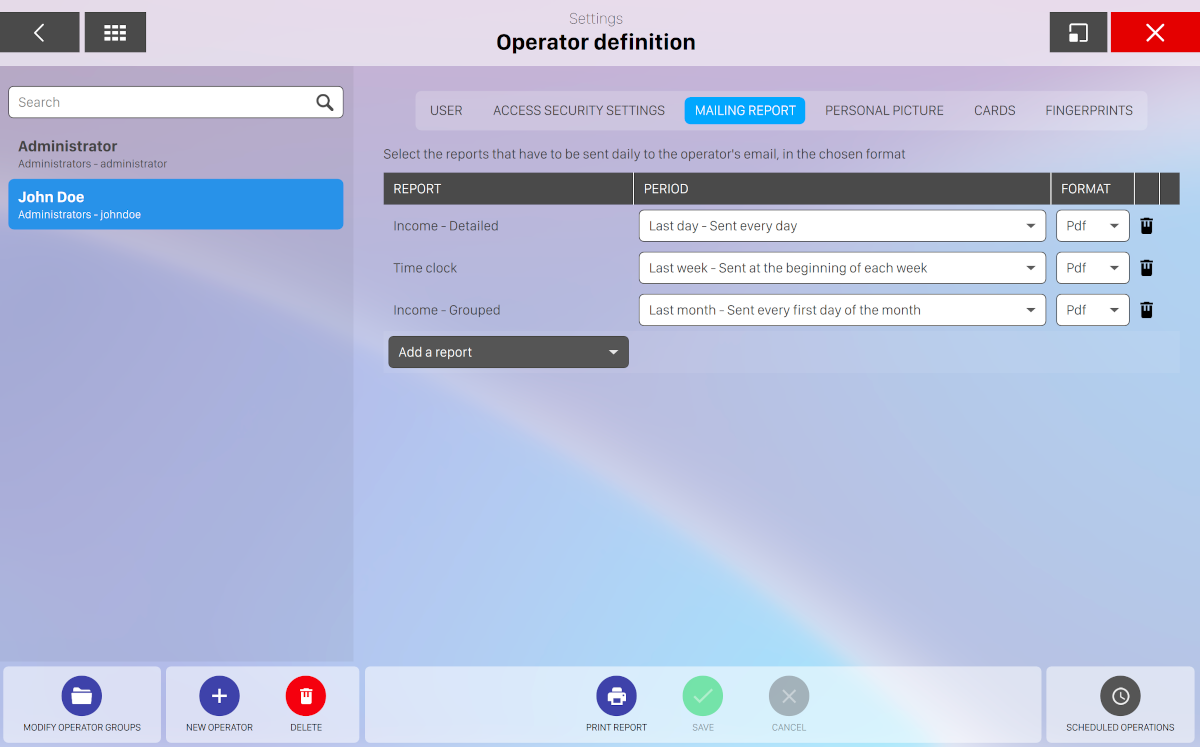
This section allows you to define the list of mailing reports that will be sent to the operator’s email address. For each item on the list you can set:
-
Report: choose the report type from the list
-
Period: choose a period among the options:
-
Last day - Sent every day
-
Last week - Sent at the beginning of the week
-
Last month - Sent at the first day of the month
-
Last year - Sent at the first day of the year
-
-
Format: choose the format of the report among the options:
-
Pdf
-
Excel
-
You can click on the Add a report button to add a new report or click on the trash icon on each row to remove the relative item.
For more details about the report types see reports section.
17.2.4 Personal Picture
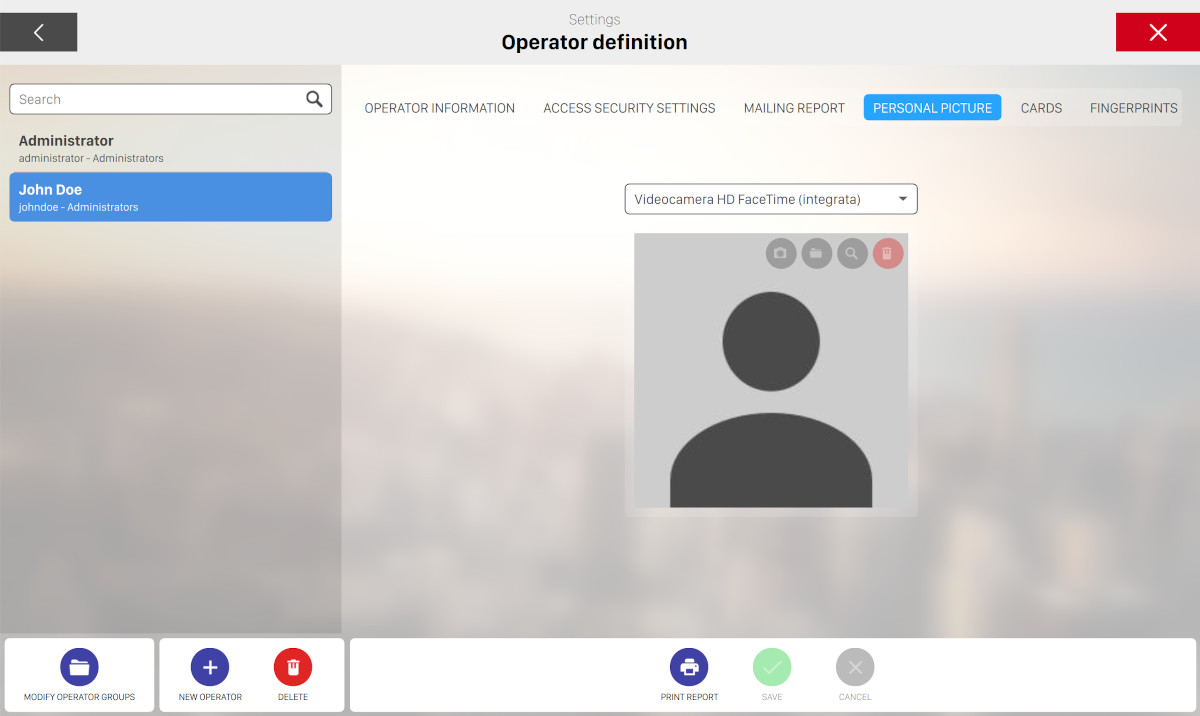
In this window it is possible to take a picture of the operator. The photo appears on the Access screen and on the user dropdown menu that can be expanded from the top bar. You have two ways of selecting a picture:
-
Webcam: click this button to take a picture from the webcam. This feature is available only if a webcam is present and configured on the machine
-
Find: allows you to use a picture that is on an external device like a memory stick
Click on ‘Delete photo‘ button to remove the current picture.
17.2.5 Cards
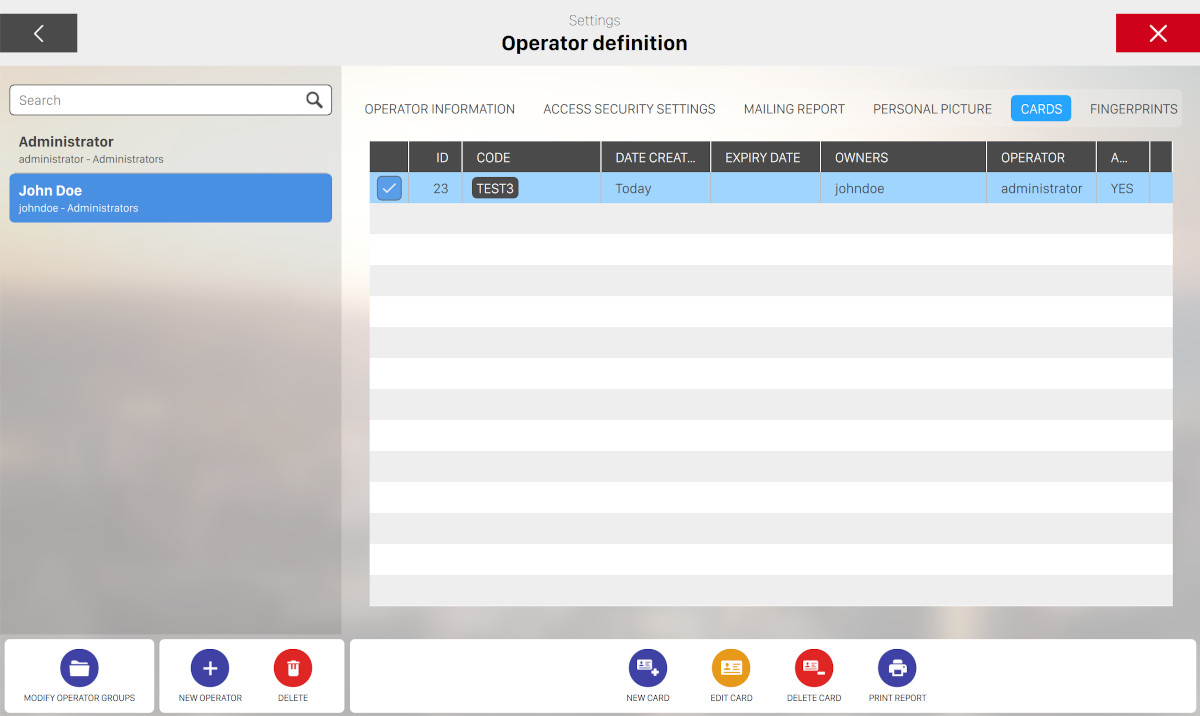
One or more cards can be issued by each operator from this window. Cards allow operators to access a workstation without entering their credentials.
-
New card: allows you to create a new card by swiping it to the card device. Once swiped the card will be registered and displayed to the card list
-
Delete card: allows you to delete any selected card
Each card has the following details:
-
Card code: unique identifier number for the card
-
Status of the card (active or not active)
-
Creation: date of when the card was created and the operator that created it
-
Card active: indicates whether the card is active or not
-
Expiration date: if checked you can specify the expiration date for the card from a calendar widget
-
Proprietors: indicates the card owner
Note that if a card has been disabled or is expired, then it will not be recognized by the Genie software.
17.2.6 Fingerprints
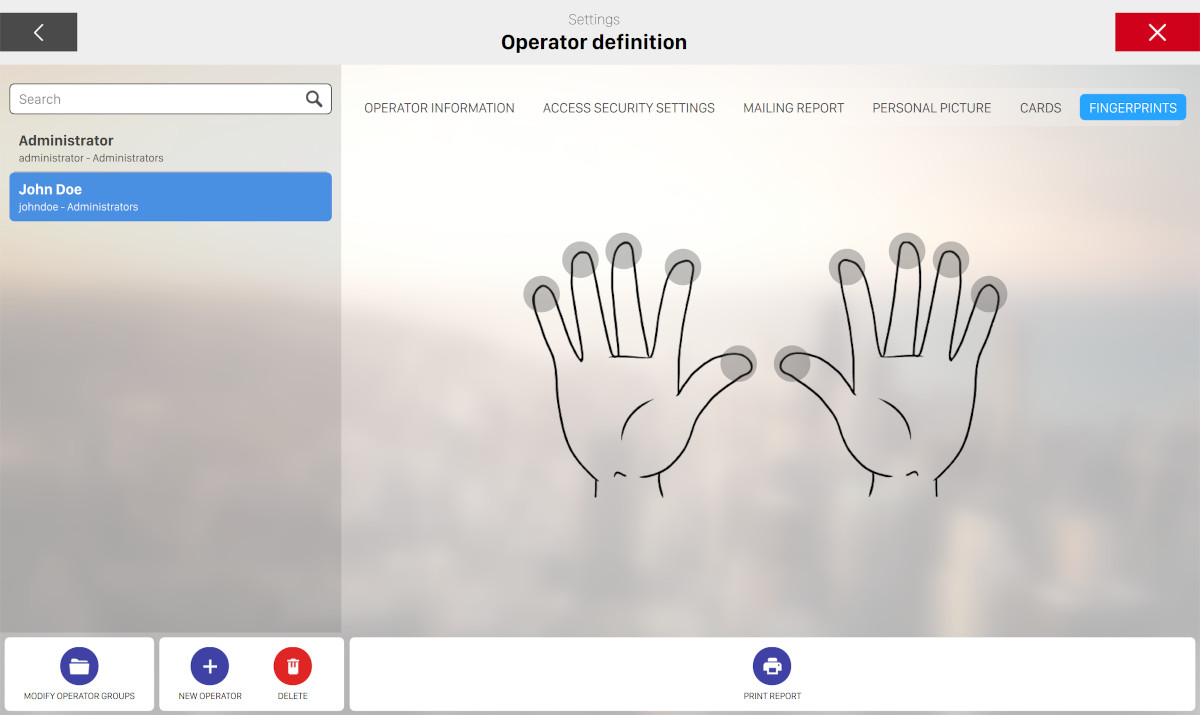
This window allows you to memorize operators fingerprints to access the workstations. Choose the fingertip that you want to memorize and put the finger on the reader. It is possible to memorize more that one finger.
On the bottom section of the screen you can find some actions that you can perform:
-
Modify operator groups: takes to the Operator group definition window
-
New operator: allows you to create a new user
-
Delete: deletes the selected operator. Neither the administrator nor the current user can be deleted
-
Print report: prints a ‘detailed operator’ report that includes every transaction and the income for the selected operator. It also shows the time of each transaction within the chosen time frame
-
Save: saves the changes made
-
Cancel: discard the changes made and restores previous data
Note: The name and access level of the default operator ‘administrator’ cannot be modified, although it is recommended to change the default password to prevent others to login into the system with the administrator rights.
17.2.7 Operator Group Definition
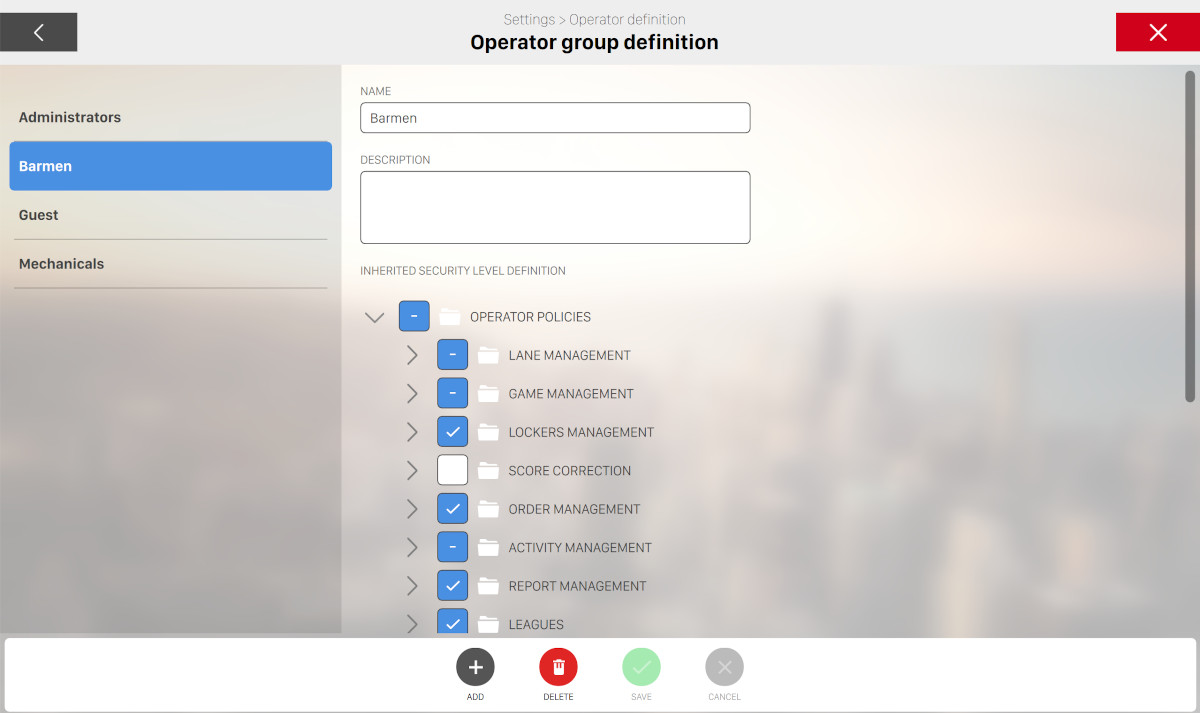
The management of the operators’ groups is carried out in this window. Operator groups can be created for each employees category (cashier, mechanic, bar staff etc.), with the appropriate access levels assigned to each group. All the operators in the same group inherit the access levels related to the group. The various access levels are organized by group, therefore the access to entire areas of the system can be enabled or disabled with a mouse click on the related group. The access levels rights can be applied to every section and function of the system.
Available actions are:
-
Delete: deletes the selected group. The group called ‘Administrators’ cannot be deleted. Note that you can’t remove a group that contains operators
-
New group: allows you to create a new group
-
Save: saves the current changes
-
Cancel: discard the current changes and restores the previous data
Note: Name and the access levels attributed to the ‘Administrators’ group cannot be modified.
17.3 International Settings
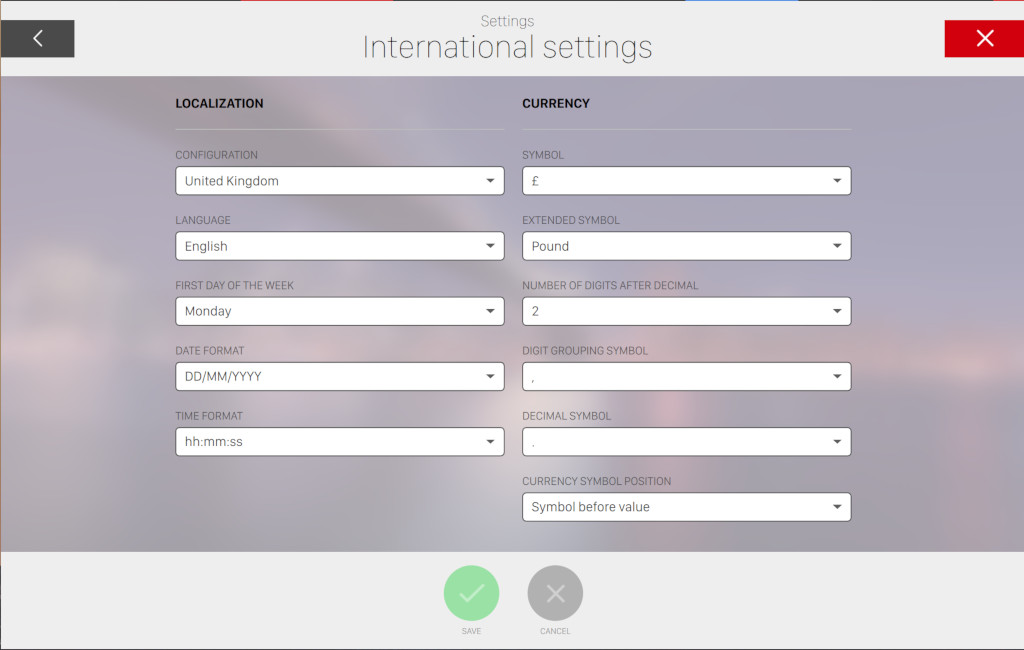
This window asks for information about the country where the bowling center is located. These information will be used by the system to format data on screen and for printouts. When the first field configuration is completed, all the values associated with the country are automatically applied by the system. Data can be then customized to the center’s requirements. Required information are:
-
Localization
-
Configuration: select a country from the list. Once selected the default setting for the chosen country will be applied
-
Language: select the language from the list. This will change the language of the interface. Note: when the main point of sale is used (the one connected to the server), the server language will also be changed. This is the language that is used on print outs. Warning: every time the language is changed, when you click the Save button, the system will require a restart
-
First day of the week: select the first day of the week. This option can be ‘Sunday’ or ‘Monday’
-
Date format: indicates the format used to display dates
-
Time format: indicates the format used to display time
-
-
Currency
-
Symbol: select the currency symbol from the list. If the symbol you are looking for is not on the list, you can type it with the keyboard
-
Full symbol: indicates the currency name. From the configuration of the thermal print you can choose to use or not the graphic print. In case you don’t want to use a graphic print then some symbols could not be supported on the printer, so it will be used the value of this field
-
Number of digits after decimal: indicates the amount of figures following the decimal point for cash transactions (e.g. for cents there would be two figures)
-
Digit grouping symbol: indicates the symbol used for thousands
-
Decimal symbol: indicates the symbol used to separate the whole numbers from the decimal parts (e.g. between the dollars and the cents)
-
Currency symbol position: shows whether the currency symbol must be before or after the numeric value
-
After you make some changes on these settings you can simply click on ‘Save’ button to save the current changes or ‘Cancel’ to discard them.
17.4 Language Support
The system provides complete interface translation for 15 languages:
|
Language |
Code |
Region |
|
English |
en_uk |
International (default) |
|
Chinese (Simplified) |
zh_cn |
China, Singapore |
|
Czech |
cs |
Czech Republic |
|
Dutch |
nl |
Netherlands, Belgium |
|
Finnish |
fi |
Finland |
|
French |
fr |
France, Canada, Belgium, Switzerland |
|
German |
de |
Germany, Austria, Switzerland |
|
Italian |
it |
Italy, Switzerland |
|
Japanese |
jp |
Japan |
|
Korean |
ko |
South Korea |
|
Polish |
pl |
Poland |
|
Romanian |
ro |
Romania, Moldova |
|
Russian |
ru |
Russia, former USSR |
|
Spanish |
es |
Spain, Latin America |
|
Turkish |
tr |
Turkey |
Configuration: Navigate to Preferences > International Settings > Language and select the
desired language. Restart the application for changes to take effect.
Translated elements: User interface, reports, receipts, kiosk interface, lane displays, and error messages.
17.5 Holidays and closings
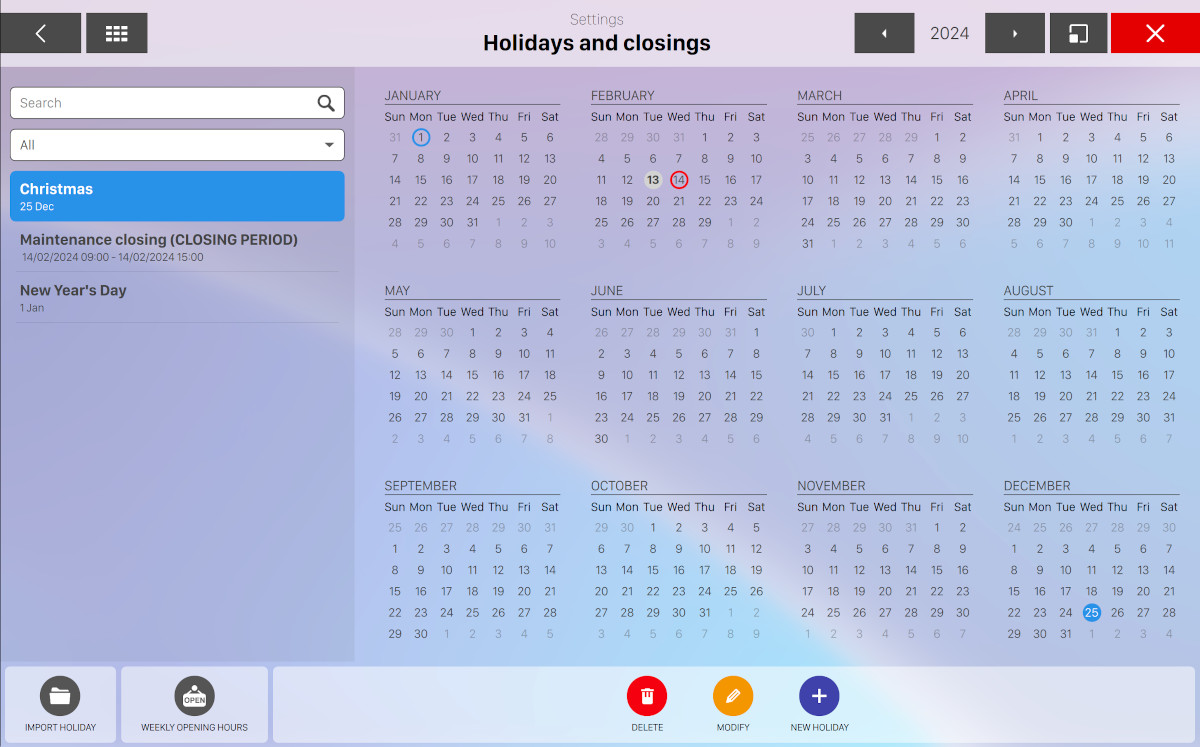
From this window you can define the custom holidays and the closing periods of your bowling center. The items that have been already entered can be seen on the left sidebar of the window while on the right side you can see the calendar of all the items that you have defined. The search field on the top left can be used to filter the list by name. Select an item and click on Edit button or click on New holiday button to create a new one. A popup will appear allowing you to enter the holiday configuration:
-
Description: represents the name of the holiday
-
Is closing period: a checkbox indicating whether the item is a closing period or is an holiday
-
Date: represents the date of the item and can be either by typing directly or by using the calendar widget: click on the caret down icon to toggle it
-
Set every year: check this option if you want the holiday to be recurrent and fall on the same day every year (e.G. Christmas day). Uncheck the option if the date changes every year (e.g. Easter)
-
Active: check this option to make the item active or not
17.5.1 Available Actions
At the bottom side of the window you can find some actions:
-
Import holiday: open the import holiday window
-
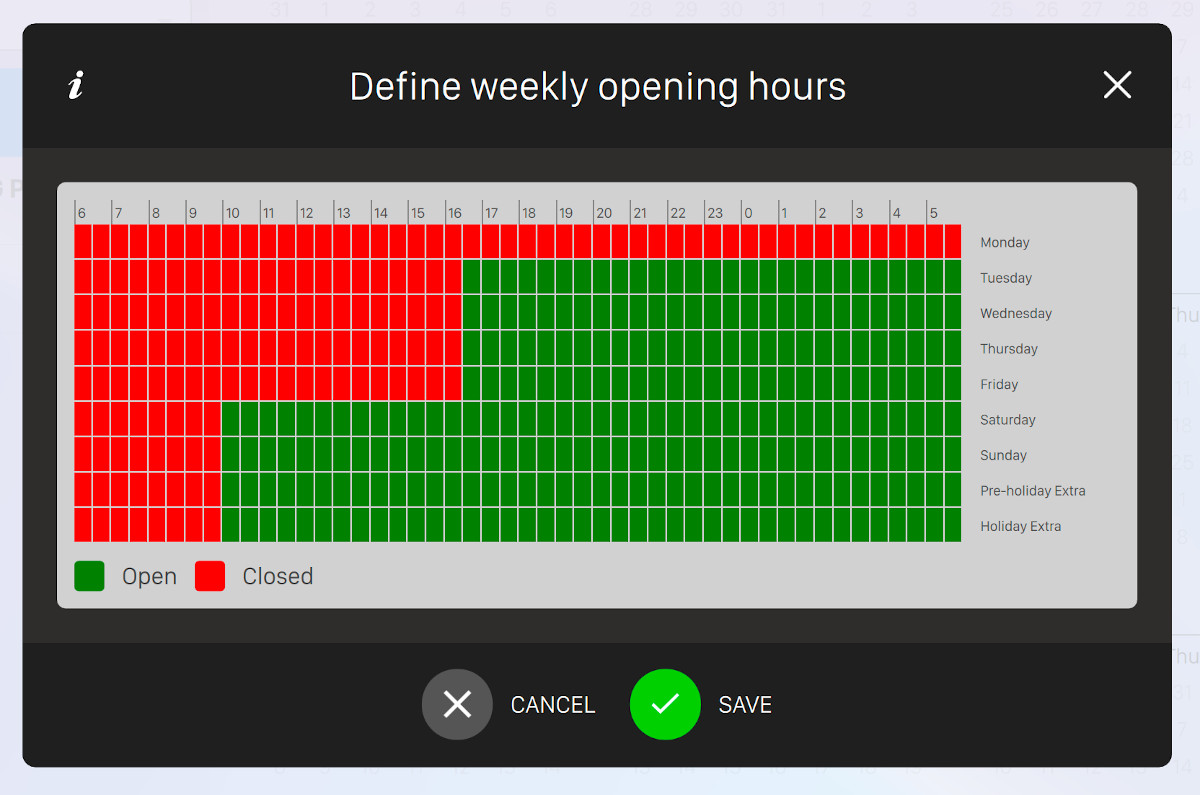
Weekly opening hours: open a popup that allows you to select the opening days and hours of your bowling center
-
New holiday: add a new custom holiday
-
Delete: removes the selected holiday
-
Save: saves the current changes
-
Cancel: discards the current changes and restores the previous data
17.5.2 Import holidays
By clicking the import holiday button on the bottom side of the window you will popup a window where you can import a set of existing holidays, grouped by countries. The default selected country is determined by the location of your bowling center.
By toggling the dropdown on the top left side of the window you can select a country from a list. Once you select it then the list will be populated with the public holidays of the selected country. For each holiday item you can see:
-
Date: the date of the holiday
-
Description: the name of the holiday
-
Every year: determines whether the holiday is recurrent or not
-
Select: click on the checkbox to select the holiday
On the bottom left side of the window you can find the Select all / Deselect all button, which will select or deselect all the holiday items on the current list.
Click on the button Add, located on the bottom right side of the window, to add the selected holidays to your list.
17.6 Bowl App configuration
This feature is not available by default and must be requested directly to Switch. It allows you to share on internet all the Bowling Center information and all the games bowled by the customers as well as the Tournament games. You can set the information and settings with the following parameters:
-
Module activated: check this box to send the Bowling Center information and all the games bowled by the customers to internet. In this case the customers who installed the Bowl App application can get a code and receive information from the bowling center and/or visualize their games on their devices (smartphones, tablets, etc.)
-
Bowling center name: The name of the center that will be seen by users who are using the app
-
Description: this field is useful to write information about your center
-
E-mail: the Bowling Center e-mail address
-
Address: the Bowling Center address
-
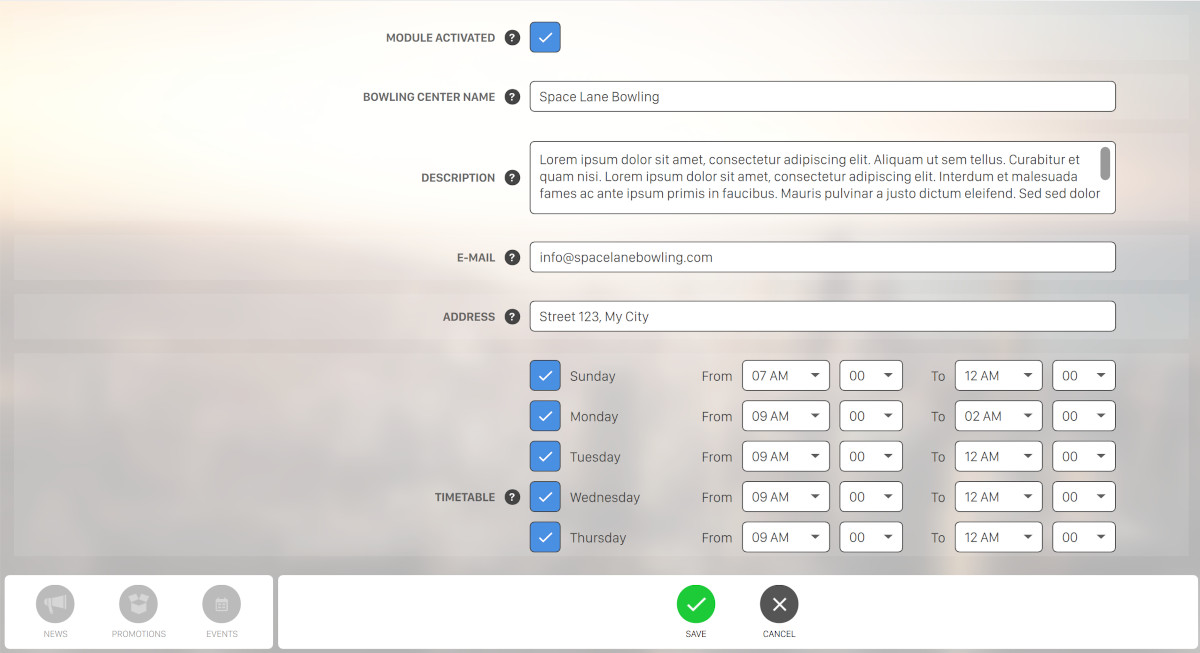
Timetable: shows the opening hours of the bowling. You can set an opening time for each day of the week or enable/disable specific days of the week
-
Active notifications: when enabled and registered customers are near your center it will send them a message through the Bowl App application. Notifications can include news, promotions or events regarding the bowling center
-
Invitation message: this is the message sent by the Bowl App Application to send to the customer an invitation to visit the bowling center
-
Automatic photo approval: when enabled allows to automatically approve the photo uploaded by the customer. The approval is controlled by the software with two parameters:
-
Threshold for adults content: this parameter sets the threshold photo approval, in percentage, for the presence of adult contents. The higher is the value the lower is the possibility that offensive pictures are show
-
Threshold for racy contents: this parameter sets the threshold photo approval, in percentage, for the presence of racy contents. The higher is the value the lower is the possibility that offensive pictures are shown
-
-
Photos reset: deletes all the photos uploaded by the customer. Warning: all data related to each photo will be lost
Click on Save button to save the current changes or Cancel to discard them and restore previous data.
On the top section of the screen you can see information that allow you to visualize your bowling center on the Bowl App Application.
-
Select image: allows you to select an image from the media browser
-
News: this window allows you to create news to show on the Bowl App Application. On the left side you can find the list of existing news, including the name and the date of each news
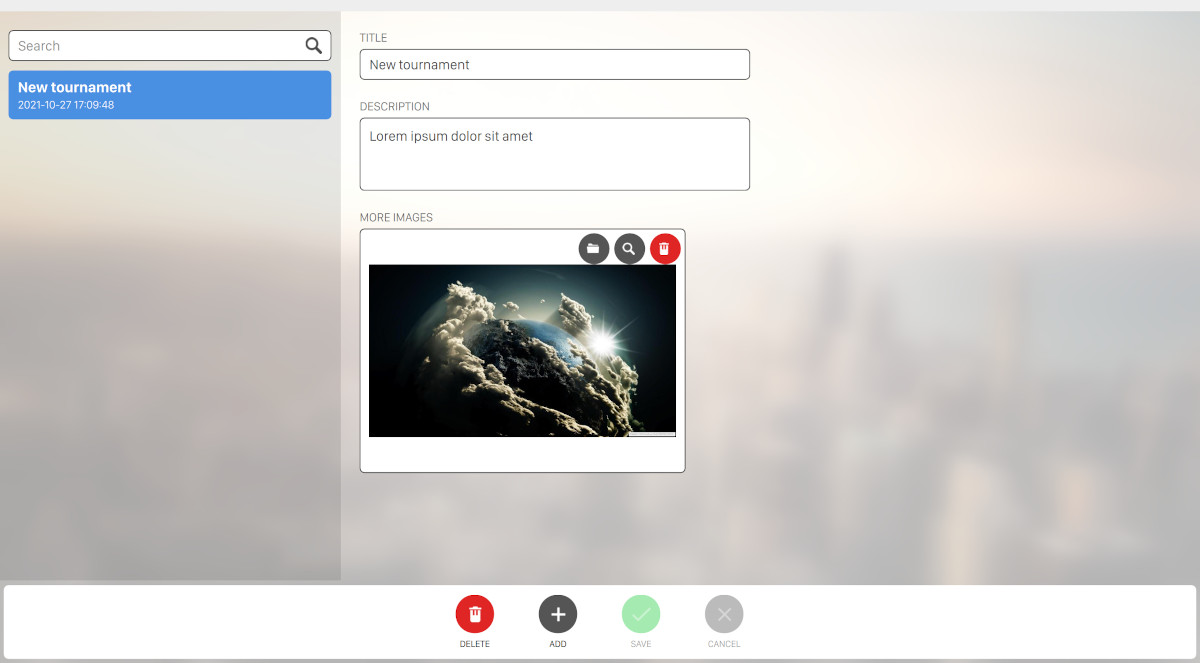
Press ‘Add‘ button to create a news:
-
Title: the news title
-
Description: a description of the news
-
More Images: allows you to select an image from the media browser
Click on Delete button to remove the selected news. Click on Save button to save the current changes or Cancel‘to discard them and restore previous data
-
-
Promotions: this window allows you to create promotions to show on the Bowl App Application
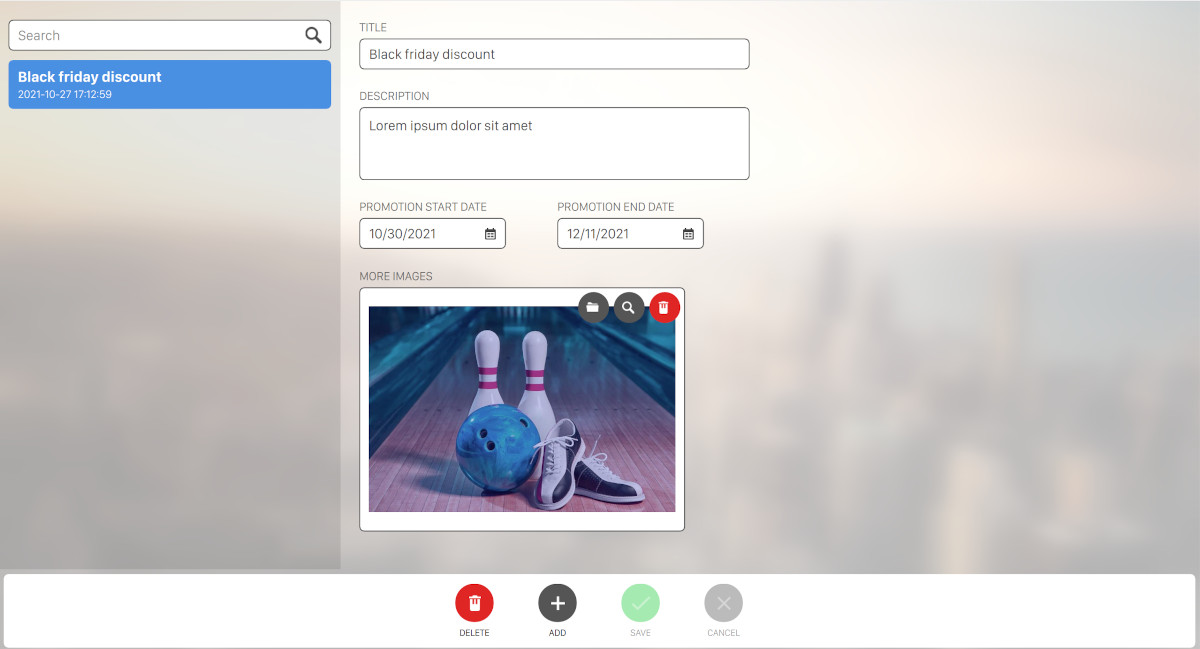
On the left side you can find the list of existing promotions. Press ‘Add‘ button to create a new promotion:
-
Title: the promotion title
-
Description: a description of the promotion
-
Promotion start date: allows you to set a date for the promotion to start
-
Promotion end date: allows you to set a date for the promotion to end
-
More Images: allows you to select an image from the media browser
Click on Delete button to remove the selected promotion. Click on Save button to save the current changes or Cancel to discard them and restore previous data
-
-
Events: this window allows you to create events to be shown on the Application
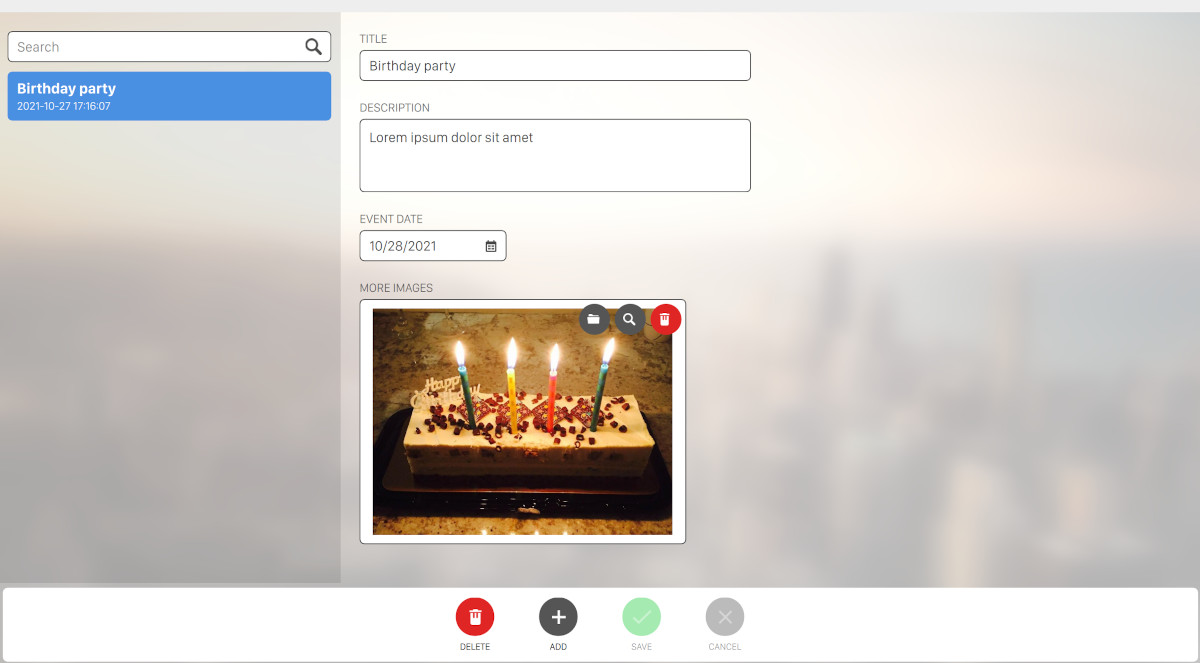
On the left side you can find the list of existing events. Press Add button to create a new event:
-
Title: the event title
-
Description: a description of the event
-
Event date: allows you to set a date for the event
-
More Images: allows you to select an image from the media browser
Click on Delete button to remove the selected event. Click on Save button to save the current changes or Cancel to discard them and restore previous data
-
17.6.1 Bowl App Application
This is an application for smartphone and tablet available for Android and iOS.
Once installed it allows customers to:
-
Search a bowling center on the internet
-
View the news, the events and the promotions of a bowling center on a feed
-
Share their games on the network Press the Menu on the top right to access.
On the homepage of the application you can see the latest info of the bowling centers connected.

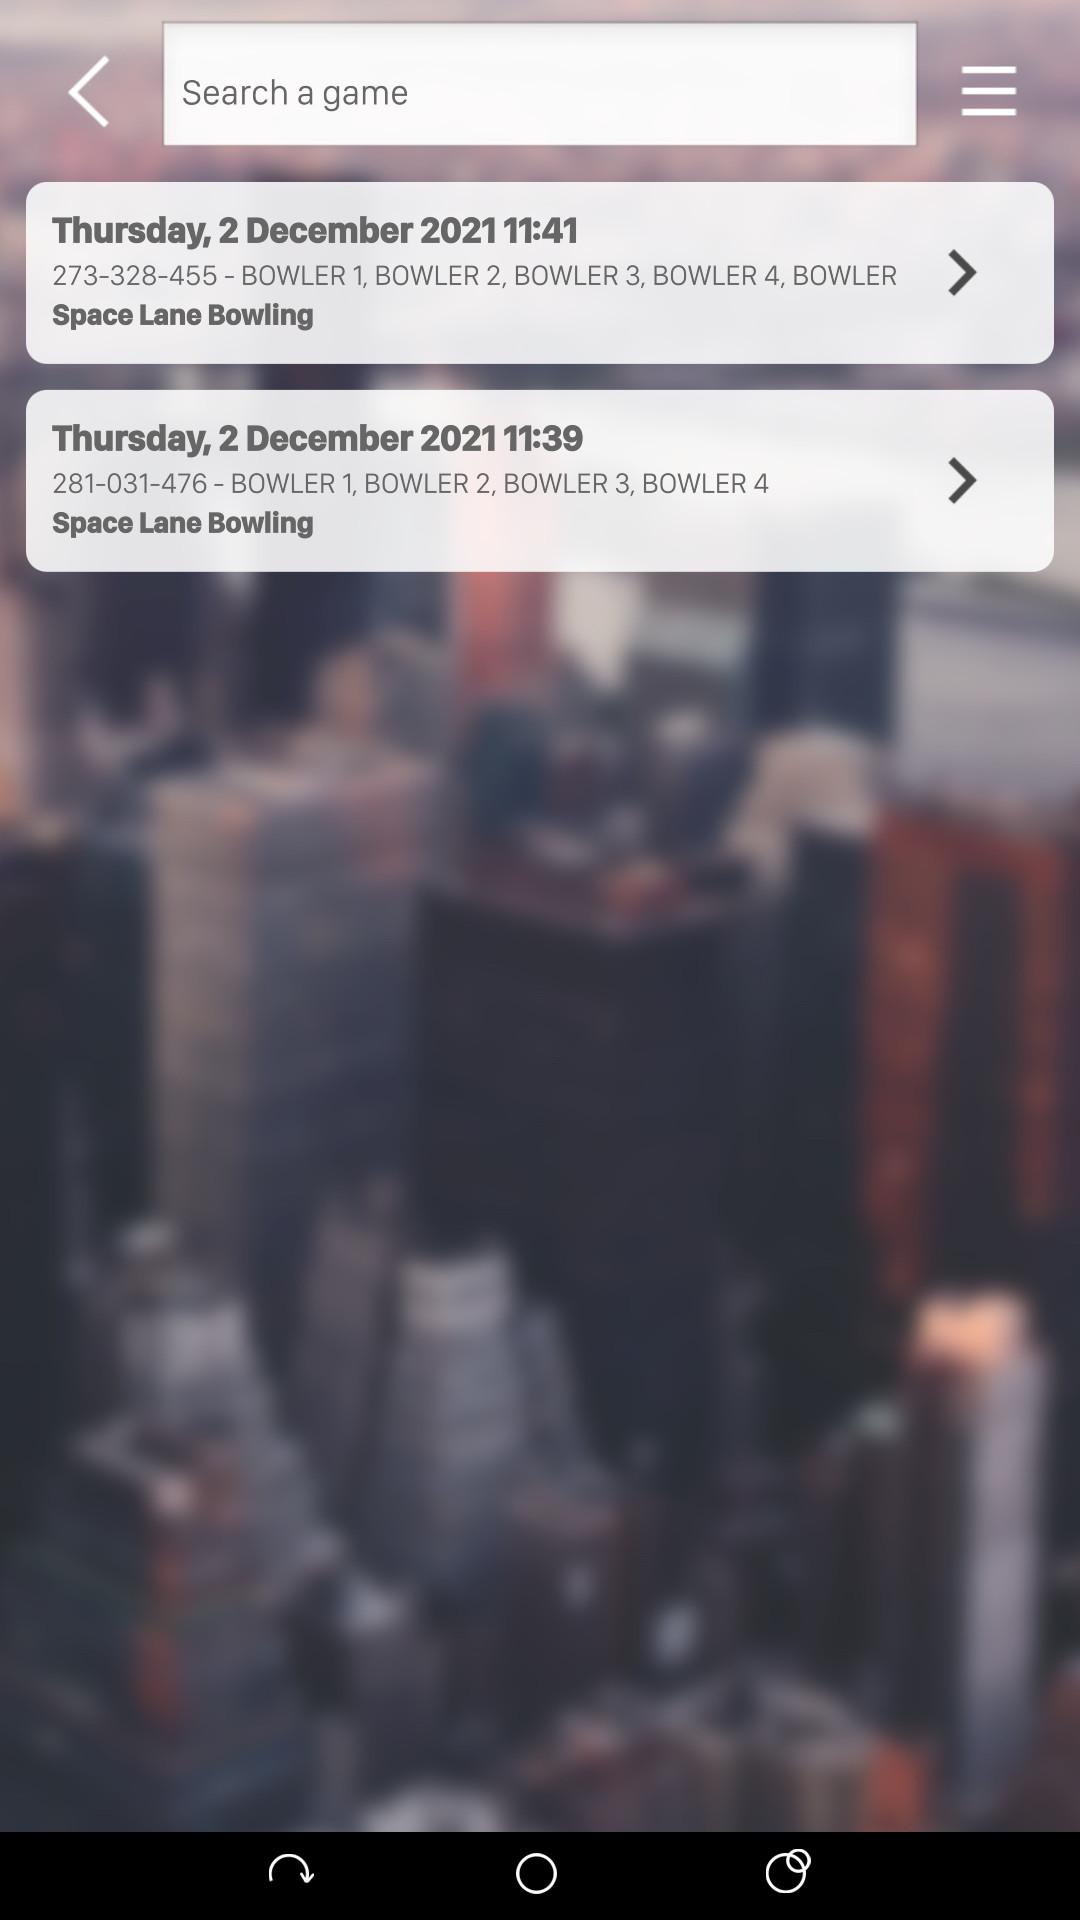
The field on top center of the screen allows customers to enter the game code that is visible on the lane monitors. Once the code is entered and verified then customers can access all the features of the app. The code can be also seen from the frontdesk on the game details page.
The current game page allows the customer to see the current game played.
The games archive page shows all the archived games. Customers can use the search field or touch a game in the list to visualize it.
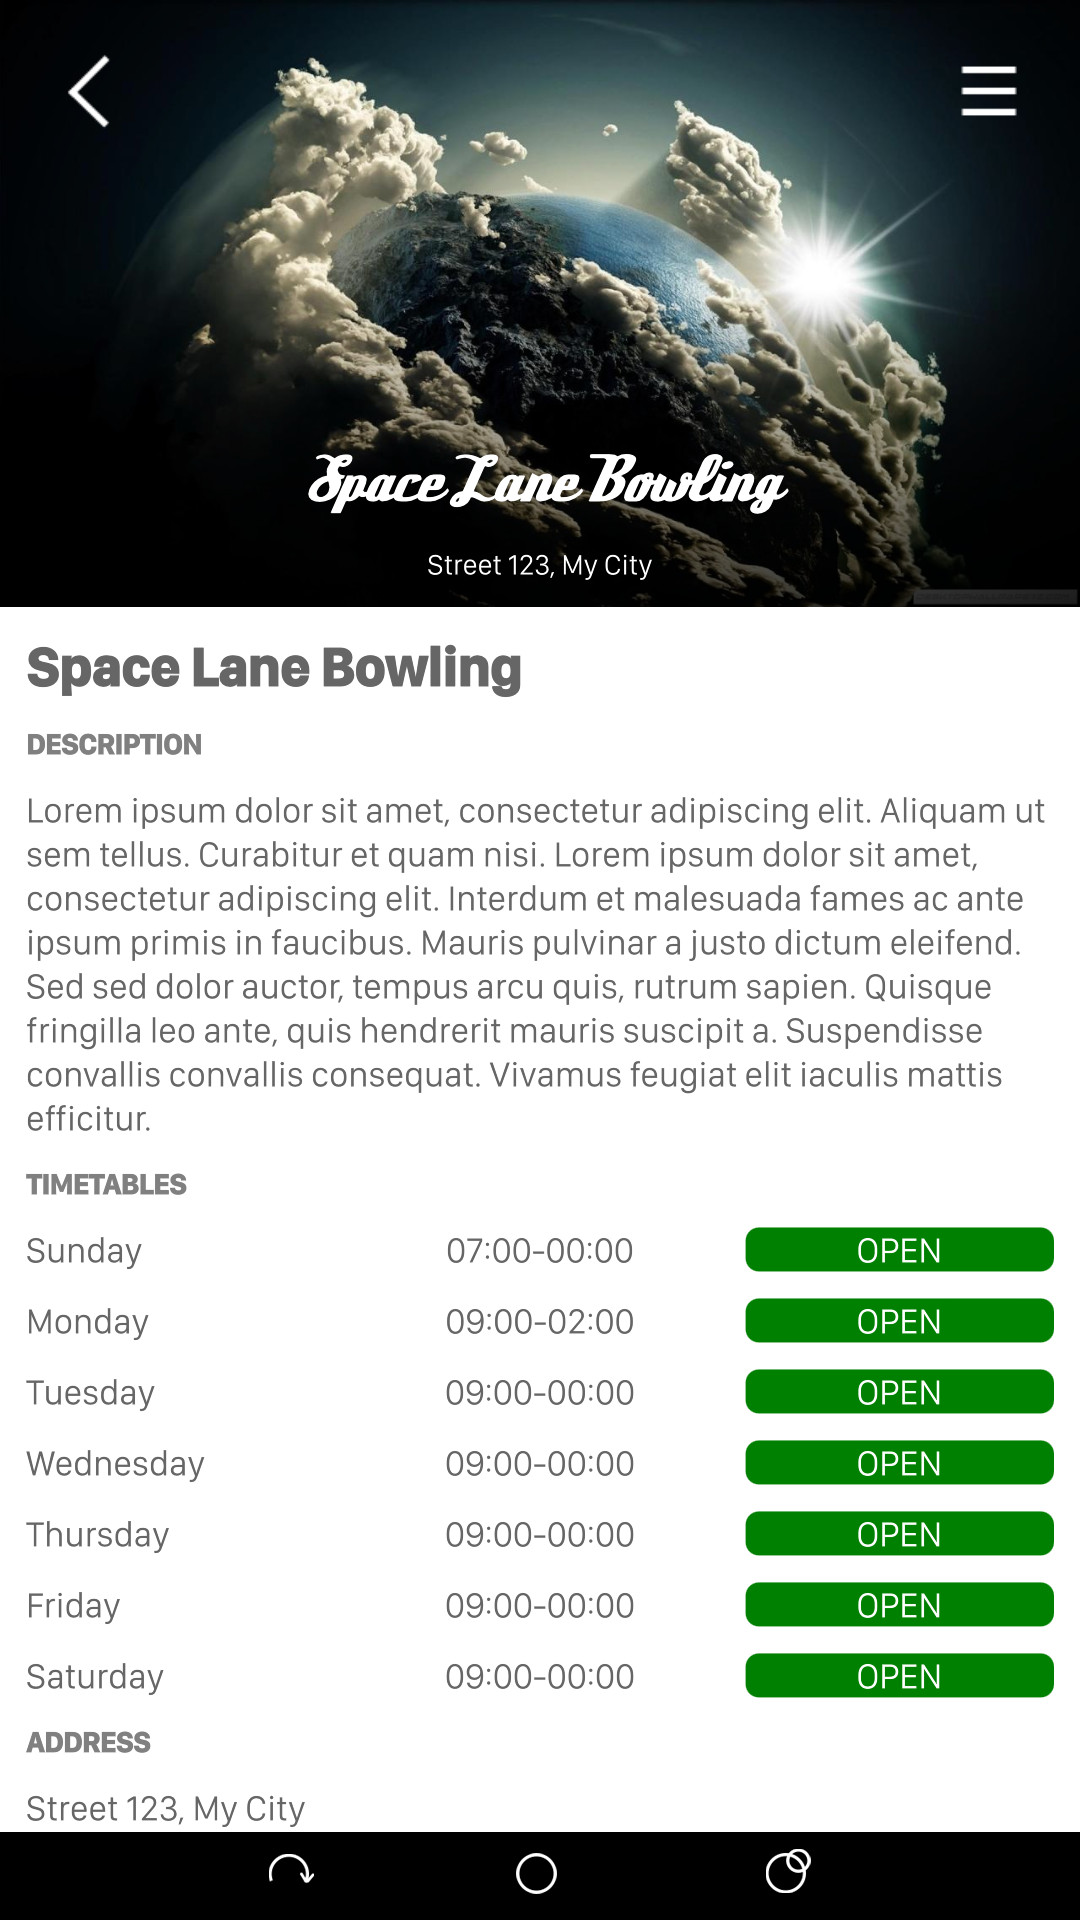
The bowling info page shows the information of the bowling center as well as the opening time, the address, the promotions, etc.
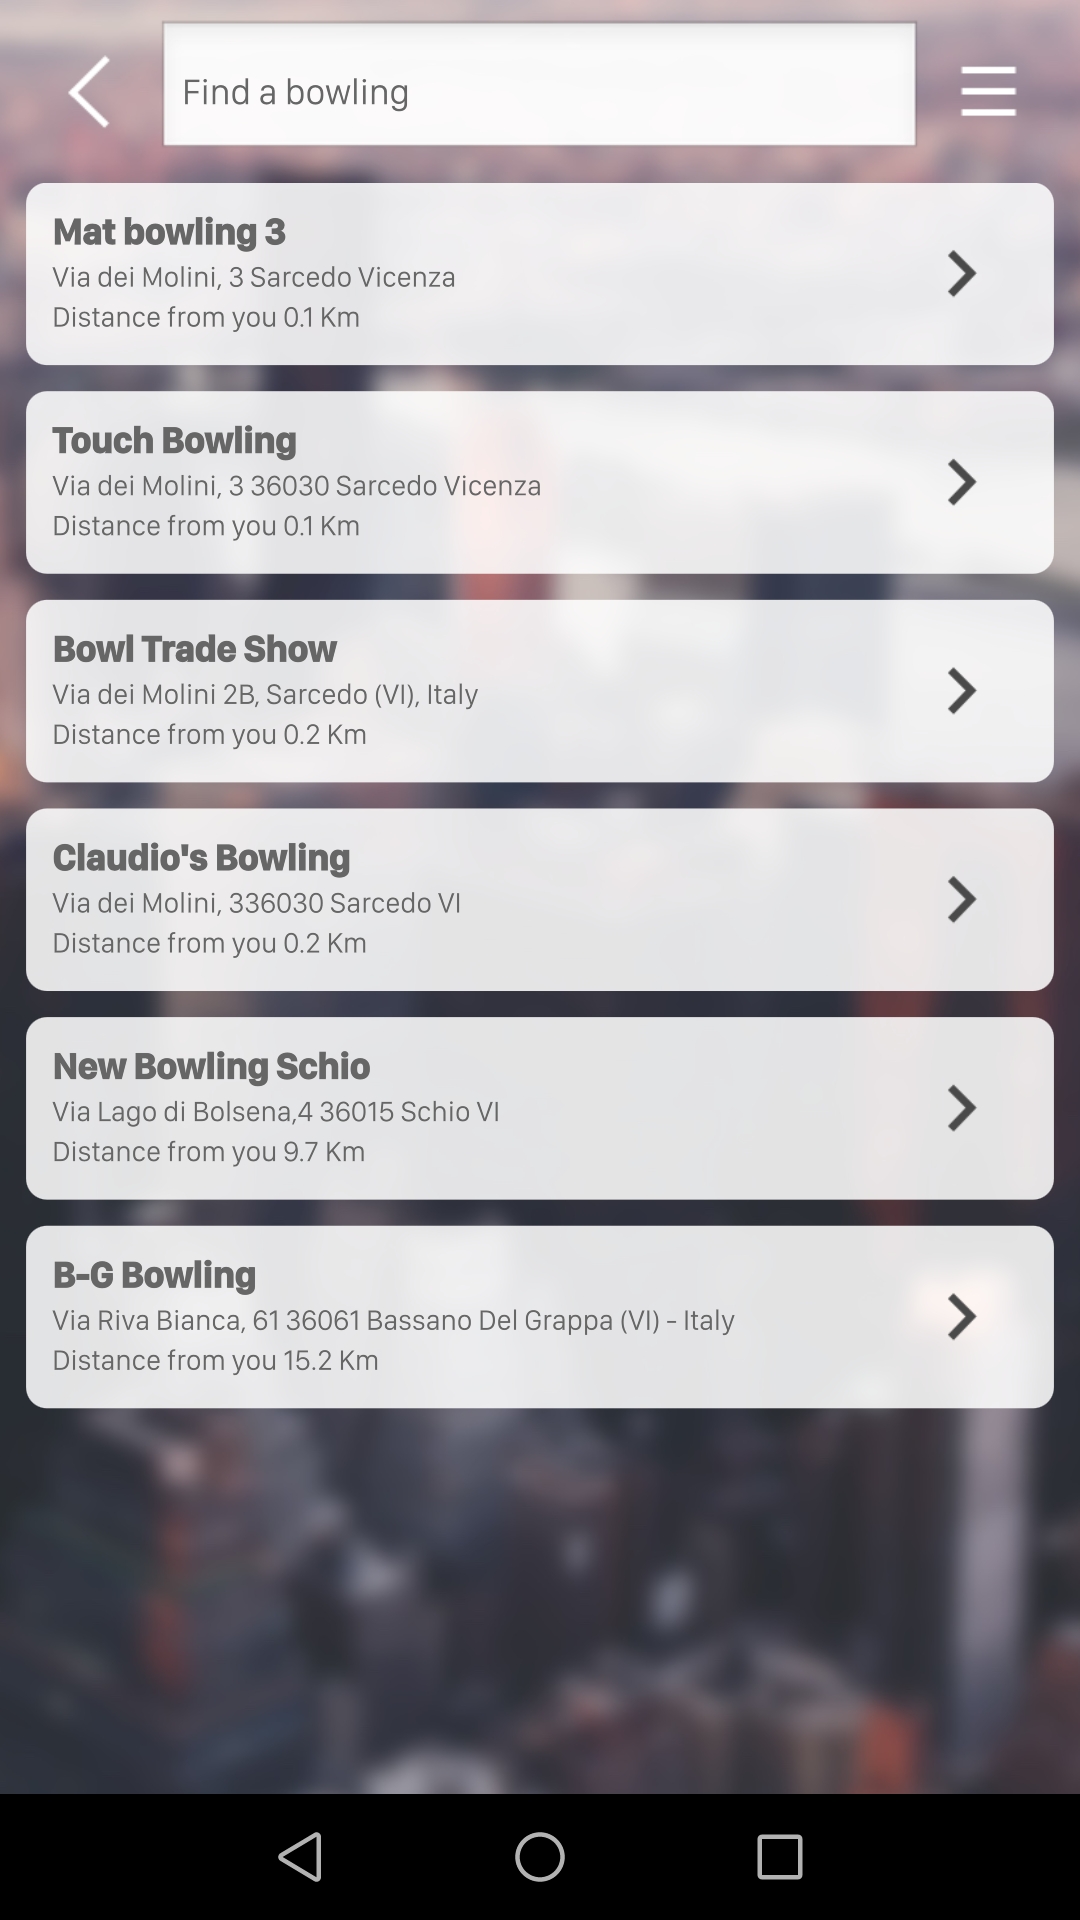
The find bowling page allows customers to find a bowling center by entering the name of the bowling center.
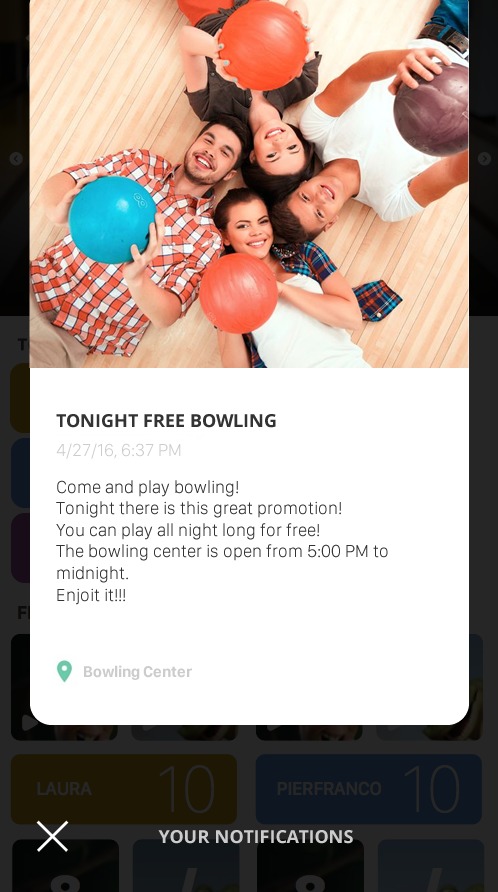
The app supports Notifications. Touch the notification icon and scroll the screen to see all the notifications.
17.7 Daily shifts and drawers

From this section you can define settings for daily shifts and drawers. The window is splitted into two sides:
-
On the left side you can customize the settings for daily shifts
-
On the right side you can configure drawers
17.7.1 Daily shifts settings
Check the option enable daily shifts to activate the feature. Once enabled you can manage the shifts from the list below. You can add as many items as you want and each item define a shift with a start time and an end time. Click on add new daily shift button to add a new item or click on the pencil icon on the right of each element:
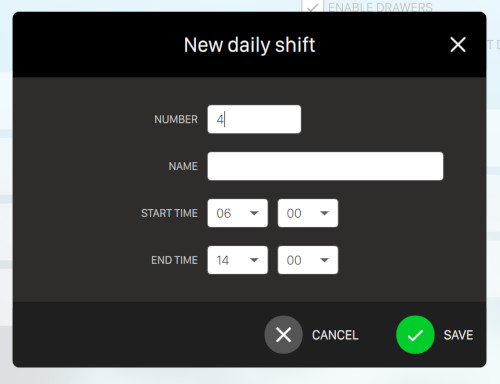
From this window you can define the parameters of the daily shift:
-
Number: define the shift number which must be unique among the other shifts defined
-
Name: indicates the name of the shift
-
Start time: define the start time of the shift
-
End time: define the end time of the shift
Click on save button to save the changes or cancel button to discard them.
The edit window is very similar to the add screen:
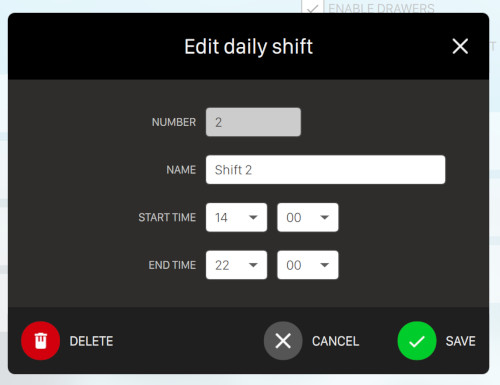
Note that the number field is disabled, because you can set this value only during the creation procedure. Press delete button to remove the current daily shift from the list. A confirmation popup will be displayed and you will have to confirm the operation.
17.7.2 Drawers settings
Check the option enable drawers to activate the feature. The option enable payments without drawers allows the frontdesk to accept payments even if there is not an open drawer. Once enabled you can manage the drawers from the list below. You can add as many drawers as you want.
Click on Add a new drawer to add a new entry or click on the pencil icon on the right of each item to edit it:
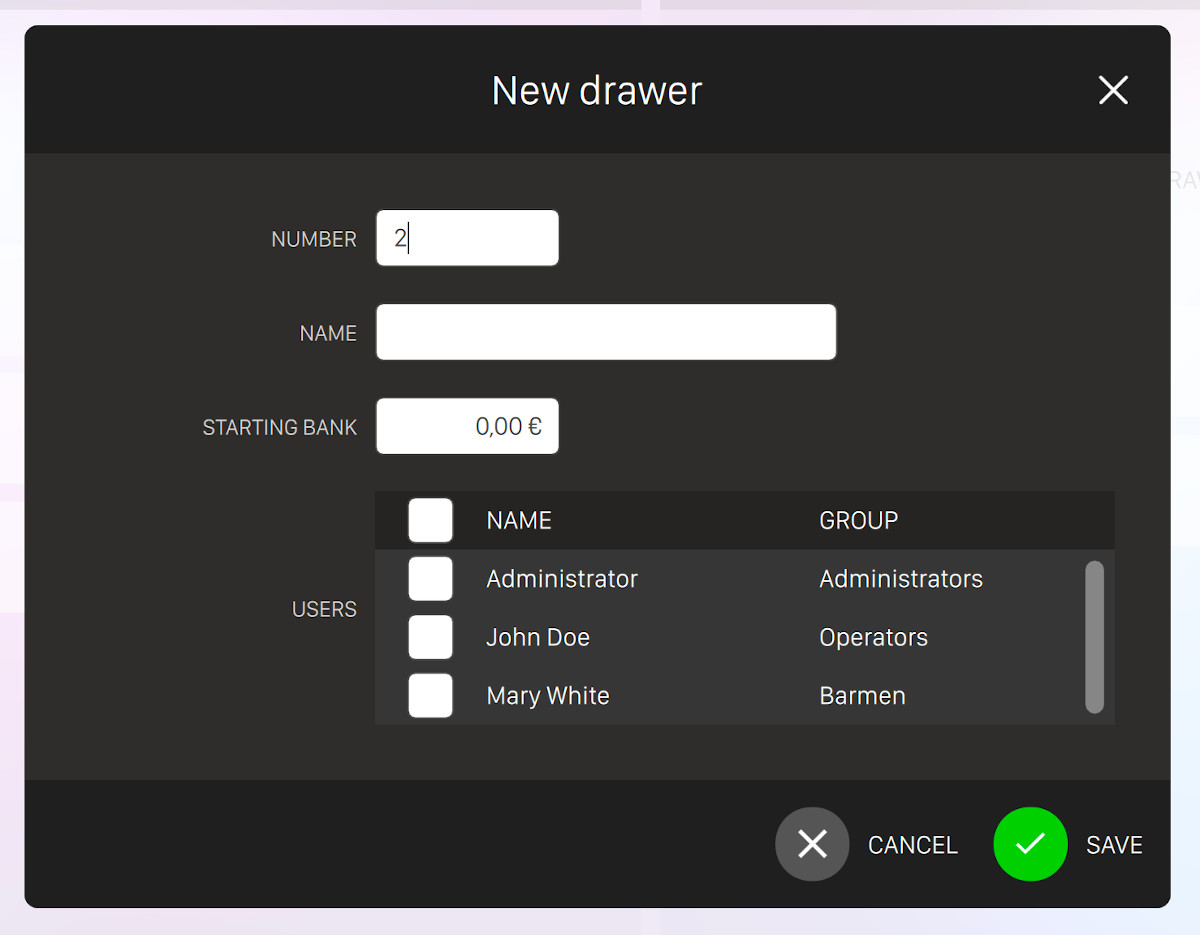
From this window you can define the parameters for the new drawer:
-
Number: define the drawer number which must be unique among the other drawers defined
-
Name: indicates the name of the drawer
-
Starting bank: indicates the amount of money that the drawer should hold when it is open
-
Users: select one or more operators from the list. The operators you select will be allowed to use the drawer
Click on save button to save the changes or cancel button to discard them. Click on the drawer item to modify it. Note that once the drawer has been created the number field will be disabled, because you can set this value only during the creation procedure. Press delete button to remove the current drawer from the list. A confirmation popup will be displayed and you will have to confirm the operation.
17.7.3 Daily shifts and drawers management
Once you have enabled daily shifts and/or drawers you will see a new item on the top bar of the frontdesk window:

From this dropdown window you can manage both drawers and daily shifts.
Manage daily shifts
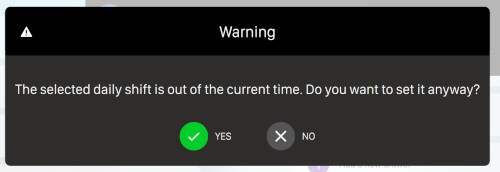
If there is not any daily shift running you can click on a shift item to start it. At this point the shift will begin and the bar will be highlighted with a green color. Click again on the shift to terminate it. If you start a shift that is out of time then a warning popup will appear and you will have to confirm the operation:
Manage drawers
Click on any drawer item to open it. A confirmation popup will appear and you will have to confirm the operation. Once the drawer has been open it will be highlighted with a green color. Click again on the drawer to disable it. Click on the red button on the right of the drawer item to close it. A popup dialog will appear:
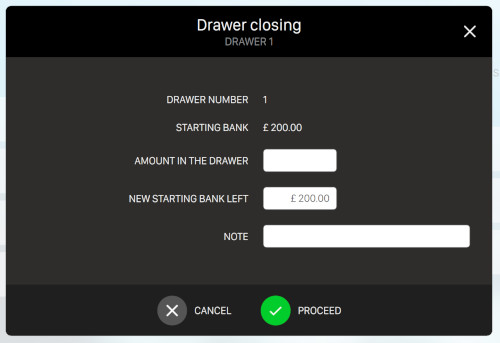
-
Drawer number: indicates the current drawer’s number
-
Starting bank: indicates the current drawer’s starting bank
-
Amount in the drawer: enter the amount left in the drawer at closing time
-
New starting bank left: enter the money that you are leaving in the drawer and that will be available as starting bank for the next time the drawers is open
-
Note: enter some optional notes
If the amount counted is different from the amount calculated by the system then a new popup will be shown:
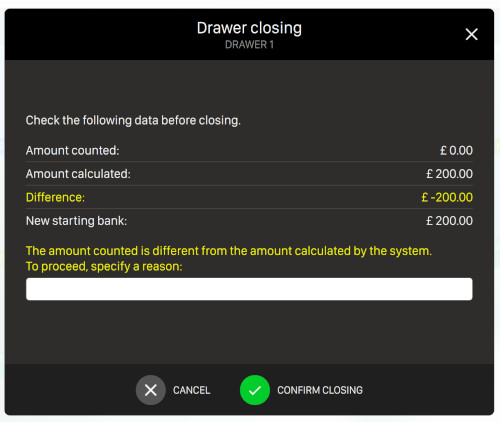
From this window you can see:
-
Amount counted: the amount that you entered at the closing time of the drawer
-
Amount calculated: the amount that the system expects to have inside the drawer
-
Difference: the difference between the amount counted and the amount calculated
-
New starting bank: the new starting bank of the drawer
You will be asked to specify a reason why the difference is negative or positive. Enter the reason and then click confirm closing button to end the procedure or click on cancel button to end it.
17.8 Advanced Settings
This window allows you to set several system parameters as peripheral devices connected to the workstations, costs calculation mode and more. Parameters are divided in pages and groups. To choose a page click on the related icon on the left sidebar of the window: all the options for that page will appear on the right. Each option has a text explanation shown on the lower box; click on the symbol (?) to view the help text.
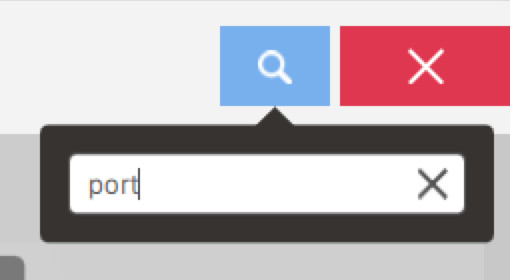
On the top right corner of the window you can find the search button. Click on it and fill the search field to find a specific parameter among all the tabs identified by their label or help text.
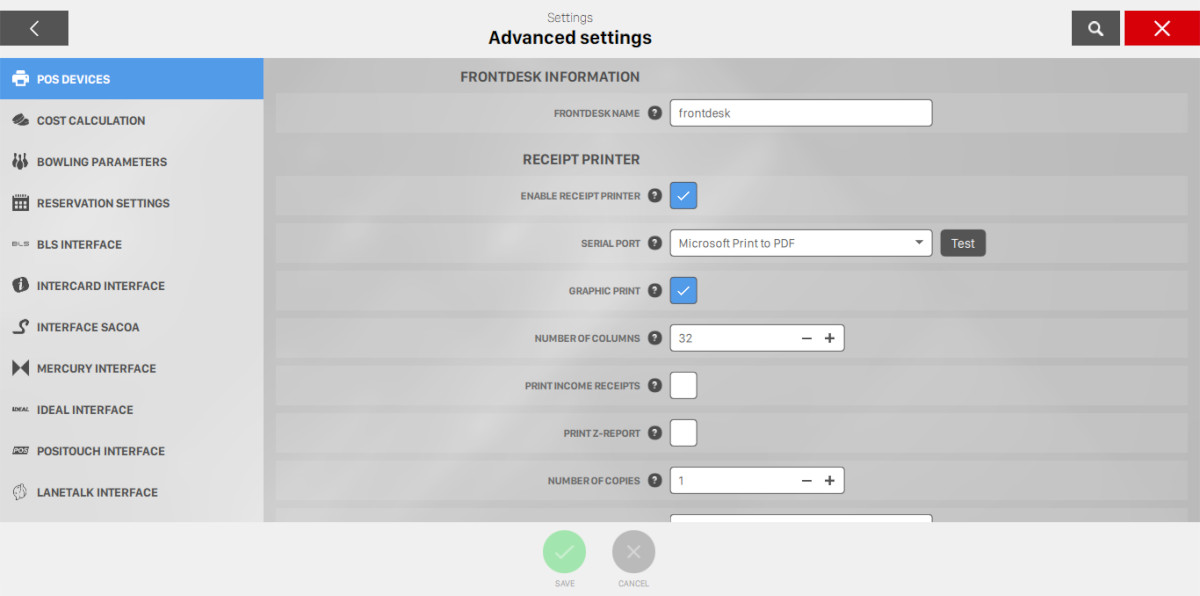
17.8.1 Pos devices
Frontdesk information
-
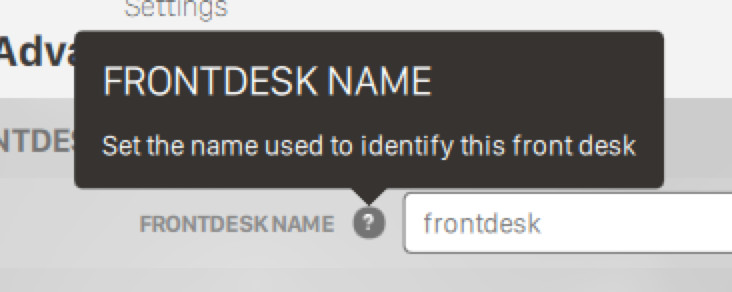
Frontdesk name: set the name to identify the current frontdesk
-
Enable receipt printer: enables the receipt printer. Check the box to use the thermal printer
-
Serial port: sets the serial port connected to the receipt printer. Press ‘Test‘ button to print a sample receipt to check whether the serial port is working correctly
-
Graphic print: some printers allow graphic print, where it is possible to print special characters that normally are not supported by printers (e.g. $ character or Korean characters)
-
Number of columns: this parameter allows you to set the columns that the printer supports
-
Print income receipts: allows you to print a receipt at the end of a transaction
-
Print z-report: indicates if z-report will be printed after the closing of a drawer. You must enable thermal printer and graphics printing
-
Number of copies: allows you to print more copies of the receipt
-
Greeting: allows you to edit the greeting message used on the receipts
-
Taxes print mode: allows you to decide how to print the taxes on the receipt
-
Print tax included + Tax total: allows you to print the price with tax included and the total amount of tax
-
Print tax included: allows you to print the price with tax included
-
Print tax excluded + Tax total: allows you to print prices with tax excluded and the total amount of tax
-
-
Open cash drawer after printing receipt: allows the operator to automatically open the cash drawer after a receipt has been printed
-
Print receipt for payment not taken: allows the operator to print a receipt when a payment is not taken. The receipt will show the amount due and the reason the payment was not taken
-
Open cash drawer for a payment not taken: allows the operator to automatically open the cash drawer after a receipt is printed for a payment not taken
-
Open cash drawer with ctrl+f8 key: allows the operator to open the cash drawer by using the CTRL+F8 keys. Note: This function requires a specific security right for each operator
-
Allow printing of receipt preview: allows you to print a receipt preview; this is useful when it is necessary to cash an order when serving tables, lanes, etc
-
Adding space to write the tip: adds a space on the receipt to add a tip
-
Add the area to sign the receipt: adds a space to sign the receipt I.E. when it is cash later, in case the customer has an account, etc.
-
Ticket e-mail header: set the text of the header in the e-mail to send the ticket to the customer
-
Ticket e-mail footer: set the text of the footer in the e-mail to send the ticket to the customer
-
Show allergens on receipt: indicates whether to show items allergens on the receipts
Primary thermal printer for orders
-
Enable printer: enables the printer
-
Print bar orders: allows the operator to print bar orders on the thermal printer
-
Print restaurant orders: allows the operator to print restaurant orders on the thermal printer
-
Print generic items orders: allows the operator to print other items orders on the thermal printer
-
Serial port: set the serial port to which the printer is connected for orders. Press ‘Test‘ button to print a sample receipt using the serial port set. It is possible to use the same thermal printer used for the receipts, in this case select the same serial port
-
Number of copies: allows you to print more copies of the receipt
-
Ticket font size: allows you to determine the font size of the print. Choose among the options:
-
Normal
-
Large
-
Secondary thermal printer for orders
It is possible to have two different thermal printer with two different configurations. The parameters for the second thermal printers are the same for the first.
POS Display - Kube D
-
Show the total income on display: allows the operator to show the amount due on the pole display KUBE D after a transaction
-
Serial port: sets the serial port where the KUBE D display is connected. Press Test button to show a sample message using the serial port set
-
Greeting: set the welcome message to display
-
Enable brightness: allows the operator to set the display brightness value, as a percentage. When the display is in standby, brightness is reduced to allow the system to save energy
-
Method of payment: specifies the method with whom the current frontdesk is authorized to receive payments
-
Payments only from the front desk: set this option to allow payments only from the front-desk
-
Only accept external payments: set this option to accept only external payments if you are using an external software. Note that any external software must be configured in order to communicate with the front desk API, through which will access the transactions
-
Cashier’s autonomous choice: set this option to allow the cashier to choose the method of payment. If this option is checked then on the income table screen will show an additional button called "Pay with another software". If the cashier press this button then the transaction will be managed by an external software through the front desk API
-
-
Use payment screen: This option, enabled by default, allows you to access the income window every time a payment is taken. When it is disabled, the payment is cashed pressing the PAY button without any further message
-
Allow payments without entering information: this option specifies whether to omit the information required during the payment procedure if the payment has been made with a credit cards or checks
-
Customized payments: allows you to handle payments that do not belong to other categories (cash, credit card, check, etc.). These payments will be visualized in the income mask and during this operation it is possible to add further notes
-
Preferential payment type 1, 2, 3: allows you to choose up to 3 payment types that will be displayed in the Income screen
Intercom service
-
Ringing tone volume: defines the volume during intercom call (from 0 to 100)
-
Speakers ringing tone active: defines whether the intercom plays a ringing tone during calls. This feature is useful when using headphones
-
Maximum ringing tone duration: defines the maximum time duration for the ringing tone in seconds. After this time the call will be ignored
-
Allowed to answer: defines whether this station is allowed to answer a call
Server network adapter
-
Network adapter of the private network: defines which network card is used to communicate with all devices on the network. Choose an options from the dropdown menu
-
Network adapter of the internet: defines which network card is used to communicate with internet
Frontdesk interface parameters
-
Lock Screen: allows you to lock the frontdesk screen after a specific period of time if not used. You can also choose the ‘No lock‘ option for never locking the screen
-
Show allergens on order page: indicates whether to show item allergens on the page order
-
Use transitional effect: if active this function allows you to enable transitional effect on the workstation in use. The transitional effect makes the graphic to look better but it could make the system slower
-
Use virtual keyboard: indicates if you want to use the virtual keyboard. If enabled, you will see a button on the screen to call the keyboard
-
Touch screen calibration: this option is useful when the operators use workstations with touch screen. The ‘START APPLICATION‘ button allows you to start the calibration procedure. Calibration utility could depend on the touch screen type
-
Use strong password validation: if this option is active user is required to insert a password that contains upper and lower case letters, numbers and must be 8 to 30 characters long
17.8.2 Cost Calculation
Variables for taxes management
By clicking ‘Modify‘ button a popup will be shown and you can customize the taxes in order to assign them to a department or to the items as Restaurant, Bar, etc.. Unless a specific tax is created, all the items that belong to a department will inherit the department tax. Press Add tax button to add a tax or the trash icon to remove the selected one. Each row of the table corresponds to a tax and columns contain parameters:
-
Tax name: allows you to enter a specific name for the tax
-
Code: allows you to use a code (ID) for the tax
-
Percentage: set the tax value in percent
-
Included: set whether the tax is included in the price or not
Once taxes have been created, click on the menu on the right of each department, to associate the proper tax value. All the Departments Default Taxes created, can be assigned to a department using the drop-down menu:
-
Default tax for the Bowling department
-
Default tax for the shoes and socks
-
Default tax for Games department
-
Default tax for the Bar department
-
Default tax for General Article department
-
Default tax for Lockers department
-
Default tax for Packages
-
Default tax for the Restaurant
-
Default tax for league department
Variable for cost calculation
-
Rounding mode: used to round the amount due. It defines the way the amount will be rounded to avoid small decimals and too small changes. It is possible to choose among 3 calculation modes:
-
Closest value: sets the rounding to the closest value
-
Closest lower value: sets the rounding to the closest lower value
-
Closest higher value: sets the rounding to the closest higher value
-
-
Rounding precision: defines the cut of the rounding
-
Merge player’s time: indicates whether to merge player’s time when collecting game time. This option makes the timed game cost clearer by showing a single entry even if there are multiple players, but it does not allow you to make separate payments per player
Variables for cost calculation (Bowling)
-
Game cost calculation in Prepaid: this setting is referred to ‘BOWLING‘ costs calculation in prepaid mode, when the games are played in different time shifts that have different rates
-
Opening game session moment: uses the active rate at the game start time
-
Middle game moment: uses the active rate in the middle of the games time
-
Closing game session moment: uses the active rate at the end of the game
-
Uniform distribution: the exact cost of each frame will be calculated considering all the time shifts involved
-
Uniform distribution per frame: the cost will be calculated for each frame with a uniform distribution of all frames in the whole time used by the game
-
-
Time cost calculation in prepaid: this setting is referred to BOWLING costs calculation in prepaid by Time, when the games are played in different time shifts that have different rates
-
Opening game moment: uses the active rate at the game start time
-
Middle game moment: uses the active rate in the middle of the games time
-
Closing game moment: uses the active rate at the end of the game
-
Uniform distribution: the exact cost of each frame will be calculated considering all the time shifts involved
-
-
Calculation of game cost in Postpaid: this setting is referred to BOWLING costs calculation in postpaid per Game, when the games are played in different time shifts that have different rates
-
Opening game session moment: uses the active rate at the game start time
-
Middle game moment: uses the active rate in the middle of the games time
-
Closing game session moment: uses the active rate at the end of the game
-
Uniform distribution: the exact cost of each frame will be calculated considering all the time shifts involved
-
Uniform distribution per frame: the cost will be calculated for each frame with a uniform distribution of all frames in the whole time used by the game
-
-
Calculation of cost by time in Postpaid: this setting is referred to BOWLING costs calculation in postpaid by Time, when games are played in different time shifts that have different rates
-
Opening game mode: uses the active rate at the game start time
-
Middle game moment: uses the active rate in the middle of the games time
-
Closing game moment: uses the active rate at the end of the game
-
Uniform distribution: the exact cost of each frame will be calculated considering all the time shifts involved
-
-
Always collect entire game: it shows whether to collect only the played frames or the whole game if a game has not been finished
-
Charge extra for 11th frame: this setting allows you to charge for the third ball in the 10th frame. In this case the game would be considered as an 11 frame game. Note: this function is present only for compatibility reasons with previous versions of our scoring so we suggest to disable this option
-
Shoes price: rental price for shoes
-
Socks price: rental price for socks
-
Minimum time for lane rental: allows you to set a minimum rental time for Bowling by Time in Postpaid. If, for example, a lane is opened and closed within 5 minutes and this value is set to 15, the cost for the lane will be calculated for 15 minutes
-
Rental time rounding: sets the lane rental time rounding in minutes for Time Bowling in Postpaid. For example, if a lane is opened and closed after 22 minutes and this parameter is set to 5, the cost is calculated for 25 minutes
-
Join shoes/socks costs with bowling rate: if this option is enabled the income voices regarging shoes and socks will be joined with the bowling rate used to pay the game. The price of the shoes and socks voices will be set to 0.
Variables for cost calculation (Games)
-
Cost calculation in prepaid: this setting refers to the cost calculation for Time games in prepaid mode, when games are played in different time shifts that have different rates. Available options are:
-
Opening game moment: uses the active rate at game start time
-
Middle game moment: uses the active rate in the middle of the games time
-
Closing game moment: uses the active rate at the end of the game
-
Uniform distribution: the exact cost will be calculated considering all the time shifts involved during the game
-
-
Cost calculation in Postpaid: this setting refers to the cost calculation for Time games in postpaid mode, when games are played in different time shifts that have different rates
-
Start of game point: uses the active rate at game start time
-
Middle of game point: uses the active rate in the middle of the games time
-
End of game point: uses the active rate at the end of the game
-
Uniform distribution: the exact cost will calculated considering all the time shifts involved during the game
-
Customer Tab
-
Duration in hours of a Customer Tab: set the hours amount from the creation until the automatic expiration of a Customer Tab
-
Close expired tabs autmoatically: if checked this option causes Customer Tabs to be closed automatically on expiration. All activities included in the tab have to be paid before the closure.
17.8.3 Bowling Parameters
This section allows you to setup all the variables related to a bowling game.
Bowling game variables:
-
Show temporary scores: indicates if temporary scores, made by players, have to be shown on the monitors. Temporary scores are the scores that depend on successive throws, and normally are not shown
-
Max frames to include a player: defines the maximum number of frames that can be played to allow a new player to be added and start to play, without waiting for the end of the current game. Anyway it is possible to include a player manually
-
Default blind: defines the BLIND value that will be displayed for a player in a leagues in the League definition window
-
Game duration in minutes: defines, in minutes, the expected duration of a game for one player. This value will be used to calculate the estimated game end time when a game starts and also in the reservation management to calculate the estimated game end time
-
Default number of games when opening: defines the default number of games every time that a game is opened. When the operators open a game it is always possible to modify this value
-
Default time when opening a new game: defines the default time in minutes every time that a game is opened. When the operators open a game it is always possible to modify this value
-
Default time for free practice: defines the default time in minutes, every time a lane is opened, for the free practice. When the operators open a a lane it is always possible to modify this value
-
Enable the practice in game opening: defines if in the opening game view the practice is enabled by default
-
Pinsetter movement during practice: defines the type of machine movements when lane is opened. When the operators open a lane it is always possible to modify this value
-
Strike cycle: the pinsetter spots a new rack of pins after each ball
-
Normal cycle: the pin spotter makes 1st and 2nd ball cycle
-
Pinsetter stopped: the pinsetter does not spot the pins
-
-
Predefined settings to start practice: defines the behaviour for the practice. If enabled, as default, the practice time starts when the first ball is delivered. Otherwise practice start when the game is started
-
Charge the game time during practice: defines if the time elapsed during practice must be charged at the current rate
-
Charge the game time when entering names: defines whether time should be counted during the entry phase of player names at the start of the game
-
Charge the game time during the warning disclaimer: defines whether time should be counted while the warning disclaimer is shown
-
Wait for the first ball to start counting the game: defines whether the system should wait for the first ball to start counting the bowling time
-
Delay in seconds after the end of practice: sets the delay before the game starts after the practice time
-
Automatically add shoes in open: defines if the system should automatically add the shoes to the players in open mode games
-
Automatically add socks in open: defines if the system should automatically add the socks to the players in open mode games
-
Automatically add shoes in league: defines if the system should automatically add the shoes to the players in league mode games
-
Automatically add socks in league: defines if the system should automatically add the socks to the players in league mode games
-
Add shoes automatically in cross lane games: defines if the system should automatically add shoes to players in cross lane games
-
Add socks automatically in cross lane games: defines if the system should automatically add socks to players in cross lane games
-
Default opening mode: defines the systems default opening mode. When opening a lane it is always possible to modify the opening mode
-
Postpaid by game: the price will be calculated on the number of games played and collected when the game is closed
-
Postpaid by game (fixed duration): the price will be calculated on the number of games played and collected when the game is closed. The number of games to play must be set
-
Prepaid by game: the price will be calculated on the number of games and paid before the game starts
-
Postpaid by time: the price will be calculated on the lane rental time and cashed at the end of the game
-
Postpaid by time (fixed duration): the price will be calculated on the lane rental time and cashed at the end of the game. The maximum lane rental time must be set
-
Prepaid by time: the price will be calculated on the lane rental time and cashed before the game starts
-
-
Duration of score table at the end of a game: defines how long the score table stays on the monitor at the end of each game
-
Game closure delay when credits are finished: defines how long a game with no more credits stays open. During this time the score table is displayed and the players will not be able to play
-
Delay for pinsetter reset command: defines the delay (in sec.) for the pinsetter reset command when a new game starts. Set the value to 0 if you don’t want to send the reset command
-
Delay pinsetter switch off when credits are over: defines the delay (in sec.) before the pinsetter switches off when the time or the frames are over. Set to 0 if you don’t want to send the switch off command
-
Delay pinsetter switch off when the lane is closed: defines the delay (in sec.) before the switch off machine command is sent when the lane is closed. Set a value between 1 and 120
-
Exclude the player automatically after payment: in post-paid mode, defines whether the player should be excluded after the customer paid the frames or the time bowled before the game is closed
-
Redistribute the excluded players remaining credit: in pre-paid mode, defines whether the frames or the time already paid by the excluded player must be divided and automatically assigned to the players still playing
-
Don’t sum the player’s time: for bowling game by time, if this option is enabled, the time of the game is not calculated summing the player’s time, but only counting the real time elapsed or the time set as fixed game duration
-
Automatically redistribute the time to the new players: in pre-paid time mode, defines whether to distribute the already paid time to the new players
-
Show the Emergency Stop button: check this option to show the ‘Emergency Stop‘ button on all the screens of the workstations
-
Show the scores as corrected for NO-TAP strike: if this option is enabled, the system shows the strikes received, thanks to the NO-TAP function, as corrected score
-
Use the square and triangle symbols for strikes and spares on the lanes: if this option is enabled, on the grid of the score on the monitors, will be used symbols square and triangle in place of ‘X‘ and ‘/‘
-
Allow to compact the players score on grids: if selected, this option allows to compact the players’s score rows on the lane monitor in order to improve the readability of the scores in case of many players in the game
-
Anchor the score grid at the top: if selected, this option allows to anchor the score grid at the top of the lane monitors
-
Show larger scratch than total on lanes monitor: if this option is enabled, on the grid of the score on the monitors, the largest scratch compared to the total (scratch + hdcp) will be shown
-
Hide the message ‘Out of Service‘: if enabled hides the message ‘Out of Service‘ from the lane monitor when the lane is out of service
-
Hide the message ‘Pinsetter malfunction detected‘: if enabled hides the message ‘Pinsetter malfunction detected‘ from the lane monitor when the machine is in error
-
Show ‘Don’t throw‘ message: set the duration of the ‘Don’t throw‘ message, which notifies the player to not throw the ball during the initialization phase of the pinsetter
-
Show the remaining time of a game: if enabled shows the remaining time of a game on the monitors
-
Show warning disclaimer before a game: set the duration of the warning disclaimer message which notifies to the player the conditional terms before each game
-
Extra message in the warning disclosure: set the extra message that is shown in the warning disclosure before a game. Max length 100 characters
-
Player name always in uppercase: if this option is enabled, the software forces the names insertion of the players always in uppercase
-
Show bumper symbol in the scoring: if active, a symbol will be shown beside the player’s name, for all players who has the bumper enabled
-
Maximum number of players for game in open: defines the maximum number of players that can be added when you open the game in open
-
Maximum number of players for game in league: defines the maximum number of players that can be added when you open the game in cross lane mode
-
Maximum number of players from the console: defines the maxiumum number of players that can be added directly by the customers through the player console
-
Wake up the console using the touch screen: this option allows to wake up the console using the touch screen by entering a touch sequence on the corners of the display. The proper sequence is 1, 2, 2, 3, 3, 3, 4, 4, 4, 4. The corners are to be considered numbered clockwise starting from the top left corner. Touches must be entered sequentially, within one second from each other
-
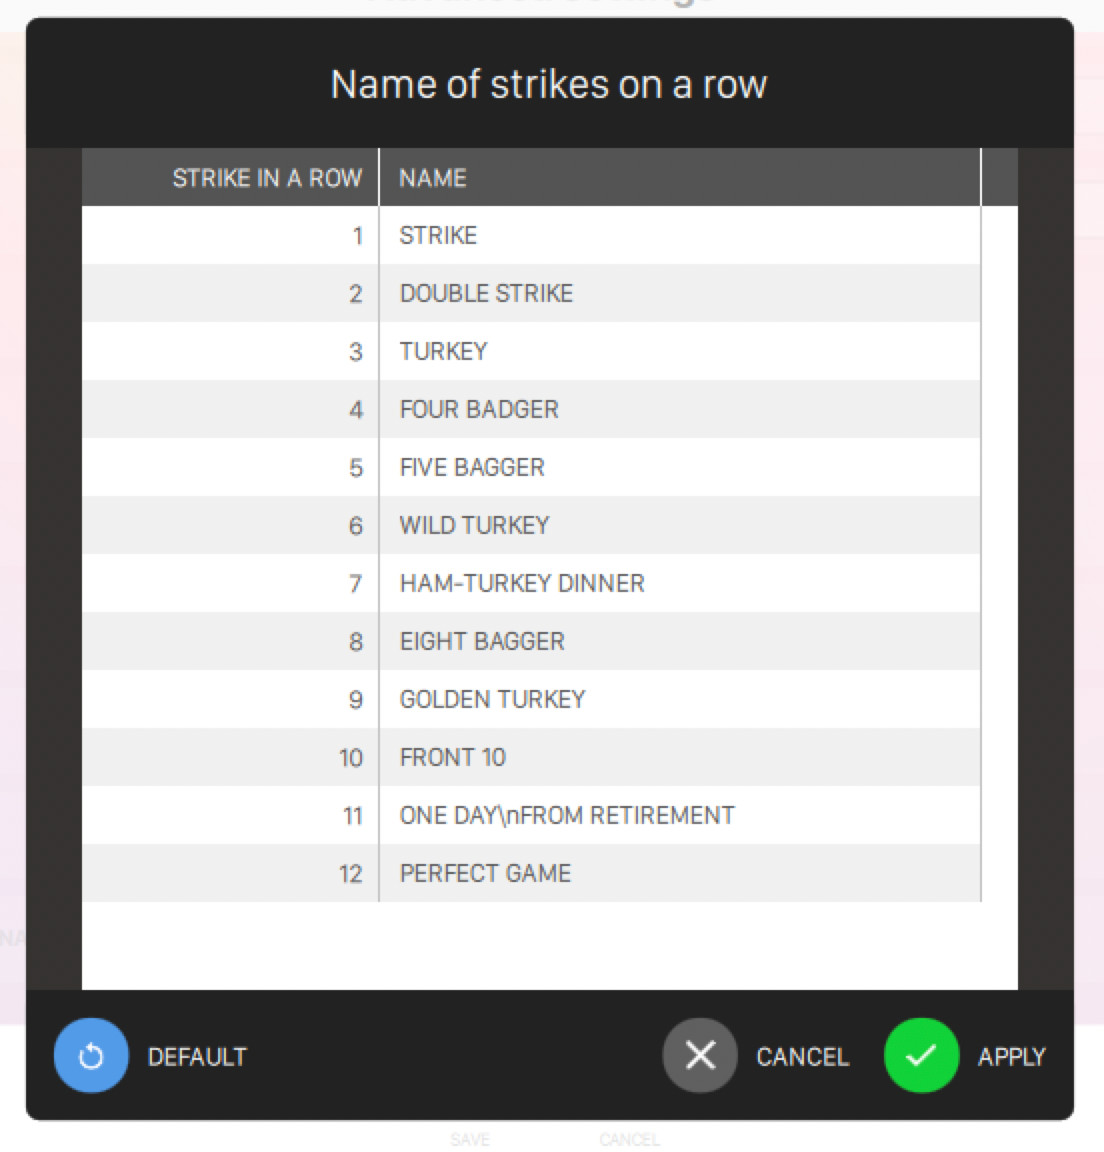
Name of multiple strikes displayed on the monitors: allows to edit the names of the 12 possible multiple strikes used by the scoreviewer when the player makes more consecutive strikes. Click on the ‘Edit’ button to customize the display values
17.8.4 Reservation settings
This section allows you to setup setting for the reservation system.
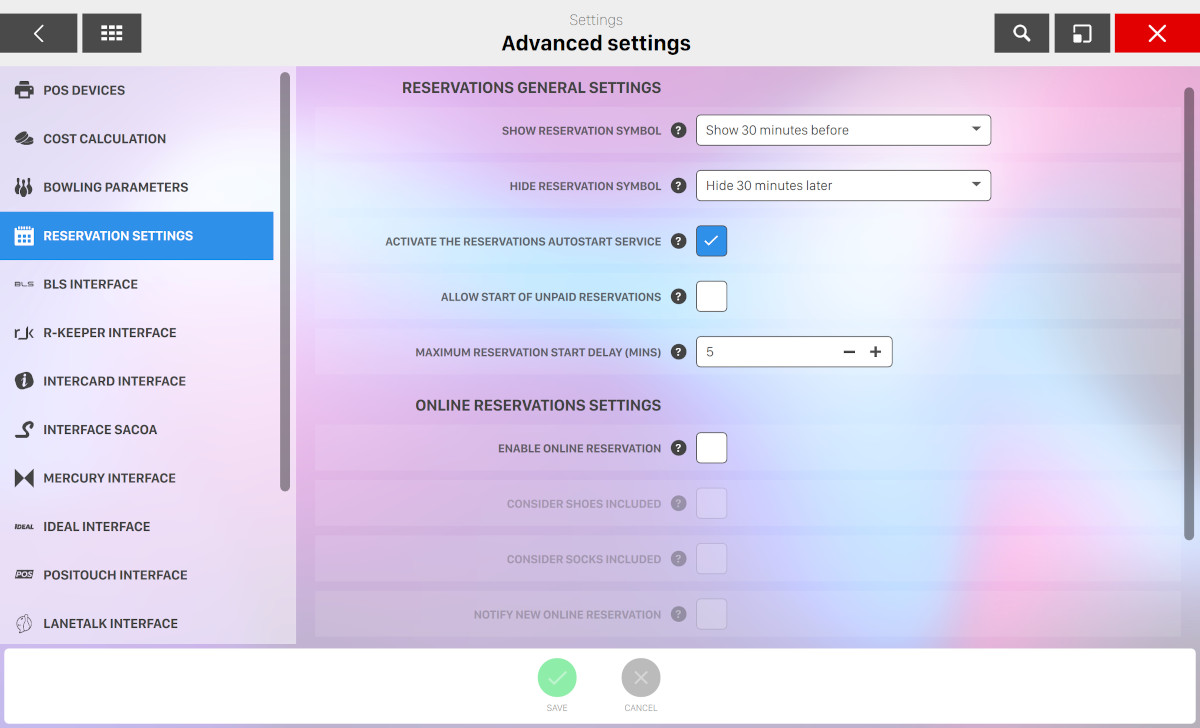
Reservation general settings
-
Show reservation symbol: defines how many minutes before the reservation is due the reservation symbol will be shown on the game icon. ‘Do not show‘ option is also available
-
Hide reservation symbol: defines after how many minutes from the reservation time the reservation symbol will be removed from the game icon, when the reservation has not been sent to lane
-
Activate the reservations autostart service: if deselected it stops the automatic start service of the reservations
-
Autostart option active by default: if activated, new reservations created manually from the Front Desk will have the auto start option active by default
-
Allow start of unpaid reservations: if enabled also unpaid reservations can be started automatically
-
Maximum reservation start delay (mins): indicates the maximum delay in minutes within which a reservation can be started automatically after the scheduled time. For example, if the value set is 5 minutes and the reservation has been programmed for 11.00, then the reservation can be started until 11.05. The system delays the start of a reservation if the start conditions are not met, for example the lane is busy or out of service
Online reservation settings
This section allows you to setup online reservations for your bowling center. Online reservations are constantly aligned with the FrontDesk (and vice versa) so if you activate this option your bowling will be automatically linked to the online reservation system.
-
Enable online reservation: allows you to activate the online reservation service. The reservations will be downloaded from the internet and added to the bowling center
-
Consider shoes included: indicates if a reservation from the web has to include shoes for all players by default
-
Consider socks included: indicates if a reservation from the web has to include socks for all players by default
-
Notify new online reservation: if checked every time that an online reservation is confirmed notify the operator with a message
-
Maximum minutes of inactivity: indicates after how many minutes of inactivity to remove a reservation that was not confirmed
-
Initialize online system: initialize the online booking system and send an email to the address listed in the ‘Bowling Information’ in order to access the configuration web portal
Once you initialize the online reservation system your bowling will be registered and an email will be sent to the Front Desk administrator address. This email contains all the instructions to activate your account and start working on the online reservation settings.
17.8.5 BLS Interface
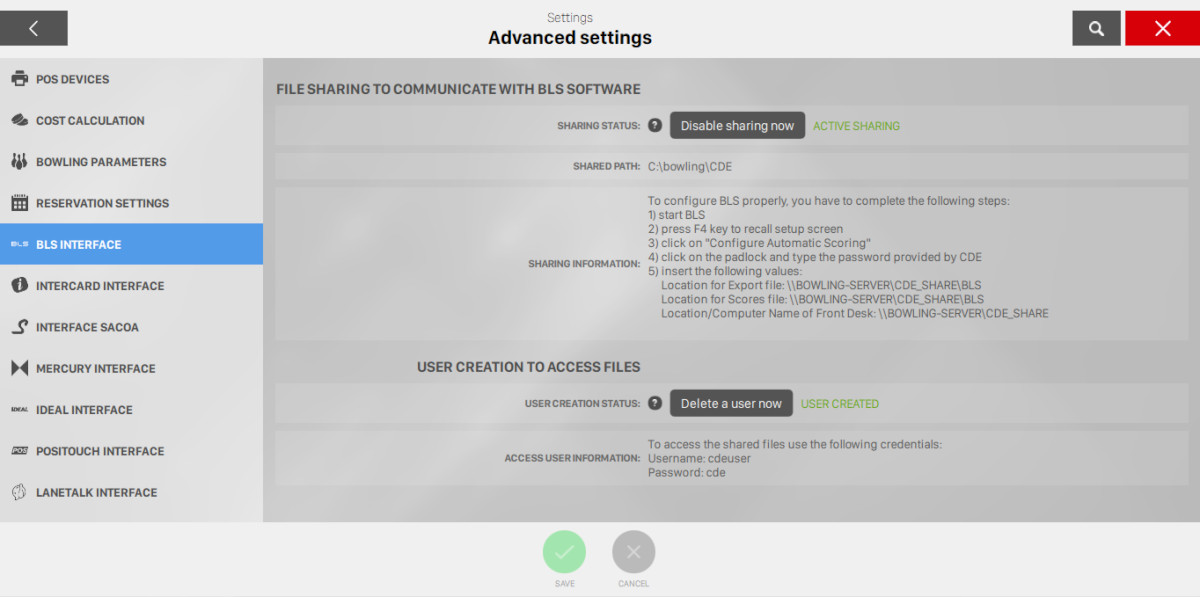
This section allows you to configure the integration with BLS software.
BLS is a software developed by CDE Software which allows to control and manage bowling tournaments.
If this option is active it is possible to import and export data compatible with BLS software.
If this options is not available on your installation please contact the customer service.
File sharing to communicate with BLS software
Click on Active sharing now to activate the BLS software. To configure BLS properly you have to complete the following steps:
-
start BLS
-
press F4 key to recall setup screen
-
click on ‘Configure Automatic Scoring’
-
click on the padlock and type the password provided by CDE
-
insert the following values that you see in bold on the section screen
User creation to access files
This section allows to create or delete the ‘CDEUSER’ user to access the folder shared by the software. Click on ‘create a user now’ to create the user. To access the shared file you have to use the credentials displayed in bold on the section.
17.8.6 R-Keeper Interface
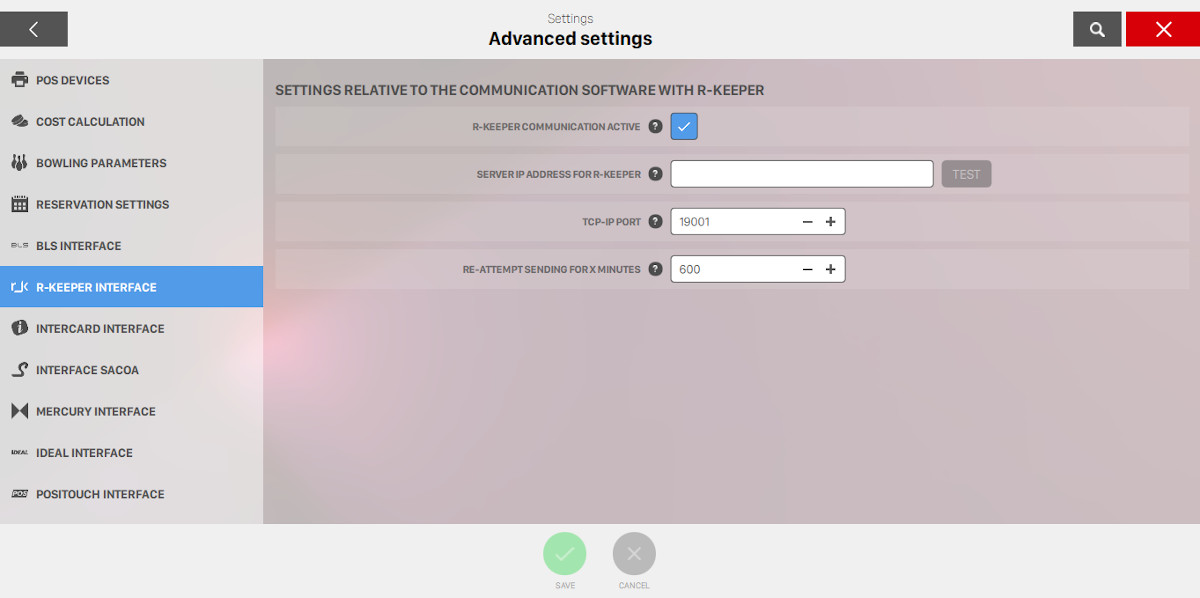
This section allows you to configure the integration with r-keeper software.
If this option is not available on your installation, please contact customer service.
-
R-Keeper communication active: indicates if the software needs to send messages regarding income transactions to R-Keeper
-
Server IP address for R-Keeper: indicates the server IP address where to send messages
-
TCP-IP port: indicates the TCP-IP port on the server for R-Keeper, usually 19001
-
Re-attempt sending for X minutes: indicates the time in minutes during which the software will continue to keep messages connection with service fails. After this time the messages are deleted from the system
Click Run a test to check if the communication with R-keeper service is working correctly.
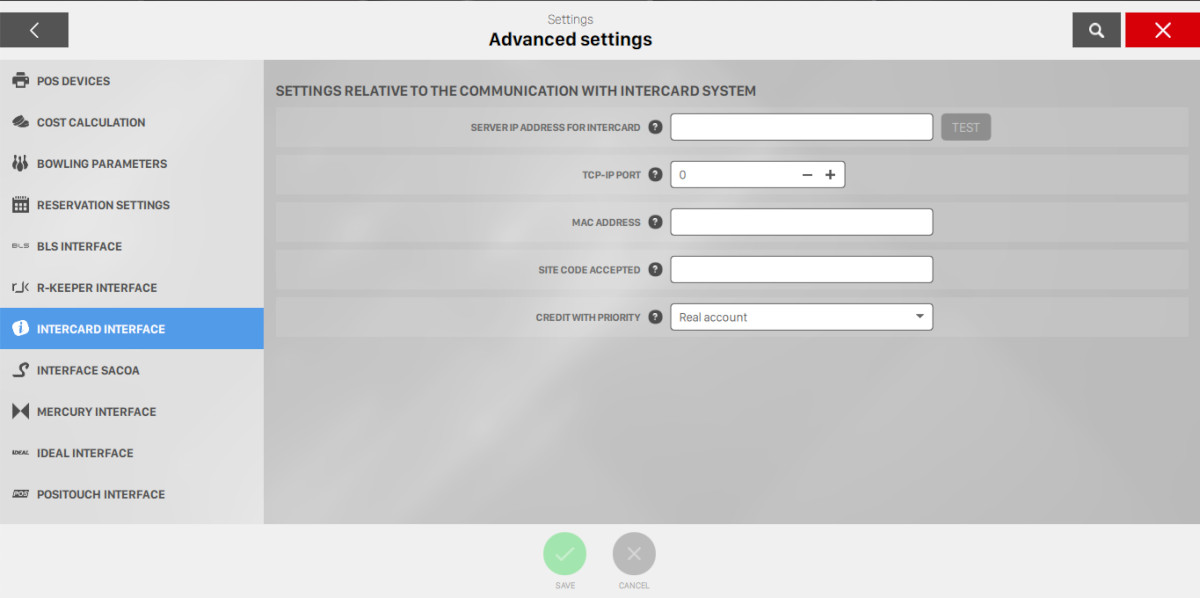
17.8.7 Intercard Interface
Intercard process payment transactions for merchants, providing cards to users. Integration with this service can be configured from this section.
-
Server IP address for Intercard: indicates the server name or the IP address to send requests. This information is provided by the Intercard technicians
-
TCP-IP port: indicates the server name or the IP address where to send requests. This information is provided by the Intercard technicians
-
Mac Address: indicates the Pos mac address. This value must be void unless the Intercard technicians ask to type in a value
-
Site code accepted: indicates the site code number acknowledged in this center. This number, provided by Intercard, allows to prevent that cards issued by other centers are accepted
-
Credit with priority: defines whether to use first the real account or the bonus account
Click Run a test to check if the communication with Intercard interface is working correctly.
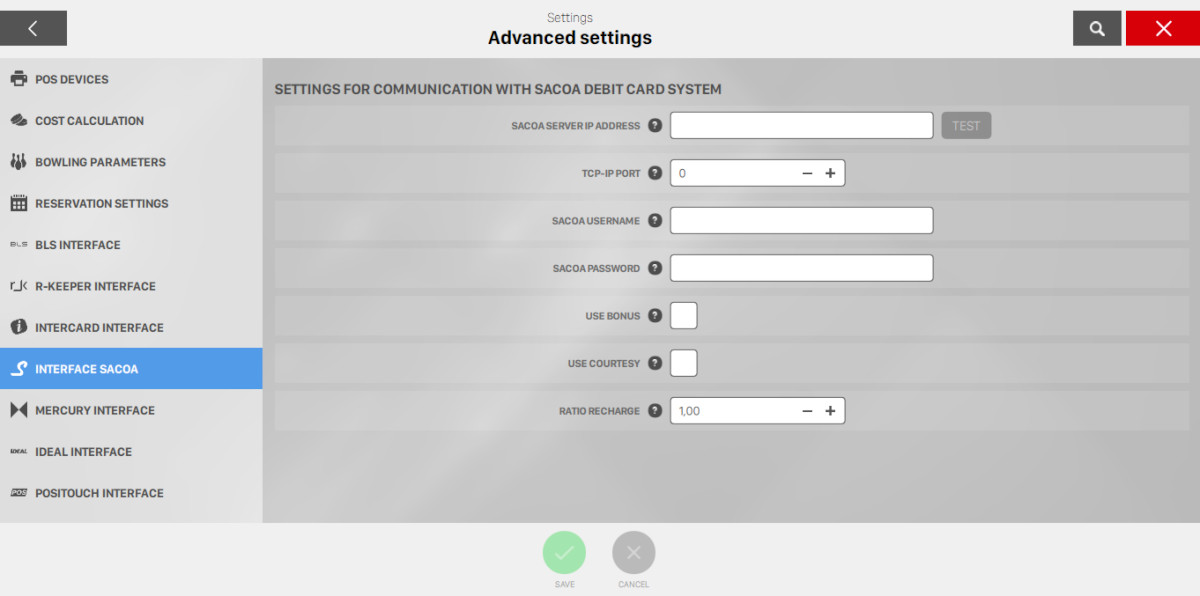
17.8.8 Sacoa Interface
This section allows you to configure the integration with Sacoa debit card system. This service allows your customers to use custom debit cards to make payments inside your bowling center.
-
SACOA Server IP Address: specifies the IP address or the server name where to send requests. This information is provided by the SACOA technicians
-
TCP-IP port: specifies the TCP-IP port of the server. The default value is 144334
-
SACOA username: set the username to login in SACOA server. This information is provided by SACOA technicians
-
SACOA password: set the password to login in SACOA server. This information is provided by SACOA technicians
-
Use bonus: indicates whether the accumulated bonus on the cards can be used to pay
-
Use courtesy: indicates whether the value of Courtesy accumulated on the cards can be used to pay
-
Ration recharge: indicates the ratio of recharge compared to the amount paid. Eg the value of 1:00 means that if a customer pays 100 $ will have a recharge of 100 $ (100 $ in credit and 0 $ in bonus). Eg the value of 1:20 means that if customer pays 100 $ will have a recharge of 120 $ (100 $ in credit and 20 $ in bonus)
17.8.9 Mercury Interface
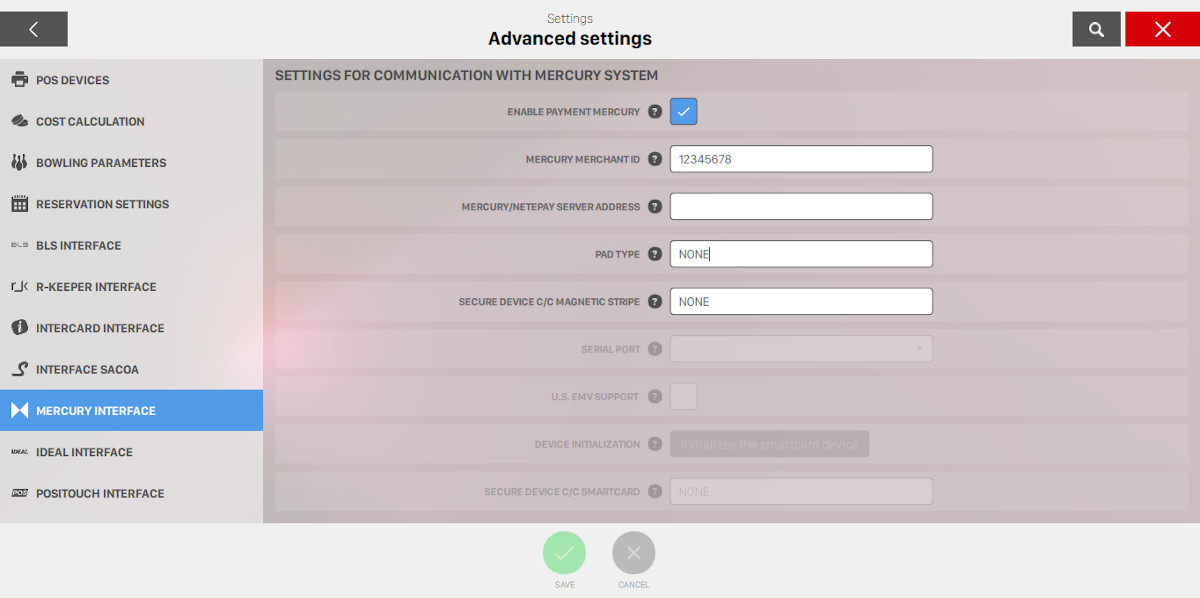
Mercury is a Credit Card Processing, Integrated Payment Network.
This section allows you to set the configurations of the the parameters required for Mercury integration.
-
Enable payment MERCURY: allows you to use the Mercury Card Processing
-
MERCURY merchant id: requires to enter the Merchant ID provided by MERCURY
-
MERCURY/NETePay server address: specifies the MERCURY server address or the server address where NETePay software runs
-
Pad Type: sets the type of device used
-
Secure device C/C magnetic stripe: sets the device for payments with magnetic stripe cards
-
Serial Port: allows you to choose the the serial or the USB port where the POS device is connected
-
U.S. EMV Support: specifies whether the device supports payments with smart cards using the U.S. EMV standard
-
Device initialization: this is used for the first installation. Please follow the Mercury software instructions
-
Secure device C/C smartcard: sets the MERCURY payment device type for payments with smart cards
17.8.10 Ideal Interface
This section allows you to enable the integration with Ideal service.
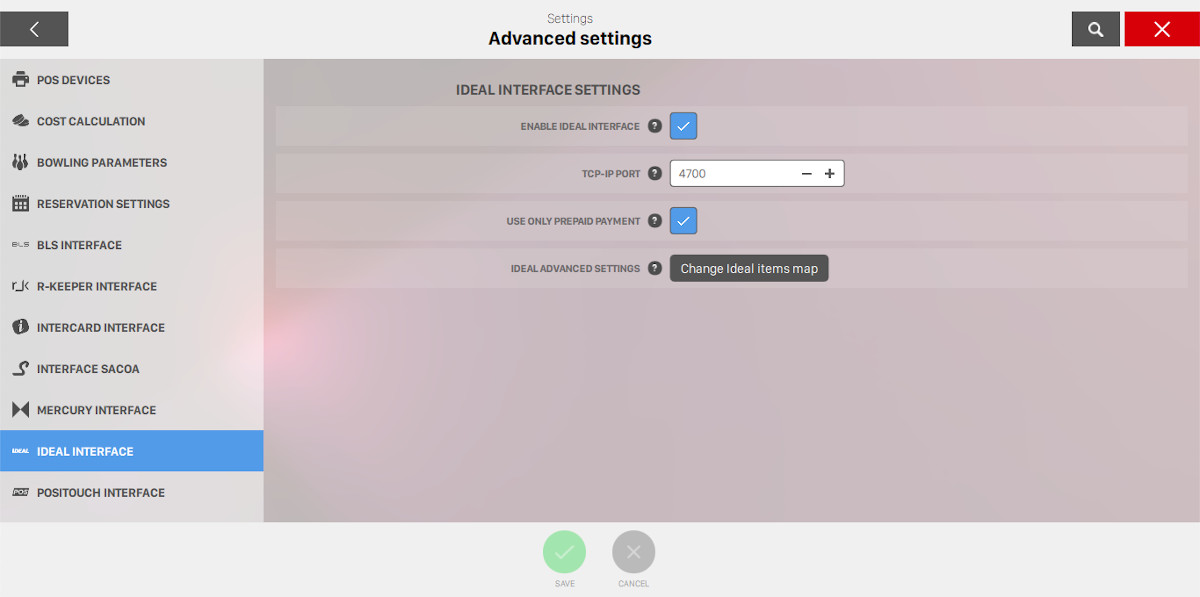
-
Enable Ideal interface: enable the Idea interface
-
TCP-IP port: indicates the TCP-IP port on which the Ideal interface should listen
-
Use only prepaid payments: if this option is enabled only prepaid payments will be used for Ideal interface
-
Ideal advanced settings: combine Ideal items to Bowling and games. Click ‘Change Ideal items map’ to open the map editor
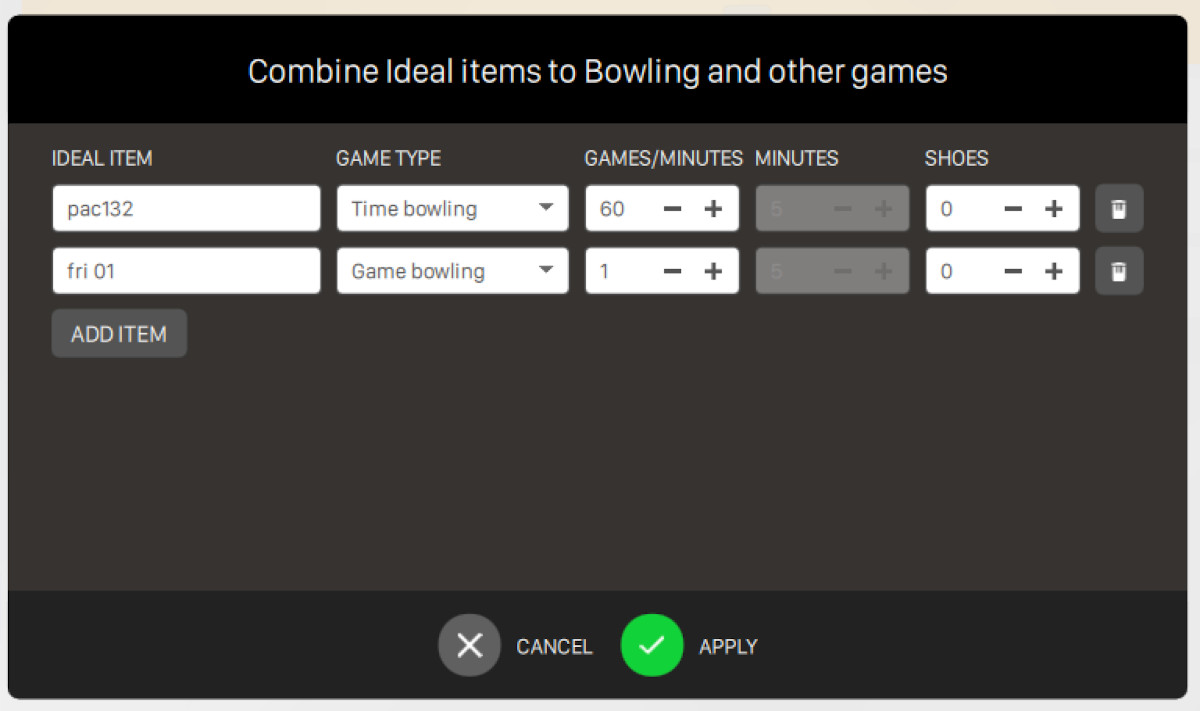
From this window you can add/remove/edit elements to map game bowling, time bowling or games with Ideal items. For each element you can choose:
-
Ideal item: the name of the correspondent Ideal item
-
Game type: this option can be
-
Game bowling: in this case you can specify the number of games
-
Time bowling: in this case you can specify the duration (in minutes) of the game
-
Games: in this case you can choose the game type from the list and the duration in minutes
-
-
For game bowling and time bowling you can sppecify the number of shoes to include
Click on the trash icon to remove an element. Click on Add item button to add a new element to the list.
17.8.11 LaneTalk interface
This section allows you to setup the integration with LaneTalk interface, which collects scores and visualize them on their apps.
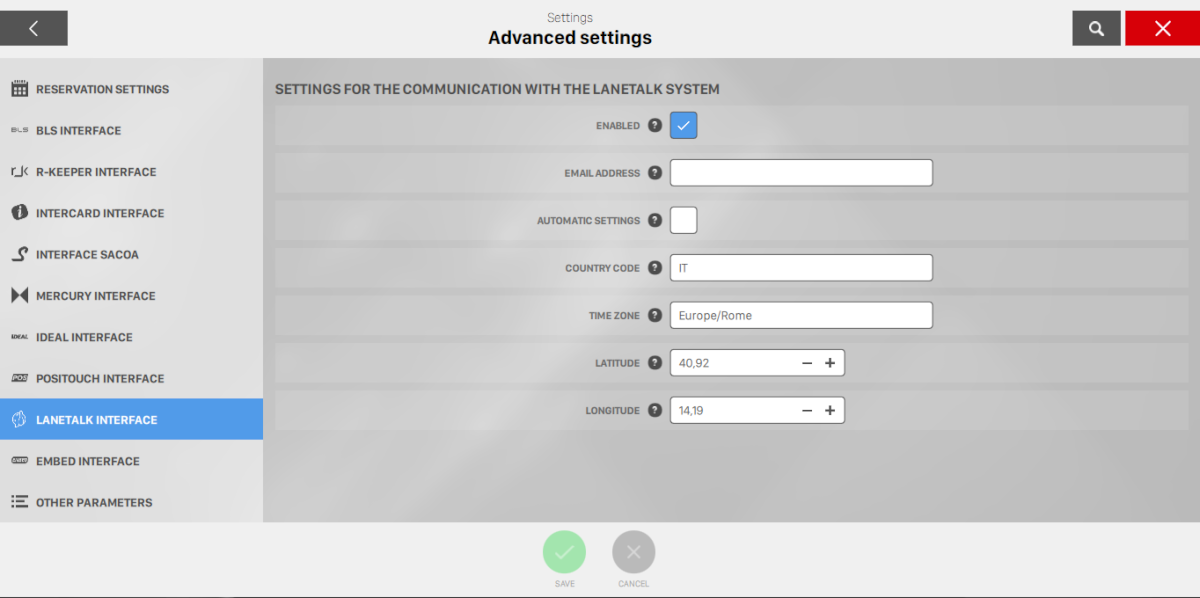
-
Enabled: check this option to enable/disable the communication with LaneTalk system on your bowling center
-
Email address: the email address used for LaneTalk service registration
-
Automatic settings: check this option to automatically load the settings of time zone, country, latitude and longitude based on the public ip address of your bowling center
-
Country code: two letters country code, following the standard ISO 3166-1 alpha-2
-
Time zone: time zone name following the standard Country/City
-
Latitude: latitude of the bowling center
-
Longitude: longitude of the bowling center
17.8.12 Embed interface
This section allows you to setup the integration with Embed system.
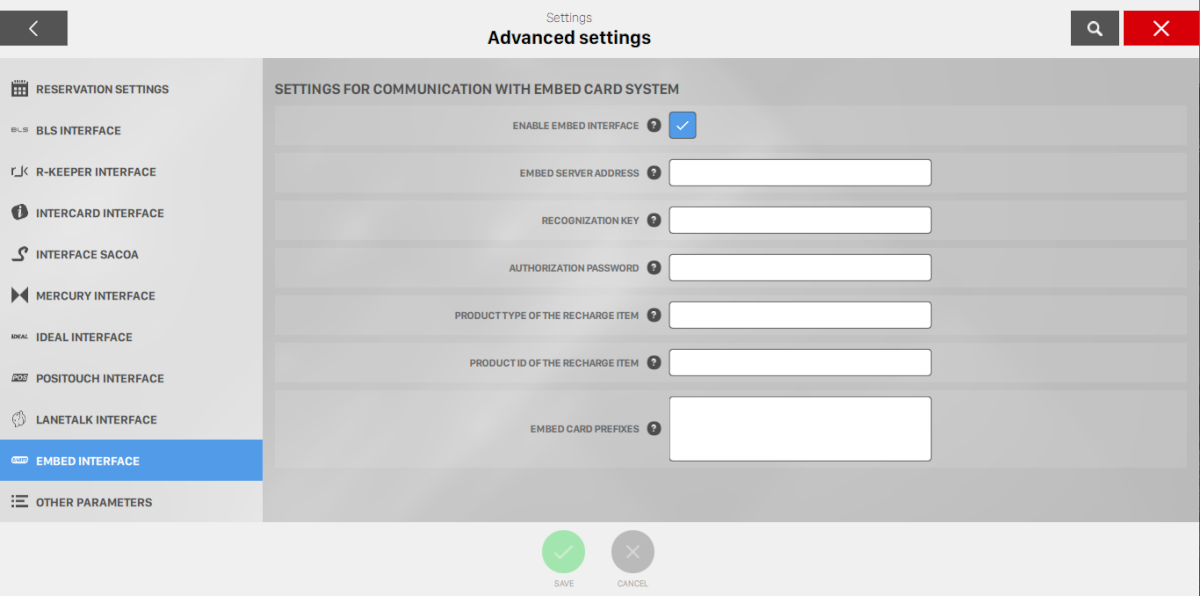
-
Enable Embed interface: this option enable the integration with Embed card system. This option will affect every front desk
-
Embed server address: set the address of the Embed server where the request will be sent (eg: https://192.168.0.1:12345/). This information is provided by the Embed technicians
-
Recognization key: set the recognition key to access to Embed server. This information is provided by the Embed technicians
-
Authorization password: set the password to access to Embed server. This information is provided by the Embed technicians
-
Product type of the recharge item: product type of the item to buy when a recharge is done. It’s mandatory that the selected product allows to specify the recharge amount
-
Product id of the recharge item: product id of the item to buy when a recharge is done. It is mandatory that the selected product allows to specify the recharge amount
-
Embed card prefixes: allows you to automatically recognize if the card is Embed type by comparing the first digits (zero included) with those in this list
17.8.13 Nordic Amusement Interface
This section allows you to setup the integration with Nordic Amusement System.

-
Enabled: enable or disable the communication with Nordic Amusement system
-
Ip address: set the ip address for communicating wth Nordic Amusement service
17.8.14 Semnox interface
This section allows you to enable/disable the semnox integration and configure it. This service allows customers to use custom cards to make payments inside your bowling center.
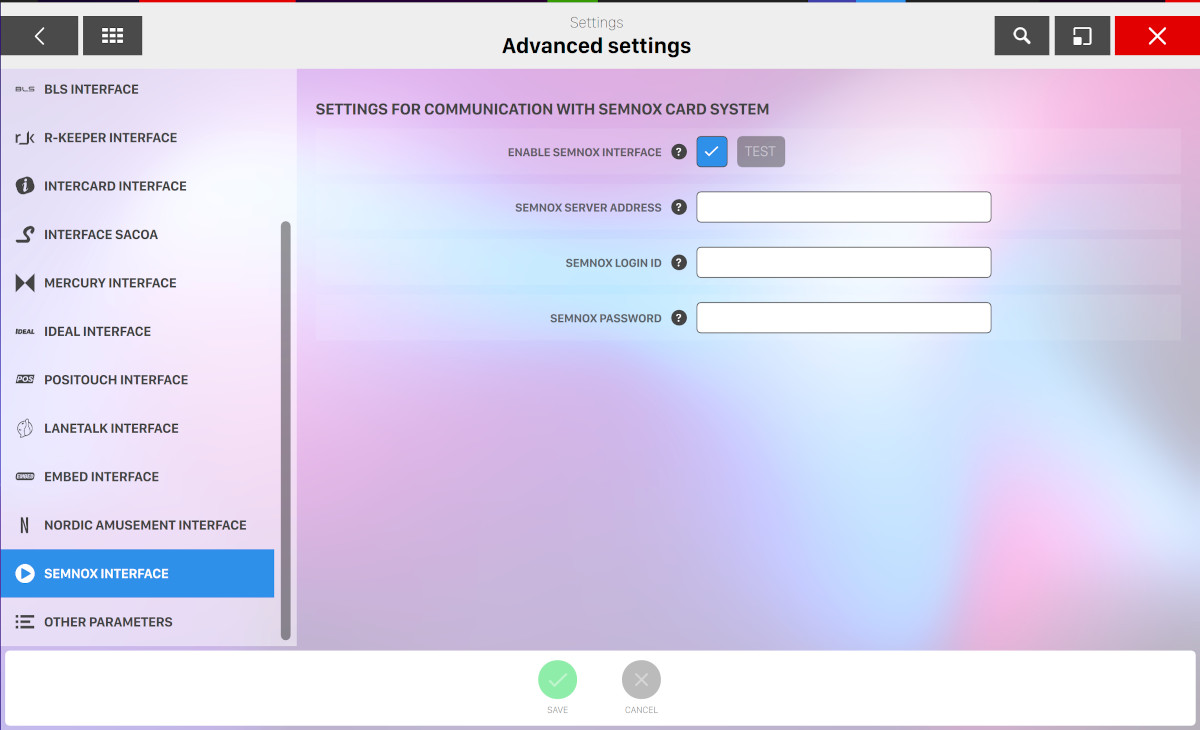
-
Enable semnox interface: this option enables the integration with Semnox card system on each front desk. Press the test button to check the connectivity to the semnox server
-
Semnox server address: set the address of the Semnox server where the request will be sent. This information is provided by the Semnox technicians. The address must start with protocol (http:// or https://) and must not include the "api" url segment
-
Semnox login id: set the login id to access the Semnox server. This information is provided by the Semnox technicians
-
Semnox password: set the password to access the Semnox server. This information is provided by the Semnox technicians
17.8.15 Stripe

From this section it is possible to edit all the options related to the integreation with Stripe for accepting payments.
-
Stripe public key: the Stripe public key provided by Stripe
-
Stripe secret key: the Stripe secret key provided by Stripe
-
Status: indicates the current status of the Stripe integration and allows you to edit the keys by pressing the related button. Click on the disconnect button to disable the integration.
Stripe POS devices registered
In this section you can see the list of connected Stripe POS devices, with the relatve information:
-
POS: indicates the label of the device
-
S.N.: indicates the serial number of the device
-
Status: indicates the status of the device, which can be "online" or "offiline"
-
Ip address: indicates the ip address of the device on your network
You can register a new POS device by entering the registration code that will be shown on the POS device and choose the kiosk number from the list. Please note that in order to register a POS device you need to have at least one kiosk configured and connected to your network.
17.8.16 Viva
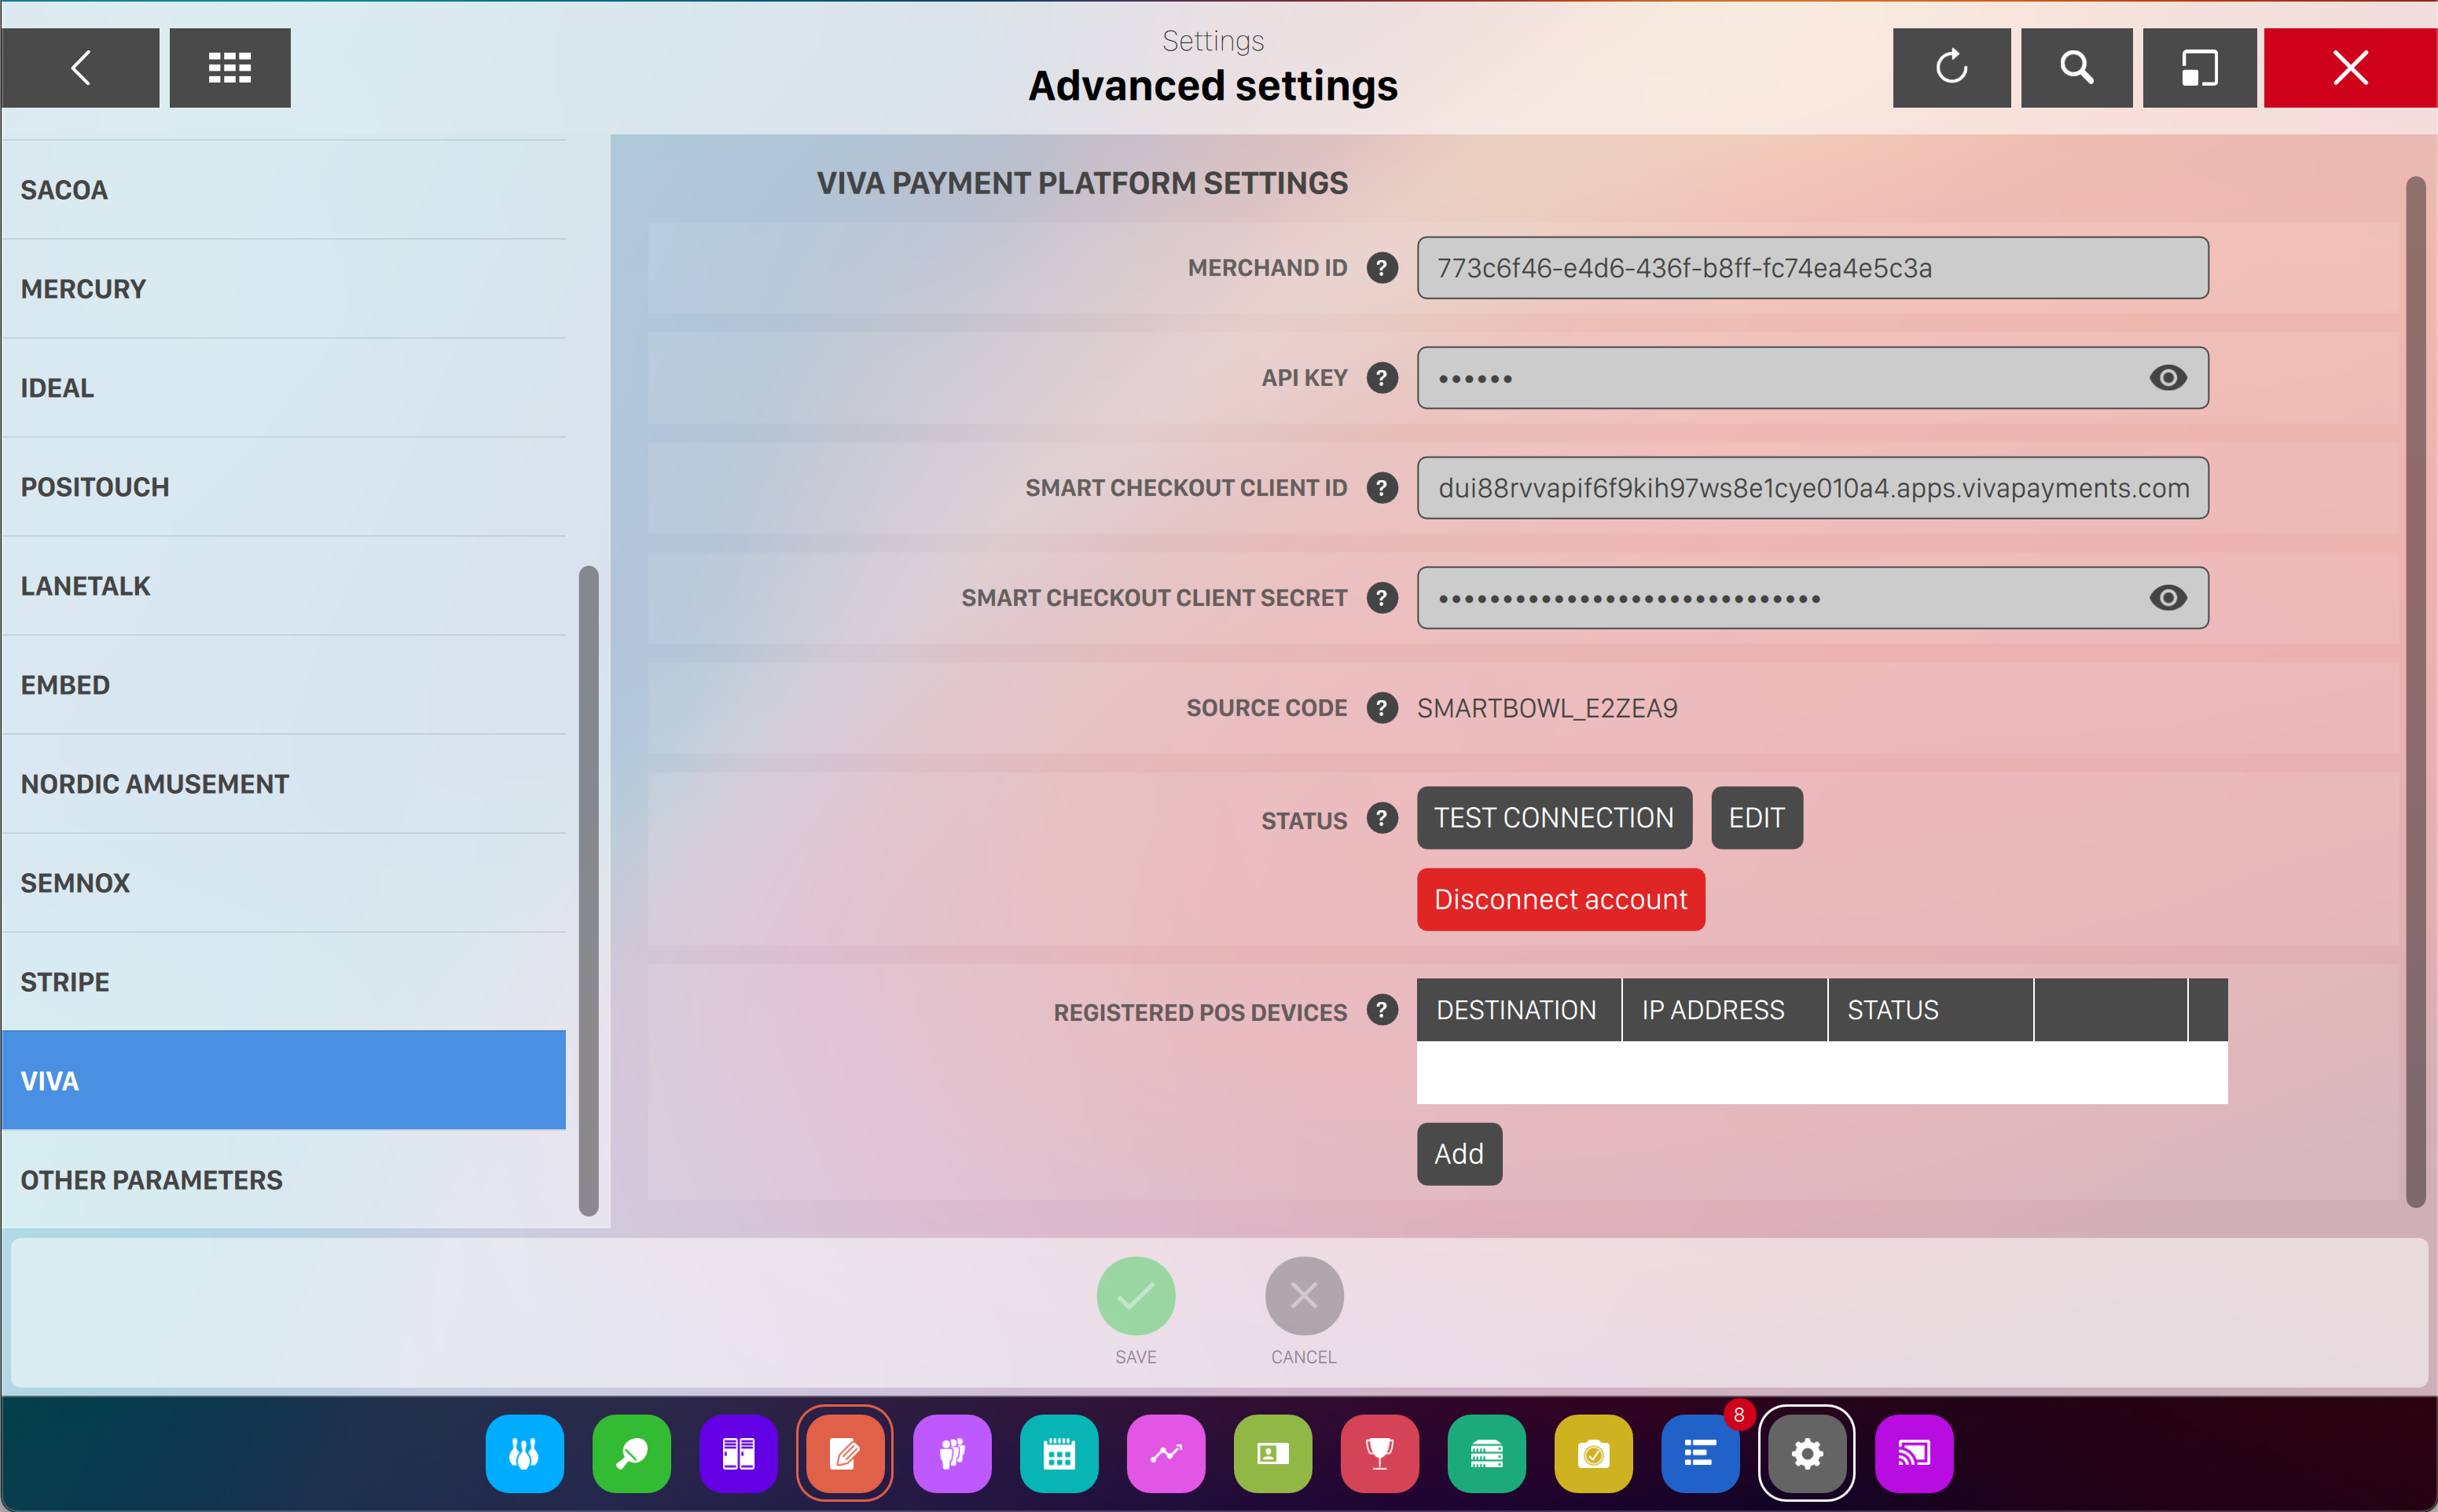
From this section it is possible to edit all the options related to the integreation with Viva for accepting payments.
-
Merchant ID: the Merchant ID provided in the Settings on the Viva Account
-
API Key: the API key provided by in the Settings on the Viva Account
-
Smart Checkout Client ID: the Smart Checkout Client ID provided in the Settings on the Viva Account
-
Smart Checkout Client Secret: the Smart Checkout Client Secret key provided in the Settings on the Viva Account
-
Status: indicates the current status of the Viva integration and allows you to edit the keys by pressing the related button. Click on the disconnect account button to disable the integration.
You can register a new POS device by entering in your Viva Sales > Card Terminal section the registration code that will be shown on the POS device and choose the kiosk number from the list. Please note that in order to register a POS device you need to have at least one kiosk configured and connected to your network.
17.8.17 Other Parameters
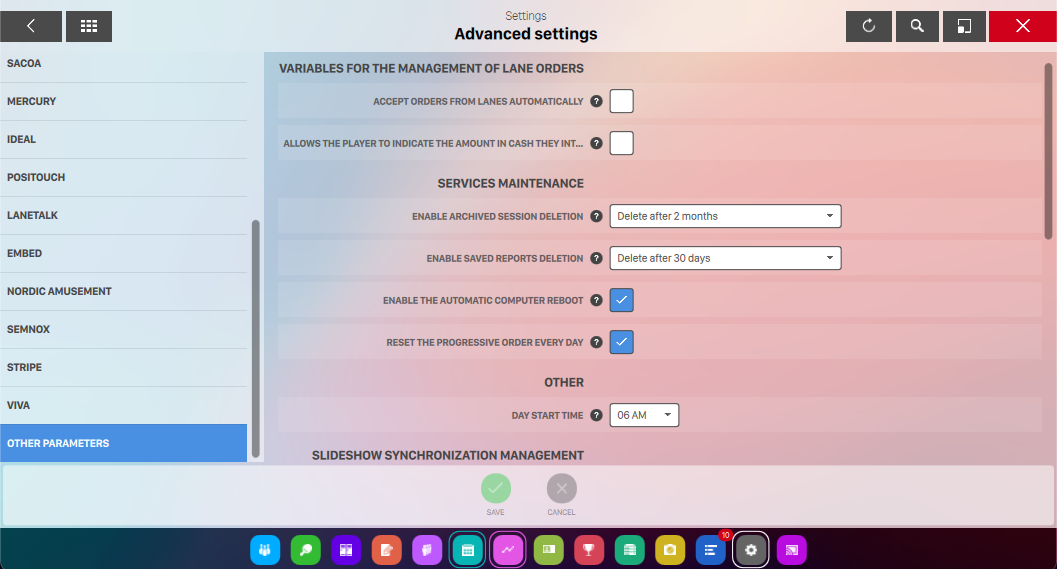
Variables for the management of lane orders
-
Calculate orders from lanes automatically: indicates whether the orders coming from the lanes should be calculated automatically or they can be modified by an operator
-
Allows the player to indicate the amount in cash they intend to submit: allows the customers to enter the amount they want to submit in cash so that the change can be calculated in advance
Services maintenance
-
Enable archived sessions deletion: this function allows you to automatically delete the archived sessions after a specified time. This procedure will NOT delete the sessions related to tournaments, open sessions or sessions not yet collected. All the information related to the income sessions will be saved as well as the activities and the player stats. It is suggested to enable this function in order to maintain a compact database for a fast access
-
Enable saved reports deletion: this function allows you to automatically delete all the reports files after a certain period of time. All the information related to income, events and players statistics will be preserved. It is recommended to activate this function to keep the database more solid and fast
-
Enable the automatic computer reboot: this function allows the system to automatically restart all the computers during the night when the center is closed (6am by default). If enabled, all the computers (including the server) will reboot. This function allows you to re-start the services at least once a day, keeping the software quick to respond. It is suggested to enable this function
-
Reset the progressive order every day: allows to automatically reset the order number evey day so that each day starts from 1
Other
-
Day start time: it is the default time that is shown when a day begins. This setting allows the system to restart all computers at the specified time. This is useful to ‘clear’ all useless data that can slow the computers. It is suggested to leave it enabled
Slideshow synchronization management
-
Enable slideshow synchronization: it allows to enable the synchronization of the slideshow with a remote computer
-
Protocol type: it allows you to choose which communication protocol the system should use to synchronize the files
-
FTP
-
SMB
-
-
Remote computer address: it specifies the address of the computer from where to synchronized
-
Username: the username used to access the remote computer
-
Password: the password user to access the remote computer
-
Click on run a test button to check if the connection is working
-
Enable time clock: check this option to enable clock in and clock out feature for the the employees / operators of the bowling center
-
Max clock in / clock out lapse: defines the maximum time, expressed in hours, from a clock in to a clock out that can be performed by an operator
Security
-
Set service password: defines a new password used to enter on the device settings page
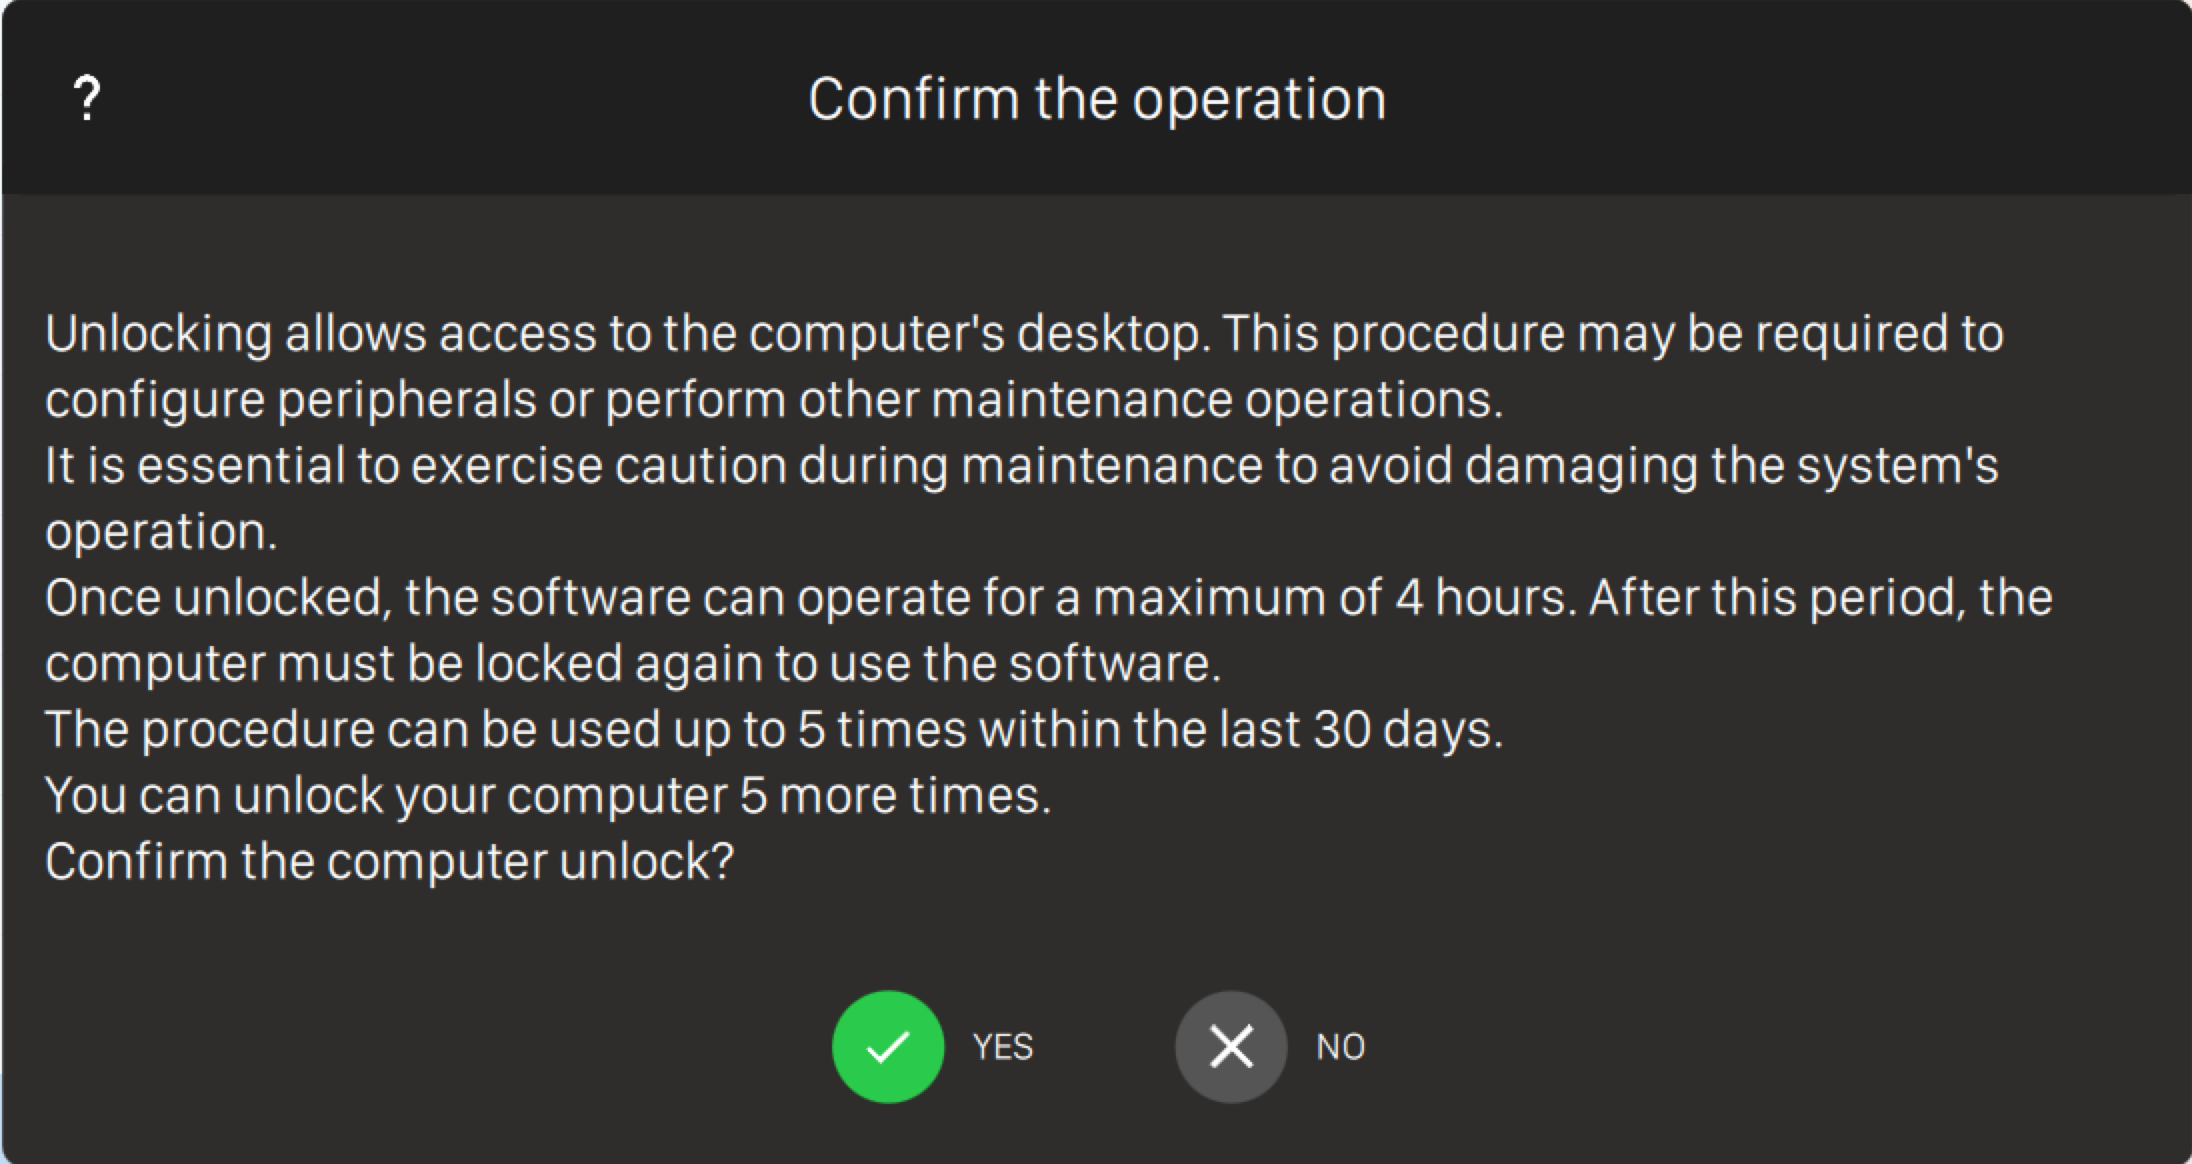
Unlock Computer

-
Unlocking the computer: This option will let you to unlock your machine for manteinance purpose. You will need to login again into your user account after unlocking the machine. The machine will remain unlocked for 4 hours and the unlock can be perfomed for a maximum of 5 times every 30 days.
17.9 Departments
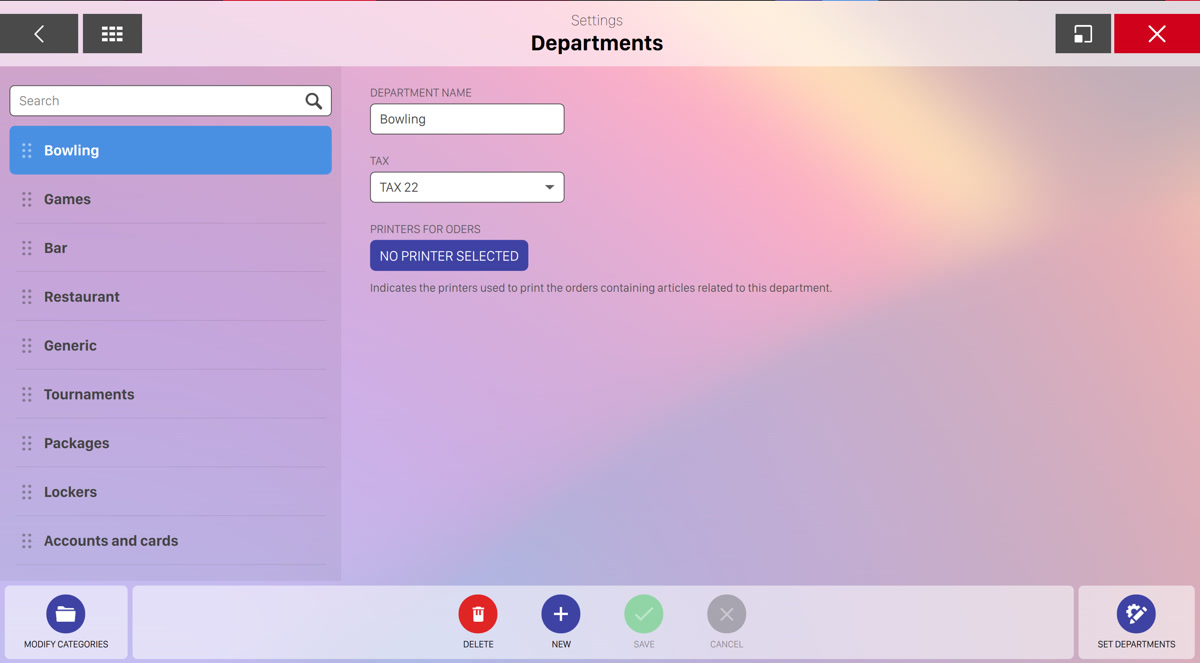
From this section it is possible to manage all the departments of the Genie software. On the left sidebar you can see the list of all the departments that have been defined, while on the central area you can edit the selected department.
Click on a single department to edit it or click on the new button to create a new one:
-
Department name: indicates the name of the department
-
Tax: select the tax related to the department from the list of defined taxes
-
Printers for orders: click the button and a dialog will appear and show the list of available printers.
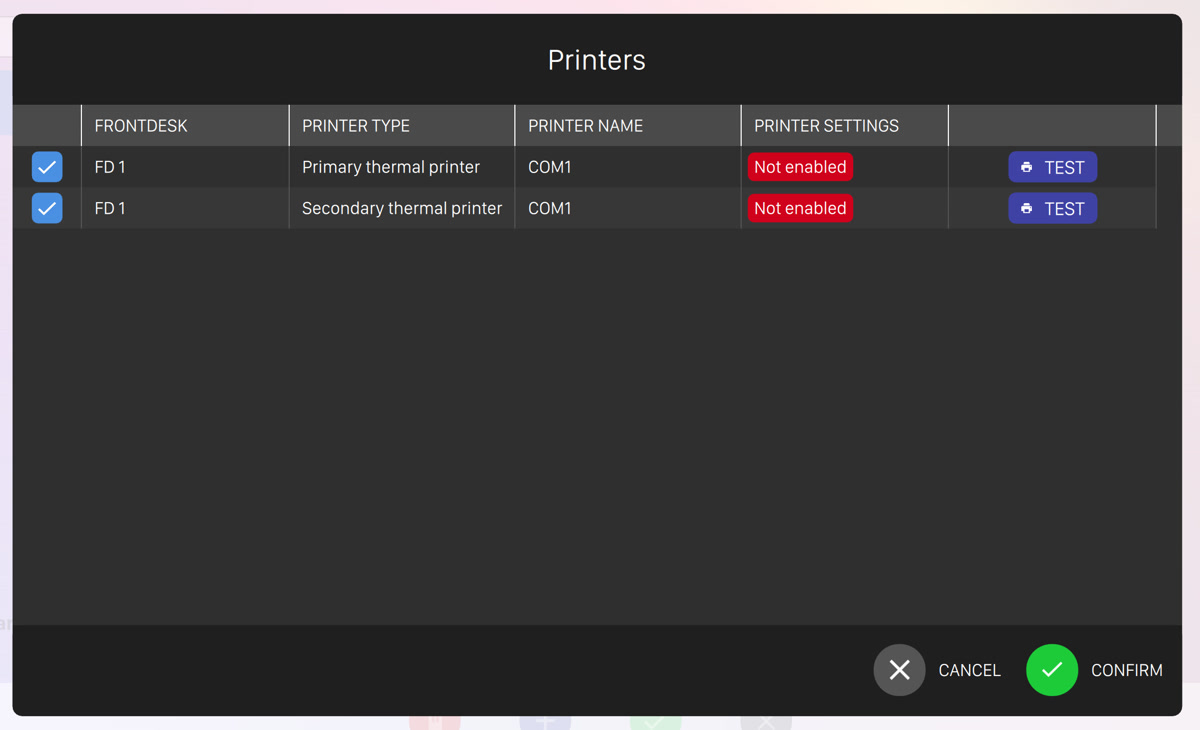
For each printer you can see:
-
The frontdesk name where the printer is connected to
-
The printer type
-
The printer name
-
The printer settings
-
The "test" button that allows you to make a test print
Select one or more printer and click on the confirm button complete the selection
-
Click on the save button to confirm the changes or click on the cancel button to discard them.
At the bottom right section of the screen you will find an additional action called Set departments.
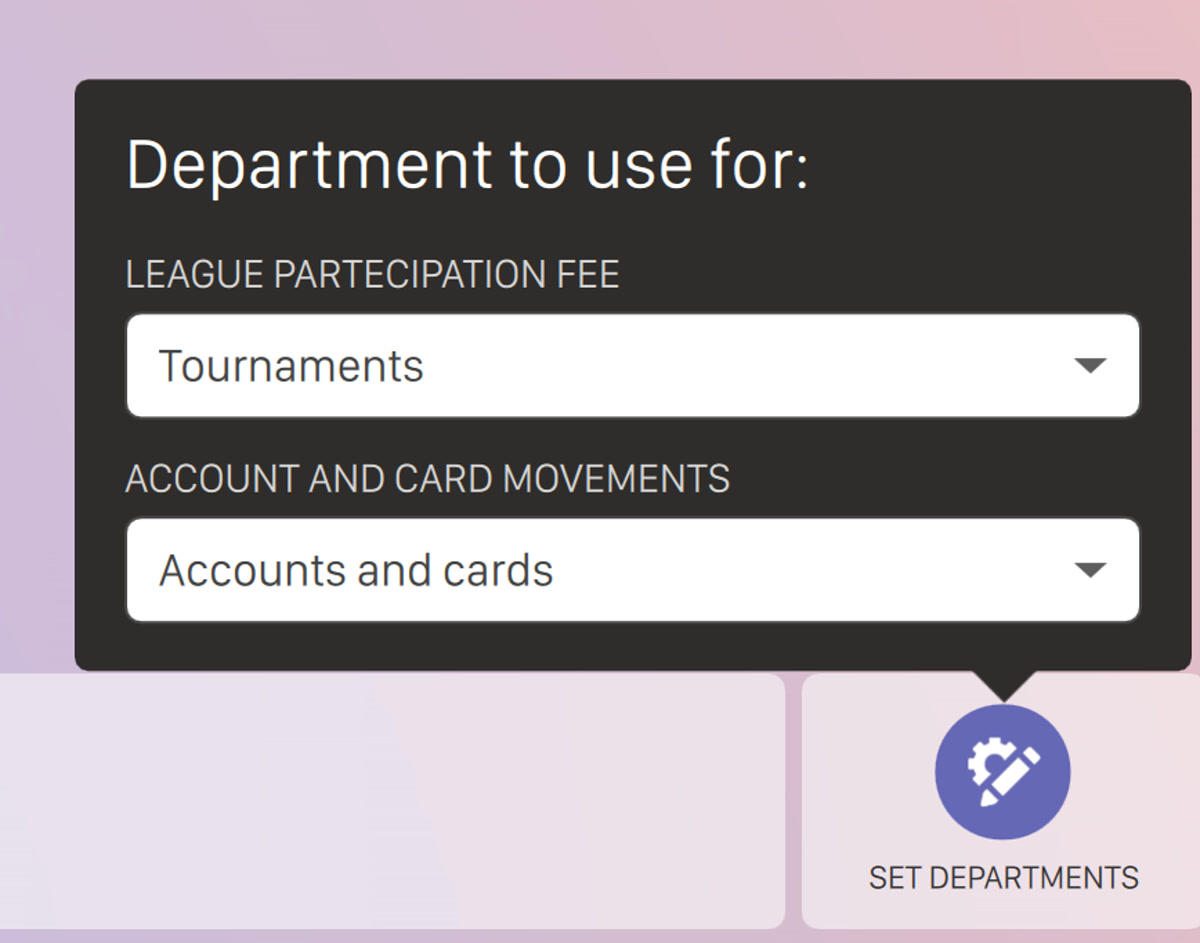
This action allows you to select which department must be used based on the specific software feature:
-
League partecipation fee: select which department must be used when collecting the league partecipation fees
-
Account and card movements: select which department must be used for account and card movements.
17.9.1 Department categories
At the bottom left of the screen you will find a button called Modify categories. This action will take you to the categories management page.
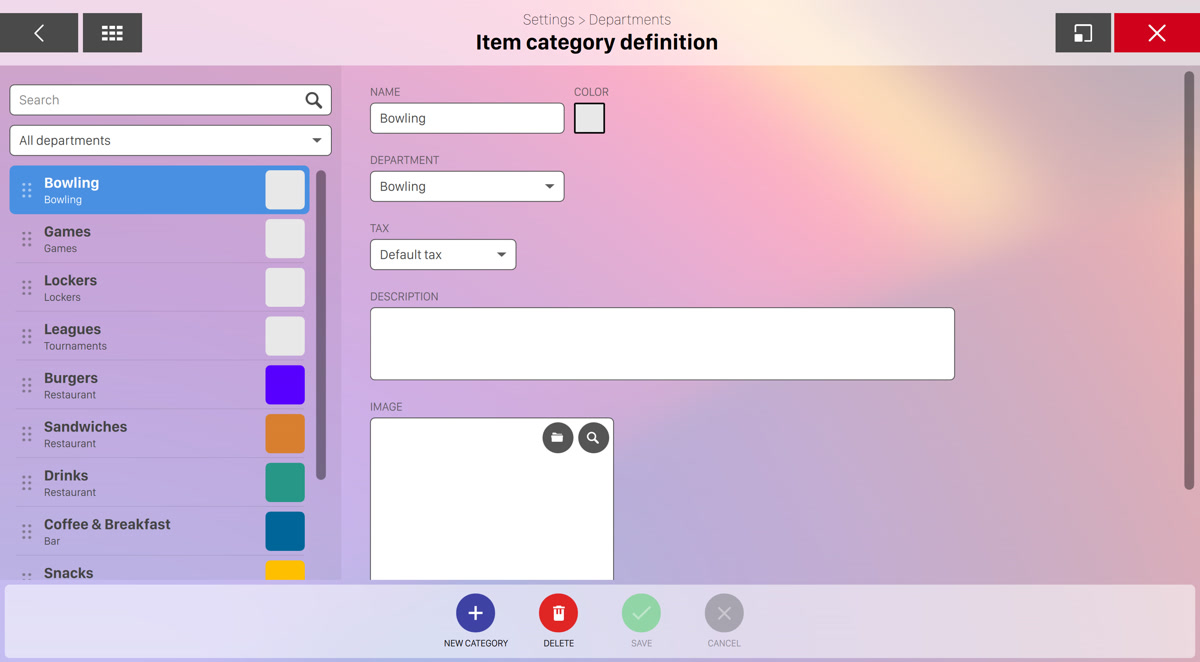
You can see the list of already defined categories on the left sidebar while on the central area you will see the form for creating or updating a category. If you want to create a new category then click the new category button located at the bottom.
For each department category you can choose:s
-
Name: indicates the name of the category
-
Color: choose the category color from a preset
-
Department: select the reference department
-
Tax: select the related tax from the list of existing taxes
-
Description: set the description of the category
-
Image: choose an image that represents the department category
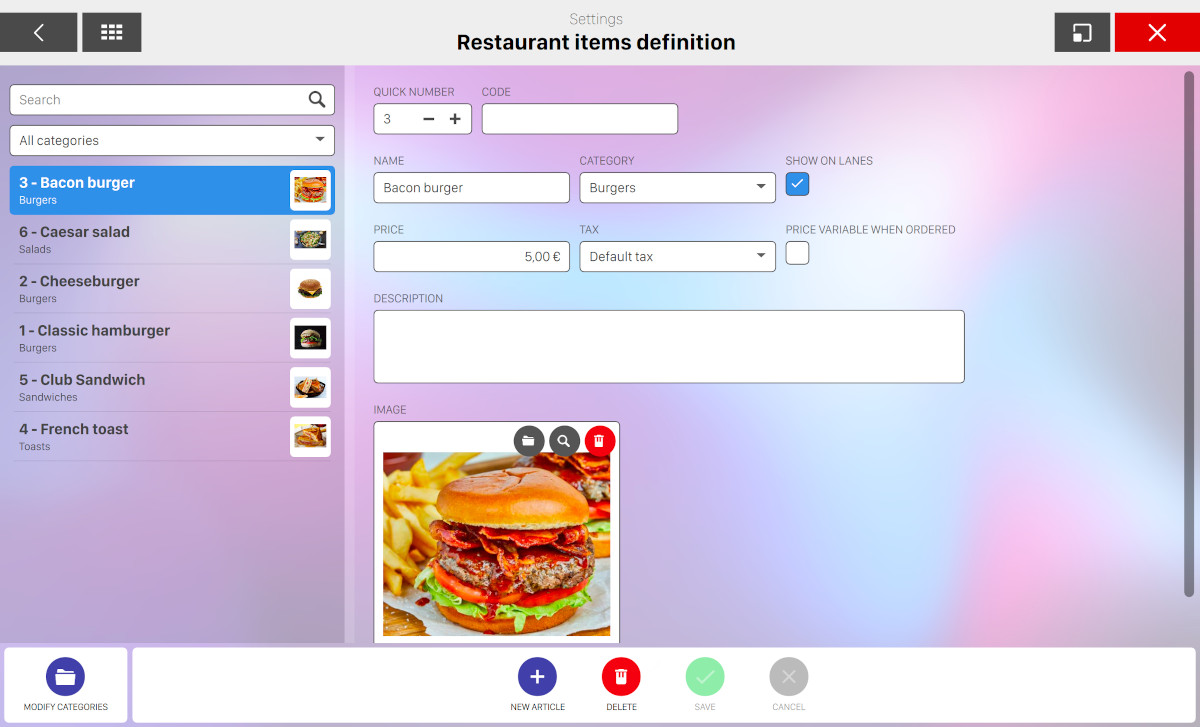
17.10 Bar Items Definition
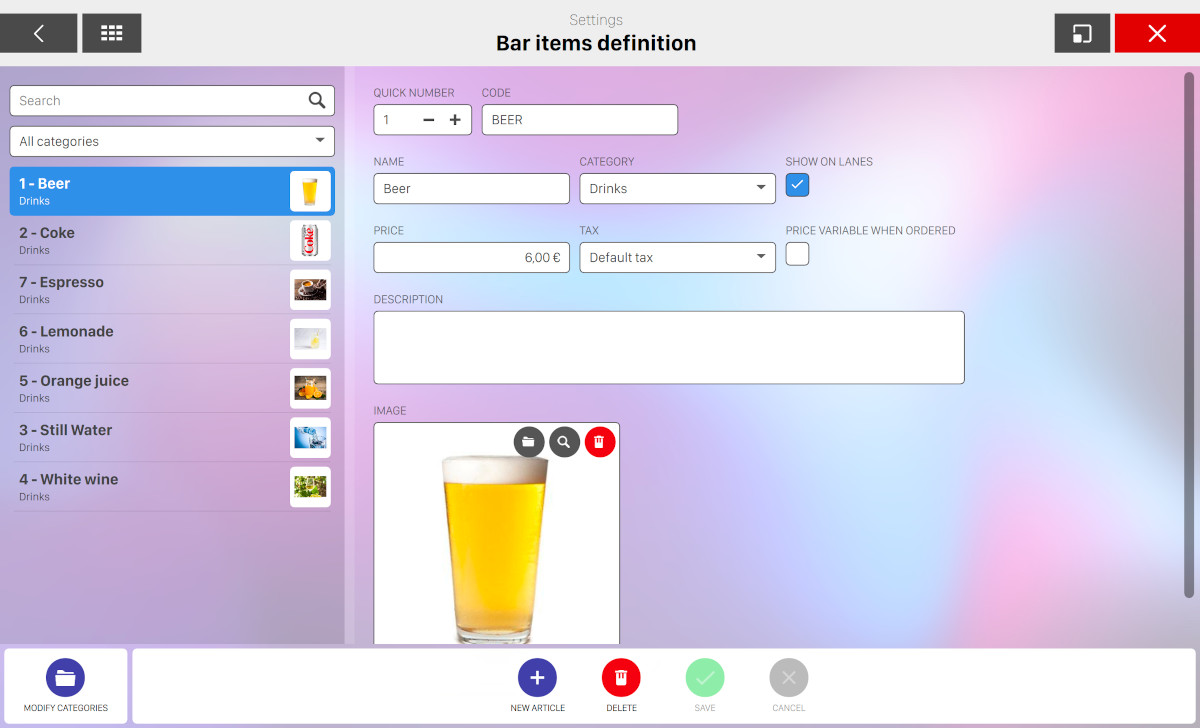
Bar items can be created from this window. On the left side you can see the list of items while on the right you can see the details of the selected item from the list. Items are organized in categories and at least one category is required on the system. To manage bar items categories see Bar items categories section.
On the left side you can also filter the list by entering the item name or by selecting a category: enter some text on the text field or toggle the category dropdown and select an option to filter the list.
On the right section you can see the details of the item you selected from the list and allows you to update it:
-
Quick number: the unique number of the item. This field can be used in a later stage to quick access the element. Click on the ‘plus’ or ‘minus’ icons to increase or decrease the number
-
Code: indicates the product SKU of the item
-
Name: indicates the name of the product
-
Category: indicates the category the product belongs to
-
Show on lanes: indicates that the menu item can be shown on the lanes when the order is placed. When the ‘price variable with order’ option is active the item will not be shown on the lanes’ monitors
-
Price: indicates the cost of the product related to the current system currency
-
Tax: allows you to specify the applicable tax choosing it from the list of defined taxes
-
Price variable when ordered: this option allows the cashier to specify a price for a product while writing the order. This is a useful feature since it allows you to price products not listed in the menu and can also be used for refunds. Refunds can be made by entering a minus before the price and must be justified by an explanation that will be memorized and included in reports
-
Description: indicates additional information on the product that will be visible to the operator
-
Image: by clicking on the image box you will be redirected to the Media Browser window, where you can select an image for the current item
At the bottom of the window you can find some actions that you can perform:
-
Modify categories: redirects you to the Bar items categories definition window
-
New article: creates a new item
-
Delete: deletes the selected item
-
Save: saves the current changes
-
Cancel: discard the current changes and restores the previous data
17.10.1 Bar Items Category Definition
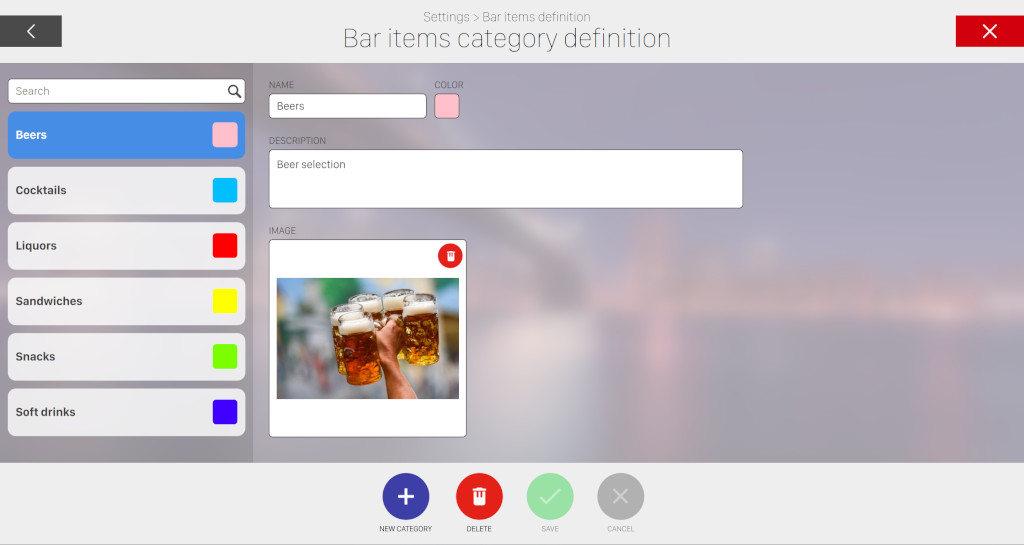
This window allows you to manage bar items categories by creating, updating or deleting categories. On the left side of the window you can see and select any of the existing categories. On the right side you can see/edit the details of the selected category. Each category has the following fields:
-
Name: the name of the category
-
Color: the color used to identify the category. You can choose the color from a preset
-
Description: additional information on the category
-
Image: by clicking on the image box you will be redirected to the Media Browser window, where you can select an image for the current category
At the bottom of the window you can find some actions:
-
New category: creates a new group of items
-
Delete: deletes the selected category and all the related bar items
-
Save: saves the current changes
-
Cancel: discard the current changes and restores the previous data
17.11 Restaurant Items Definition
Restaurant items can be created from this window. On the left side you can find and select all the restaurant items while on the right you can see/edit the details of the selected item. Items are organized in categories. You need at least one category if you want to create restaurant items. To create categories, see Restaurant items categories definition section
On the left side you can also filter the list by entering the item name or by selecting a category: enter some text on the text field or toggle the category dropdown and select an option to filter the list.
For each restaurant item you have to set:
-
Quick number: this is a unique number that identify the item. It can be used in a later stage to quick access the element
-
Code: it represents the product SKU of the item
-
Name: indicates the product name
-
Category: indicates the category the product belong to
-
Show on lanes: indicates that the item can be shown on the lane’s monitor when the order is placed. When the ‘PRICE VARIABLE WITH ORDER‘ option is active the item will not be shown on the lanes’ monitors
-
Price: indicates the price of the product
-
Tax: allows you to specify the applicable tax for the product
-
Price variable when ordered: this option allows the cashier to specify a price for a product while writing the order. This is a useful feature since it allows you to price products not listed in the menu and can also be used for refunds. Refunds can be made by entering a minus before the price and must be justified by an explanation that will be memorized and included in reports
-
Description: indicates additional information on the product
-
Image: by clicking on the image box you will be redirected to the Media Browser window, where you can select an image for the current item
At the bottom side of the screen you can find some actions:
-
Modify categories: takes to the Restaurant categories definition window
-
New article: creates a new item
-
Delete: deletes the selected item
-
Save: saves the current changes
-
Cancel: discards the current changes and restores the previous data
17.11.1 Restaurant Items Categories Definition
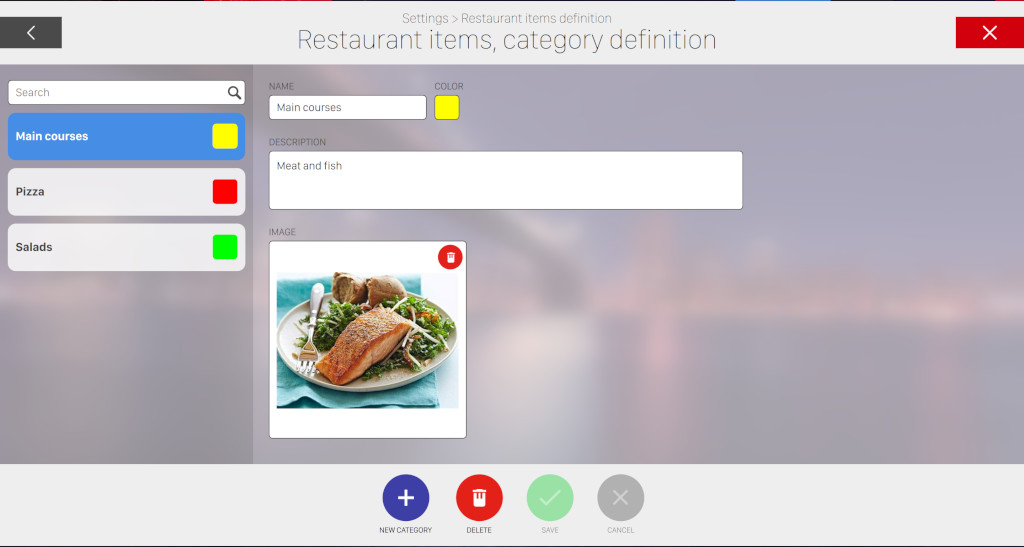
This window allows you to manage restaurant items categories by creating, updating or deleting categories. On the left side of the window you can see and select any of the existing categories. On the right side you can see/edit the details of the selected category. Each category has the following fields:
-
Name: the name of the category
-
Color: the color used to identify items that belong to the selected category
-
Description: additional information on the category
-
Image: by clicking on the image box you will be redirected to the Media Browser window, where you can select an image for the current category
At the bottom side of the screen you can find some actions:
-
New category: creates a new category
-
Delete: removes the selected category
-
Save: saves the current changes
-
Cancel: discard the current changes and restores the previous data
17.12 Other Items Definition
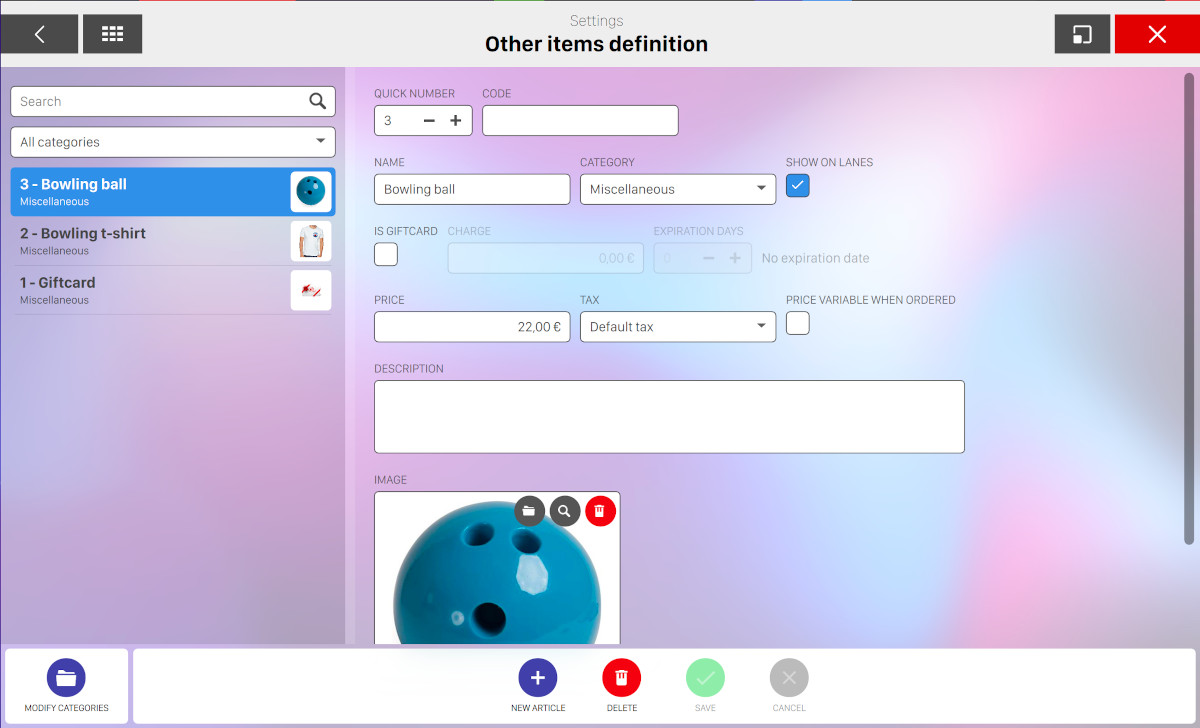
General merchandise for sale can be created in this window. The window has two sections. The left section shows the items created, the right section shows the information of the selected item. Items are organized in categories and if there are no categories it is necessary to create at least one before any item can be entered into the system. To create categories, see Other items categories definition section.
On the left side you can also filter the list by entering the item name or by selecting a category: enter some text on the text field or toggle the category dropdown and select an option to filter the list.
On the right section you can see/edit all the details of a selected item:
-
Quick number: this is a unique number that identify the item. It can be used in a later stage to quick access the element
-
Code: it represents the product SKU of the item
-
Name: indicates the product name
-
Category: indicates the category the product belong to
-
Show on lanes: indicates that the item can be shown on the lane’s monitor when the order is placed. When the ‘PRICE VARIABLE WITH ORDER‘ option is active the item will not be shown on the lanes’ monitors
-
Is giftcard: set the current article as giftcard. These items can be sold, binded to a card and used again later as a payment method
-
Charge: set the amount of credit of the giftcard
-
Expiration days: allows you to set an expiration to the giftcard by setting the days you want the giftcard to last
-
Price: indicates the price of the product
-
Tax: allows you to specify the applicable tax for the product
-
Price variable when ordered: this option allows the cashier to specify a price for a product while writing the order. This is a useful feature since it allows you to price products not listed in the menu and can also be used for refunds. Refunds can be made by entering a minus before the price and must be justified by an explanation that will be memorized and included in reports
-
Description: indicates additional information on the product
-
Image: by clicking on the image box you will be redirected to the Media Browser window, where you can select an image for the current item
At the bottom of the window you can find some actions:
-
Modify categories: takes to the Other Items Categories Definition window
-
New article: creates a new item
-
Delete: deletes the selected item
-
Save: saves the current changes
-
Cancel: discards the current changes and restores the previous data
17.12.1 Generic Items Categories Definition
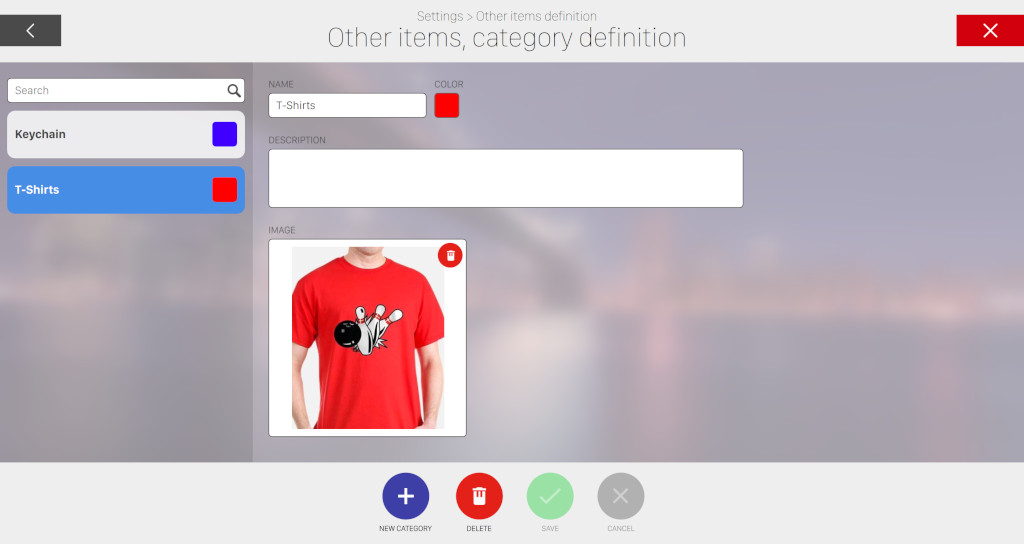
This window allows you to manage generic items categories by creating, updating or deleting categories. On the left side of the window you can see and select any of the existing categories. On the right side you can see/edit the details of the selected category. Each category has the following fields:
-
Name: the name of the category
-
Color: the color used to identify items that belong to the selected category
-
Description: additional information on the category
-
Image: by clicking on the image box you will be redirected to the Media Browser window, where you can select an image for the current category
At the bottom side of the screen you can find some actions:
-
New category: creates a new category
-
Delete: removes the selected category
-
Save: saves the current changes
-
Cancel: discard the current changes and restores the previous data
17.13 Purchase Package Definition
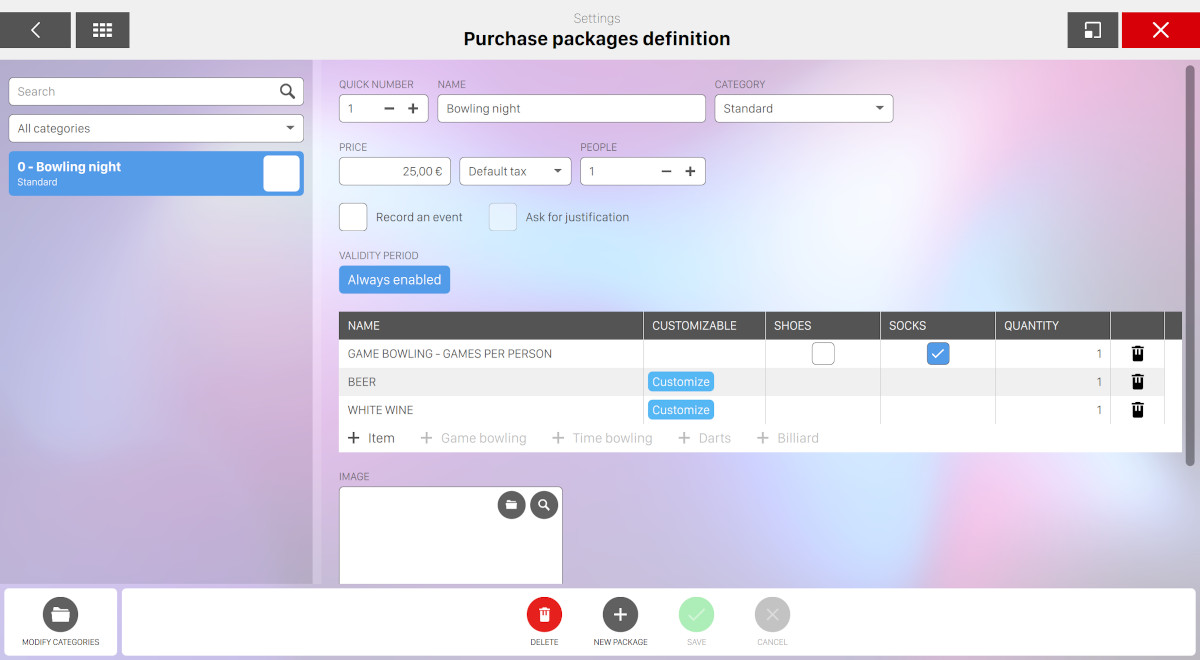
This window allows you to define a package. A Package can include bowling games, time games and bar, restaurant and other items. The packages already created can be seen on the left side of the window. Click on any package to view its detauls on the central area or modify its data. The central area of the window provides the information related to the selected package and allows you to update its configuration. Packages are organized in categories. If there is no category yet it is mandatory to create at least one before any package can be entered into the system. To create categories see Purchase Package Categories Definition section.
From the list on the left sidebar you can filter the packages by using the filters on top:
-
Search field can be used as a filter to search a package by entering some arbitrary text
-
Category combobox can be used to show packages that belong to the select category. ‘All categories’ option is also available
When you select a package from the list, the central section shows the details of the selected Package:
-
Quick number: allows you to edit the unique id number of the package. This number can be used in a later stage to quick access the package
-
Name: name of the package
-
Category: the category the package belong to
-
Price: the total cost of the package
-
Tax: allows you to specify a tax that will be applied to the package
-
People: this option allows the cashier to specify how many people can buy/use the package
-
Record an event: if this option is checked when a package is sold an event will be recorded. This is useful to take track of all the packages sold
-
Ask for justification: this function allows you to have a written reason for the packages sold. This option is available only if ‘Record an event’ is checked
-
Validity period: sets the time shift when the packages are available

Select the week days and the time shifts to set the Package availability
-
A table containing the items of the package. You can add an article, a game bowling, a time bowling or a time game category. For each element you can find the following columns:
-
The name of the item
-
Whether the item is customizable or not. In case a customizable item has been selected it allows you to setup the compatible items
From this window you can decide if the selected article can be compatible with other items’ categories, which means that when the current package is selected you can decide to replace the current item with another item from the selected article category. Check the option include compatible items to allow the item to be compatible with others.
-
Fill the maximum price field to allow replacement only with articles with a cost up to the provided value
-
Categories: a brief summary of all the selected categories separated by comma
-
See all the defined article categories with their department and check them to set the compatibility
-
Click on show compatible items to see all the articles that are compatible with the selected item
-
-
Include socks and Include shoes for bowling games, to include or not socks or shoes for the game
-
In case of items you can choose to include compatible items. In this case when a players buys a package can choose to change the item with some compatible items. In order to choose the compatible items you can:
-
The quantity of games or items
-
Click on the trash icon to remove the row
-
-
Image: by clicking on the image box, it allows you to select an image for the package from the internet. You can also search for a file from the local library.
At the bottom of the screen some actions are available:
-
Delete: deletes the selected package
-
New package: creates a new package
-
Save: saves the current changes
-
Cancel: discards the current changes and restores previous data
17.13.1 Package Categories Definition
This window allows you to organize packages into groups. In case of categories it is necessary to create at least one before any package can be entered into the system. The following information can be attributed to each group:
-
Name: the name of the category
-
Description: additional information about the packages group
-
Color: the color used to identify packages in the group
-
Tax: the default tax applied to packages that belong to the category
At the bottom of the screen some actions are available:
-
Delete: deletes the selected category
-
New category: creates a new category
-
Save: saves the current changes
-
Cancel: discards the current changes and restores the previous data
17.14 Lockers definition
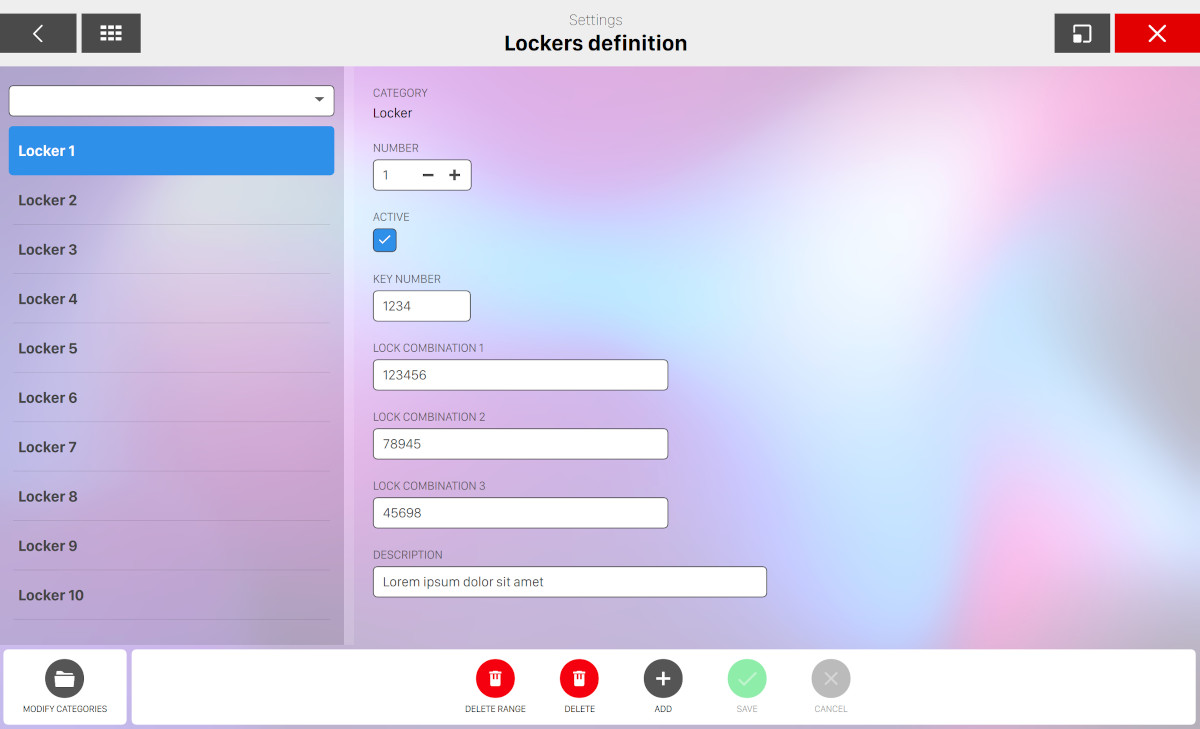
From this section you can define the lockers and the of your bowling center. If no category is defined you will be asked to create at least one before proceeding with the creation of one or more lockers.
The window is splitted into two main sides:
-
On the left sidebar you can see and select the defined lockers
-
On the central side you can customize the locker definition
On the left sidebar you can filter the list of lockers by selecting one specific category from the dropdown menu. Select the locker you want to modify and the central side of the window will be filled with its data:
-
Category: indicates the category the locker belongs to. This is not modifiable after the creation of the locker
-
Number: indicates the locker number. When you update this value you must check whether the provided number is not already in use by another locker of the same category
-
Active: indicates whether the locker is active or not. If a locker is not active then it is considered out of service
-
Key number: indicates the number of the key used for the locker
-
Lock combination (1,2,3): indicates the three optional lock combinations
-
Description: represents an additional description of the locker
At the bottom area of the window you can find a list of buttons:
-
Delete range: click this button and a popup will appear

-
Category: select a locker category from the dropdown menu
-
Delete lockers from: select the start number of the locker range to be deleted
-
To: select the last number of the locker range to be deleted
Press Delete to confirm the operation or Cancel to cancel it and close the popup
-
-
Delete: removes a single locker. A confirmation message will appear before proceeding. Note that you can not remove a locker which is in use
-
Add: open a new popup with the locker addition configuration:
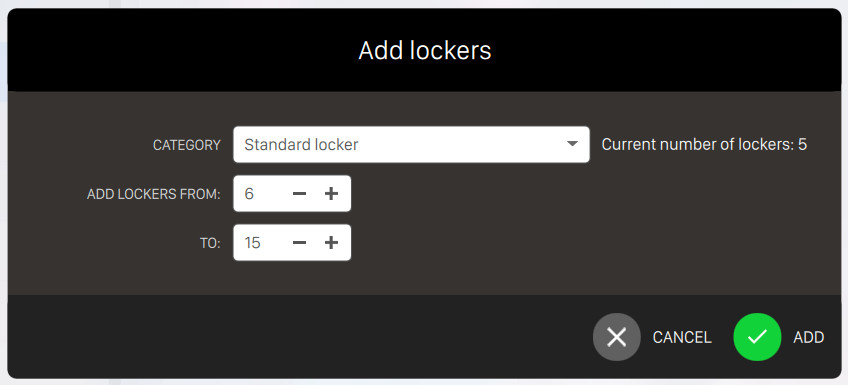
-
Category: select a locker category from the dropdown menu
-
Add lockers from: select the start number of the locker range to be added
-
To: select the end number of the locker range to be added
-
-
Save: save the current changes
-
Cancel: discard the current changes
17.14.1 Locker category definition
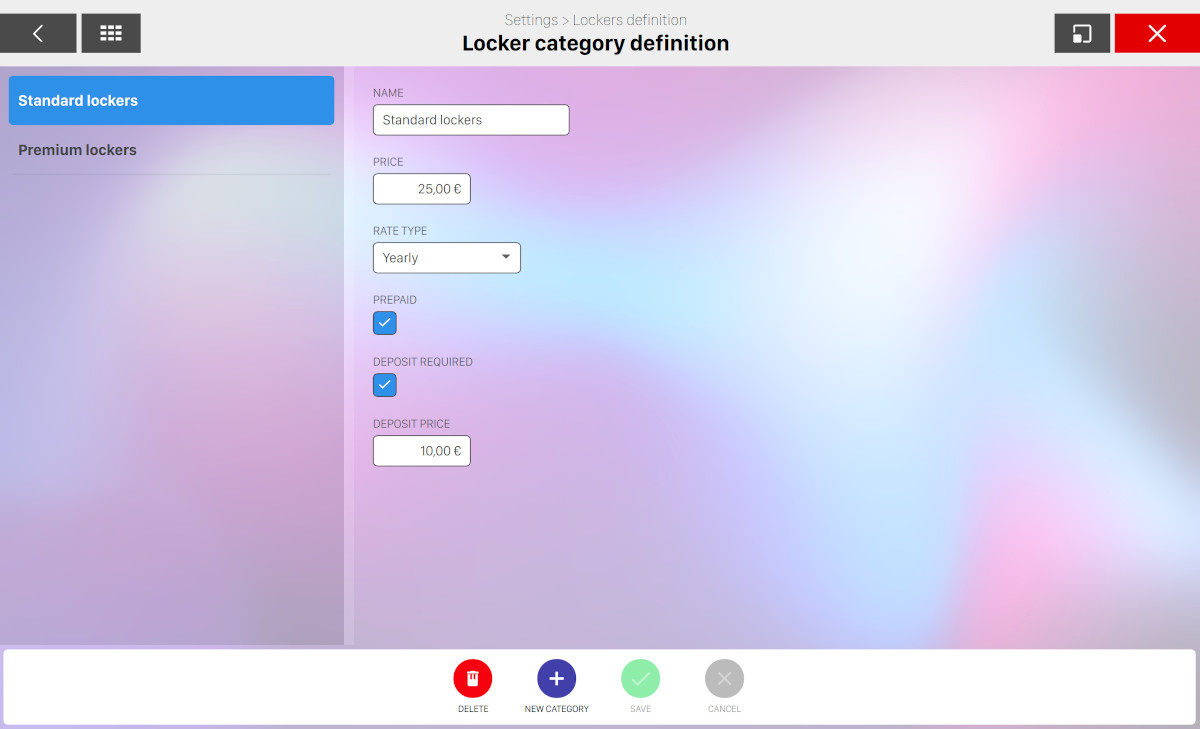
From this window you can define the locker categories of your bowling center. On the left side you can find the list of locker categories that have been already created. On the central side you can find the configuration of the selected locker category:
-
Name: represents the name of the locker category
-
Price: represents the price of the locker category
-
Rate type: represents the rate type:
-
Daily
-
Monthly
-
Yearly
-
-
Prepaid: indicates whether the locker category is prepaid by default
-
Deposit required: indicates whether the deposit of the locker is required
-
Deposit price: indicates the price of the deposit
On the bottom area of the window you can find a list of buttons:
-
Delete: remove the selected locker. Note that if you proceed with this action then all the lockers that belong to the deleted category will be removed. Note also that if one ore more lockers of the selected category are in use then it is not possible to remove the category
-
New category: allows the creation of a new locker category
-
Save: save the current changes
-
Cancel: discard the current changes
17.15 Tables
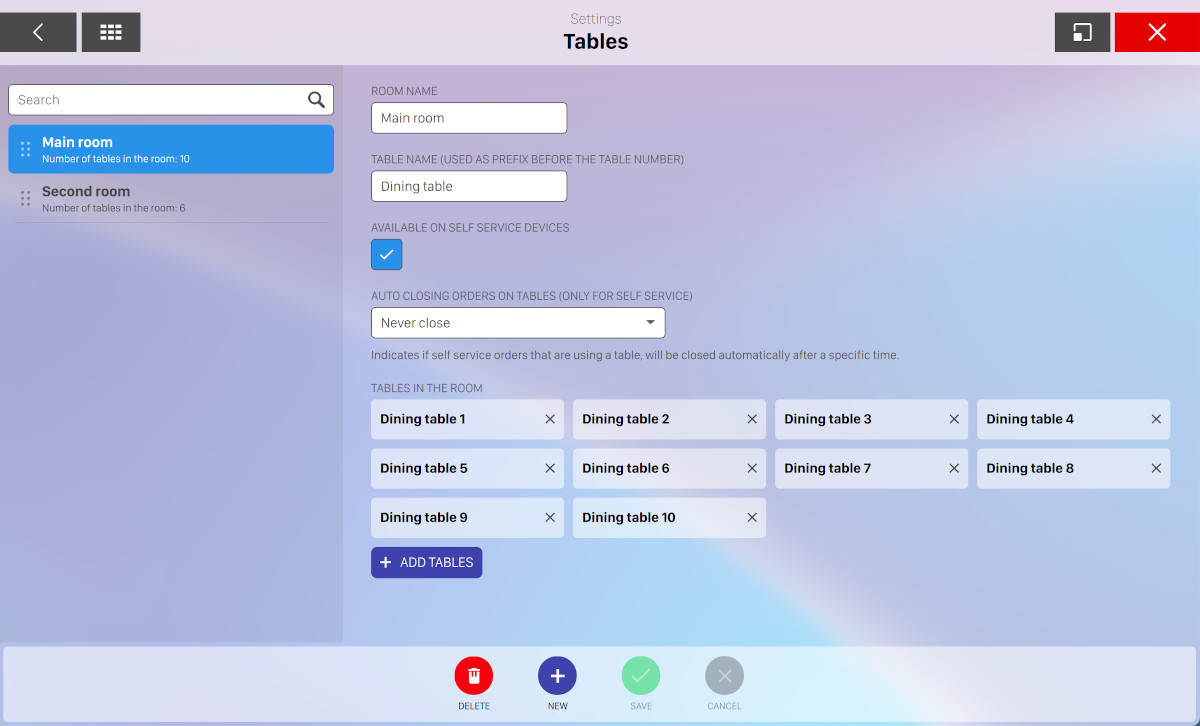
From this section you can define the rooms and the tables of your restaurant/bar department. This section is very helpful for setting a destination of food/beverage orders, that can be either made directly from the Order management page or from the Smart Bowl Kiosk platform.
On the left sidebar you can see and filter the list of rooms that have been already created while on the right side it is possible to see/update the details.
Click on the new icon to create a new room or click the delete icon to remove the selected one.
-
Room name: set the name of the room
-
Table name: set the prefix of tables on the current room that will be displayed before the table number
-
Available on self service: check this option to make the tables on the selected room available for orders made from the Smart Bowl Kiosk
-
Auto closing orders on table: this option is available only for self service and it indicates the amount of minutes after that the table will automatically close
-
Never close
-
Close after 5 minutes
-
Close after 10 minutes
-
Close after 15 minutes
-
Close after 30 minutes
-
Close after 60 minutes
-
Close after 120 minutes
-
Close after 240 minutes
-
-
Add tables: click on this button to add or edit the sequence of tables on the current room
Click on the save button to confirm the current changes or click on the Cancel button to discard them.
17.16 Smart Bowl Cloud settings
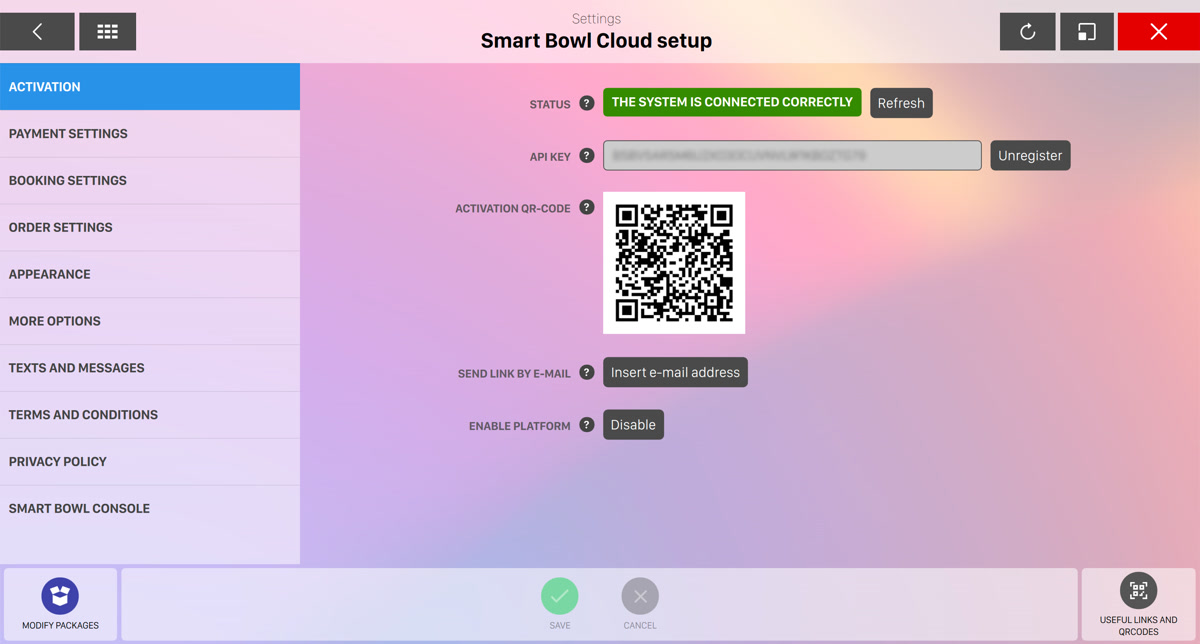
This section allows you to configure all the settings of the Smart Bowl Cloud platform, which allows your customers to interact with your bowling center through web services, such as:
-
The Smart Bowl Kiosk platform, which allows your customers to create new games or make reservations from the kiosk stations or from their smartphones
-
The Smart Bowl Console, which allows your customer to control their game and use the console features directly from their smartphones
17.16.1 Activation
In order to use the cloud features of the Genie software you must first register your account. From this section it is possible to enter your api key and enable the cloud services.
-
Status: this field indicates the current status of your integration. Click on the refresh button to make an instant check
-
Api key: enter the Api Key that you have generated on the the billing platform and click on the register button to bind it to your bowling center. You can also click on the unregister button to remove the binding and release the api key. Note that by unregistering the api key the smart bowl cloud features will be disabled
-
Activation qr-code: scan the qr-code with your smartphone to access to the billing platform. From there you will be able to create a new account and register an api key
-
Send link by email: by clicking this button you will be asked to enter your email and you will receive a message containing the instructions to register to the billing platform
-
Enable platform: this button allows you to enable or disable the smart bowl cloud features
17.16.2 Payment settings

From this section it is possible to set all the options related to payments.
-
Enable payment at front desk: if enabled, it will be possible to pay a session made on the Kiosk from the Front desk
-
Choose payment provider: choose which one of the configured payment services must be used to make payments on the Kiosk platform
-
Enable tip on kiosk: if enabled, it will be possible add tips to a Kiosk session
-
Print payment ticket on kiosk: choose whether to print payment tickets on the Kiosk in-built printer
-
Ask for ticket print: ask the customer if they want to print their payment receipt
-
Apply service fee: check this option if you want to apply a service fee to the transactions made with the cloud services. This fee is meant to charge the customer an additional fee to cover the expenses of the utilization of the Smart Bowl Cloud platform. You can charge a fix amount plus a percentage, as well as the cost of SMS notifications
-
Service fee name: enter the name of the service fee that will be shown in the receipt
-
Service fee fixed amount: enter the service fee fixed amount that will be charged to customers. Leave zero if you dont’t want to charge the customer
-
Service fee percentage: enter the service fee percentage. Leave zero if you dont’t want to charge the customer
-
SMS fee amount: enter the fee amount that the customer will pay for each SMS notification
17.16.3 Booking settings
Play now settings
-
Enable play now: check this option to enable the play now feature on the Smart Bowl Kiosk platform
-
Reservation delay (in minutes): indicates the minimum time in minutes between the start of use of the kiosk and the start time of the reservation, normally 15 minutes. This time must take into account that the user must complete the configuration and must be able to complete the payment.
-
Maximum time to play (in minutes): indicates the maximum time in which a reservation must start with the play now function. If the bowling is full and there are many reservations waiting, this value will allow the customer to be offered a later reservation even if they are using the play now function. If no slot is found in this time range, the software will tell the customer that it is not possible to play now
-
Personal information required: if checked, customers will be asked to enter their personal information in order to create a new session or reservation from the Smart Bowl Kiosk platform. Personal information include first name, last name, email and phone number
Play later settings
-
Enable play now: check this option to enable the play later feature on the Smart Bowl Kiosk platform
-
Rounding starting reservations (in minutes): indicates the rounding in minutes of starting reservations, usually 30 minutes. This value allows you to start reservations at regular intervals
-
Minimum hours in advance for reservations: indicates the minimum time (in hours) within which a customer can make a reservation. For example, if the set value is 24, the customer will be able to book starting from the current time of the following day
-
Maximum days in advance for reservations: indicates the maximum time (in days) allowed for customers to make a reservation in the future. For example, if the set value is 60, the customer will be able to book a maximum of 2 months in advance
Other parameters
-
Maximum time to pay a reservation at front desk (in minutes): if the customer chooses to pay at the front desk, the software allows to complete the payment within a specific time, otherwise the reservation will be cancelled. Since each reservation takes up a slot, this automatic behaviour is important to keep only reservations confirmed by the payment
-
Maximum time to pay an order at front desk (in minutes): similary to the reservations, specifies the amount of time allowed for the customer to pay an order at the front desk
-
Kiosk packages: packages define the booking options that are displayed on the kiosk. For each package it is possibile to define rates, timetables, availability and many other features
-
Validity period: defines the period of validity, i.e. the hours of the week in which the system will allow bookings to be accepted. This settings will be crossed with the weekly opening hours set in the holiday section
-
Lanes usable for reservations: indicates which lanes can be used for reservations made by the kiosk
-
Allow to cancel the reservation: indicates whether and how the user is allowed to cancel the reservation made
-
Enable SMS notifications: if checked, customers will be notified via SMS about their reservations or orders made from the kiosk
-
Enable reservation check-in: if checked customers will have to check-in their reservation on the kiosk before the game starts. This can be done using the reservation code or by scanning the qr code provided on the email. This option is recommended when using packages reserved by game.
-
Maximum delay for check-in (in minutes): determines the time after the start of the reservation when the customer is still allowed to check-in. When this time is elapsed, the reservation must be started immediately
17.16.4 Order settings
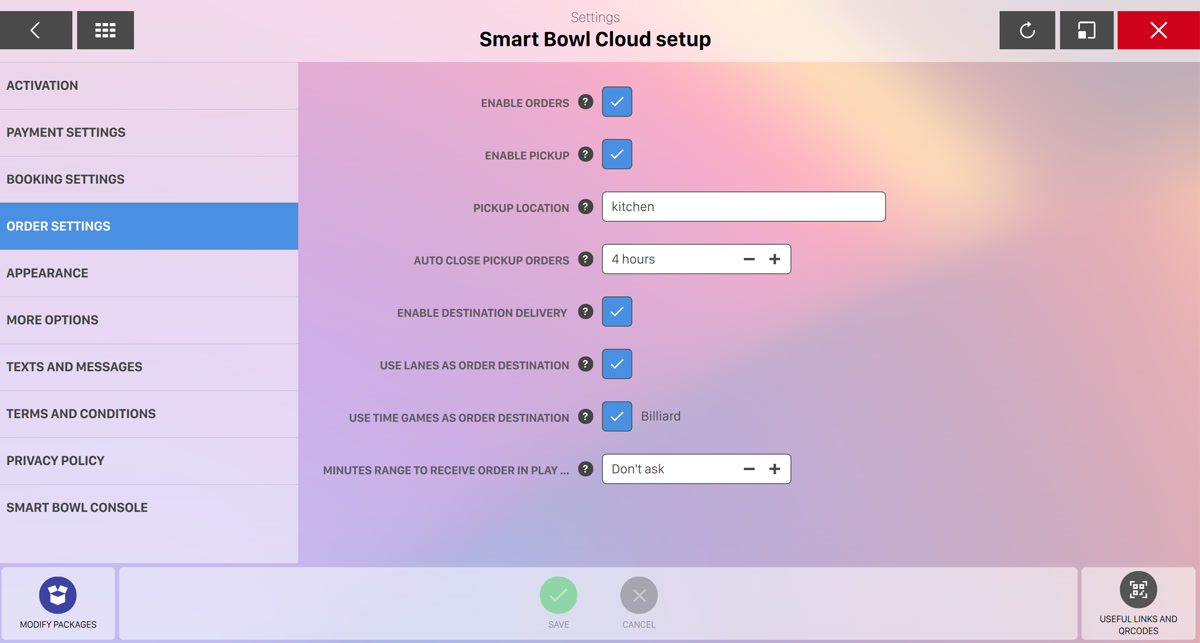
From this section you can customize all the options related to orders made on the Smart Bowl Kiosk platform.
-
Enable orders: enable the feature for ordering food on the kiosk
-
Enable pickup: allow the users to order their food on the kiosk and pick it up by themselves
-
Pickup location: indicates the name of the location that will be used for picking up orders
-
Auto close pickup orders: indicates after how long to close prepaid orders not assigned to specific destinations
-
Enable destination delivery: users can order their food on the kiosk and choose to have it delivered at the destination they have selected
-
Use lanes as order destination: allows customers to have their food and drinks brought to the bowling lanes
-
Use time games as order destination: allows customers to have their food and drinks brought to the time games
-
Minutes range to receive order in play now: when booking a game to play now, if the reserved start time is after the number of minutes specified from now, ask the user if he prefers to receive his food order immediately or later at the lane or game
17.16.5 Appearance
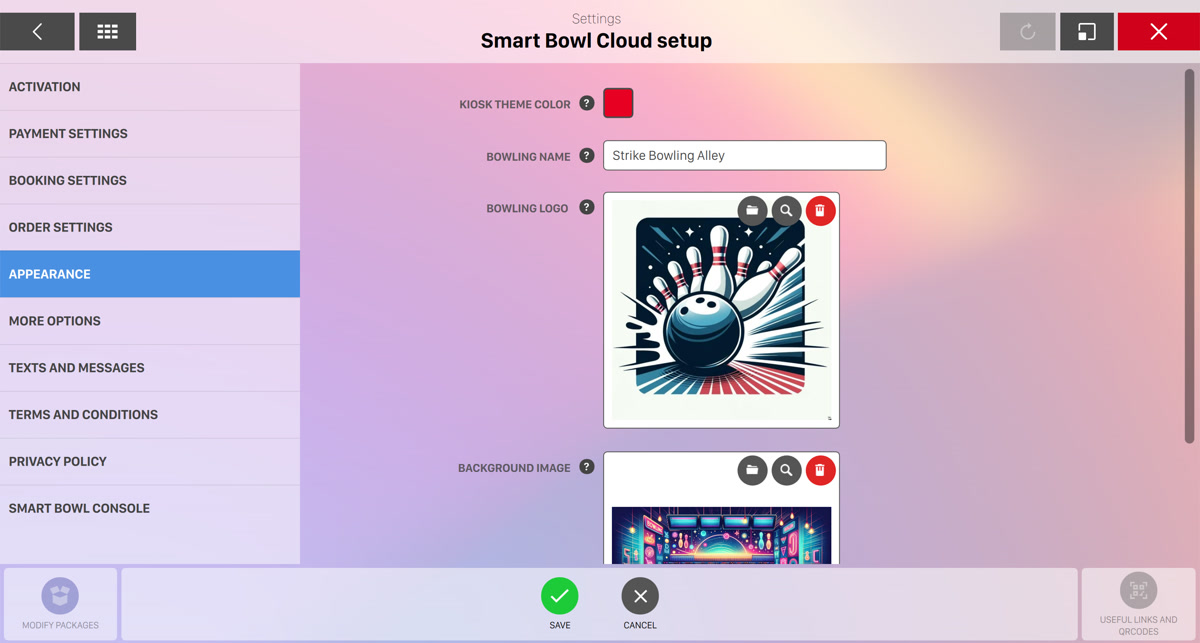
From this section it is possible to customize the appearance of the Smart Bowl Kiosk platform. These settings will be applied both to the kiosk and smartphone applications.
-
Kiosk theme color: set the primary color of the theme used on the interface of the kiosk and webapp
-
Bowling name: set the name of the bowling that will be displayed
-
Bowling logo: set the bowling logo that will be displayed on kiosks. The logo will be displayed on a white background and should be squared
-
Background image: set the image used as background for the kiosk interface. The image will be covered by the chosen theme color in transparency
-
Screen saver delay: set the amount of time after which the kiosk screen saver appears on the kiosk or disable it by choosign the "Never" option.
-
Use bowling logo on screen saver: decide whether to show the Bowling logo when the screen saver appears.
17.16.6 More options
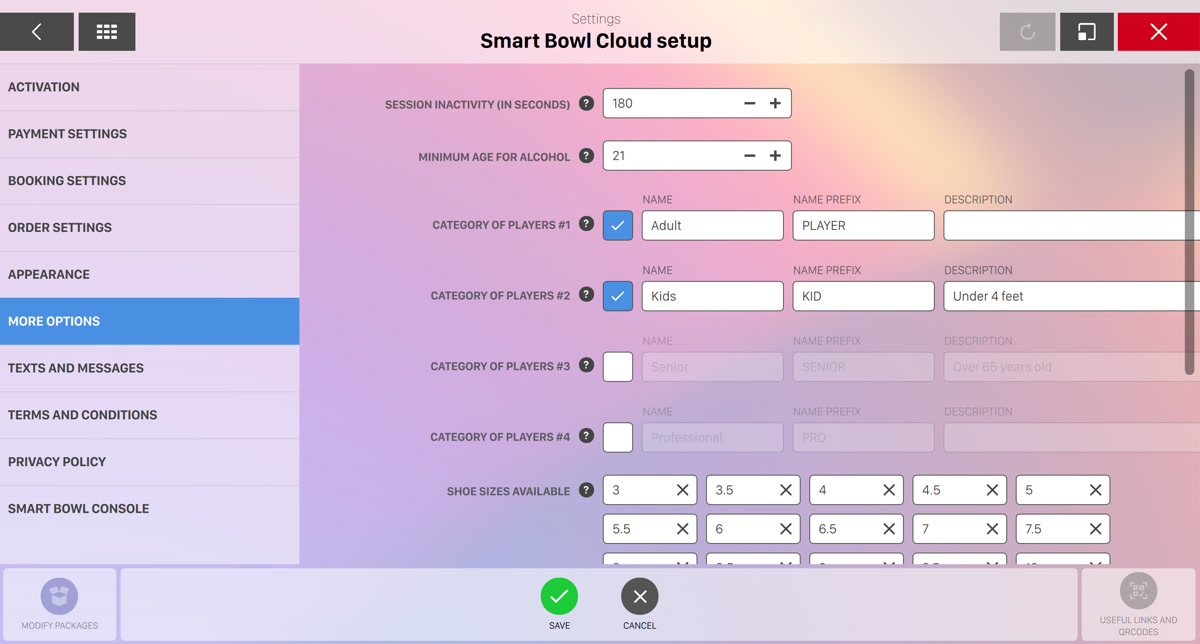
-
Session inactivity (in seconds): set the maximum time in seconds of inactivity by the user after which the reservation will be cancelled
-
Minimum age for alcohol: indicates the minimum age required to order alcoholic items
-
Category of players: defines the characteristics of a category of players. The categories of players are useful to differentiate the rates to be used. For each category it is possible to indicate:
-
Name, that appears on the Kiosk (e.g. Kids)
-
Description, useful for the customer to understand if he falls into this category (e.g. under 12 years old)
-
Name prefix, used by the software to create default player names (e.g. KID)
-
Active, enable or disable the category of players on the kiosk. Please note that at least one category must be active
-
-
Shoe sizes available: indicates the shoe sizes that players will be able to select on the kiosk
-
Use qrcode for console orders: indicates whether to display a QRCode instead of the classic ordering interface on bowler consoles. Once the QRCode has been scanned, the player will be able to buy food and drinks directly from their phone and can also make the payments
-
Send email for feedback: indicates whether to send an email to the customer after the activity is concluded
-
Feedback email wait time (in hours): indicates how many hours after the activity is concluded need to pass to send the feedback email
-
Hours from last feedback: if a feedback email has been sent to an email address, specifies the minimum time that needs to pass before sending another feedback to that address
17.16.7 Texts and messages
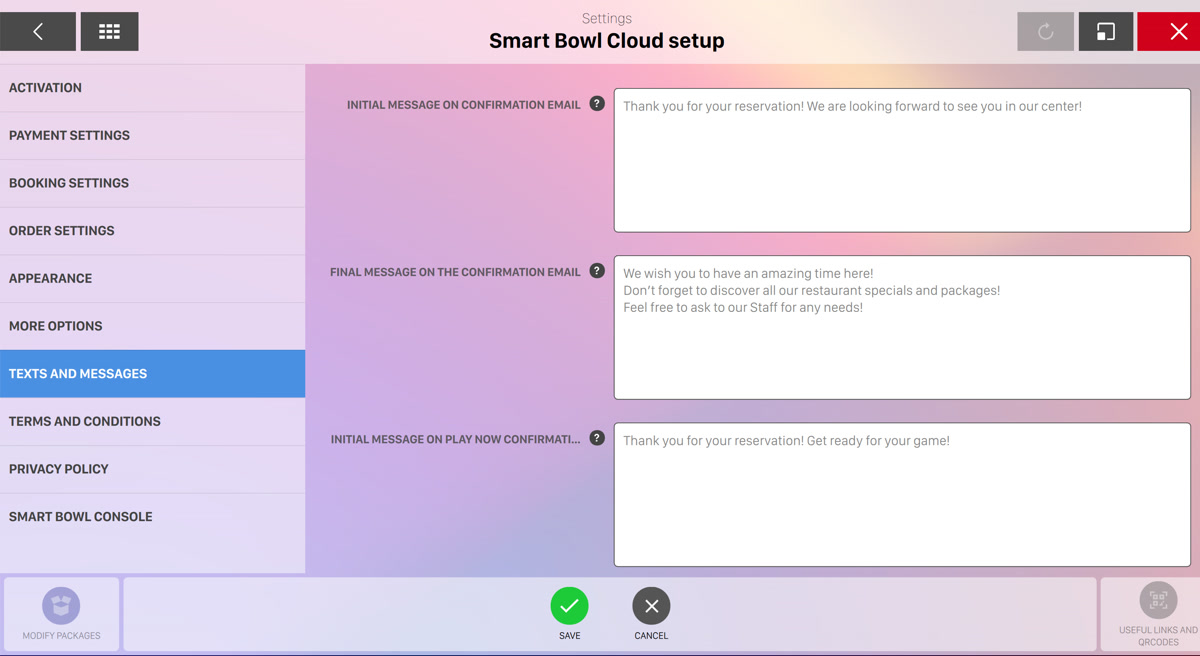
This sections allows you to define all the communication to the final customers that will be displayed on the Smart Bowl Kiosk platform.
The text supports formatting based on the Markdown standard, you can find documentation at markdownguide.org. It is possible to use the following variables which will be with the relative values set in the Bowling Information section.
-
{BUSINESS_NAME}: the business name of the bowling center -
{COUNTRY}: the country of the bowling center -
{CITY}: the city of the bowling center -
{ADDRESS}: the address of the bowling center -
{ZIP_CODE}: the zip code of the bowling center -
{STATE}: the state of the bowling center -
{EMAIL}: the email address of the bowling center -
{PHONENUMBER}: the phone number of the bowling center -
{MOBILEPHONENUMBER}: the mobile phone number of the bowling center
For each configuration a default value is provided. You can override the default value with your custom text/message and you can restore it to the default value at any time by clicking the default button next to the textarea.
-
Initial message on confirmation email: this message will be shown at the beginning of the booking confirmation email
-
Final message on the confirmation email: this message will be shown at the end of the booking confirmation email
-
Initial message on play now confirmation email: this message will be shown at the beginning od the play now game confirmation email
-
Initial message on order email: this message will be shown at the beginning of the order confirmation email
-
Final message on the order confirmation email: this message will be shown at the end of the order confirmation email
-
Initial message on account activation email: this message will be shown at the beginning of the account activation email
-
Final message on the account activation email: this message will be shown at the end of the account activation email
-
Reservation SMS notification message: set the notification text message that will be sent to the customer who created a reservation from the kiosk stations when the reservation is ready to start
-
Facebook page: if set, it will be displayed in the footer of emails sent to customers
-
Instagram page: if set, it will be displayed in the footer of emails sent to customers
-
Twitter page: if set, it will be displayed in the footer of emails to customers
-
Mail address: if set, it will be displayed in the footer of emails sent to customers
17.16.8 Terms and conditions
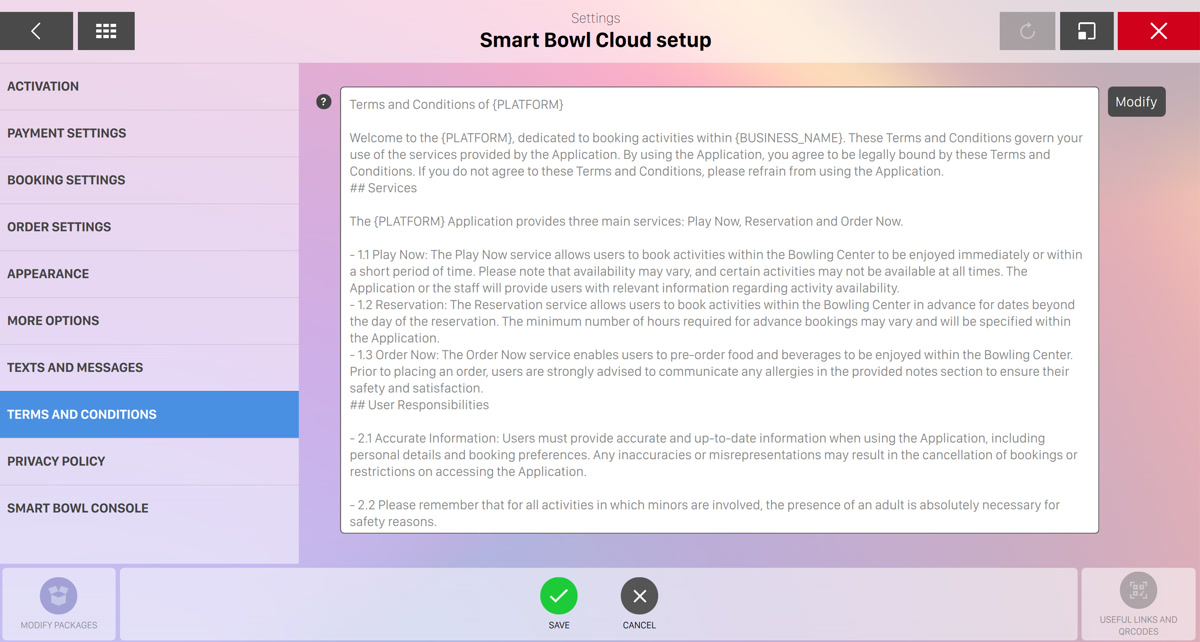
From this page it is possible to explain to customers the terms and conditions for the use of the service offered. This page will be displayed upon request on the kiosk and on the web page accessible via smartphones.
The text supports formatting based on the Markdown standard, you can find documentation at markdownguide.org. It is possible to use the following variables which will be with the relative values set in the Bowling Information section.
-
{BUSINESS_NAME}: the business name of the bowling center -
{COUNTRY}: the country of the bowling center -
{CITY}: the city of the bowling center -
{ADDRESS}: the address of the bowling center -
{ZIP_CODE}: the zip code of the bowling center -
{STATE}: the state of the bowling center -
{EMAIL}: the email address of the bowling center -
{PHONENUMBER}: the phone number of the bowling center -
{MOBILEPHONENUMBER}: the mobile phone number of the bowling center
17.16.9 Privacy policy
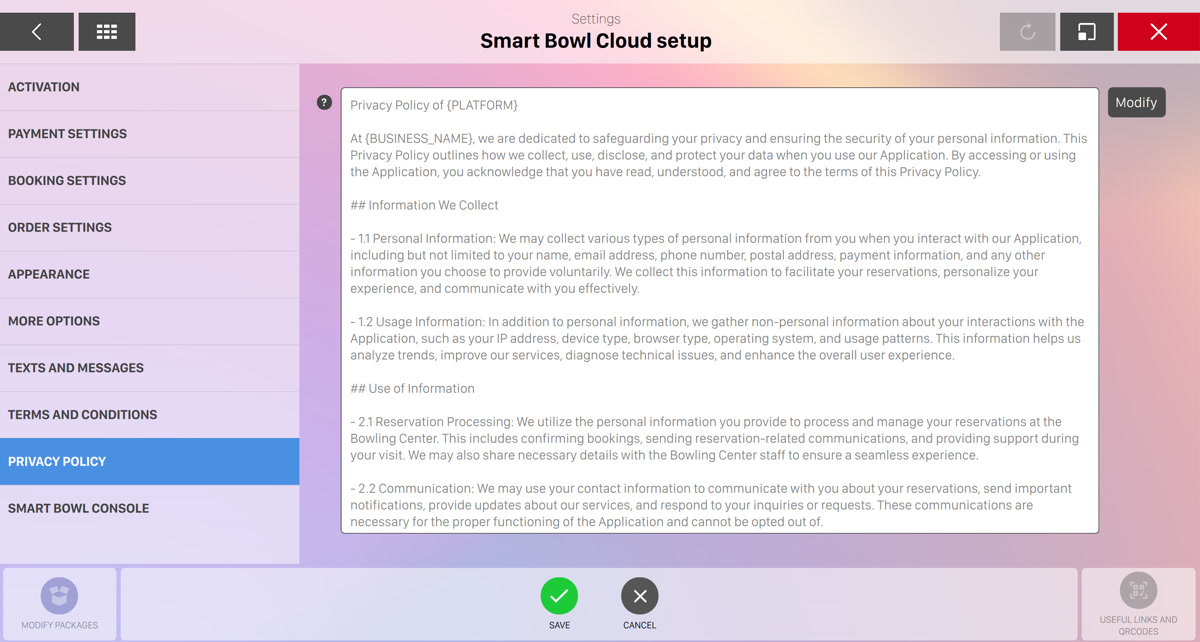
From this page it is possible to explain to the customers the policies for handling the sensitive data that is collected on the Smart Bowl Kiosk platform. This page will be displayed upon request on the kiosk and on the web page accessible via smartphones.
The text supports formatting based on the Markdown standard, you can find documentation at markdownguide.org. It is possible to use the following variables which will be with the relative values set in the Bowling Information section.
-
{BUSINESS_NAME}: the business name of the bowling center -
{COUNTRY}: the country of the bowling center -
{CITY}: the city of the bowling center -
{ADDRESS}: the address of the bowling center -
{ZIP_CODE}: the zip code of the bowling center -
{STATE}: the state of the bowling center -
{EMAIL}: the email address of the bowling center -
{PHONENUMBER}: the phone number of the bowling center -
{MOBILEPHONENUMBER}: the mobile phone number of the bowling center
17.16.10 Smart Bowl Console
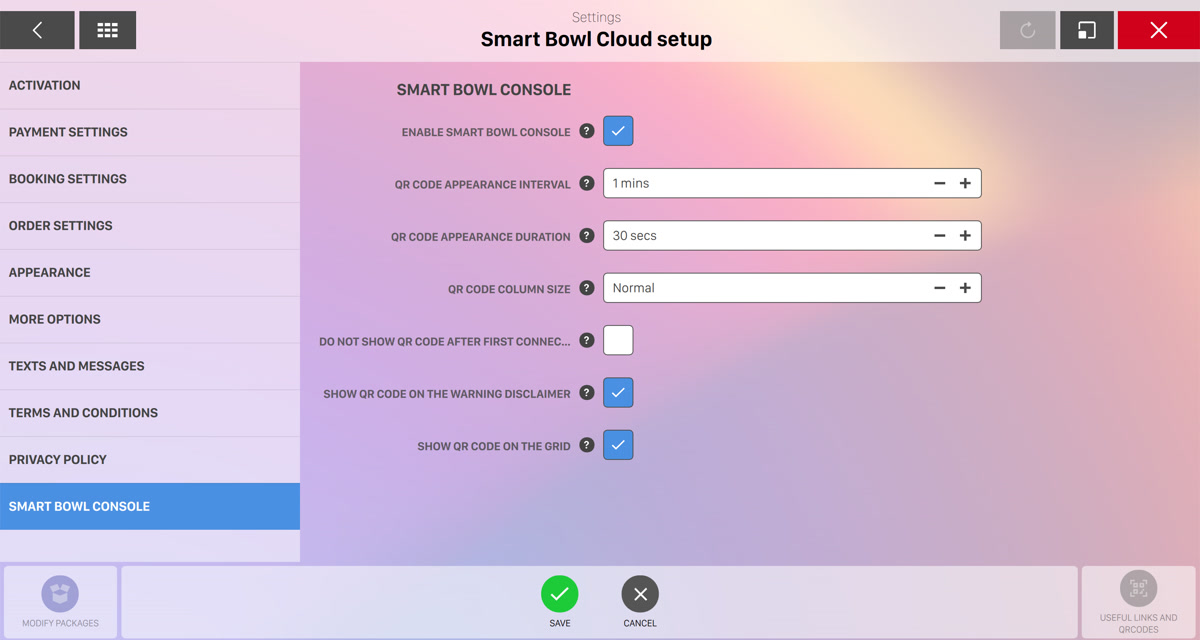
From this section it is possible to configure all the options related to the Smart Bowl Console web application, which allows customers to use the console features directly from their smartphones. Players can connect to their games by simply scanning the qr code that will be shown on the lane monitors.
-
Enable smart bowl console: check this option to enable / disable the Smart Bowl Console application
-
Qr code appaerence interval: this value indicates how often the connection qr code will be displayed on the monitors, allowing players to scan it and connect to the game
-
Qr code appaerence duration: this value indicates how long the qr code will remain visible on the monitor, allowing players to connect to the game
-
Qr code column size: this value specifies the width of the column that will appear on the right side of the monitor to display the qr code. You can adjust the width based on the size of your monitors and the distance from the players
-
Do not show qr code after first connection: if this option is enabled, the qr code will no longer appear after the first player has connected. It is recommended not to enable this option if you want to allow multiple players to connect. However, the qr code may still remain visible in the console menu and on the scoreboard during the game
-
Show qr code on the warning disclaimer: if this option is enabled, the qr code will appear on the warning disclaimer message before game starts
-
Show qr code on the grid: if this option is enabled the qr code will be displayed at the bottom right if the pindeck is shown on the grid
17.16.11 Packages definition
Locate the button Modify packages at the bottom left of the screen. If you click on it you will be redirected to the packages definition page.
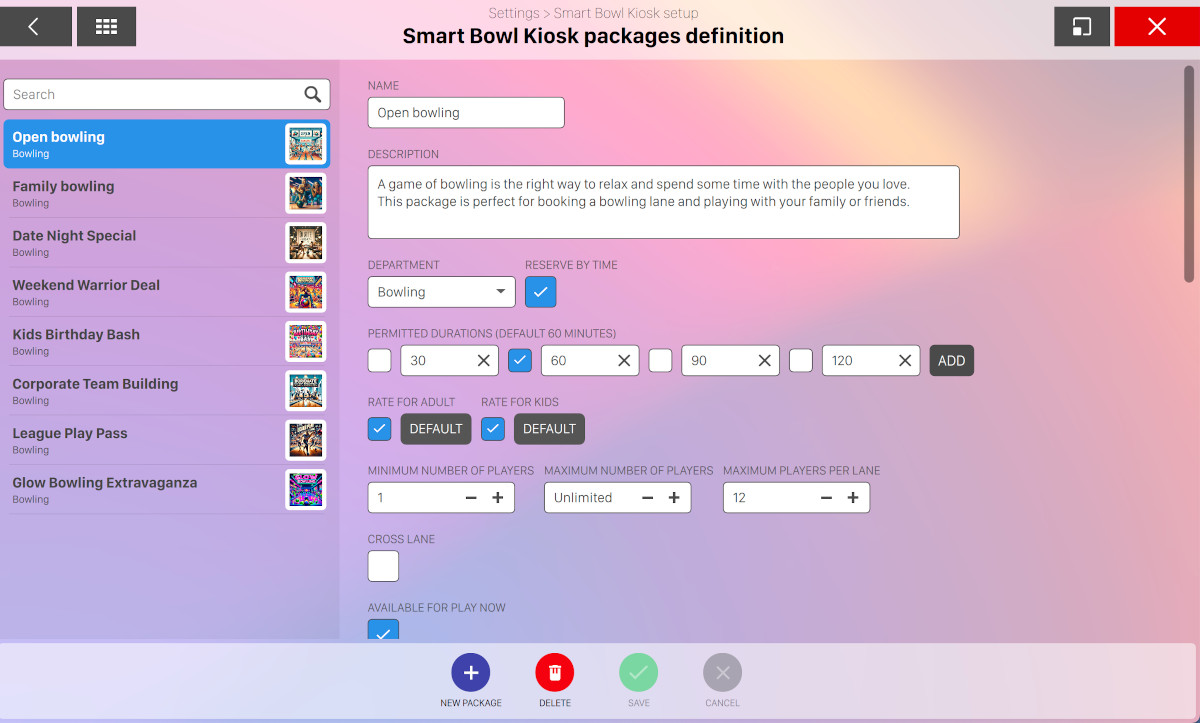
From this section it is possible to define and customize all the packages for the Smart Bowl Kiosk sessions. Each package contains a list of settings that brings the final customer to build a specific bowling or time game session from the kiosk devices or from their smartphones.
For each package you can configure:
-
Name: set the name of the package that will be displayed to the final user
-
Description: set the description of the package. The description will be visible to the final customer
-
Department: choose the department of the package, that can be bowling or time games
-
Reserve by time: check this option to set the package reservation by time or by game. Please remember that it is not reccommended to book per game as the duration of the reservations is not guaranteed
-
Permitted durations: set one or more duration slots. Duration can be expressed in minutes for reservations by time or in games for reservations by game
-
Rate for categories: for each player category that you have previously defined you can set the relative rate
-
Minimum number of players: set the minimum number of players allowed
-
Maxumum number of players: set the maxu number of players allowed
-
Maximum players per lane: set the maximum number of players per lane
-
Cross lane: indicates whether the package should be played in "cross lane" mode
-
Available for play now: indicates whether the package can be used for "Play now" mode
-
Available for reservations: indicates whether the package can be used for reservations. It is also possible to define the minimum hours in advance that reservations can be made
-
Show shoes choice: indicates whether to allow players to add shoes to the reservation
-
Shoes chosen by default: indicates whether to consider the shoes chosen by default
-
Show shoes choice: indicates whether to allow players to add socks to the reservation
-
Socks chosen by default: indicates whether to consider the socks chosen by default
-
Show bumper choice: indicates whether to allow players to set the bumpers
-
Bumper chosen by default: indicates whether to consider bumpers chosen by default
-
Usable lanes: select the lanes where you want the reservations that will be created with this package to be put on
-
Activation date: you can set the date from which the package will be available. Leave this field blank to ignore the activation date
-
Expiration date: you can set the date until the package will be available. Leave this field blank to ignore the expiration date
-
Validity period: set the days of the week and the hours when the package is available
-
Active: determines whether the package is active or not
-
Order: indicates the visualization order of the packages compared to the others
-
Image: set the image of the package by choosing it from the media browser
You can add a new package by clicking on the Nes package button or remove the selected one by clicking the Delete button.
17.16.12 Useful links and qrcodes
By clicking on the useful links and qrcodes on the bottom right of the screen you can access a page from where you can see and download the Smart Bowl Kiosk qr codes and links:
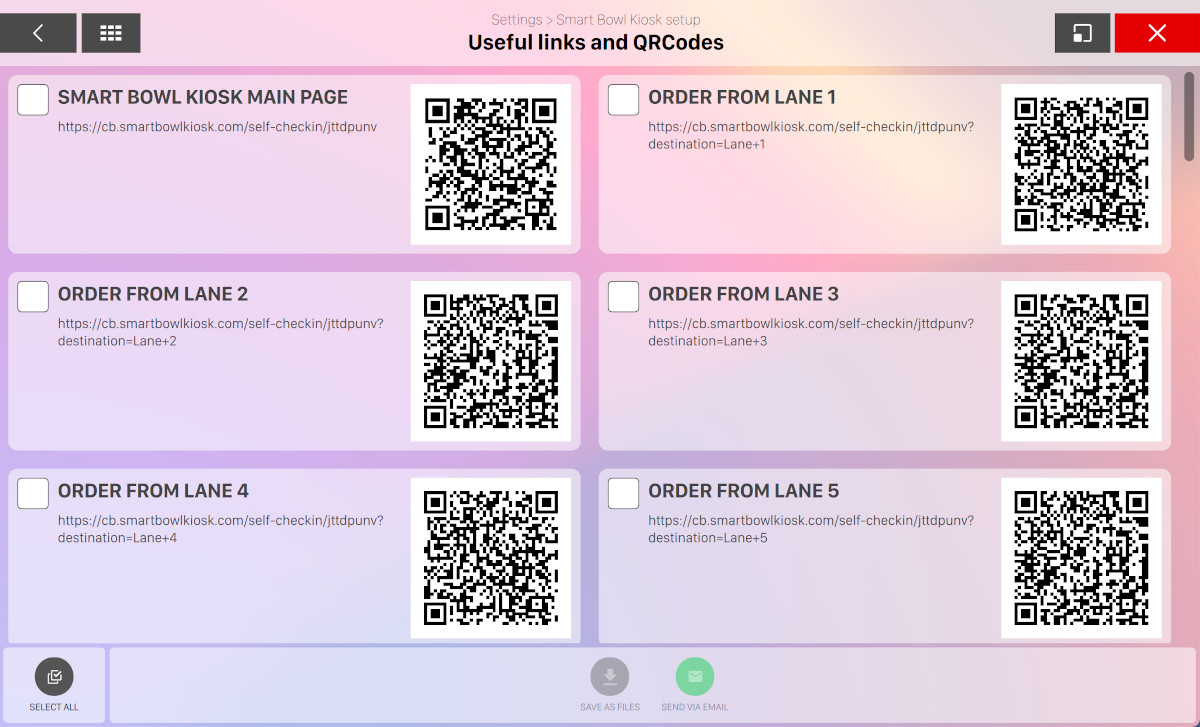
Each element represents a link that can be accessed from the internet either by directly entering the url or by scanning the relative qrcode. You can click on any element to put the focus on it.
It is also possible to click on the Save as files button to export the qr codes into separate image files or click on the Send via email button to send an email with the links to a specific email address.
17.17 Rate Definition
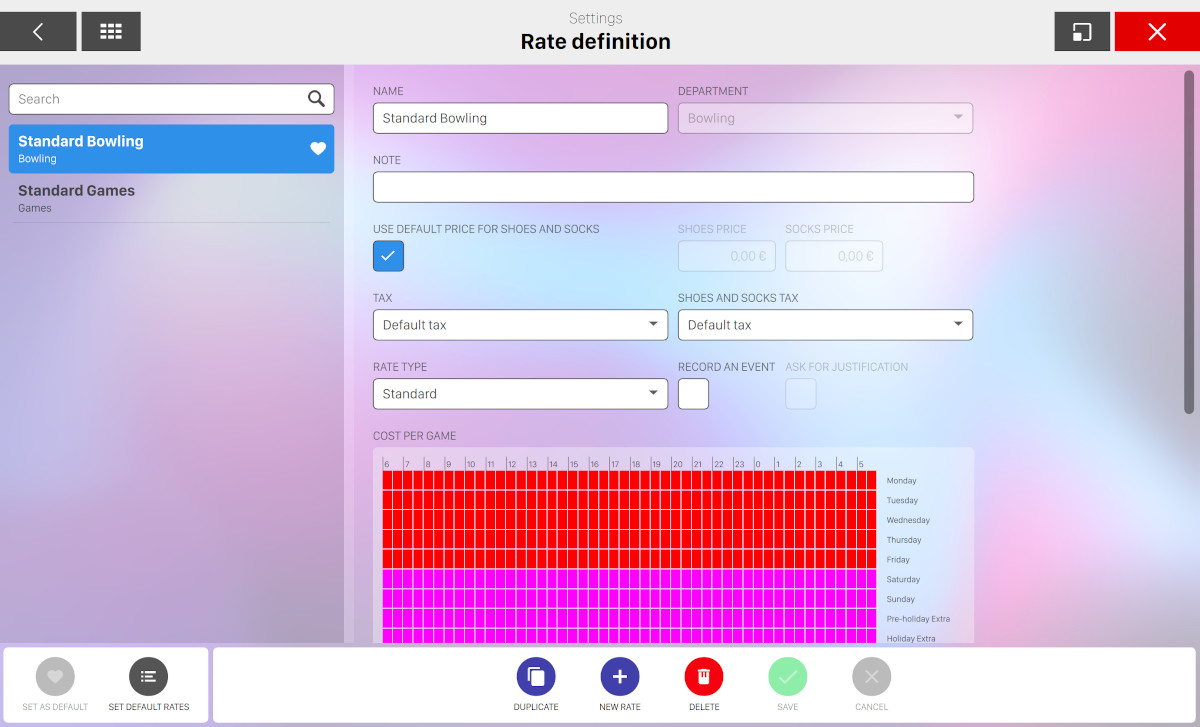
From this window it is possible to create different rates for specific departments (bowling and time games). Genie offers 2 ways to calculate the rates: standard or incremental.
The rates already defined are shown on the left side of the screen and can be viewed and modified by clicking on them. The search field can be used as a filter to search in a long list. Enter the initials of the name and press enter.
The following parameters can be assigned to each rate:
-
Name: the name of the rate
-
Department: the type of game (bowling or time games)
-
Notes: additional information related to the rate
-
Use default price for shoes and socks: this option if checked allows you to use default prices for the rental of shoes and socks. If this option is unchecked then you can define your own custom prices for shoes and socks by entering the amount. This option is available only for bowling department
-
Tax: select the tax related to the rate from the list
-
Shoes and socks tax: if the selected department is "bowling" then this option allows to select the tax related to the shoes and socks rental
-
Rate type
-
Standard rate allows you to set a different price every 30 minutes, if wanted, for specific days of the week
-
Incremental rate allows you to apply special rates based on the number of games played (or hours played) within a particular time frame
Warning: Any attempt to change a standard rate to an incremental rate, or vice versa, will result in the loss of all the data previously entered
-
-
Record an event: When checked, it allows to system to create an event when the rate is used, it also allows the system to activate the Ask for justification box
-
Ask for justification: it allows the system to ask for a justification for using that rate, the justification will be recorded in the Reports
17.17.1 Standard Rate
The standard rate section displays a multi-colored grid representing the days of the week divided into 30 minutes boxes. Any 30 minutes box can have a different rate. Furthermore there are two lines called pre-holiday extra and holiday extra. These lines are linked to the holidays as defined in the Festivity definition section. In order to change any price for games (or hourly rates) select a time shift on the grid (drag and drop), enter the price in the box that is opened and click enter key.
For each different rate a new color is created and you can customize the amount of the rate at any time from the fields below the grid.
In case of bowling games, a rate defines the cost parameters both for game mode and time mode.
17.17.2 Incremental Rate
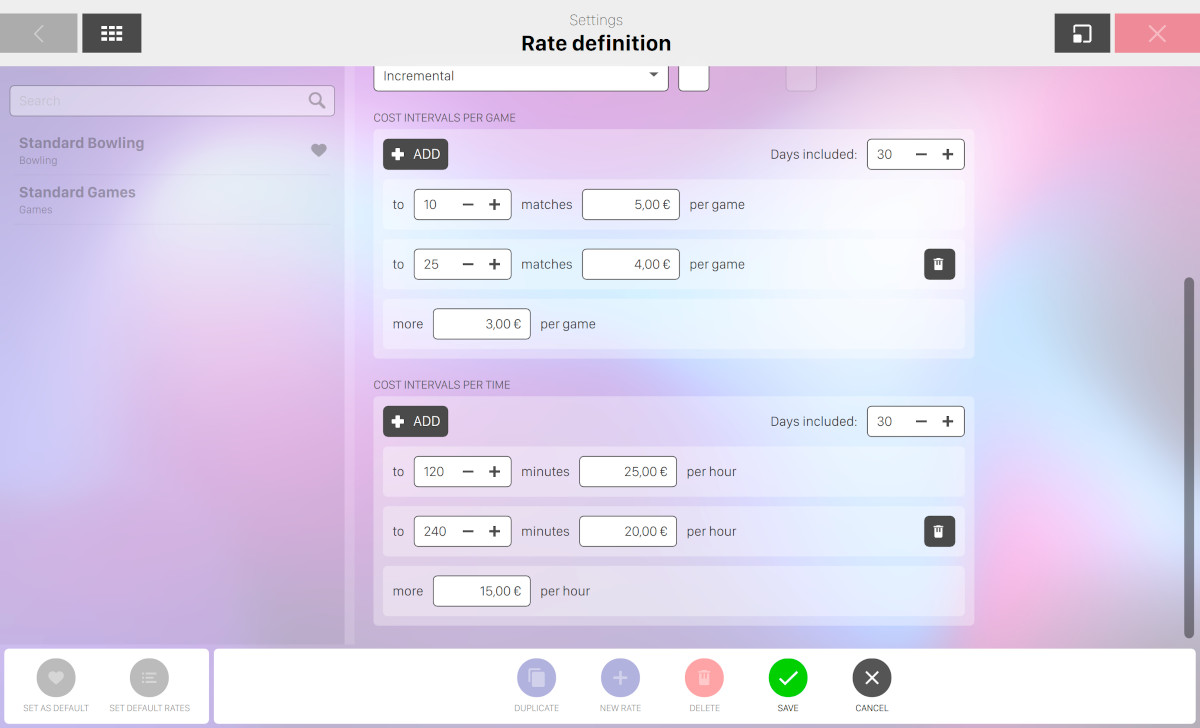
The incremental rate shows a list of rows that allows you to set a price for a certain number of games in a specific time frame, which means that the incrementation of games is calculated within a specific period of time, which goes from the first day a player bowls a game to the defined time frame (i.e. 30 days). The time frame can be entered in the days included field. I.E., if within one month (time frame) a bowler plays up to 10 games he pays 5.00 USD per game; from 11 to 20 games, 4.00 USD; from 21 to 30, 3.00 USD and so on. The incremental rates is suggested for players who are registered in the player archive. An incremental rate can be set as follows:
-
To: defines the game up to the rate is applied. If previous element are present on the list then this rate will be applied from the value of the previous plus one. For instance if an element of 10 is set before and you want to set a new element with 20, it means that the rate you are defining will be used if the players plays a number of games between 11 and 20
-
Rate: define the amount of money for the incremental rate item
-
More: you can set an option to define the rate when the number of played games is greater than the last incremental rate limit defined
You can cancel any element from the list of incremental rates except the first one, because at least one element is required on the list. Click the Add button to add a new incremental rate item. The ‘more‘ item can not be removed.
17.17.3 Game rate and time rate
Both for standard and incremental rates you can define custom rates for game and time modes:
-
If the player decides to pay for a certain number of games then the game rate is applied. Note that this option is available only for bowling department and not for time games
-
If the player decides to pay for a specific time frame then the time rate is applied. In case of incremental rates you can customize the measure of ‘to‘ field by specifying the number of hours or the number of minutes
17.17.4 Available Actions
At the bottom of the window you can find some actions:
-
Set as default: tells the system that the selected rate must be the default rate for Bowling or time games. The default rate is highlighted by a heart-shaped icon
-
Set default rates: takes to the Default Rate Settings section
-
Duplicate: allows you to duplicate a selected rate
-
New rate: allows you to create a new rate
-
Delete: deletes the selected rate
-
Save: saves the current changes
-
Cancel: discards the current changes and restores the previous data
17.17.5 Set default rate

The default rates for bowling and for time games can be set from this window. A default rate will be automatically applied to the customers at the beginning of a new game if they have no other special rate assigned. All the available rates are displayed in a menu when the operator opens a new bowling or time game or in the Modify bowling or time game section. Choose the specific rate that you want to apply as default to each department in the drop down menu on the right of each department.
Click on save button to save the current changes or cancel to discard them.
17.18 Game Definition
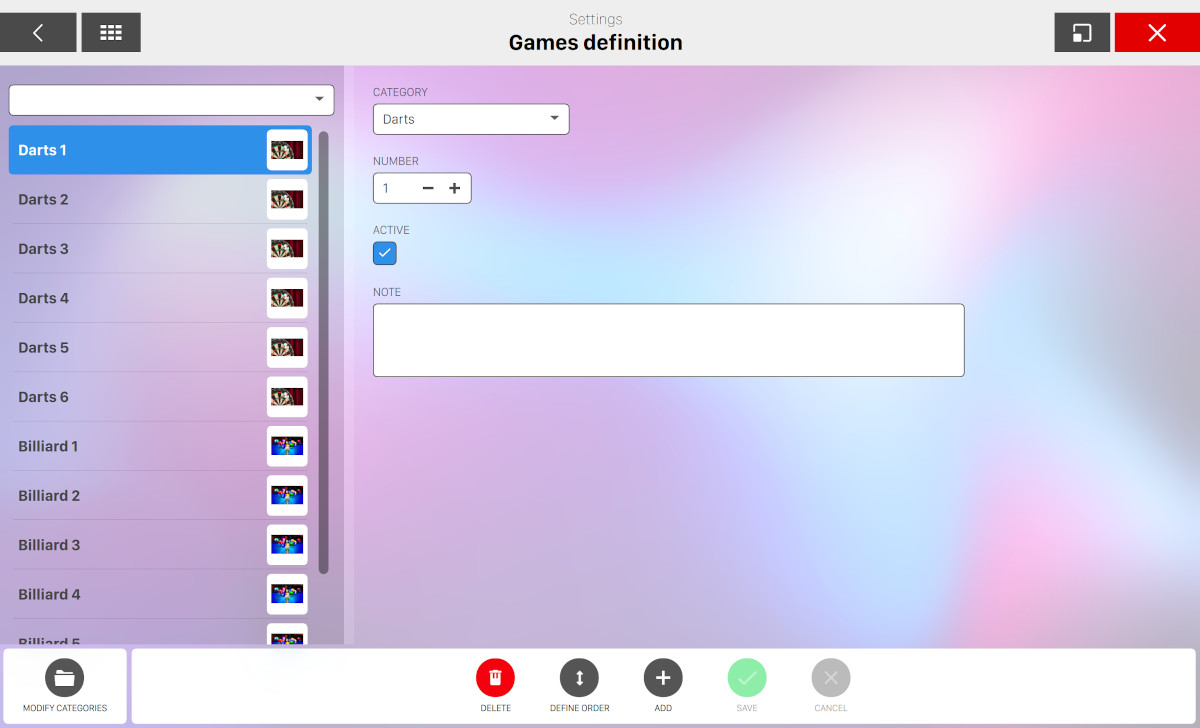
This window allows you to manage the time games available at the bowling center, I.E. Billiards, Table Tennis, Darts, etc. The list of existing games is shown on the left side. Click on any item to view its details or modify it. The list of the games can be filtered by the ‘group‘ combobox so that only the games in a particular category will be displayed on the screen. For each game you can set the following parameters:
-
Category: select the category the game belongs to
-
Number: set the progressive number of the game in the category
-
Active: set whether the game is active and can be used. Uncheck the Active box when the game is out of order
-
Notes: set additional information about the game
Click on Save button to apply the changes or click on Cancel button to discard them.
17.18.1 Add new games
Press Add button on the lower side of the window. A popup will appear:

New games can only be added if at least a category is defined. This can be done in Game category definition section. Select the category and how many of games must be created and press Add button. The games will appear in the list on the left. The order of how games appear on the screen games grid in the Games management window can be changed. Click on Define order button to define the order of the games:
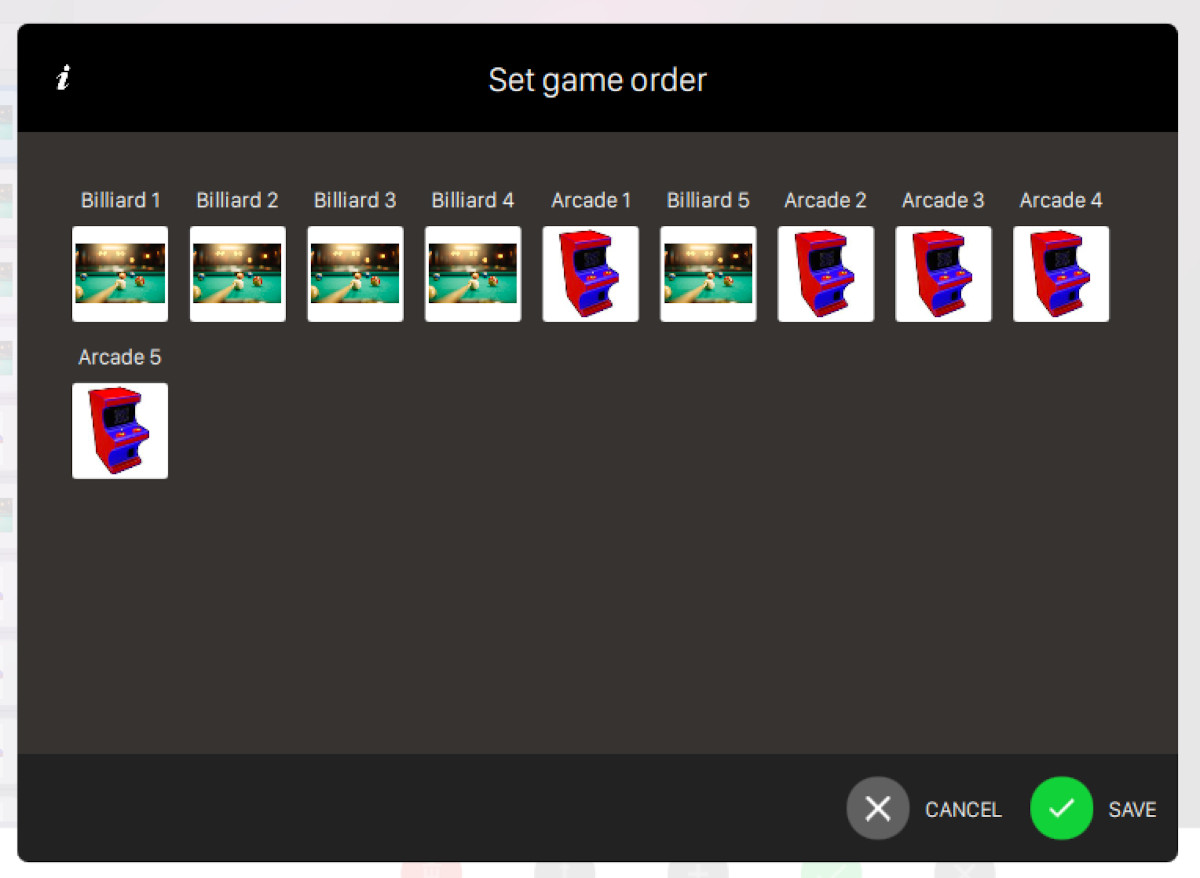
To move a game, click on its icon and drag and drop it to the new position. When done, click on Save to save the current changes or Cancel to restore the previous order.
At the bottom of the window you can find some buttons:
-
Modify categories: takes to the Game category definition section
-
Delete: allows you to remove the selected game. It is not possible to cancel a game that is in use
-
Define order: allows you to change the games order
-
Add: allows you to add new games
-
Save: allows you to save the current changes
-
Cancel: allows you to discard the current changes and restore the previous data
17.18.2 Game Category Definition
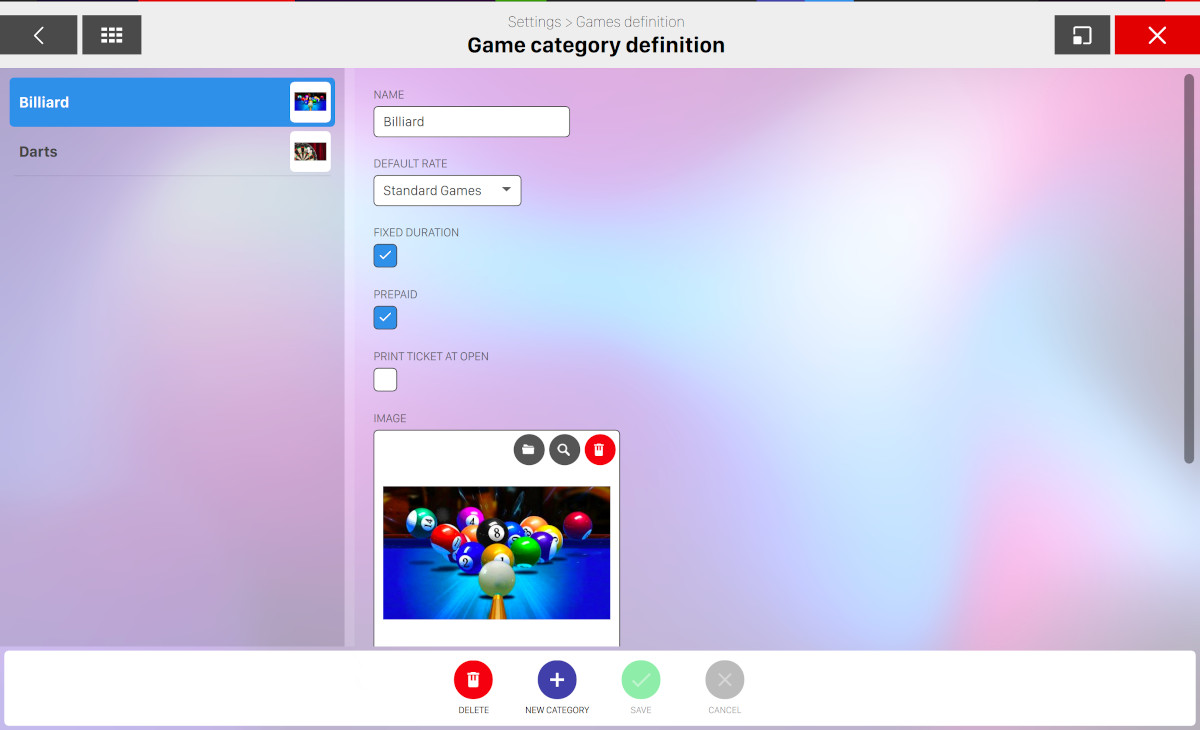
Time games category, such as Billiards, Table Tennis and Darts can be organized from this window. The games’ category already entered are shown on the left. To view or modify the data of any particular game category, just click on it. The following parameters can be specified for each category:
-
Name: indicates the name of the game category
-
Default rate: shows the default rate for this category of games. The default rates can also be set in Default rate settings section
-
Fixed duration: shows whether the ‘Fixed duration’ option should be set when the game is opened
-
Prepaid: shows whether the ‘prepaid‘ option should be set when the game is opened
-
Print ticket at open: shows whether a receipt should be printed when the game is opened. The receipt will show the details of the game, the starting time, and in case the ‘fixed duration‘ option is active, the end time of the game
-
Image: by clicking on the blank box, it takes to internet to find a picture that will be displayed in the left section. You can also choose an image from the media library. Click on the trash icon to delete the current image
-
Minimum duration: shows the minimum rental time for the games in minutes. For example, if the minimum time has been set to 30 minutes, the system will charge this price even if the players finish to play before the 30 minutes have elapsed. This option is used in ‘post-pay’
-
Rounding: shows the figure used for rounding up the game rental times. For example, if the round up figure is set at 5 minutes, a game lasting 23 minutes will be charged for 25 minutes. This option is used in ‘post-pay‘
-
Default duration: shows the default time limit when the game is opened. The time limit can be changed at any time
17.19 Definition of bowling games
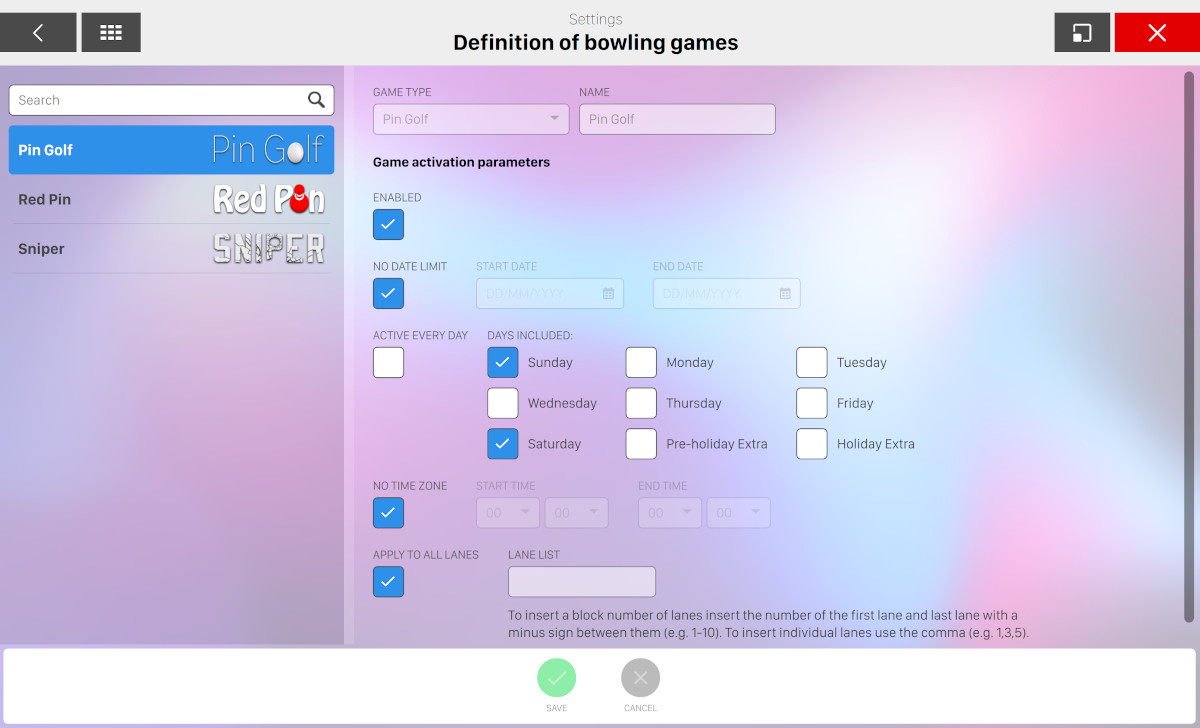
This sections allows you to customize bowling games inside your bowling center. Bowling games are automatically downloaded from the internet when the software is installed, therefore this feature is available only if your center has at least one game. Currently available games are:
-
Pin golf: each player can have up to 10 ‘holes’ to play and each hole has a specific number of shots that players are expected to reach with a strike or a spare (the correspondent concept of par in golf games). If a player exceed the number of shots, then will receive a point of penalty. At the end of the game the player with the highest score wins
-
Red pin: depending on the probability, in some frames a red pin could appear. If the player do a strike with the red pin then he will receive some bonus points
-
Sniper: the player has to complete some missions hitting some specific targets and avoiding forbidden pins
Each game can have its own custom configuration but they share some basic parameters:
-
Enabled: check this option if you want to enable the selected game
-
No date limit: check this option if you want to disable date limit for the selected game. Otherwise you can setup the start date and end date
-
You can specify which day of the week the selected game is enabled, or check the option Active every day
-
You can decide to set a time zone when the selected game is enabled, setting start time and end time. If you don’t want a time zone check the option No time zone
-
You can decide to apply the selected game to some specific lanes or all the lanes. To insert a block number of lanes insert the number of the first lane and last lane with a dash sign between them (e.g. 1-10). To insert individual lanes use the comma character (e.g. 1,3,5)
17.19.1 Sniper
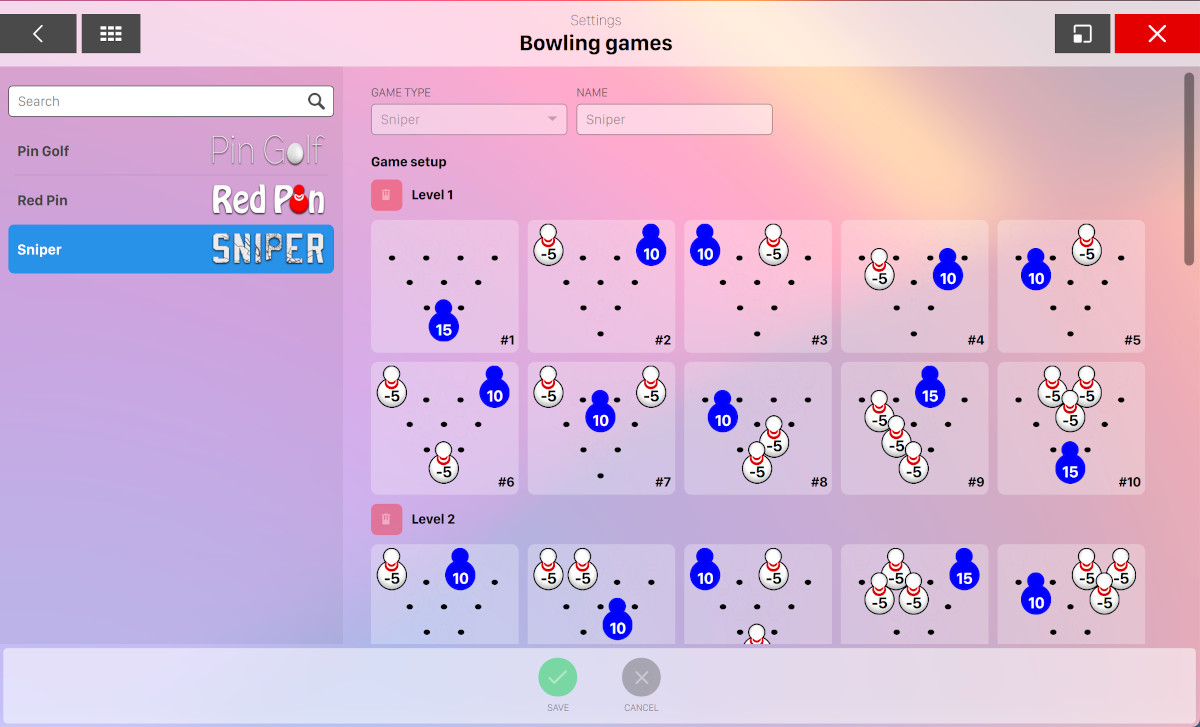
For the Sniper game you can also add/customize the levels by setting the points of each pin on each frame.
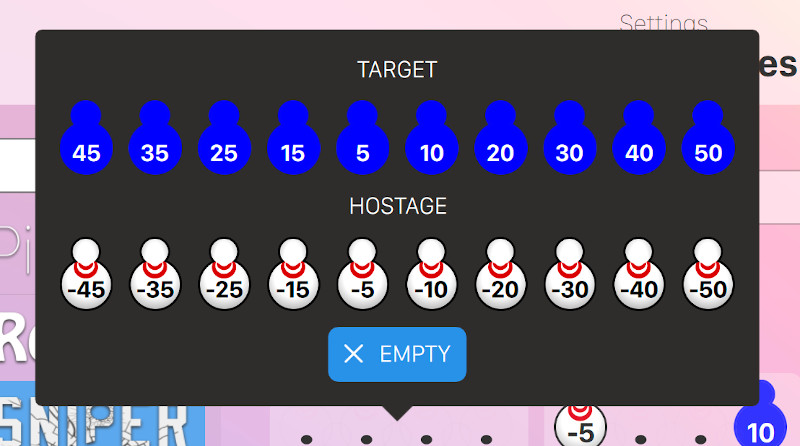
By clicking on each pin of each frame of each level you can define whether the pin is:
-
A target with its relative positive points
-
A hostage with its relative negative points
-
An empty element wich does not add or remove points
For each frames at least one target is required, so it is not possible to have frames with only hostages or empty elements.
Click on the Add a new level button to add an additional level or click on the Restore default setup to restore the default configuration.
Other available options are:
-
Reorder levels randomly every game: if this option is checked then at every new game the levels will be randomly re-ordered
17.19.2 Red pin
For the red Pin game you can also set:
-
Probability of red pin appearing (%): indicates the probability (in percentage) that a game has a red pin
-
Points for a strike with red pin: indicates the points that will be summed if a player do a strike with a red pin
17.20 Lane Settings
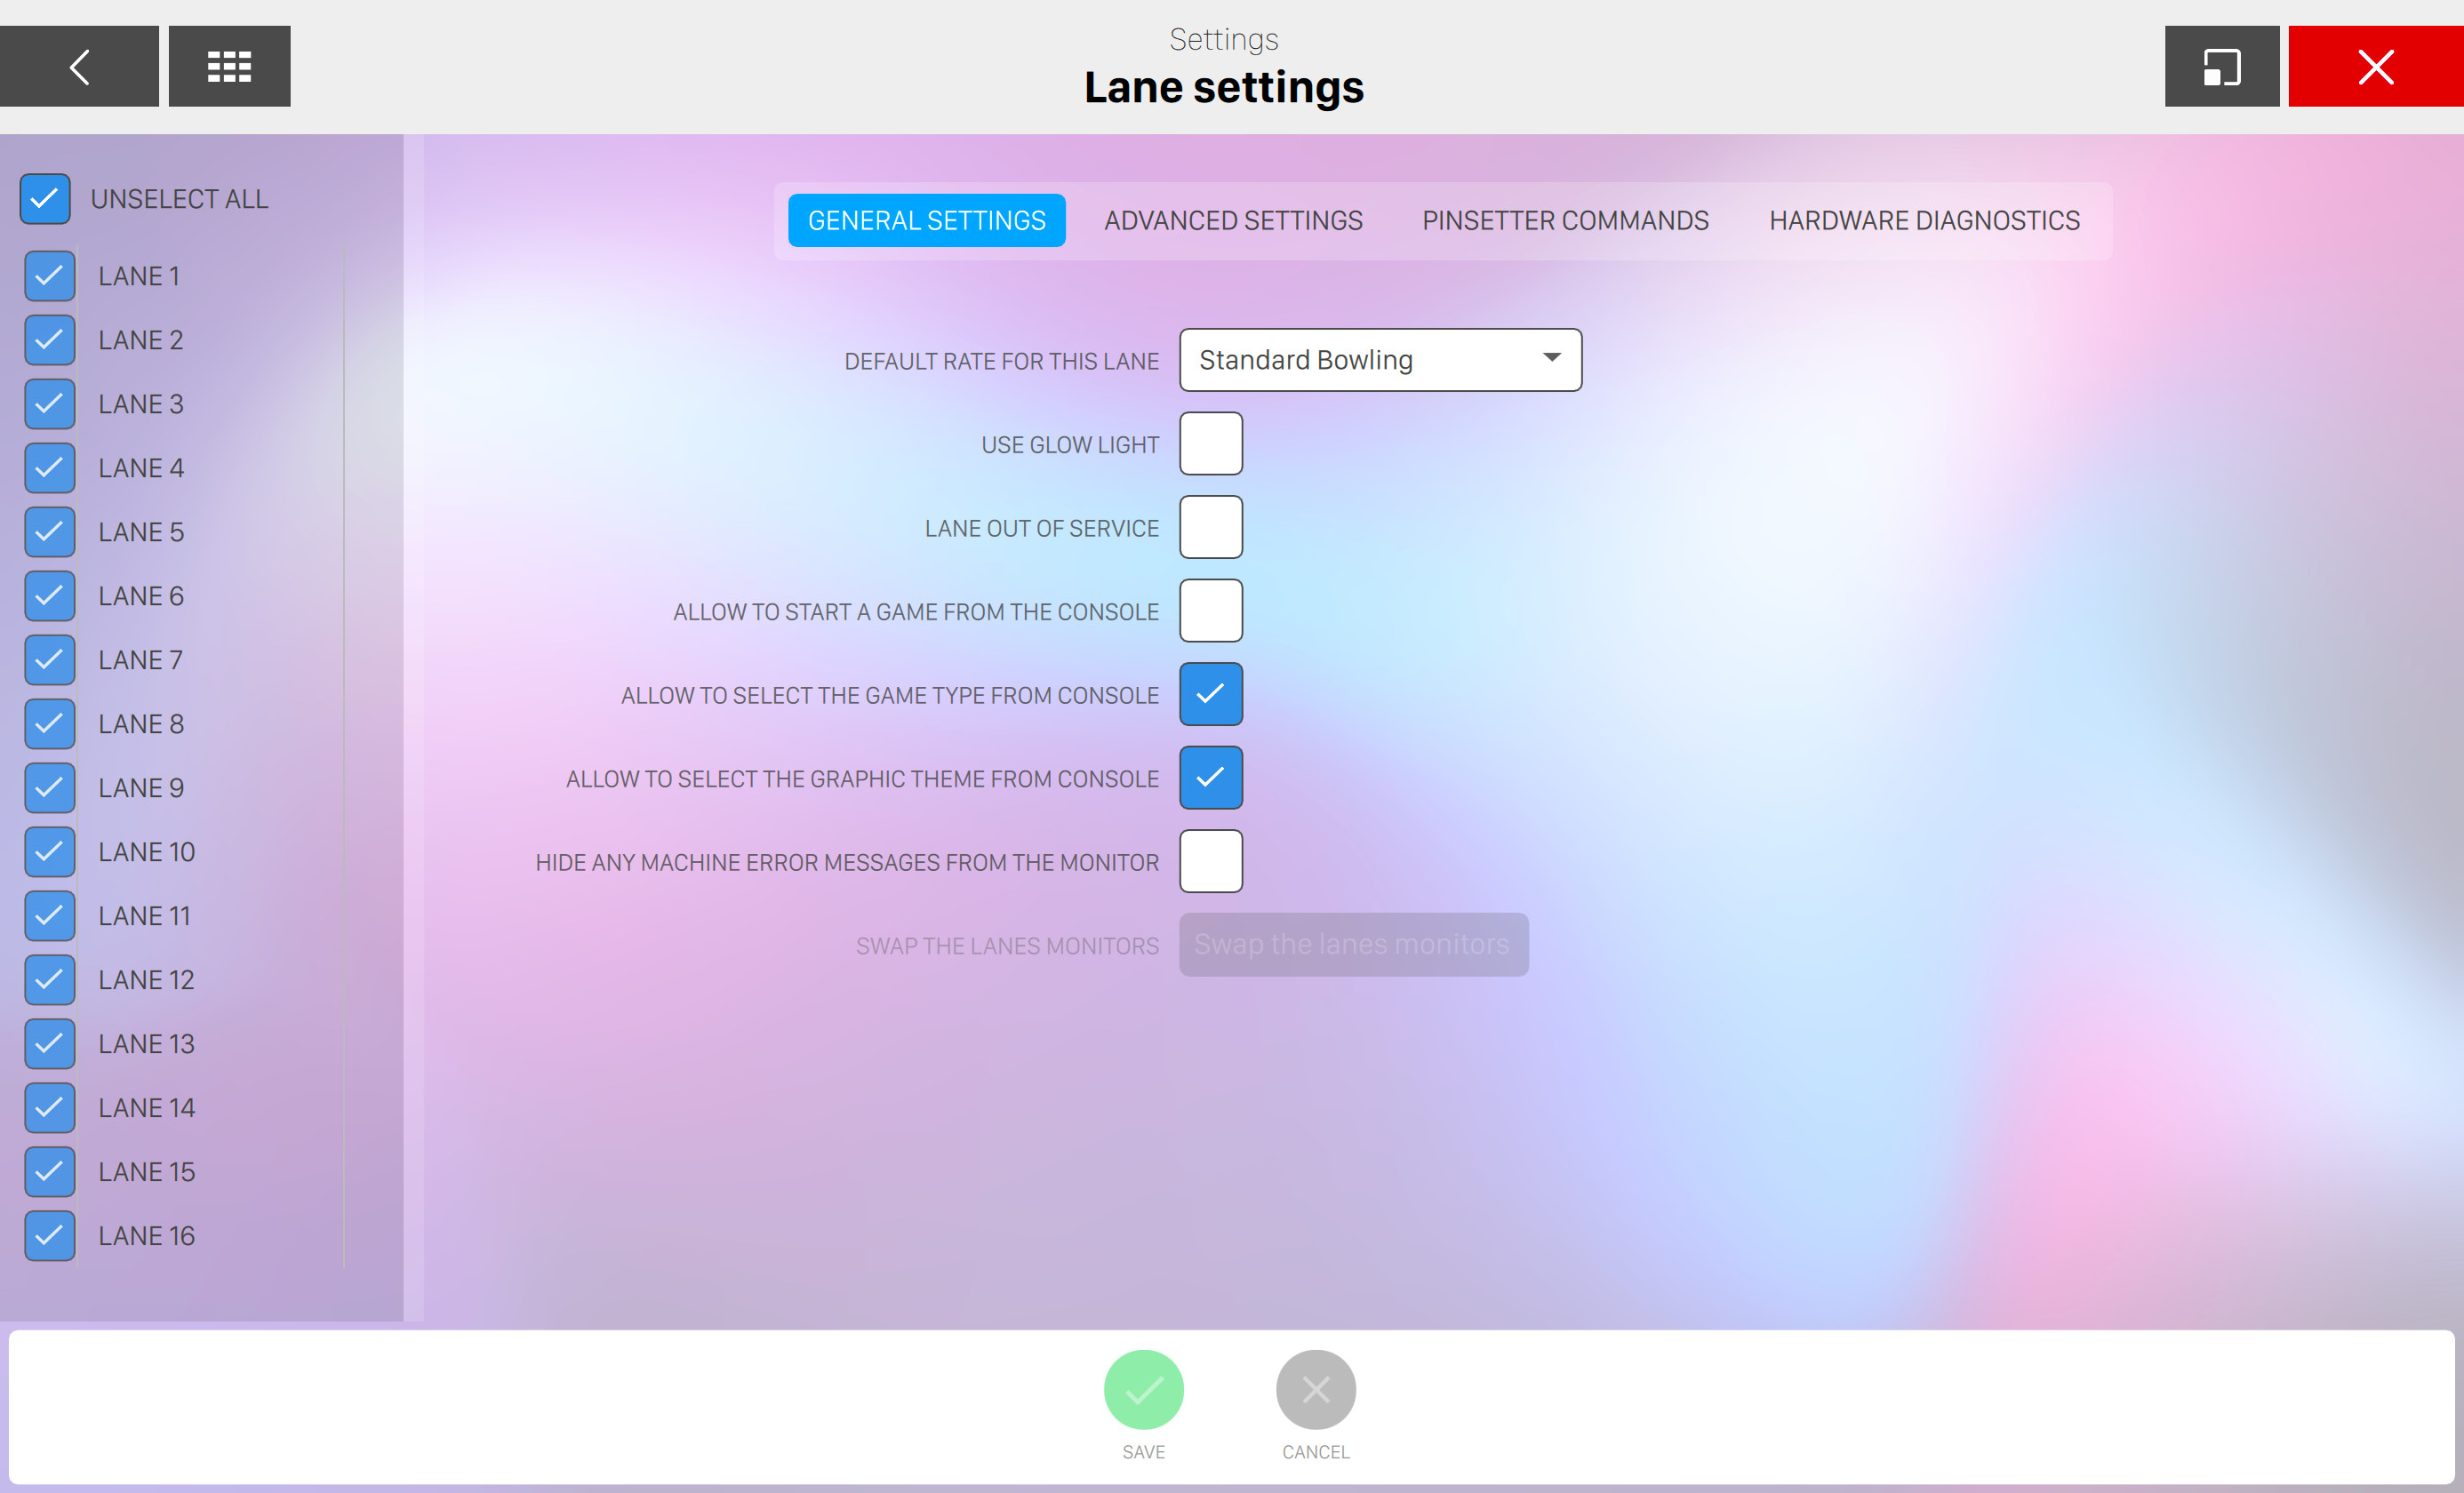
From this window you can configure parameters related to the bowling lanes. The number of available lanes is listed on the left side. The information related to each lane(s) can be seen and modified by selecting one or more lanes. Lanes that are not adjacent can be selected by pressing CTRL or SHIFT on the keyboard. When one or more options on the right side are highlighted in orange it means that the option is not the same for all the selected lanes.
17.20.1 General Settings
-
Default rate for this lane: allows you to select a rate from the list that will be applied by default when the selected lane(s) open a new game
-
Use Glow light: select the lanes that must have the glow lights
-
Lane out of service: puts the selected lane out of order and shows a sign with the ‘LANE OUT OF SERVICE’ message on the lane monitor. Lanes that are out of service cannot be used to start a new game
-
Allow to start a game from console: when enabled, it allows the customers to start a game from the bowler’s console
-
Allow to select the game type from the console: when enabled, it allows the customers to change or select the game type of the bowling game from the console
-
Allow to select the graphic theme from console: when enabled, it allows the customers to select the graphic theme of the console from the console
-
Hide any machine error messages from the monitor: when enabled, any error message related to the selected lane will be hidden from the monitor
-
Swap the lanes monitors: swap the monitors between two lanes
If you select multiple lanes then the parameters that have differences are highlighted in yellow.
17.20.2 Advanced Settings
These settings are normally adjusted during the installation of the system, and they need to be updated when a hardware component is added or changed to the center. This area is protected, so the operator must enter his own password.
Note: it is strongly recommended that only a qualified technician manage these options.

Connected devices
-
Console type: when a console is installed, it allows you to choose the console type
-
None: no console installed
-
1 Keyboard each 2 lanes: one keyboard is used for each pair of lanes
-
1 Keyboard each lane: one keyboard is used for each lane
-
Touch screen: allows you to enable a console with a touch screen
-
-
Foul available: enables the foul detector
-
Bumpers available: enables the bumpers
-
Glow light available: enables the to glow the light on the lane, when available
Pinsetter configuration
-
Pinsetter type: allows to choose the installed pinsetter type
-
Enable PBZ control: this option is used only for AMF 82-70 pinsetters. It allows you to change from 1st to 2nd ball without cycling the machine
-
Ignore Second Ball Input: this is used to align the scoring with the pinsetter so that they are both on the same ball cycle. If this is not the case, the scoring will cycle the pinsetter to realign it to the 1st or to the 2nd ball. This option should only be disabled when no second ball signal is present
-
Enable Eco Mode: enables, if available, the Economy mode on the machine. This means that, when a gutter ball is thrown, both in first and in second ball, the machine does not cycle, saving power
-
Enable solenoid: if solenoid mode has been installed on the pinsetter then check this option to enable it. This feature is enabled only on specific pinsetters
-
Double cycle: this option allows to send the cycle command twice in case the pinsetter needs to be realigned. This feature is available only in specific circumn- stances and pinsetters
-
Ball Hook (mm): indicates the diameter of the ball in millimetres read by the photocells. The default setting is 190 mm (7.48")
-
Triggering Photocell Distance from Pit (mm): indicates the distance between the photocells and the 7-10 line on the pindeck in millimetres. The default setting is 3800. During installation, or later, this value can be increased by 500 or 1000 increments if the readings are not accurate due to either late falling pins, or wobbling pins. Note: do not exceed a value of 4800
-
Minimum FOUL FC time (ms): indicates the minimum time delay for a foul in milliseconds. The default value is 300. This gives enough time for a ball to pass the photocell without activating the foul signal
-
Maximum Foul Duration (0.1sec): indicates the length of time the foul detector buzzer will be on in tenths of a second. The default value is 130, equal to 13 seconds
-
Additional time for pinsetter movement (ms): indicates the delay the machine start after the ball passed the photocell to add time for the pin count. The value is in milliseconds
-
1st ball verification delay (ms): enables the delay between the cycle start signal and the reading of the pins on 1st ball. Do not exceed a value of 3000 (3 seconds)
-
2nd ball verification delay (ms): enables the delay between the cycle start signal and the reading of the pins on 2nd ball in milliseconds
-
Waiting time for realignment at the end of a game (ms): this value is only applicable to Brunswick A and A2 machines. In the event that the game ends with the machine in second ball, it automatically cycles the machine to bring it back to first ball. The value is in milliseconds. The value set for this function must allow the machine enough time to complete the cycle and reach the ’zero’ position. The value is usually set to 15000 (15 seconds)
-
The machine supports only the DuckPin game: check this option to indicate that this machine only supports DuckPin games, which is a special bowling game with different features
-
Show the interface of timing calibration: when enabled, it shows a diagnostic screen on the lane monitors.
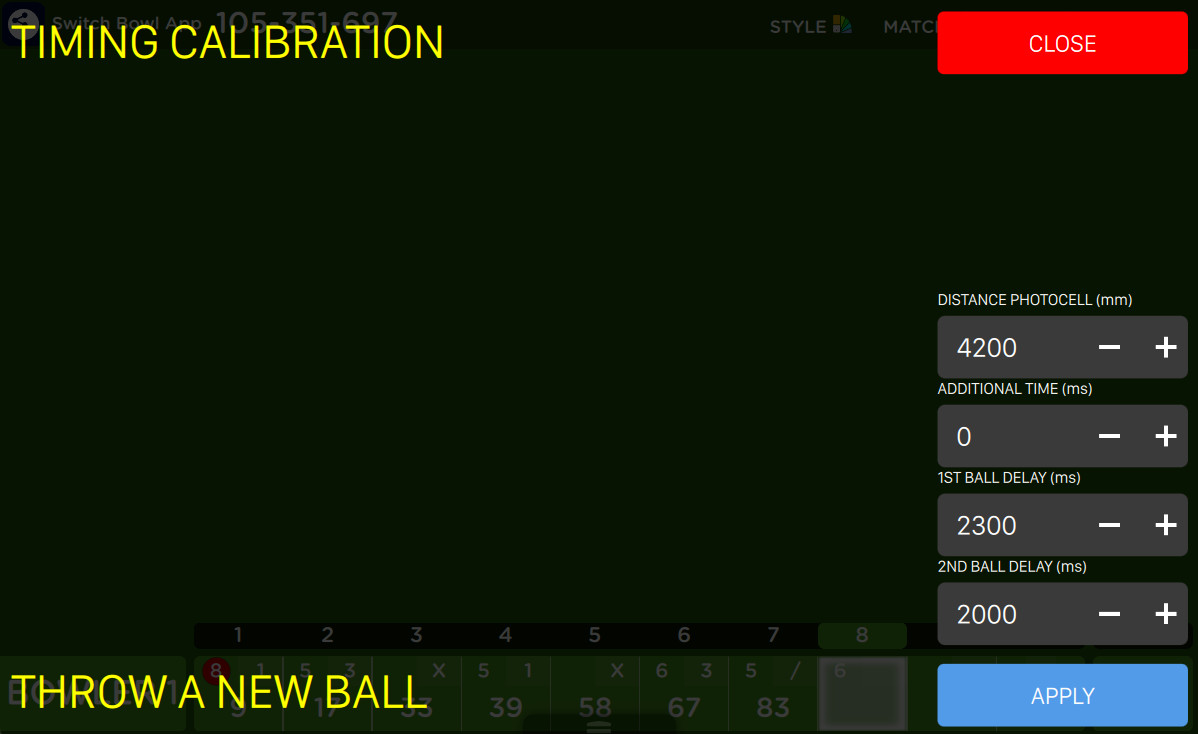
From this window you can understand how the system works and you can calibrate it. It shows you some information about the last throw and helps you to adjust the parameters in order to have a better timing for throws. The parameters you set will influence the time of the photo capture. When a white flash light appears on the screen, it represents the moment of the photo capture. It is important to check that in that precise moment the swip is not covering pins.
-
Distance photocell (mm)
-
Additional time (ms)
-
1st ball delay (ms)
-
2nd ball delay (ms)
Note that the meaning of these parameters is the same of the pinsetter configuration above.
-
Chassis configuration
-
SWITCH chassis available: enables the SWITCH CHASSIS when it is installed on the selected lane. If this option is not active, the other options will be disabled
-
Off Spot control: allows you to choose whether the sweep must reverse or stop when a pin is off spot
-
Sweep reverse: the machine cycle is completed by reversing the Sweep to zero, the machine goes to 2nd ball
-
Sweep stop: the Sweep stops at 66 � (on the lane), the Table stay at zero, the machine is on 2nd ball. The sweep has to be reversed manually (Normally used only for tournaments)
-
-
Start Back End: allows you to select how the SWITCH CHASSIS should control the back end motor
-
Start on first ball cycle: the back end motor will start when the first ball activates the triggering photocell
-
Start when the lane is opened: the back end motor will automatically switch on when the the lane is opened
-
-
Standard power: tells the SWITCH CHASSIS which power supply voltage is present: 220VAC or 380VAC
-
Maximum time for mechanical maintenance (min.): sets the maximum time allowed for maintenance when the ‘Safety Kit‘ is installed
-
Inverter type: allows you to tell the system what type of inverters are used in the chassis
17.20.3 Pinsetter Commands

This window allows you to send commands to the selected lane machine. Some of the commands can be sent to groups of lanes. Warning: it is essential to be sure that nobody is working on, or is close to the machines before any command is sent.
Main commands
-
Send "Power on" command to pinsetter: switches on all the selected lanes
-
Send "Power off" command to pinsetter: switches off all the selected lanes
-
Sweep and respot a full rack of pins: sweeps the pindeck and spots a full rack of pins
-
Send "Cycle" command to pinsetter: the selected lane will complete a first or second ball cycle
-
Send change ball command to pinsetter: the pinsetter changes from the first ball cycle to the second ball cycle or vice versa
-
Send "Strike" command: the pinsetter will complete a strike cycle
Other commands
-
Lift bumpers: raises the bumpers on all selected lanes
-
Lower bumpers: lowers the bumpers on all selected lanes
-
Send service mode on command to pinsetter: send a service mode "on" command
-
Send service mode off command to pinsetter: send a service mode "off" command
17.20.4 Camera Calibration
The calibration of the cameras is done from this window. Before the camera calibration can be executed, be sure that the selected lane’s pit light is on and that there are ten pins on the pindeck. Use the pinsetter commands to switch the pinsetter on and spot a full rack of pins if necessary. To calibrate a camera click on any lane on the left side of the screen. The calibration is carried out in 4 steps:
Step 1
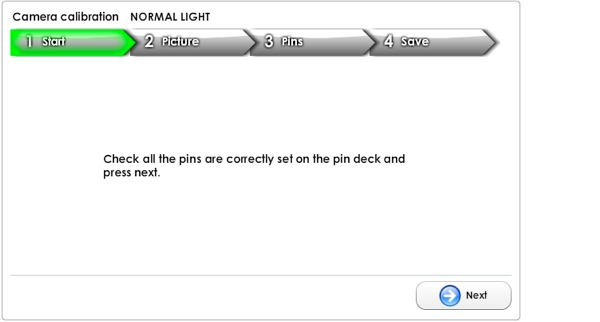
Tells the operator to check for the correct spotting of all ten pins. Press ‘Next’ to proceed.
Step 2
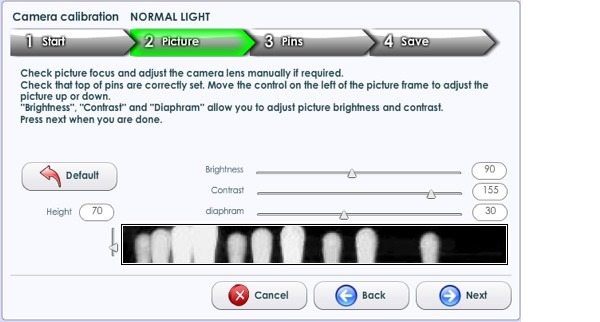
The image quality and the position can be adjusted in this window:
-
Height: allows you to raise or lower the position of the pins head. It is important that the heads of the pins are clearly visible. It is not possible to make lateral adjustments of the camera from this window; any lateral adjustment must be done manually, moving the camera’s position
-
Brightness: allows you to adjust the brightness
-
Contrast: allows you to adjust the contrast
-
Diaphragm: allows you to adjust the diaphragm. This value should be lower than 50 to avoid delays in the capture of the images
-
Default: press this button to restore all the default values
Step 3
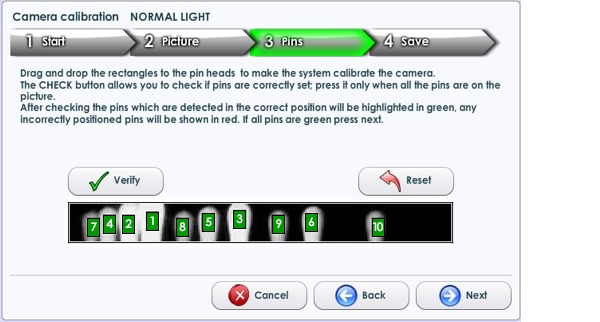
Drag and drop the numbered rectangles over the pins head.
-
Verify: checks the pins position. The rectangles on the pins head that are correctly positioned are green, if not properly placed they will be red. When all the rectangles are green press ‘Next‘
-
Reset: allows you to check again the pin’s position
Step 4

Saves the adjustments made.
Available Actions
-
Next: moves to the next step
-
Back: moves back to the last step
-
Cancel: discards the current changes and restores previous data
-
SAVE: saves the current changes
Note: if GLOW lights are installed, a separate calibration must be carried out. Be sure that the GLOW lights are ‘on‘ before you start the camera calibration.
17.20.5 Camera calibration for BitCAM Net
From this window you can calibrate the camera of a pair of lanes. Before you calibrate the camera make sure the lane is turned on (with the lights on) and with all the 10 pins available. If not use the machine to turn on the lane and initialize the pin deck.
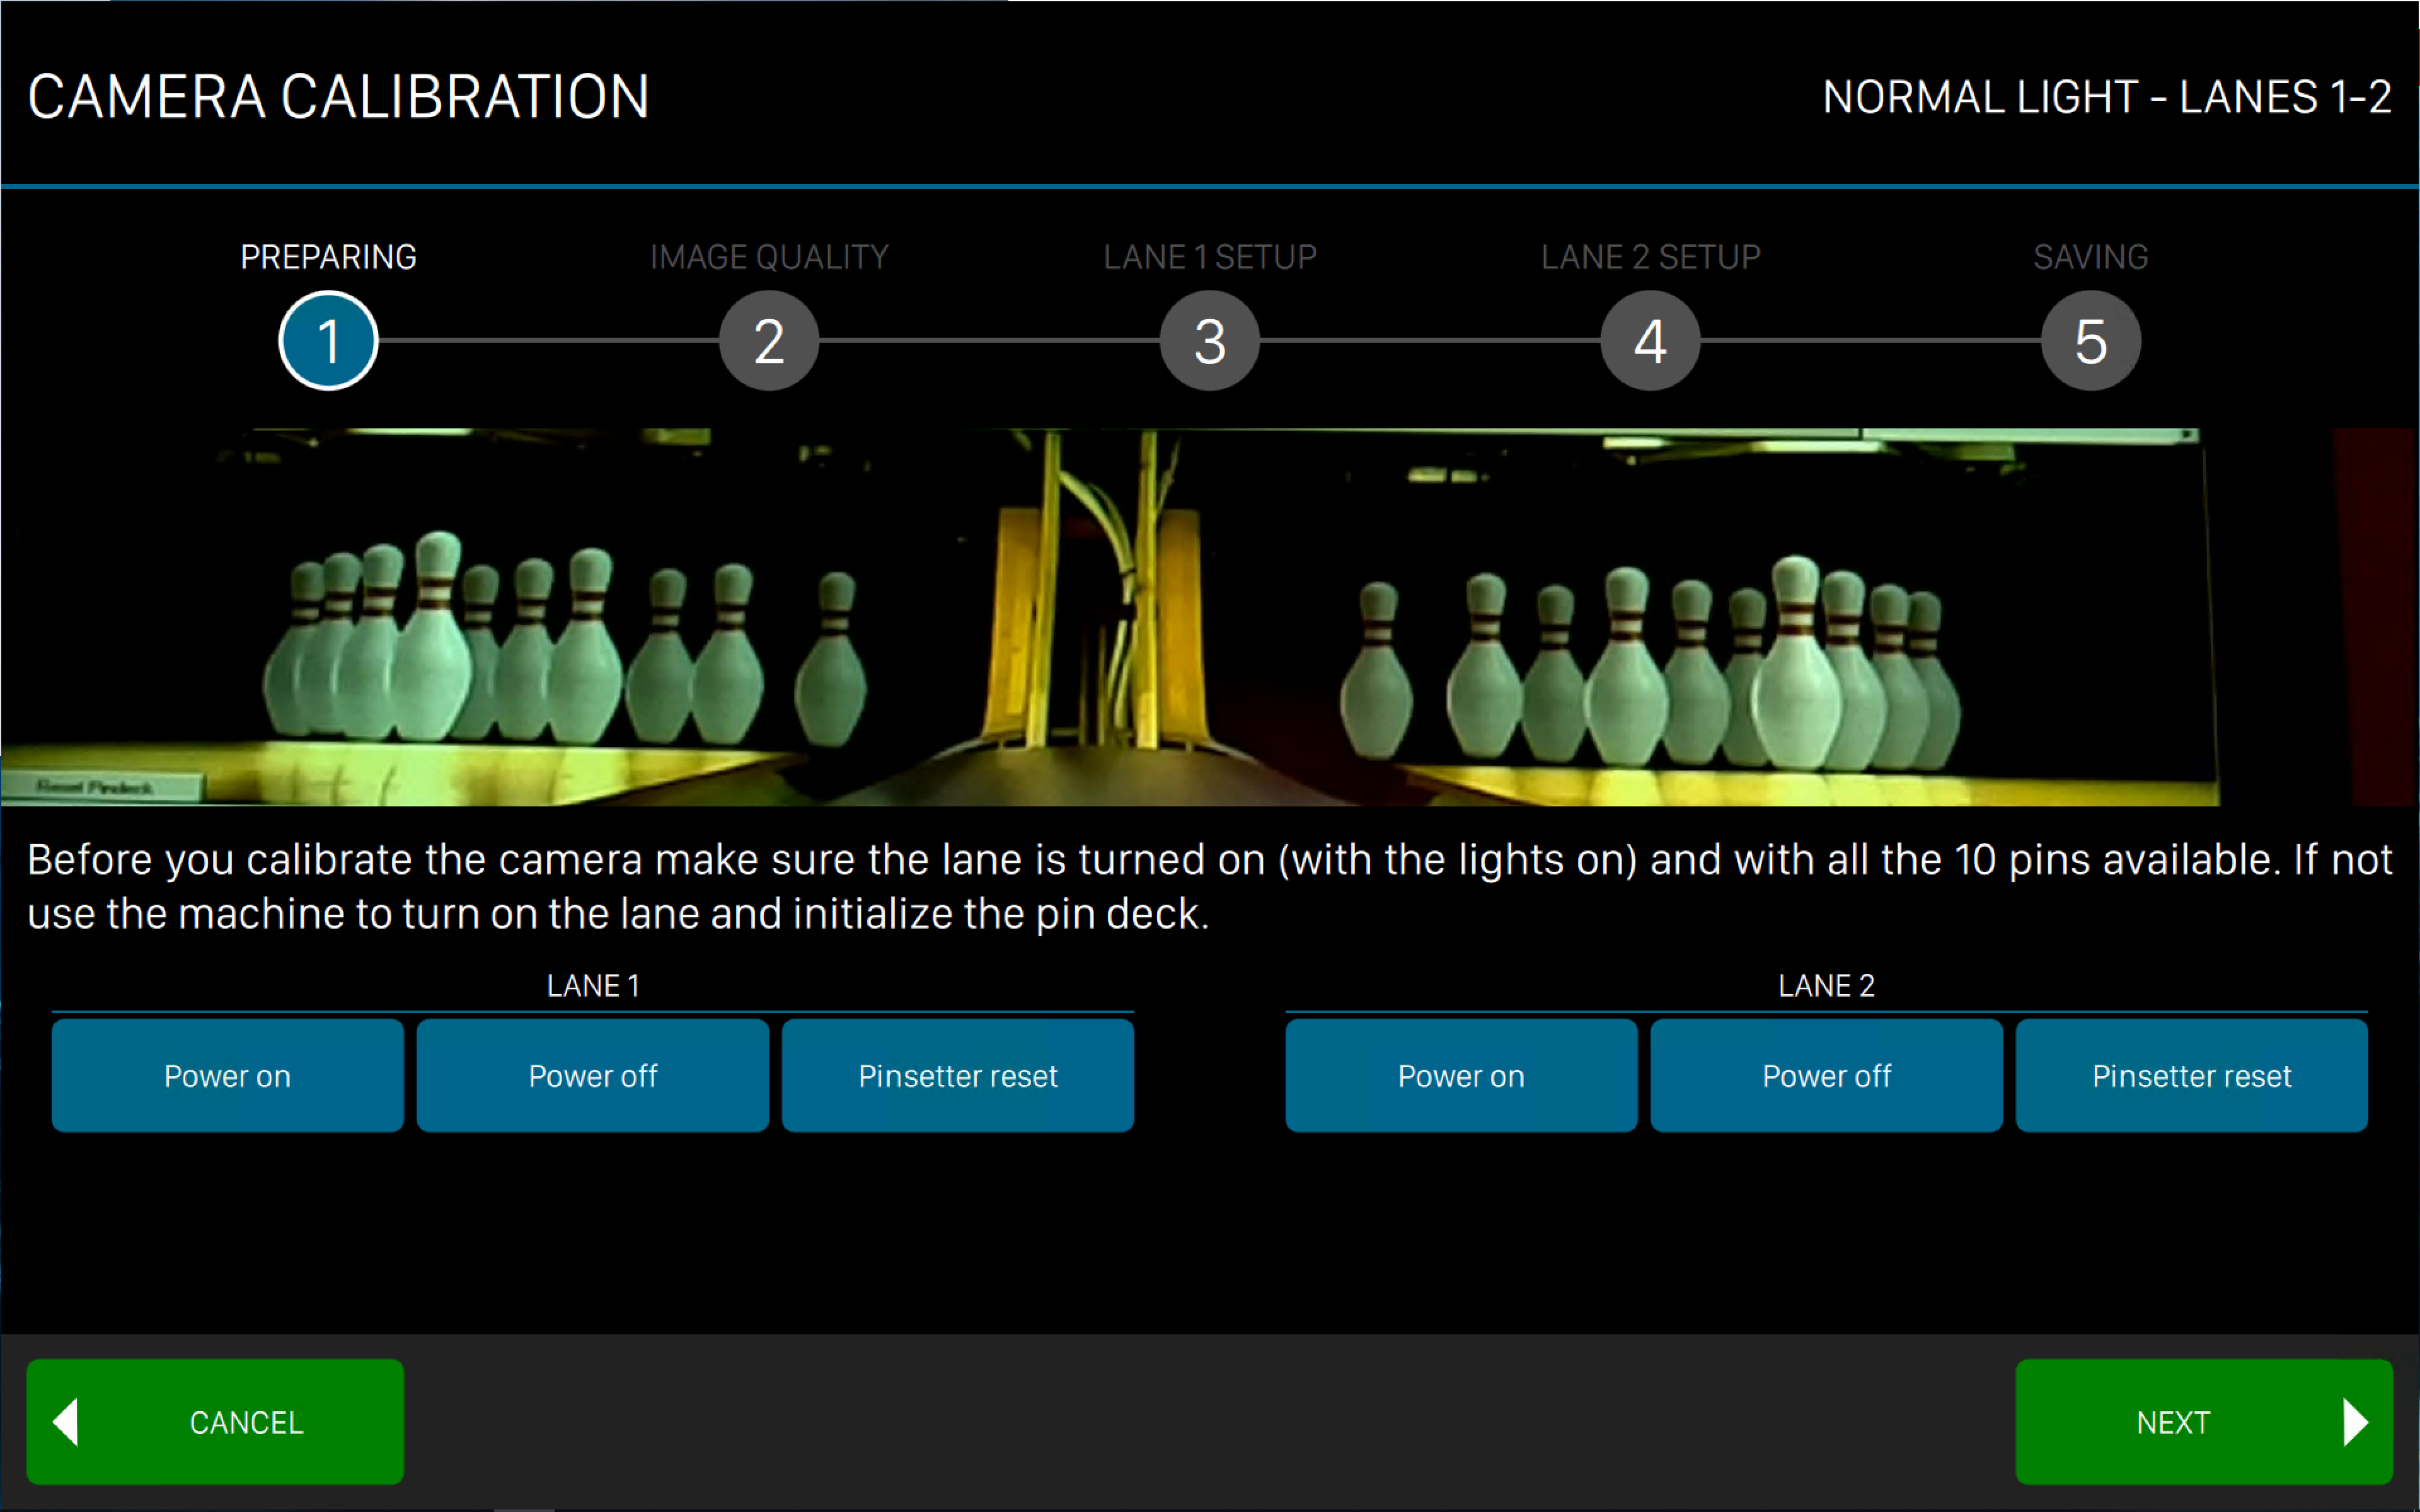
For each lane you can send some machine commands:
-
Power on: gives power to the machine
-
Power off: shut down the machine
-
Pinsetter reset: send a pinsetter reset command to the machine, which will put all the pins to their original position
Once you are done click Next to proceed to the next step.
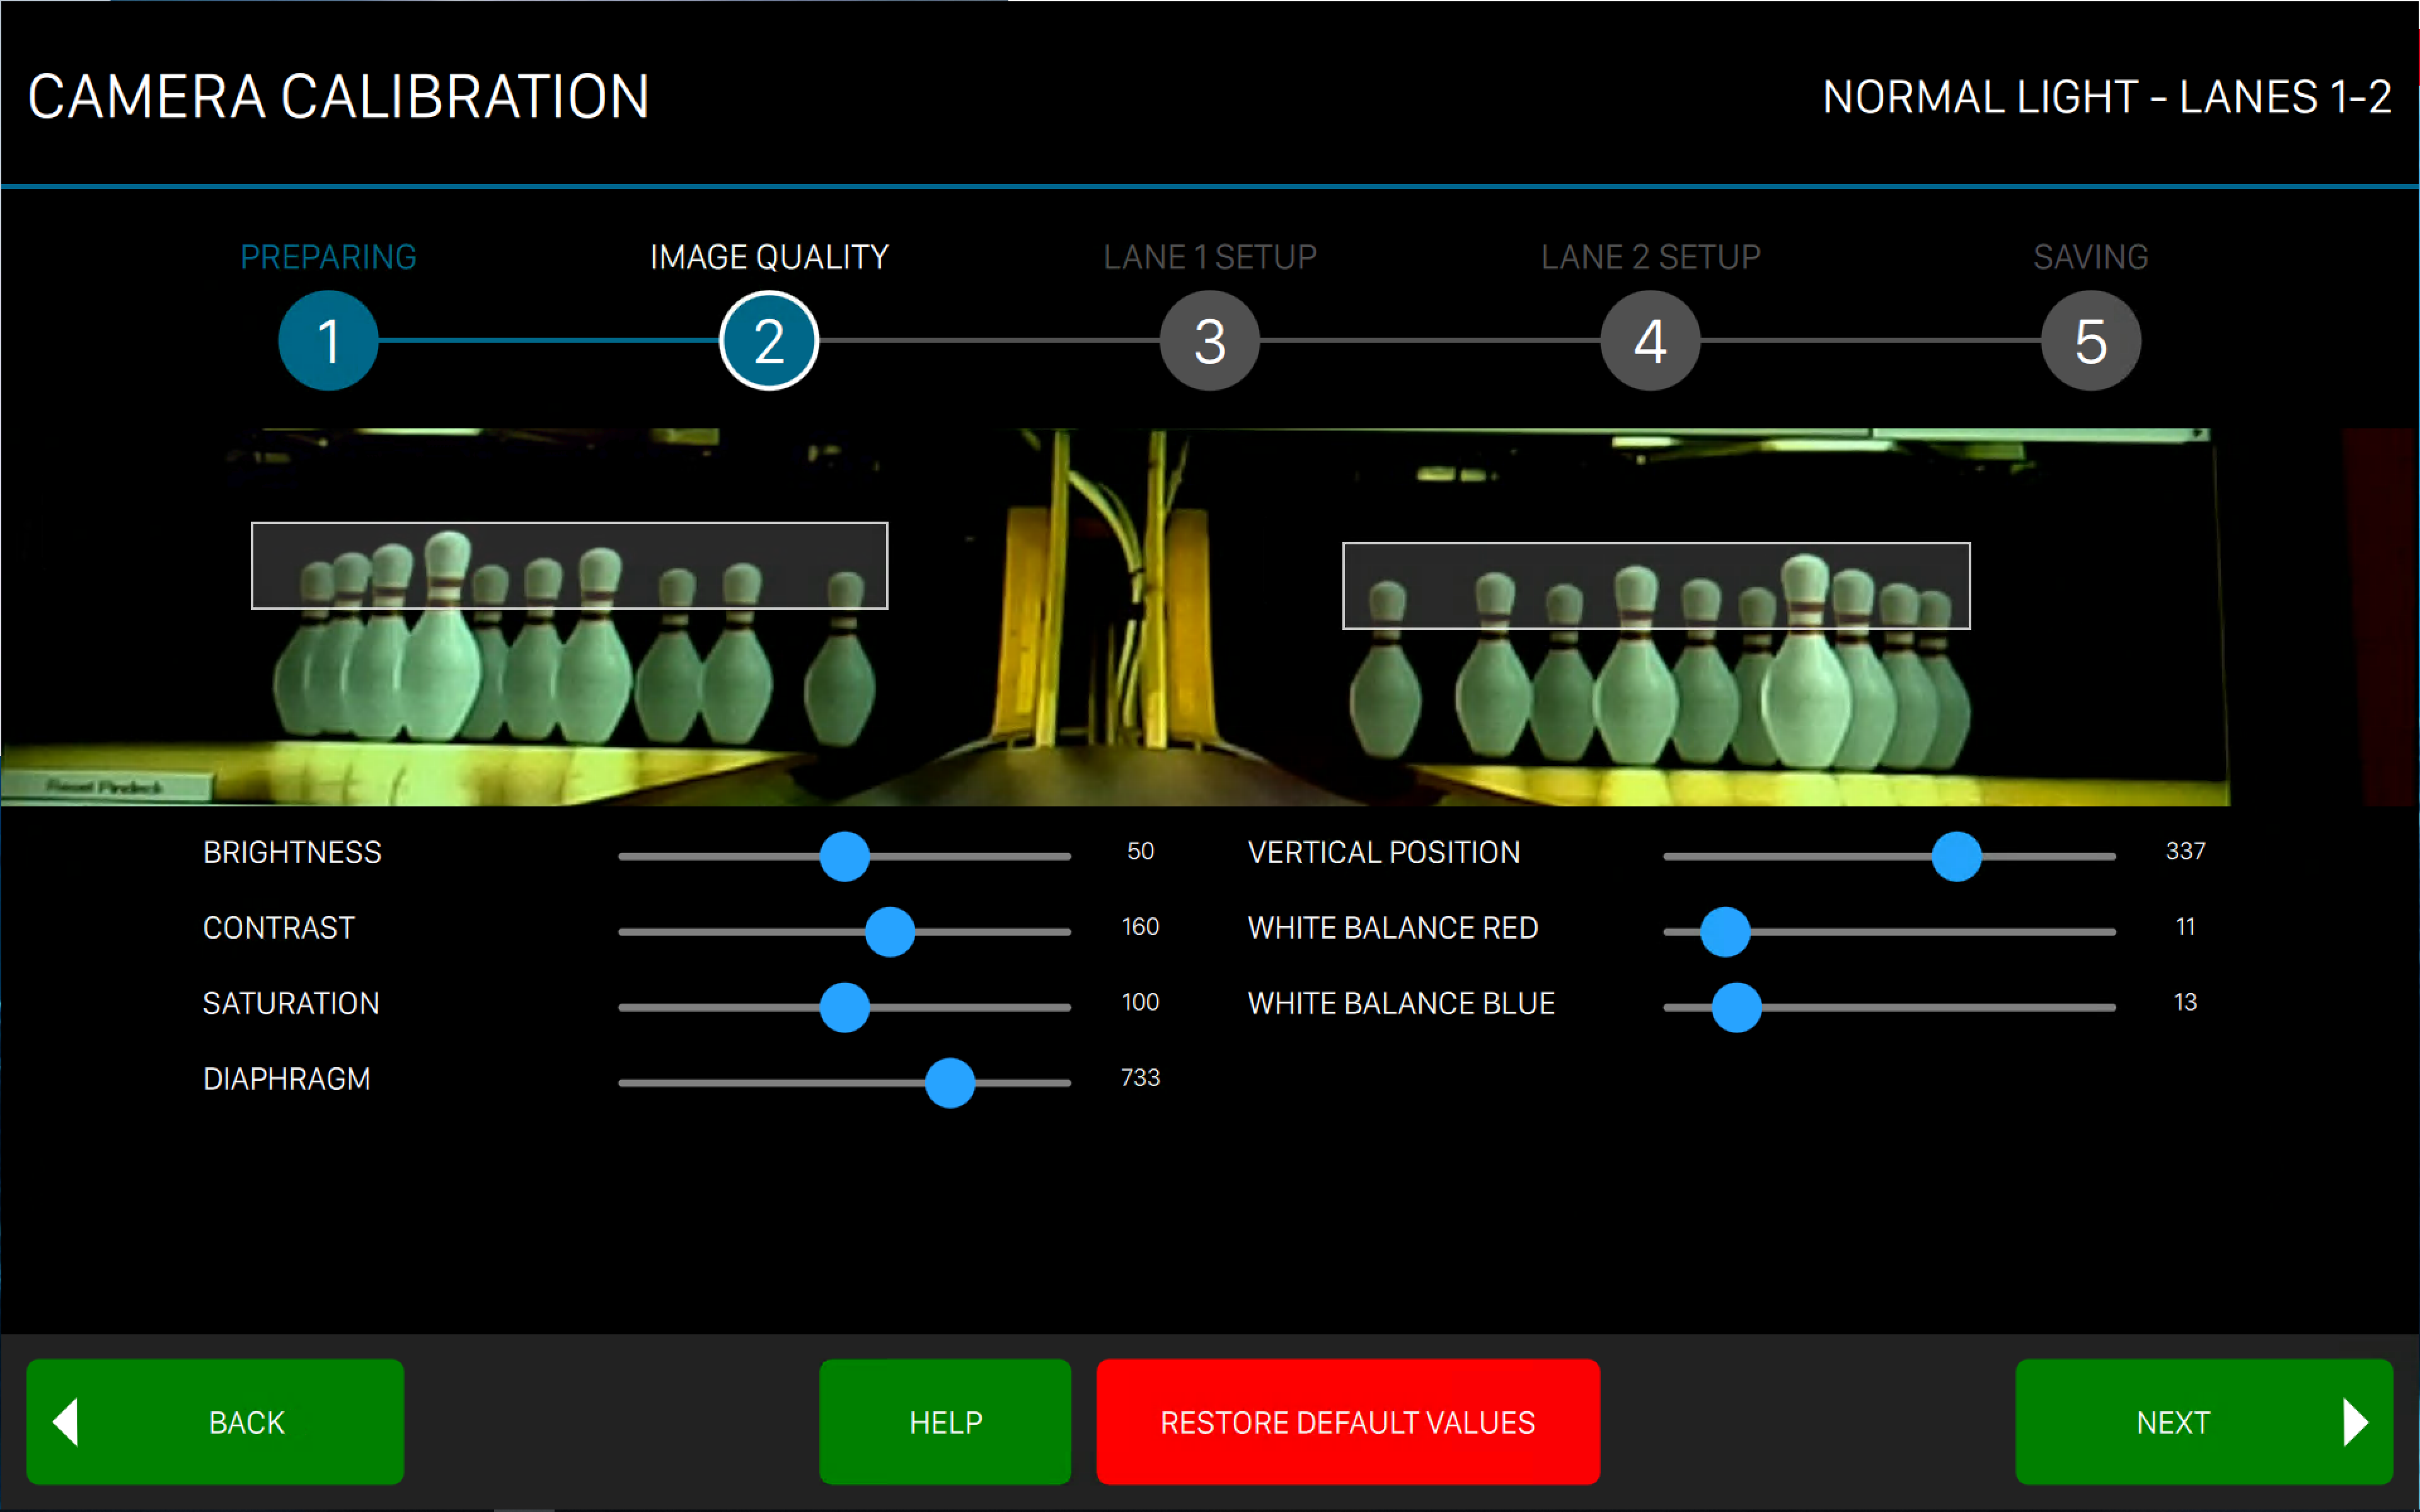
From this window you can set the image quality, by drawing a rectangle around the heads of the pins. You can also set the saturation, contrast, diaphragm, vertical position, white balance red and white balance blue of the camera, in order to have a more precise and clear image. Consider that you should have a dark background and the pins should be clearly visible.
Once you are done click Next to proceed with the next step.
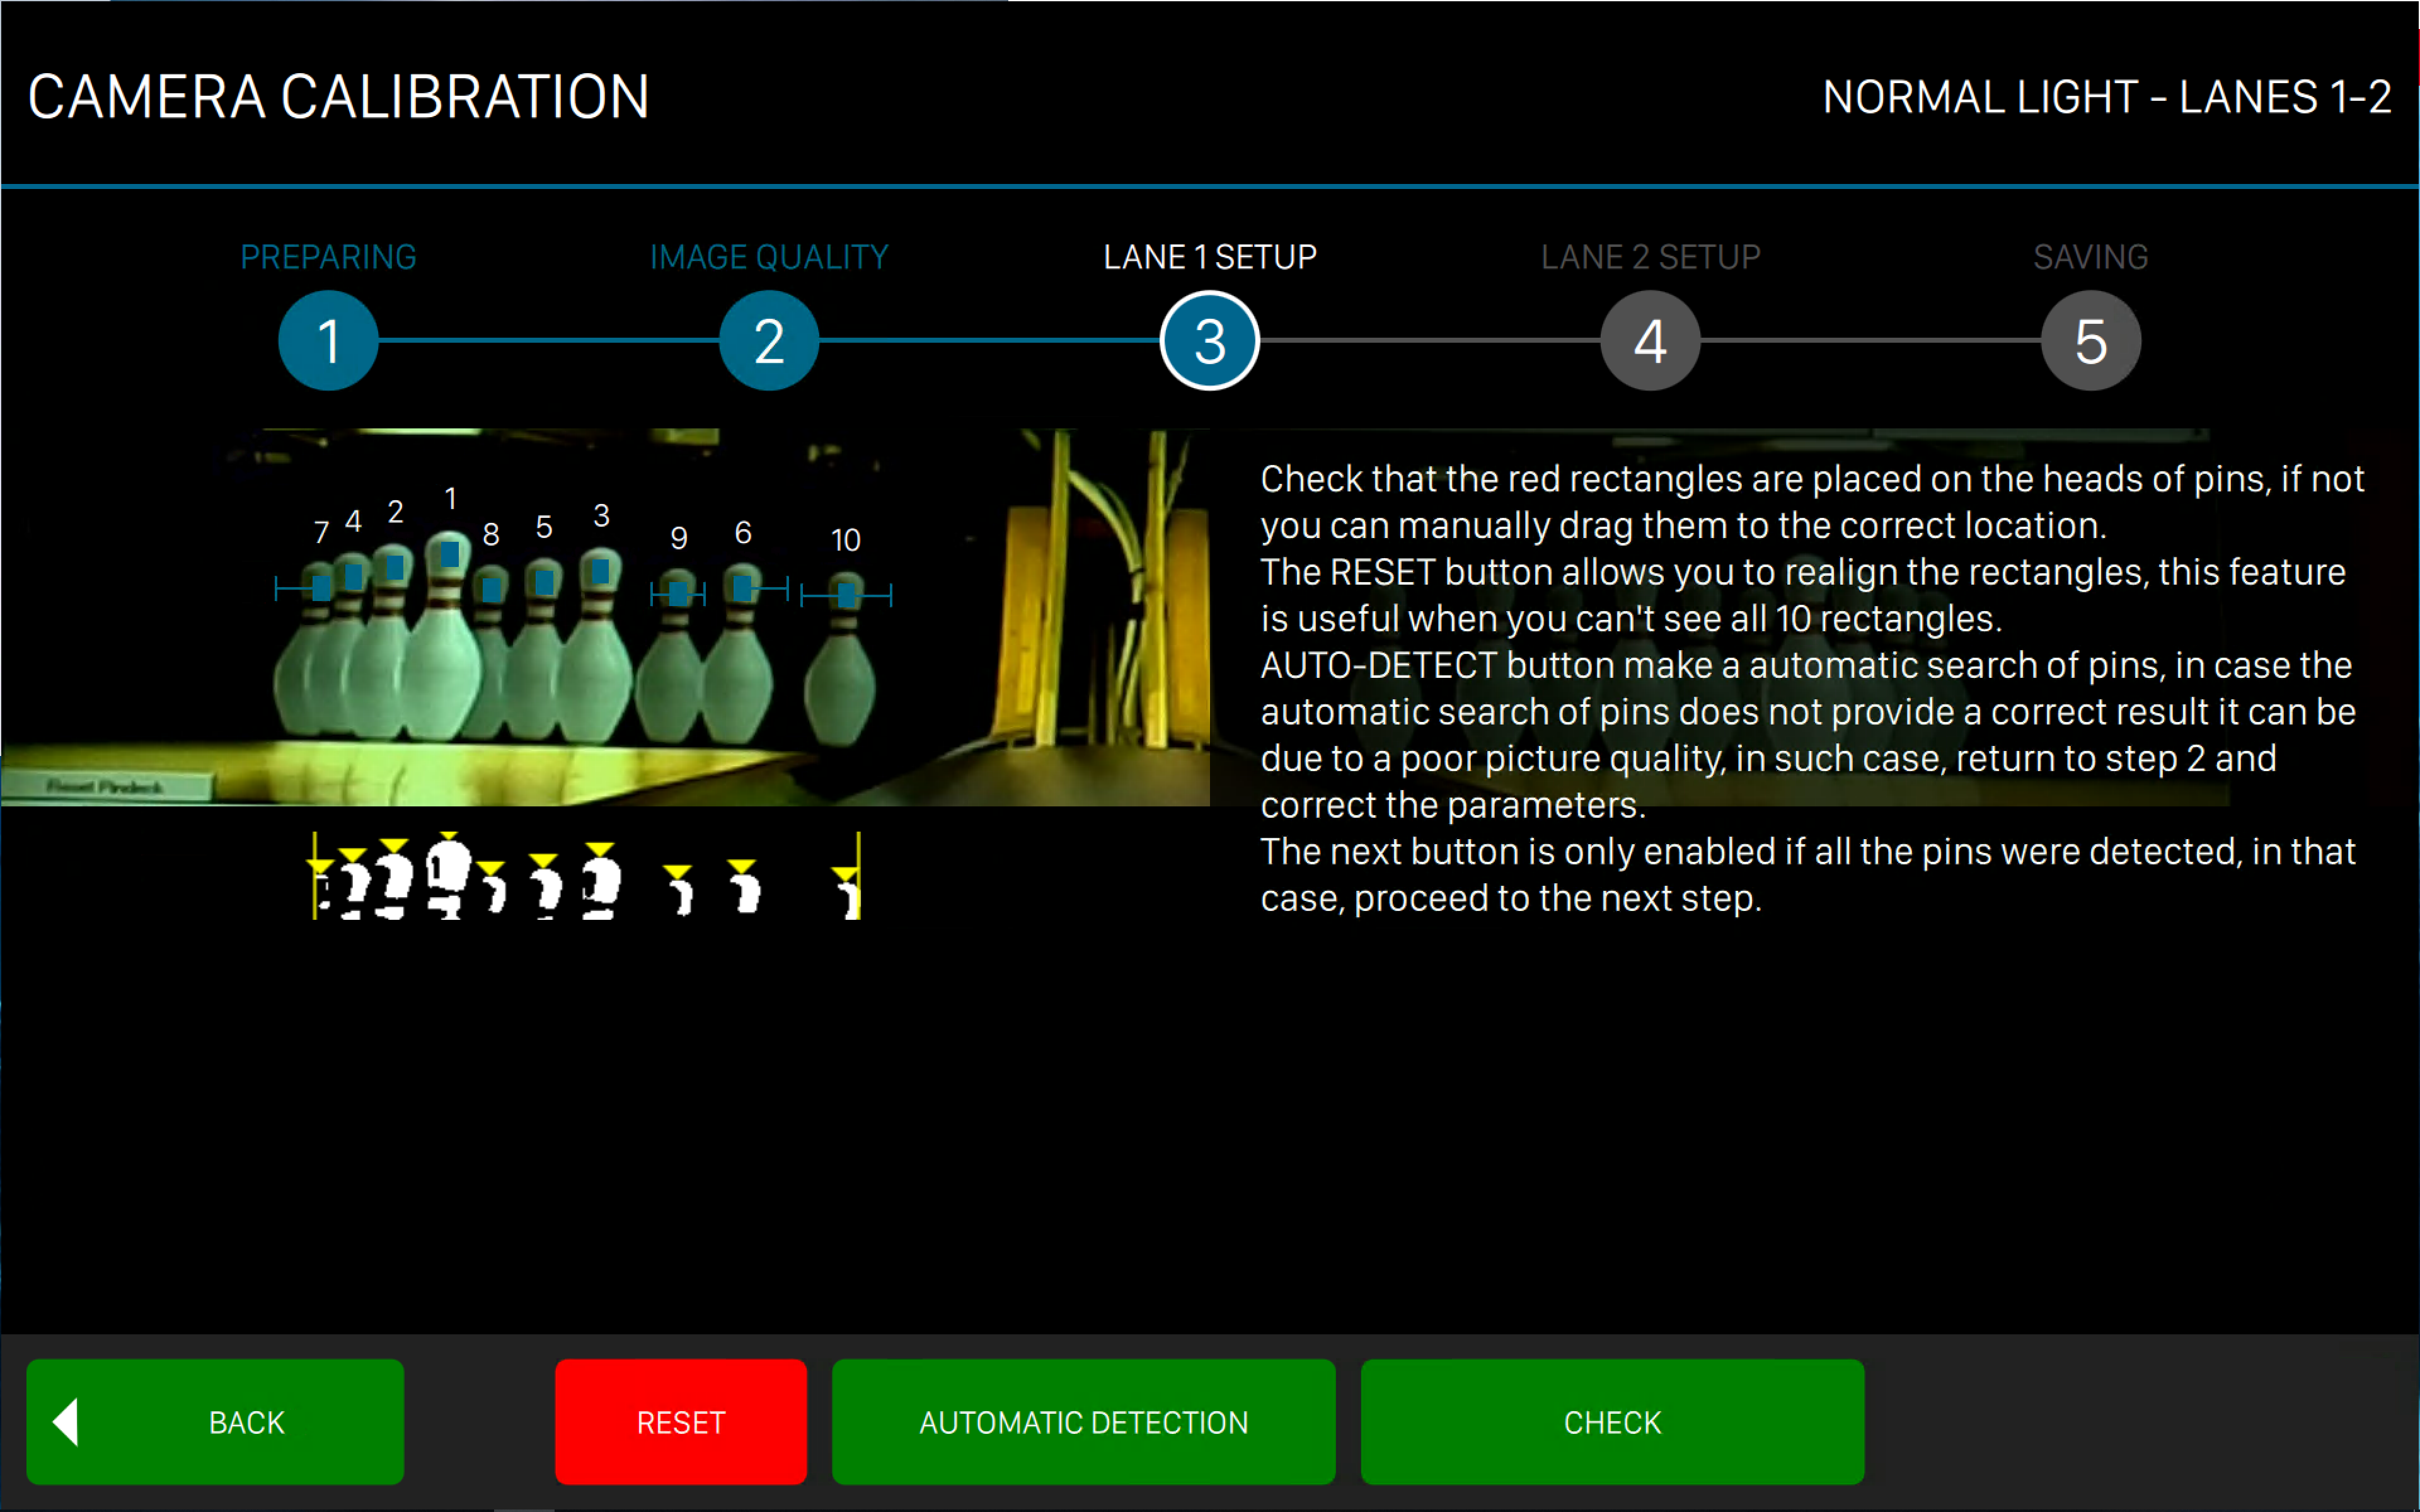
From this window you can identify each pin with its relative number, by dragging and dropping the blue squares on the head of the pins. You can click Automatic detection to allow the software to automatically identify the pins. Once you are done click on Check to execute a test. If all the ten pins are marked with a green check then the test succeeded and you can proceed with the next lane.
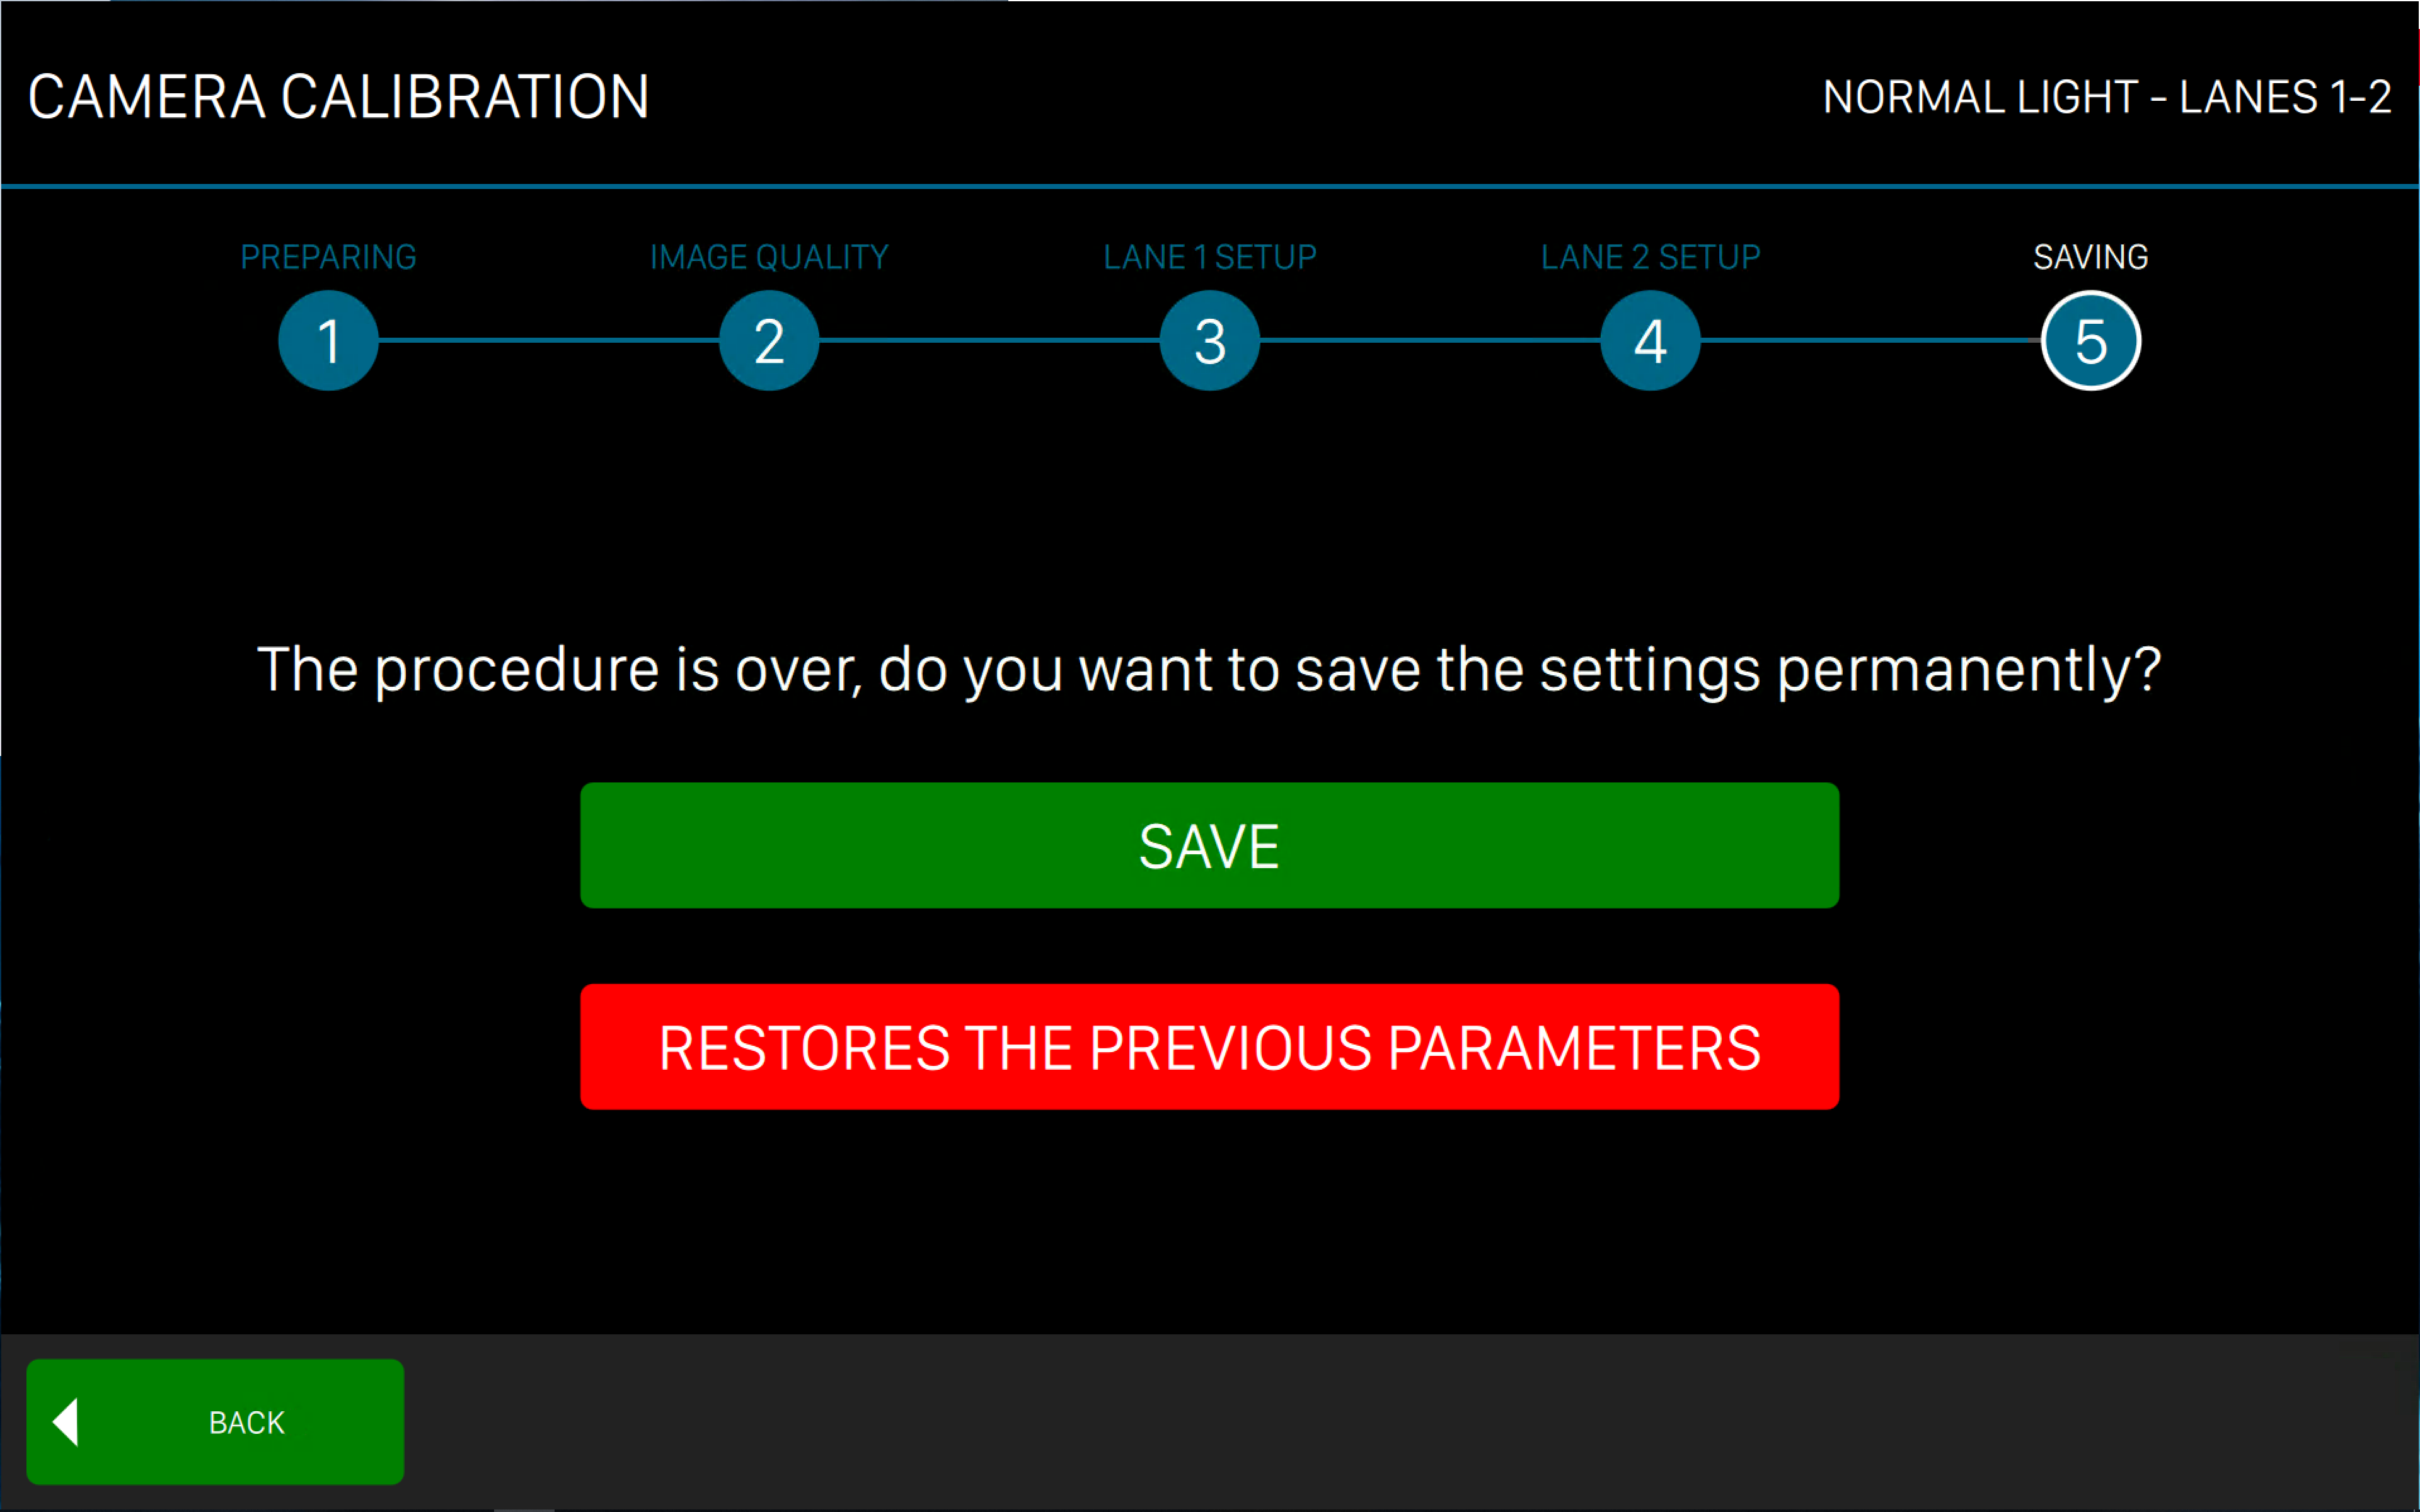
When the procedure is over you can decide to Save the changes or restore the previous parameters.
17.20.6 Hardware diagnostic

The status of the various PC boards in the system can be checked by selecting one or more lanes. The color of the pc boards shows its status. GREY means that the pc board is either not installed, switched off or defective. GREEN means that the pc board is working properly. The troubleshooting of the hardware is greatly simplified in this way. The firmware and boot loader versions of each pc board are shown below each PCB. Click on a pc board to open a window that contains more information. These information are useful to find a potential problem or to check other parts of the hardware and of the machines.
BitPC
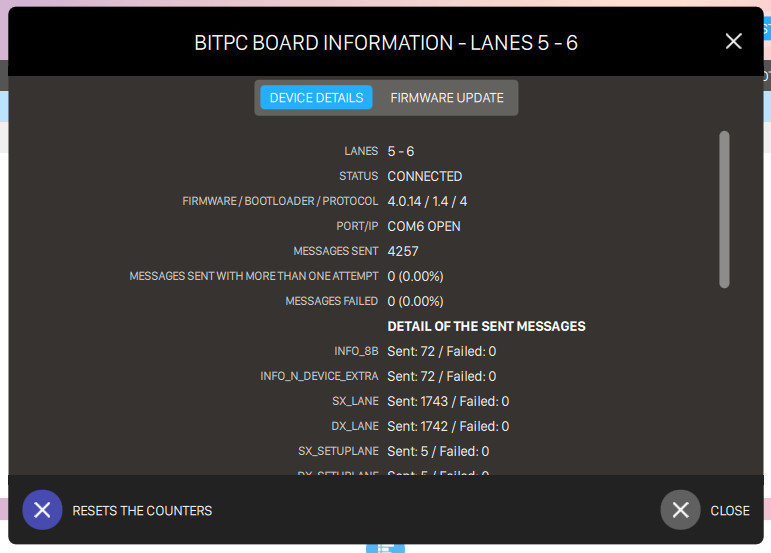
Click on the BitPC board image to access its details. The Board Details window shows information about the BitPC board:
-
Card details
-
Lanes checked: indicates the couple of lanes the card belong to
-
Card detected: indicates the presence or the failure of the board
-
Firmware/Bootloader/Protocol: shows the installed version
-
Serial Port: shows the connected serial port in the LanePC
-
Port/IP: port and ip address where the software is communicating
-
Serial Messages Sent: shows the percentage of the Serial Messages sent.
-
Messages sent: number of messages sent
-
Messages failed: number of messages failed
-
Detail of the sent messages: shows all the type of messages sent with related data
-
Serial Messages Sent with More....: shows the percentage of the Serial Messages sent with more than one attempt. The messages are sent 3 times before this field shows the error.
-
Serial Messages Failed: shows the percentage of the failed messages
-
Details on Serial Messages Sent: allows you to identify the specific area, in case there are errors (messages failed).
-
-
Firmware update: this page allows you to check the firmware version of each pcb installed and eventually to update them. Press the Start Firmware Reprogramming button

BitLANE
Click on the BitLANE board details button to access the detailed information:
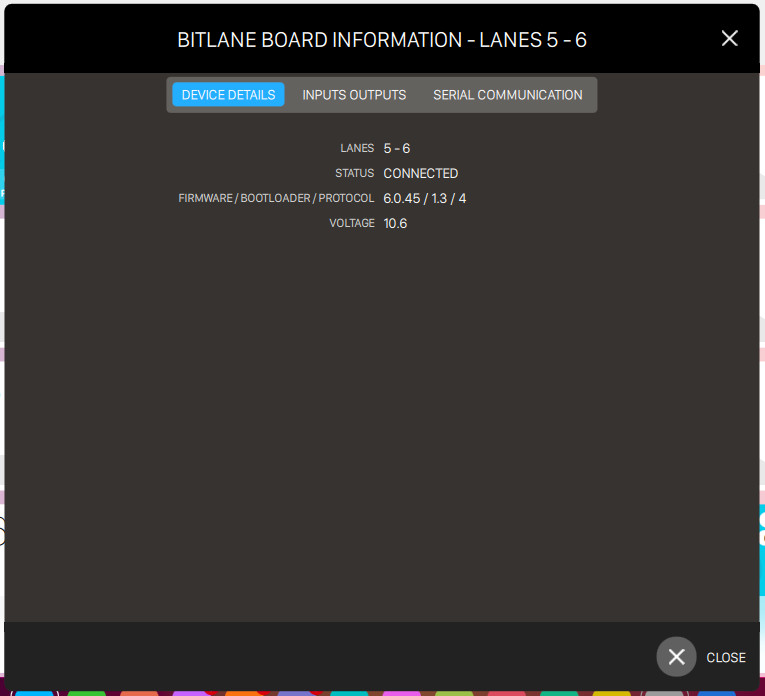
This window indicates:
-
The lanes the board is connected to
-
The status of the board
-
The firmware, bootloader and protocol version
-
The value of voltage
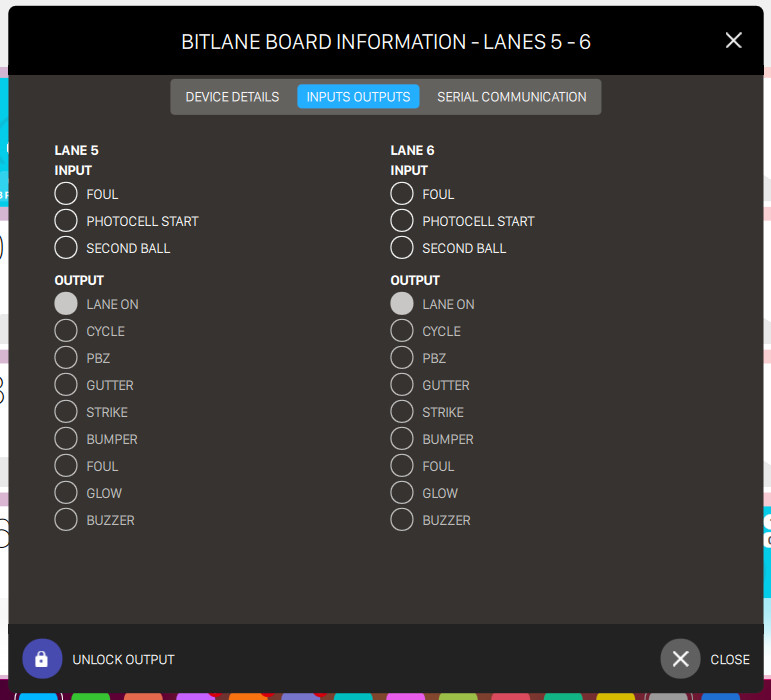
This window show the input and output values for each lane connected to the board. The INPUT section shows the signals going to the system. The output section shows the signals that the system sends to the machines. Click on the padlock icon to unlock it. Once unlocked, it is possible to simulate the machines functions clicking on the component to check.
The Serial Communication page allows you to check the BitPC serial communication:
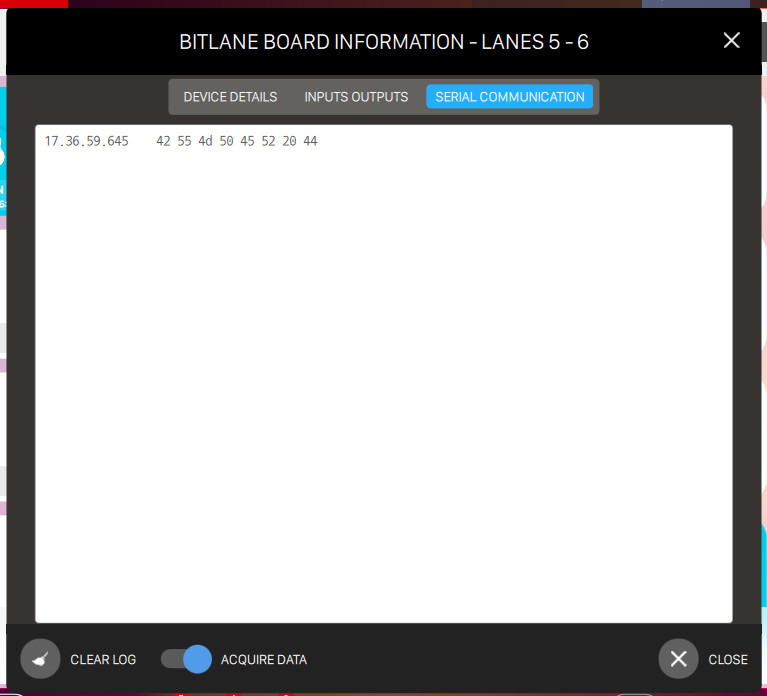
Check the ’Acquire data’ button to get the latest info. Click on Clear log button to clear the data.
BitCAM
Click on the BitCAM element details button to access detailed information about the BitCAM boards:
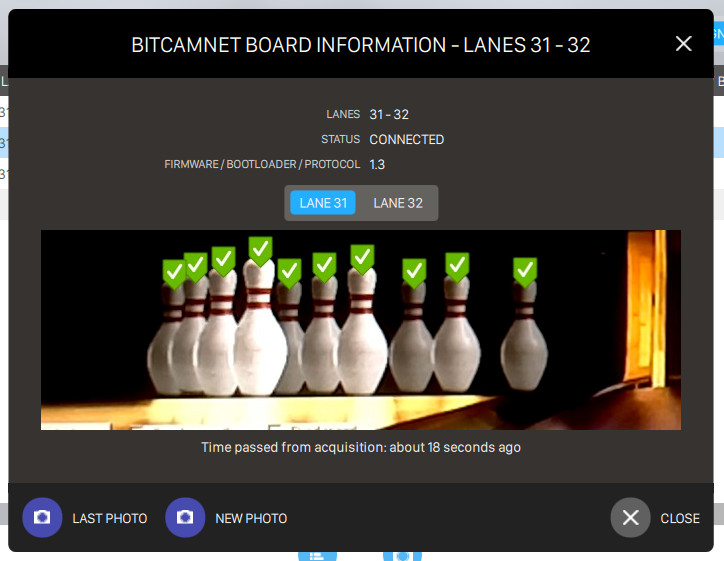
It also allows you to check in ’real-time’, the pins position in case there are reading mistakes. Click on ‘New photo‘ button to take a new picture of the pins. Click on Last photo button to restore the previous taken picture.
BitChassis (only available for Switch machines)
Click on the BitChassis item to access detailed information about the BitChassis board:
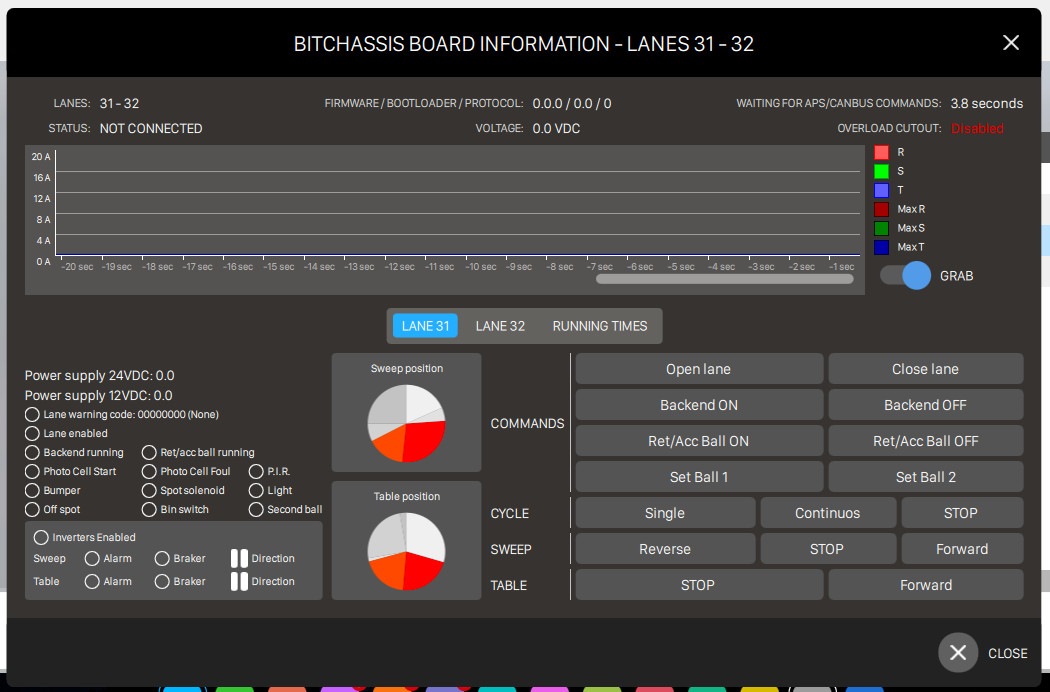
In this screen it is possible to many functions of the SWITCH chassis. The following information are shown on the top of the window:
-
Lanes: indicates the lanes number
-
Status: indicates the status of the board
-
Firmware/Bootloader/Protocol: indicates the version of the installed firmware, etc.
-
Voltage: indicates the operating voltage
-
Waiting for APS/CAN bus commands: indicates that the chassis accepts APS commands (‘strike’, ‘sweep reverse’) from external sources
-
Overload cutout: indicates the load current limit set on the chassis pc board. If the preset current limit exceeds this value, the pair of lanes switches off and an alarm signal is generated
The chart below shows, by colored lines, the electric energy consumption for each phase and the overload limits, every 2 seconds. Grab enable option allows you to freeze the window in order to check the values.
Below the chart you can find a panel where you can see information about one specific lane of the couple and execute some commands. ‘Running times’ tab displays more information about the use of the lanes.
The lower part of the screen allows you to verify the low voltage power (12 - 24volts) and the correct operation of the lane components and of the inverters. On the right side there are the graphic images of the Sweep and of the Table Cams and a list of commands that allows you to check the lane motors.
Commands
-
Open lane: switches on the lane
-
Close lane: switches off the lane
-
Backend on: switches on the backend motor
-
Backend off: switches off the backend motor
-
Ret/Acc Ball ON: switches on the ball return and the accelerator motors
-
Ret/Acc Ball OFF: switches off the ball return and the accelerator motors
-
Set Ball 1: puts the machine on ball 1
-
Set ball 2: puts the machine on ball 2
Cycle
-
Single: allows you to run a single cycle
-
Continuous: allows you to run continuous cycles
-
STOP: stops the cycle function
SWEEP
-
Reverse: allows you to run the sweep motor backward
-
STOP: allows you to stop the sweep motor
-
Forward: allows you to run the sweep motor forward
Table
-
STOP: allows you to stop the table motor
-
Forward: allows you to run the table motor forward
The Running times screen allows you to verify the use of the machines’ motors in order to plan the maintenance.
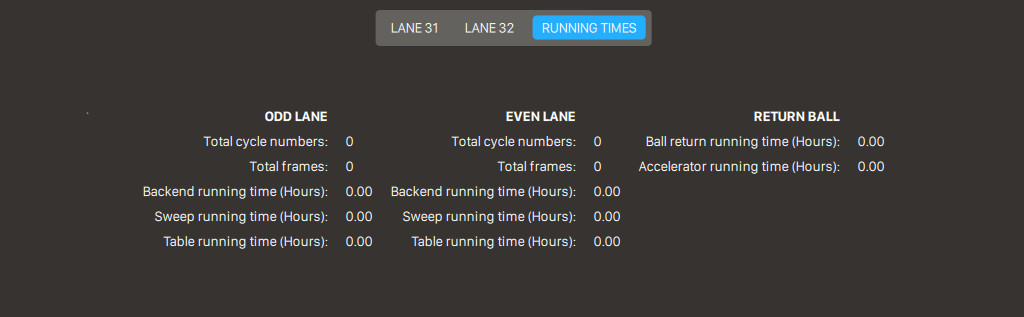
-
Total cycle numbers: indicates the total cycles performed
-
Total frames: indicates the total frames played
-
Backend running time (Hours): indicates how many hours the backend motor ran
-
Sweep running time (Hours): indicates how many hours the sweep motor ran
-
Table running time (Hours): indicates how many hours the table motor ran
-
Ball return running time: indicates how many hours the ball return motor ran
-
Accelerator running time: indicates how many hours the accelerator motor ran
17.21 Slideshow definition
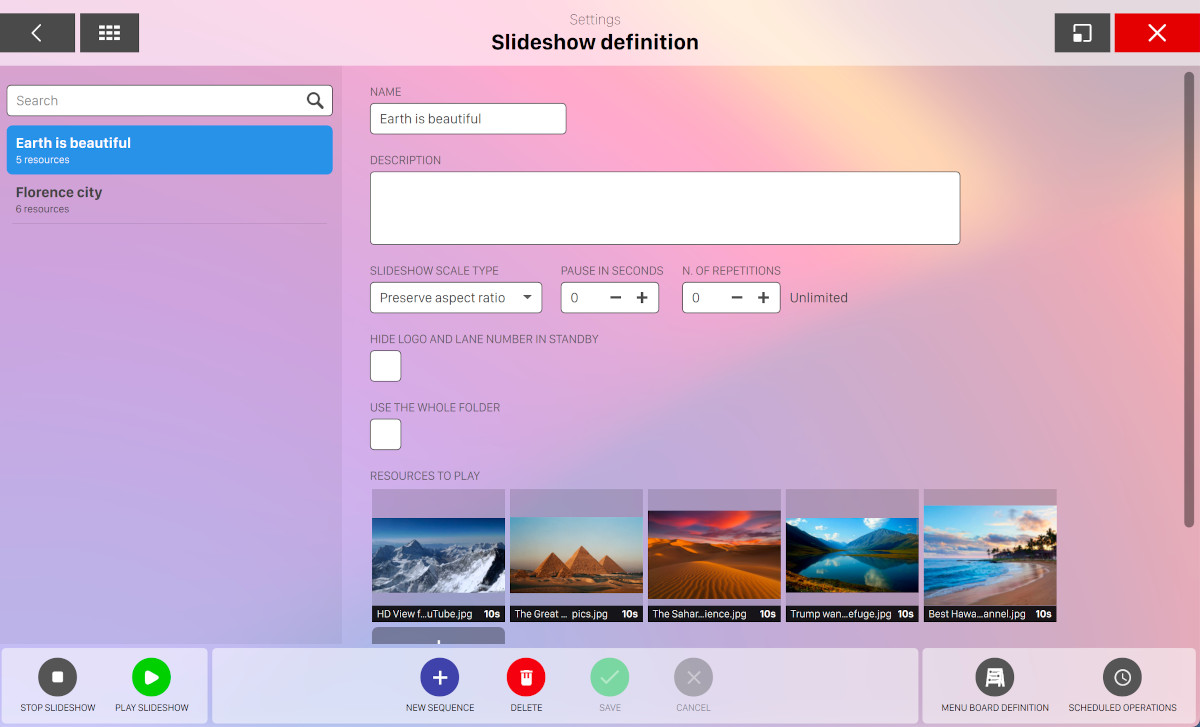
This window allows you to display pictures, advertising and videos or a group of them on the lane monitors, viewers or kiosk devices. In the case of lane monitors they will be visible only when the lanes are not in use. When a sequence of images has been sent to the lanes, it will replace the Genie logo on the overhead monitors. The window is splitted into three sections: the left section contains the sequences of images already created while on the right you can see the contents and the parameters assigned to the selected sequence.
17.21.1 Sequence Parameters
Each sequence can have the following parameters
-
Name: name of the sequence
-
Description: additional information about the sequence
-
Slideshow scale type: this option determines how the image should be rendered on the screen
-
Preserve aspect ratio: this option does not modify the aspect ratio of the image
-
Stretch to screen: this option modify the width and height of the image to the width and height of the screen
-
Cover all screen: this option cover the all screen with the selected image without modifying the width and height
-
-
Pause in seconds: shows the length of the pause between repetitions of the sequence. If ‘zero’ is entered, the sequence will loop without pauses. Note: the default background on the overhead monitors can be replaced with a new image, a sequence of images or video once a sequence is created with both the number of repeats and pause time set to zero, and sent to the selected lanes. The sequence will remain on the screen until the command is removed
-
N. of repetitions: the number of times that a sequence will be repeated on the lanes. The sequence will run continuously if it is set to zero
-
Hide logo and lane number in standby: check this option to remove the logo and the lane number when the image sequence is in standby mode
-
Use the whole folder: this option allows to use an existing folder selected from the Media Browser for the sequence
-
Resources to play: select one or more media items and add it to the list. If the menu board feature is enabled then you can also choose one ore more defined slides. At the same time you will see a shortcut to the menu board definition on the bottom right of the screen
For each item it is possible to customize the duration in seconds. By default this value is set to the pause in seconds field defined above. Edit a sequence and click on any of the images. A cog icon will be shown on the top right corner of the image. Click on the icon to show a popover:
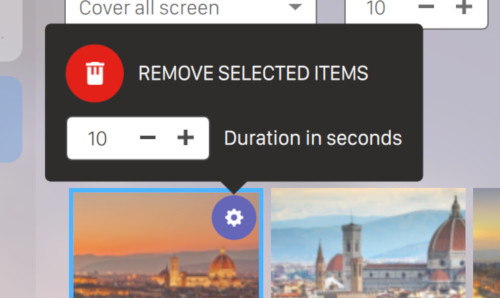
Click on the trash icon to remove the image from the sequence or edit the duration in seconds by clicking on the minus or plus icons.
Click on the gray square to add new images to the sequence. The image selection will be managed by the Media Browser.
17.21.2 Available Actions
-
Stop slideshow: allows you to stop the selected slideshow on specific devices
-
Play slideshow: allows you to allocate the selected image sequence to one or more devices:
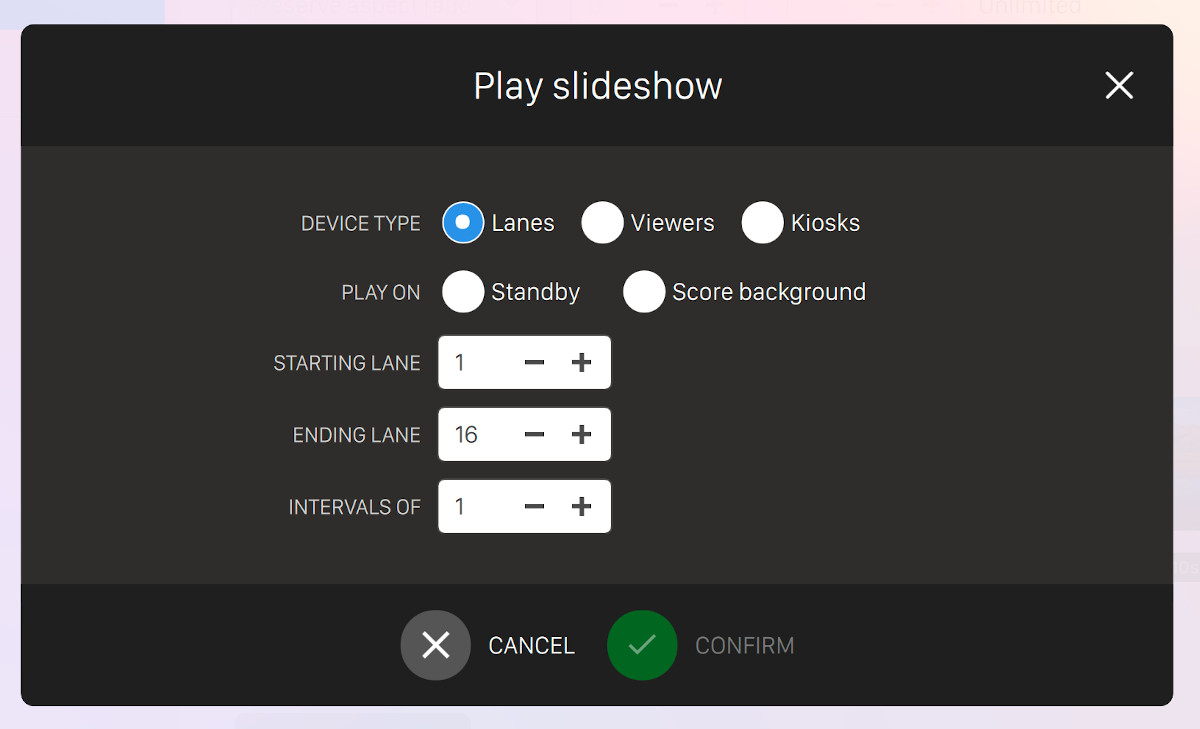
-
Device type: choose an option among lanes, viewers or kiosks
-
Play on: if the device type is a lane you can choose to set the image sequence as:
-
Standby: the sequence will be displayed without the score view
-
Background: the sequence will be displayed under the score view
-
-
Starting device: allows you to select the first device where the sequence will be sent
-
Ending device: allows you to select the last device where the sequence will be sent
-
Intervals of: allows you to send the sequence only to some devices with an interval. I.E. interval 2, the sequence is sent to the 1,3,5,7, etc. lanes (select 1 to send the sequence to all the lanes)
-
-
New sequence: allows you to create a new image sequence
-
Delete: allows you to remove the current image sequence
-
Save: saves the current changes
-
Cancel: discards the current changes
17.22 Lane Messages
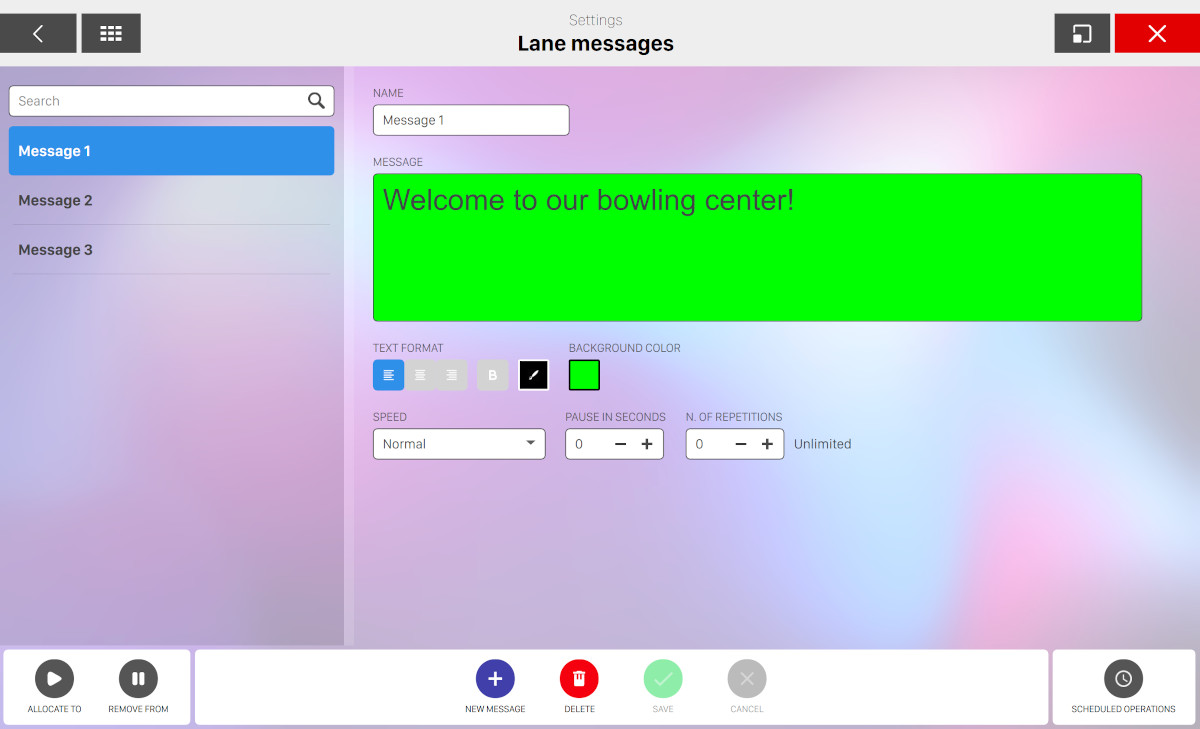
From this window it is possible to create scrolling text messages. The messages will appear at the bottom part of the overhead monitors. Messages can be displayed on lanes in standby or in play. When the message has more than one line of text, the lines will scroll up. The text messages are shown on the left section. The box on the right shows the text message as it will be displayed on the lane monitors.
To create a message use the following options:
-
Name: indicates the title of the message
-
Message: indicates the text of the message. You can select a portion of the text and customize the format:
-
Choose the alignment of the text (left, center, right)
-
Determine if the selected text should be bold
-
Determine the text color of the selected text
-
-
Background color: indicates the background color of the message. Select the background color from a preset
-
Speed: the scrolling speed can be selected from: slow, normal and fast
-
Pause in seconds: shows the time interval between repetitions. When the value is set to zero there will be no interval between the repetitions. To show a message continuously, set to zero both number of repeats and pause time. The message will run until the command is removed
-
N. of repetitions: the number of times the message will be displayed. If the value is set to zero, the message will run continuously
17.22.1 Available Actions
At the bottom side of the window you can find some buttons:
-
Allocate to lanes: allows you to allocate the selected message to one or more lanes. A popup will appear:
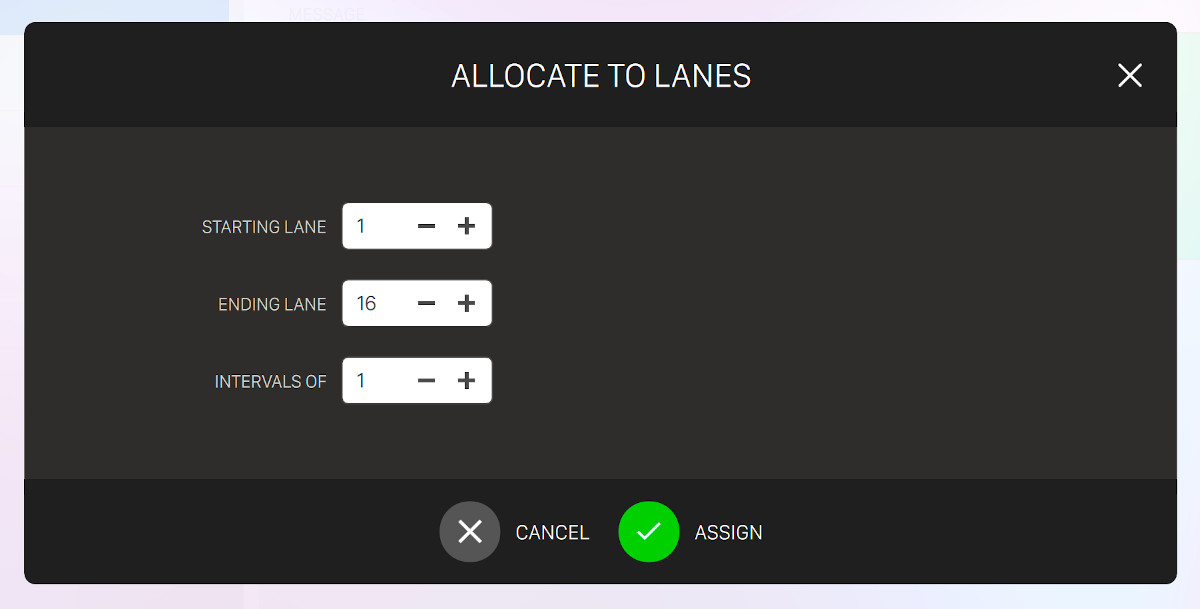
-
Starting lane: select the lane number to start the range
-
Ending lane: select the lane number to end the range
-
Interval of: select the interval of the range. Select 1 to apply the message to each lane of the range
-
-
Remove from lanes: allows you to remove the selected message from one or more lanes. A popup will appear:
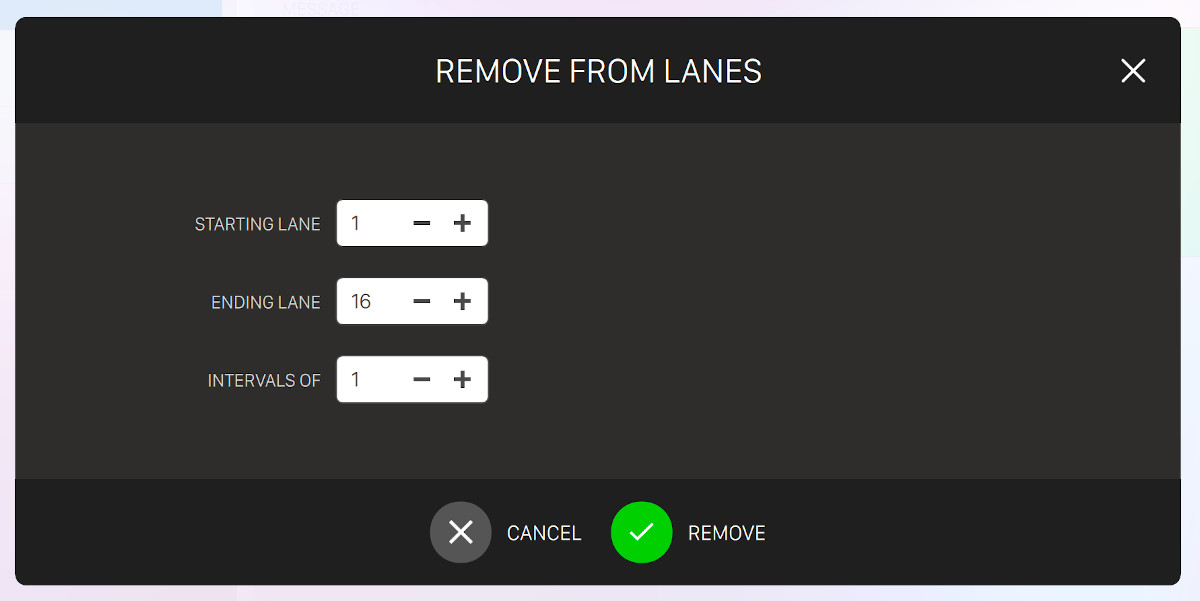
-
Starting lane: select the lane number to start the range
-
Ending lane: select the lane number to end the range
-
Interval of: select the interval of the range. Select 1 to remove the message to each lane of the range
-
-
New message: allows you to create a new scrolling message
-
Delete: allows you to delete the selected messages
-
Save: saves the current changes
-
Cancel: discards the current changes and restores the previous data
17.23 Reservation board
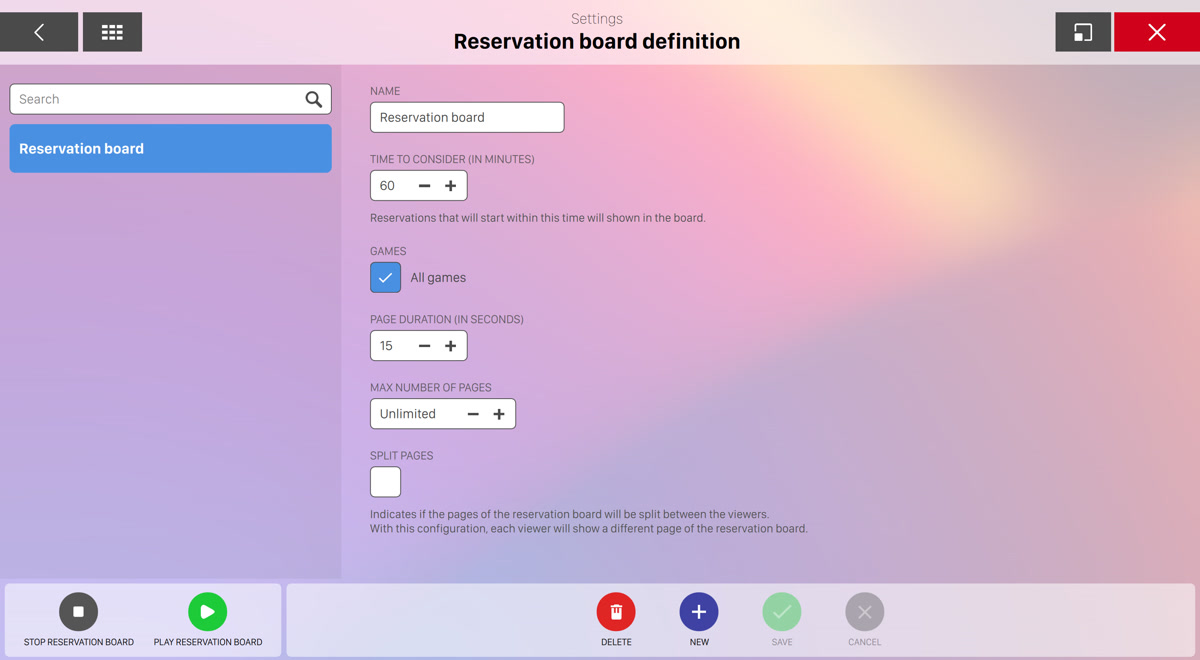
From this section it is possible to create and customized the boards related to reservations that can be shown on viewer devices.
Reservation boards allows customer to see the current state of the reservations on the bowling center and check for their reservation.
You can create more than one board. On the left sidebar you can see the list of boards you have created so far, while on the central area you can see the form of the board you are about to create or update.
Click on the new button to create a new board or click on any item on the sidebar:
-
Name: indicates the name of the board
-
Time to consider (in minutes): set the time in minutes to be considered for the reservations. Reservations that will start within this time will be shown on the board
-
Time to keep reservation not started (in minutes): determines for how long a not started reservation should be kept on the reservation board after its scheduled time. This applies to cancelled and late reservations.
-
Games: allows you to filter the reservations by specific game types, such as bowling or time games
-
Page duration (in seconds): set the duration in seconds of each page of the board
-
Max number of pages: set the maximum number of pages to be displayed. Unlimited option is also available
-
Split pages: indicates if the pages of the reservation board will be split between the viewers. With this configuration, each viewer will show a different page of the reservation board
Click on the save button to confirm the changes or click on the cancel button to discard them.
At the bottom left of the screen you can see two buttons:
-
Play reservation board: allows you to play the reservation board on the viewer devices
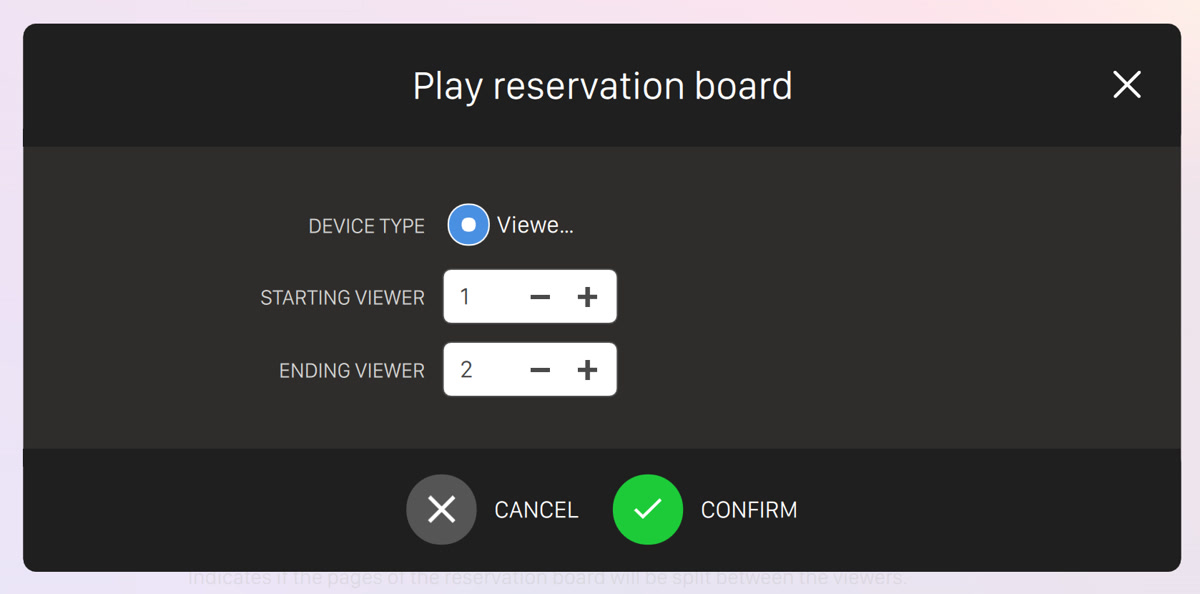
You can select the range of viewer devices where the reservation board will be played.
-
Stop reservation board: allows you to stop the reservation board on the viewer devices
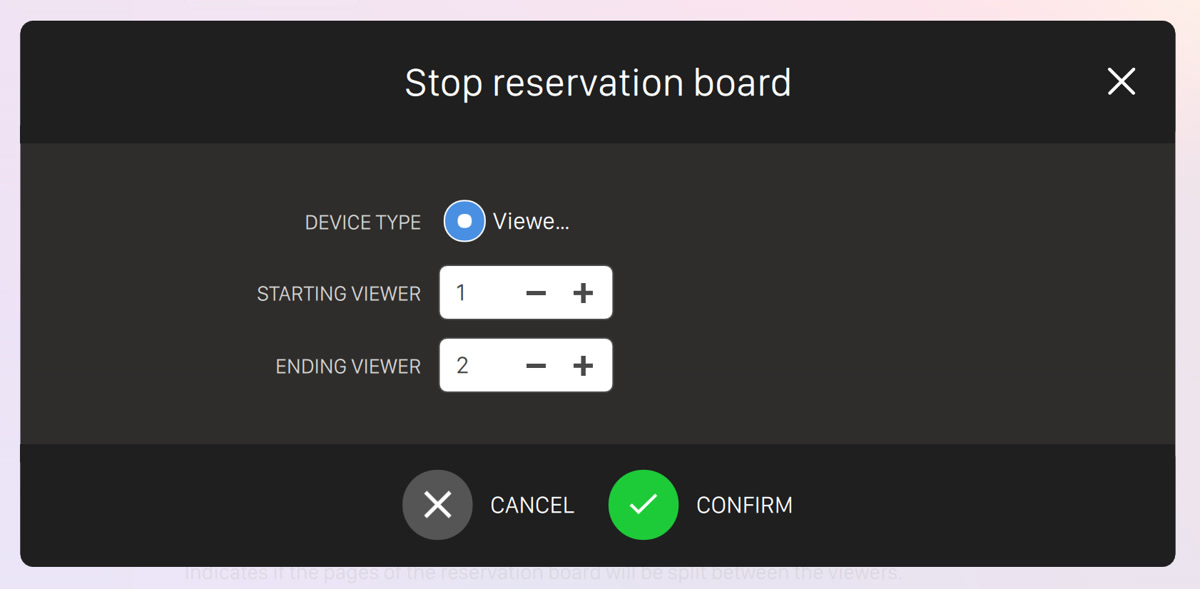
17.24 Menu board definition
From this section it is possible to define one ore more menu board items that can be used to show to the customers promotional or informational slides of articles / features of the bowling center.
This feature is not available by default and must be activated by setting the relative option on your software license: contact your distributor for getting support and activate it.

On the left sidebar you can see the list of all the boards that you have created so far. Use the search field to filter the list and find the board(s) that you are searching for. By clicking on any item on the left sidebar you will see the preview of the board on the central area and you can set the name by editing the relative field.
On the bottom area you can see a list of buttons actions that you can perform:
-
New board: create a new board item
-
Duplicate: duplicate the selected board
-
Modify: edit the selected board
-
Delete: remove the selected board
-
Save: save the current changes on the selected board
-
Cancel: discard the current changes on the selected board
-
Save as template: use the selected board as a template. Templates can be used for creating new boards by starting with an existing item and not from scratch. This feature is very useful to save time and reuse the work already done
17.24.1 Create a new menu board
By clicking on new board button you will be redirected to the template selection page:
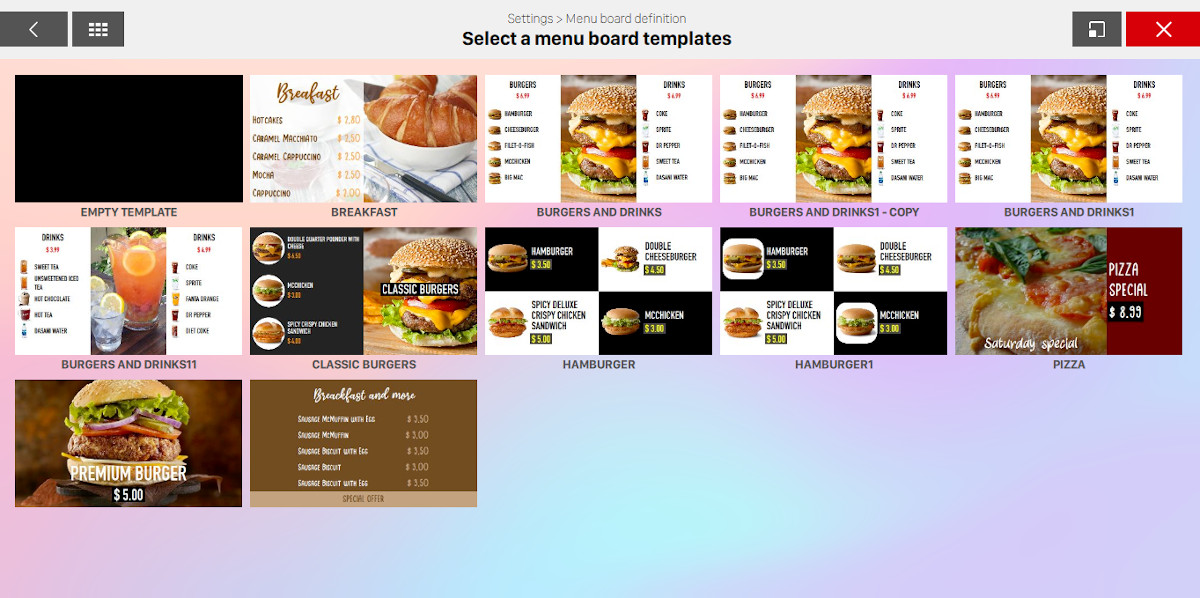
Choose the template that best suits your requirements and start creating a new board from that. If you want to start from scratch simply select the empty template.
17.24.2 Edit an existing menu board
Once you have created a new board or clicked on Modify button on an existing one you will see the board editor screen:
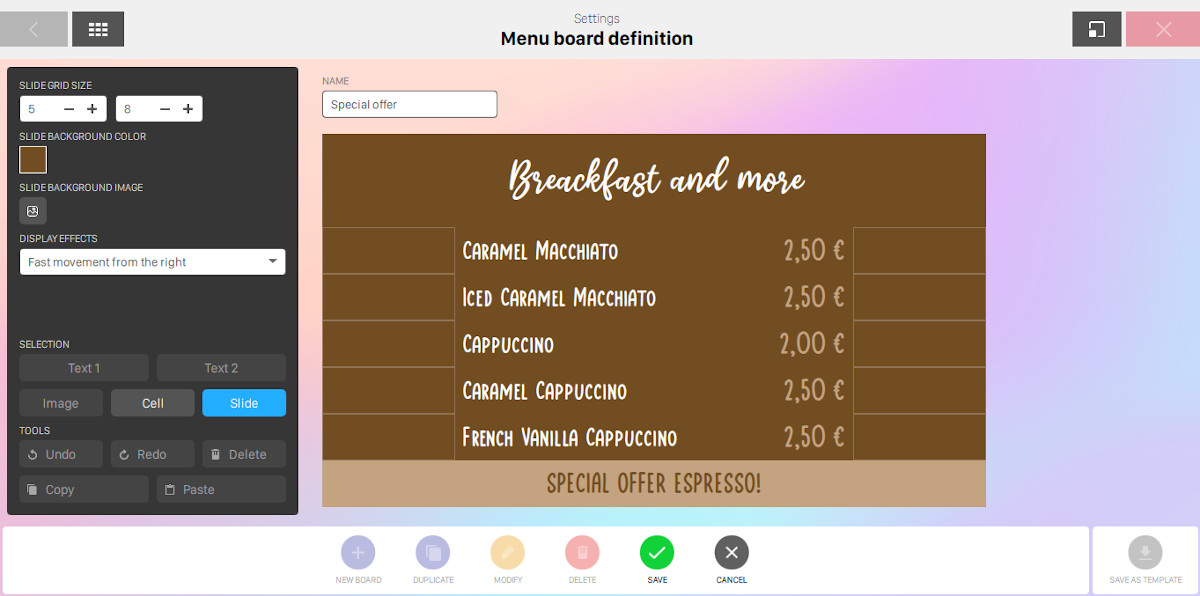
-
Slide grid size: first of all you have to select the size of the grid by setting the number of columns and rows.
-
Slide background color: select the background color of the slide by choosing it from a preset or by manually entering the hexadecimal code
-
Slide background image: select a background image from the slide by selecting it from the media browser
-
Display effects: select the animation type of the items when the slide is shown. Available options are
-
No effect
-
Fast movement from the right
-
Fast movement from the left
-
Fast movement from the bottom
-
Fast movement from the top
-
Slow movement from the right
-
Slow movement from the left
-
Slow movement from the bottom
-
Slow movement from the top
-
-
Selection: customize the selected cell. Each cell can contain two texts and one image
-
Text1 or Text2: customize the text1 or text2 of the cell
-
Text: enter the value of the text item. You can use template variables to automatically print article information
-
Text style: select the style of the text from a preset
-
Foreground and background color: select the foreground and background color of the text by selecting it from a preset or by manually entering the hexadecimal code
-
Text transformation: select the text transformation option from the list
-
Normal case
-
Upper case
-
Lower case
Text size: select the size of the text Text maximum lines: select the maximum amount of lines that will be shown
-
-
-
Image: select an image from the media browser
-
Remove bg: remove the background of the selected image
-
Remove: remove the selected image from the cell
-
Image shape: select the shape of the image
-
Square
-
Circle
-
Rounded
-
Rounded 2
Select the rule which determines how the image should be contained on the shape:
-
Fit
-
Crop
-
Scretch
Select the background color of the shape. Note that this function will take effect only if the background has been removed from the image
-
Cell: customize the content of the selected cell. If the cell is empty then click on create button for adding contents
-
Article: select an article by browsing the list of available articles. With this option you can customize the cell content with the article information. You can optionally edit the cell content to make it dynamic towards the article. In this case by default the cell content will contain the article name, the article price and the article image
-
Color: set the background color of the cell
-
Bg image: set the background image of the cell
-
Layout: select the layout of the cell contents
-
Vertical alignment: select the vertical alignment of the cell contents
-
Cell column span / row span: set the column and row span
-
Cell margins left right: set the left and right margin of the cell
-
Cell margins top bottom: set the top and bottom margin of the cell
-
-
-
Tools
-
Undo: discard and roll-back the last altertation you have made to the board
-
Redo: click on this button if you want to discard the undo operation you have just made
-
Delete: remove the selected cell content
-
Copy: copy the selected cell contents
-
Paste: replace the selected cell contents with the previously copied
-
17.24.3 Create a menu board from template
When creating a new menu board you will be redirected to the template gallery page, from where you can choose the template to start from. By default you will find a preset of examples and the empty template option. If you previously saved one or more existing boards as a template you will find them on this list.
Unless you select the empty template option you will be redirected to the board customization page, where you will be asked to edit the template parameters:
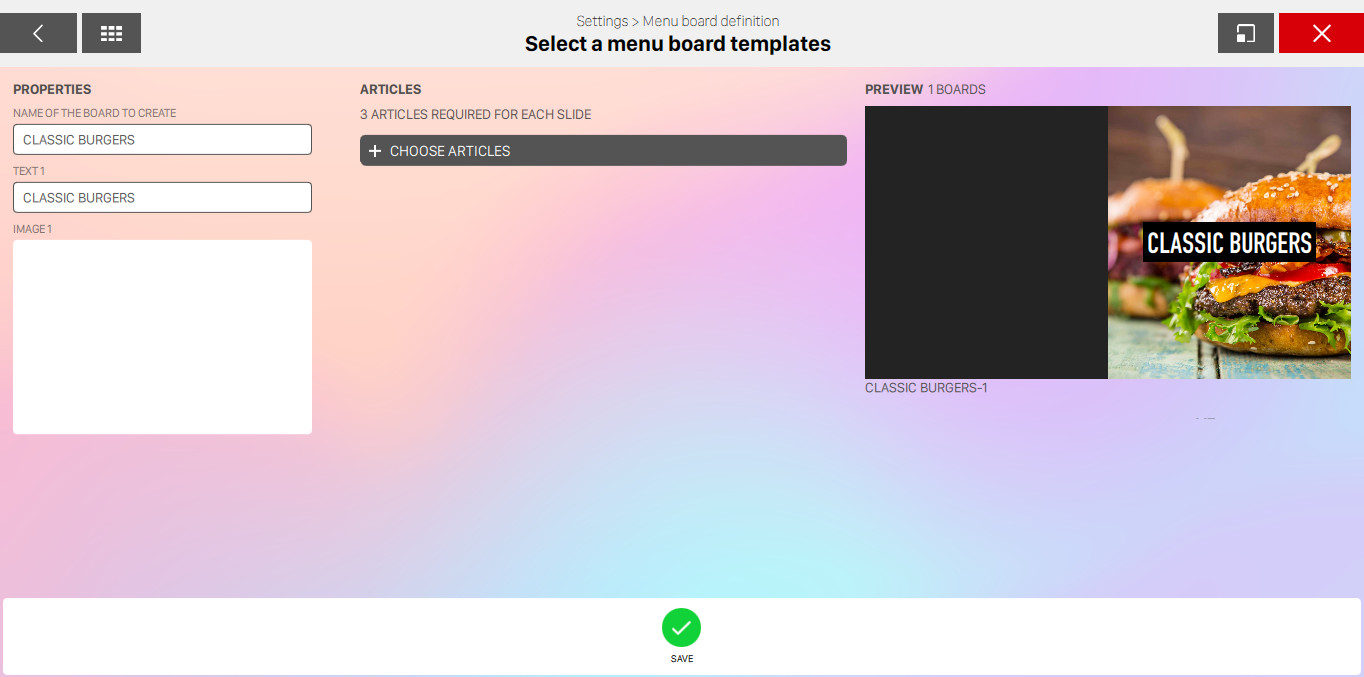
-
Name of the board to create: set the name of the board. The default value is the template name
-
Text and images: set the values of texts and select the images you want to override
-
Articles: if one ore more articles are required you will be asked to select them from the list
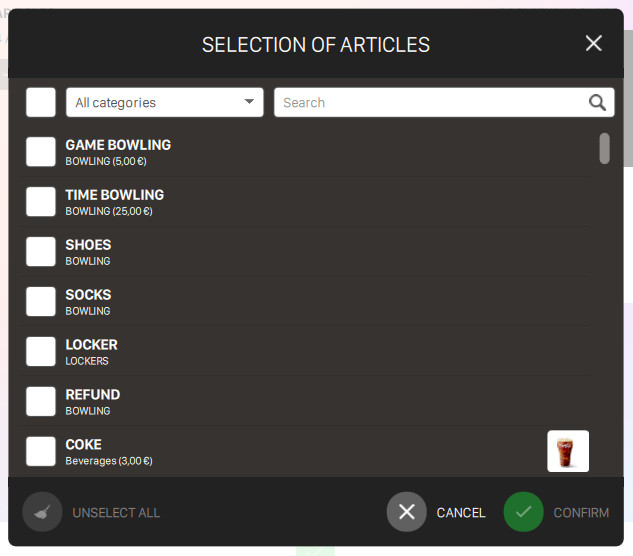
-
Preview: see the preview of the resulting menu board
Click on the save button to apply the customization and create the new menu board.
17.25 Backup Management
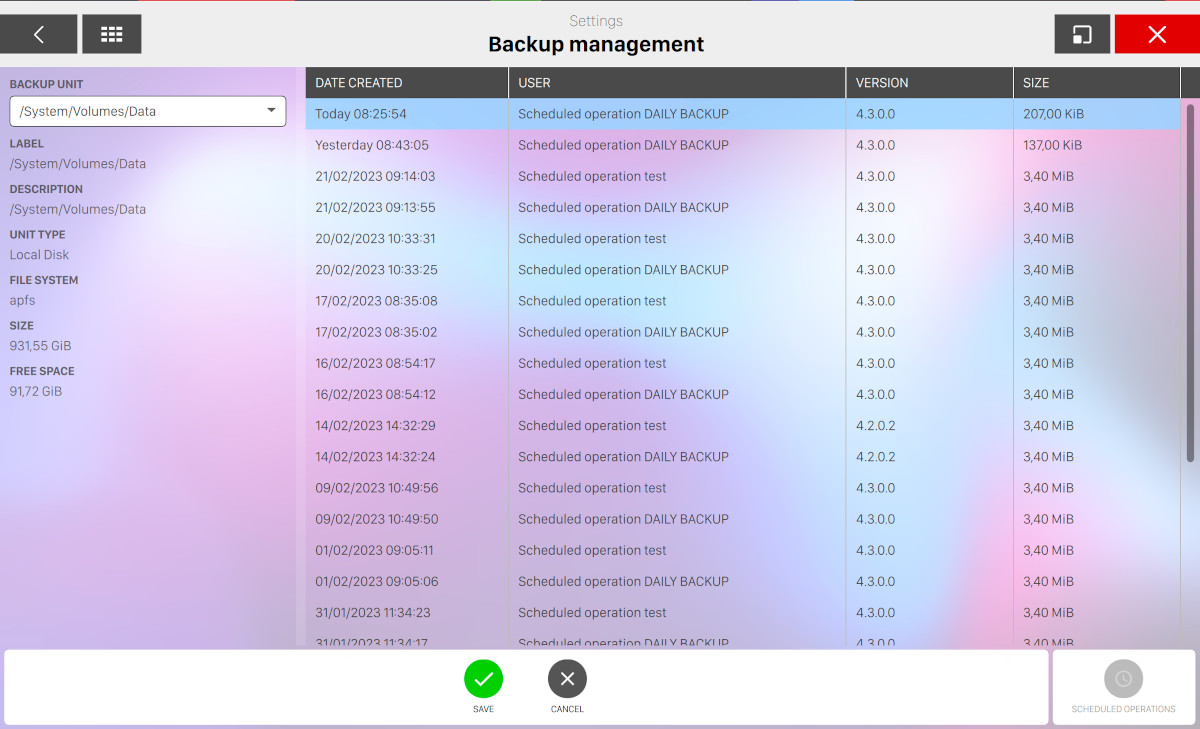
This window allows you to back up data manually or automatically at a specific time. The window also allows you to restore previously saved data. A USB key, that is normally supplied with the system, should be used to back up the data.
NOTE: It is important that the USB key remains in the server to allow the system to perform periodic backups. A daily backup can be done when the system starts every day using the Automatic start checkbox. The unit used for the back up can be selected by selecting the Backup unit. Once the unit has been selected, click on Save. If the automatic backup has been set, the system will add a daily back up into the selected unit. When the memory of the unit is full, the older backups will be deleted until enough space is available for the new backup. The backups created are listed on the screen with the following details:
-
Date created: date and time of the backup
-
User: the operator who made the backup (this field shows ’Automatic by server’ when the automatic backup is selected)
-
Version: the software version installed
-
Size: the size of the backup file
17.25.1 Available Actions
At the bottom of the window you can find some buttons:
-
Save: saves the current changes on the automatic start
-
Cancel: discards the current changes on the automatic start and restores the previous data
-
Launch backup: allows you to make a manual backup
-
Launch restore: allows you to restore a previous backup. Warning: The RESTORE operation requires extreme caution since all current data will be lost and the data in the selected backup will be restored. It is also important to notice that all the information stored in the database after the last backup, will be lost. This operation requires to restart the system, be sure that you really want to restore a specific backup, before starting the operation. Warning: due to the critical nature of the restore operation, a confirmation will be asked 3 times, and the operator will be warned about the possible consequences of this action
-
Show log: open a window that shows a list of technical information related to the backup
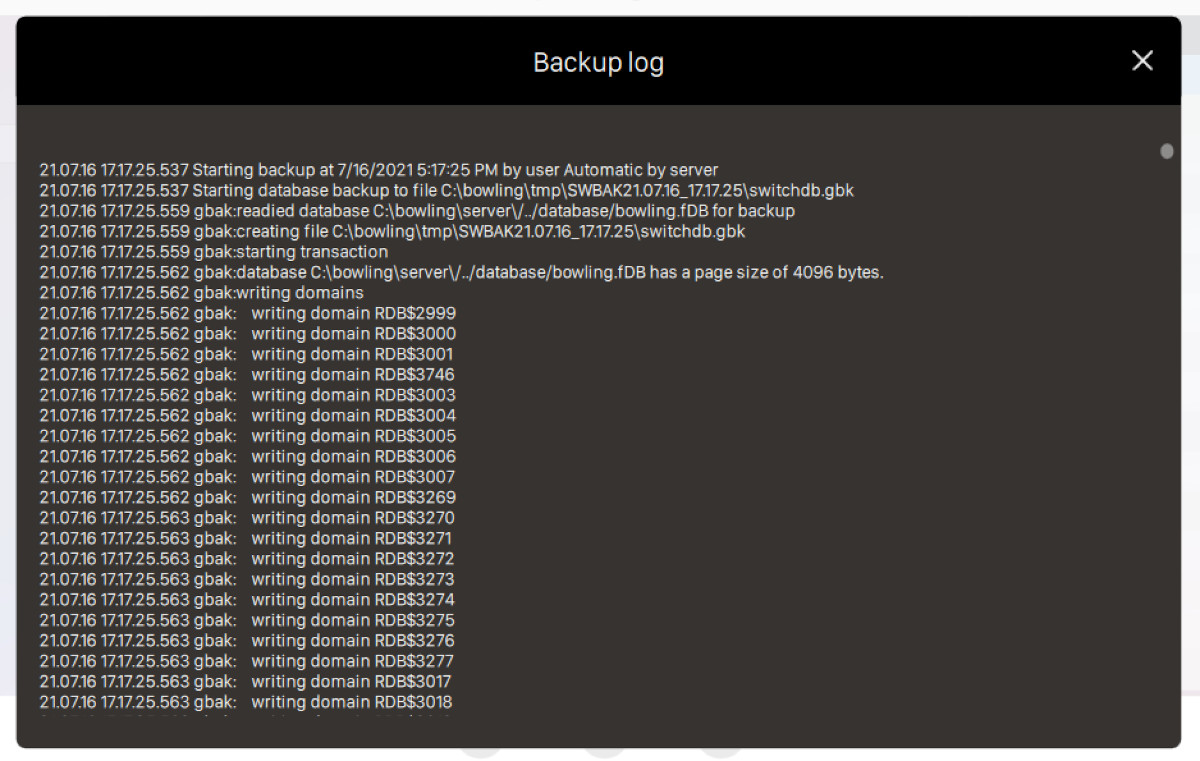
17.26 Clean Database

It is possible to free space on the hard disk drive to speed up operations in the system. Warning: it is always recommended to make a backup copy before any information in the current database is modified. For information on how to make a backup, see Backup management section. The procedure of database cleanup is divided into 3 sections (or tabs).
17.26.1 Database
This page allows you to cancel data in the database for a specific period of time. Set the time frame for the database entering ‘from’ and ‘to’ dates. The system will calculate the amount of data that can be deleted based on the time frame entered here. Data that can be deleted is organized in groups that can be selected by checking the box next to their name. For each group the number of transactions is shown for the period selected. The total number of transactions of the group in the database is shown between brackets. Use the Delete data button to cancel the data. All the transactions selected will be removed from the database. The system will ask for confirmation before each step, depending on the type of data. Groups of data are:
-
Activities
-
Reservations
-
Events
-
Messages
-
Coupon
-
Magnetic cards
-
Point games standings events
-
Intercom calls
-
Issued receipts
17.26.2 Reports
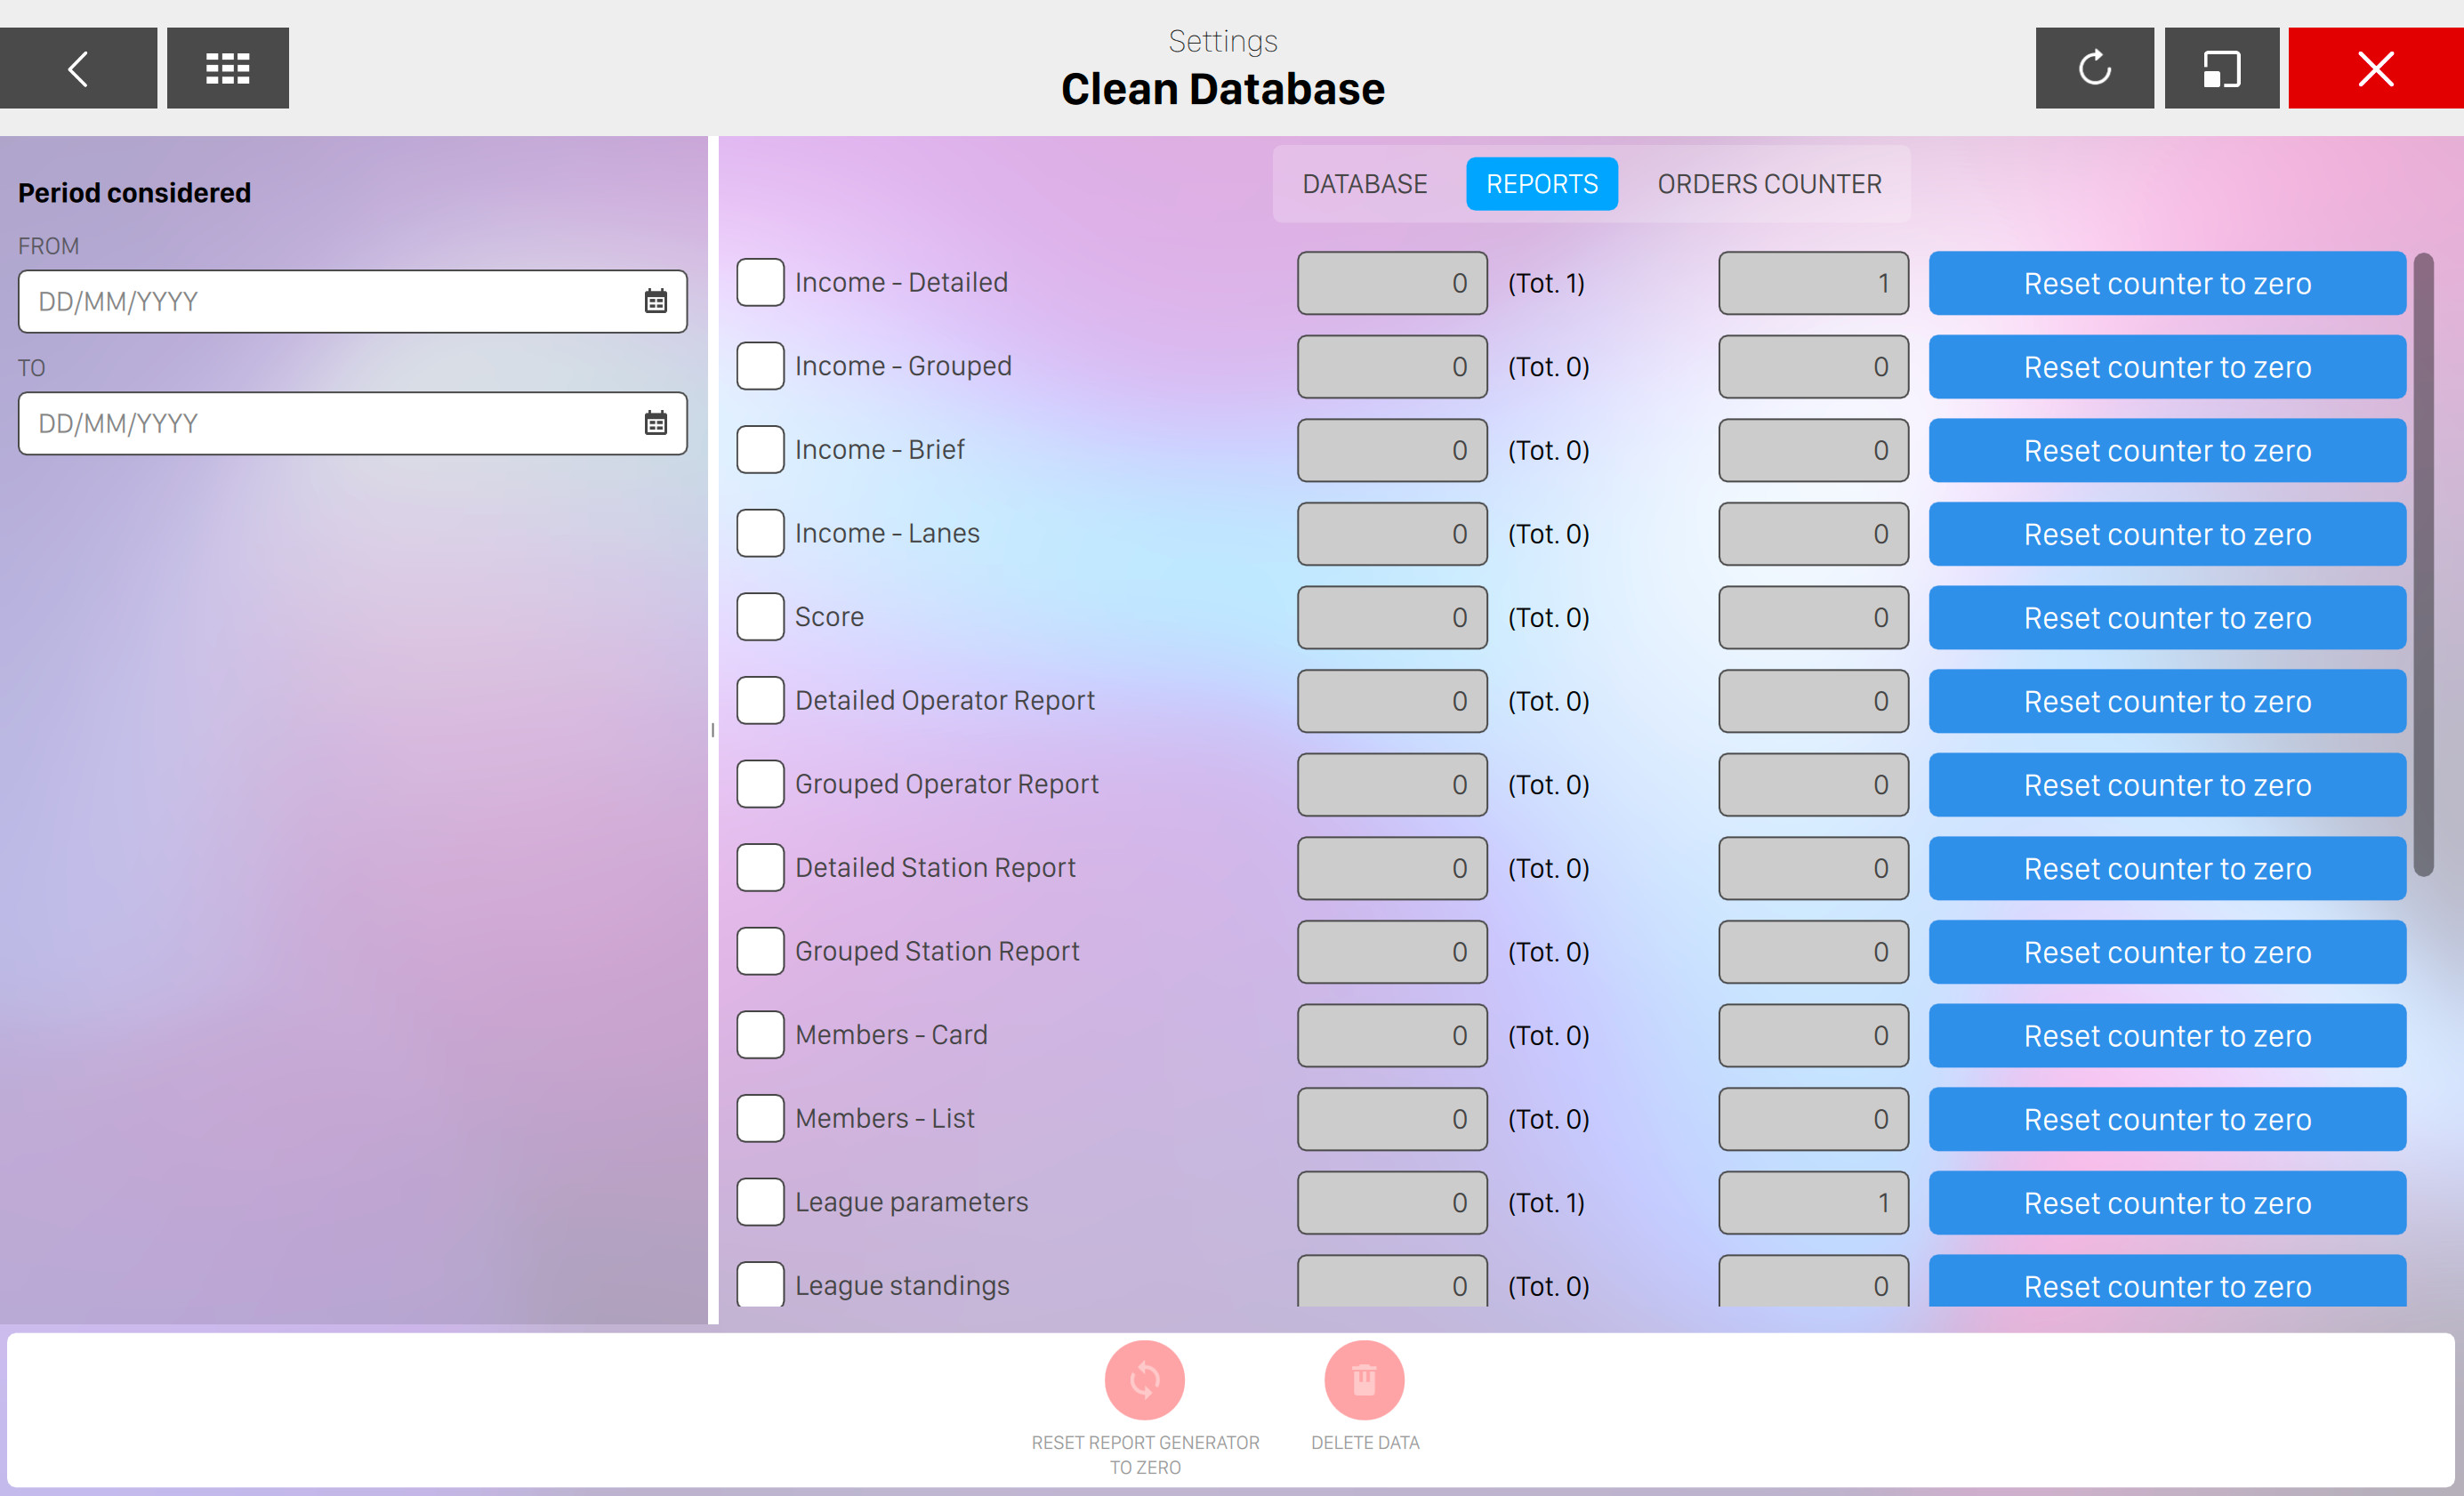
Reports have a progressive number and the are stored in the database in PDF format. They have an unique and progressive ID number set by a system function, called Report generator. From this page reports can be deleted and their progressive and ‘report generator’ numbers reset to zero. The first step to clean/reset the database is to select a period of time. Enter the start and end date. As soon as the dates have been entered the system will display the reports that can be cancelled. Select the reports that you want to delete by checking the boxes next to their names. For each type of report the following information will be displayed:
-
the number of transactions during the selected period
-
the total number stored in the database
-
the progressive number
Click on the Delete data button to start the cancellation. All the selected reports will be cancelled. Before the cancellation operation starts, the system will ask for a confirmation. Click on the ‘Reset counter to zero‘ button on the right of each type of report to reset the progressive number. The next report will start from nr. 1.
The ‘Reset report generator to zero‘ button is used to reset the progressive number for all the reports. This key will only become active when all the reports have been cancelled.
17.26.3 Orders counter
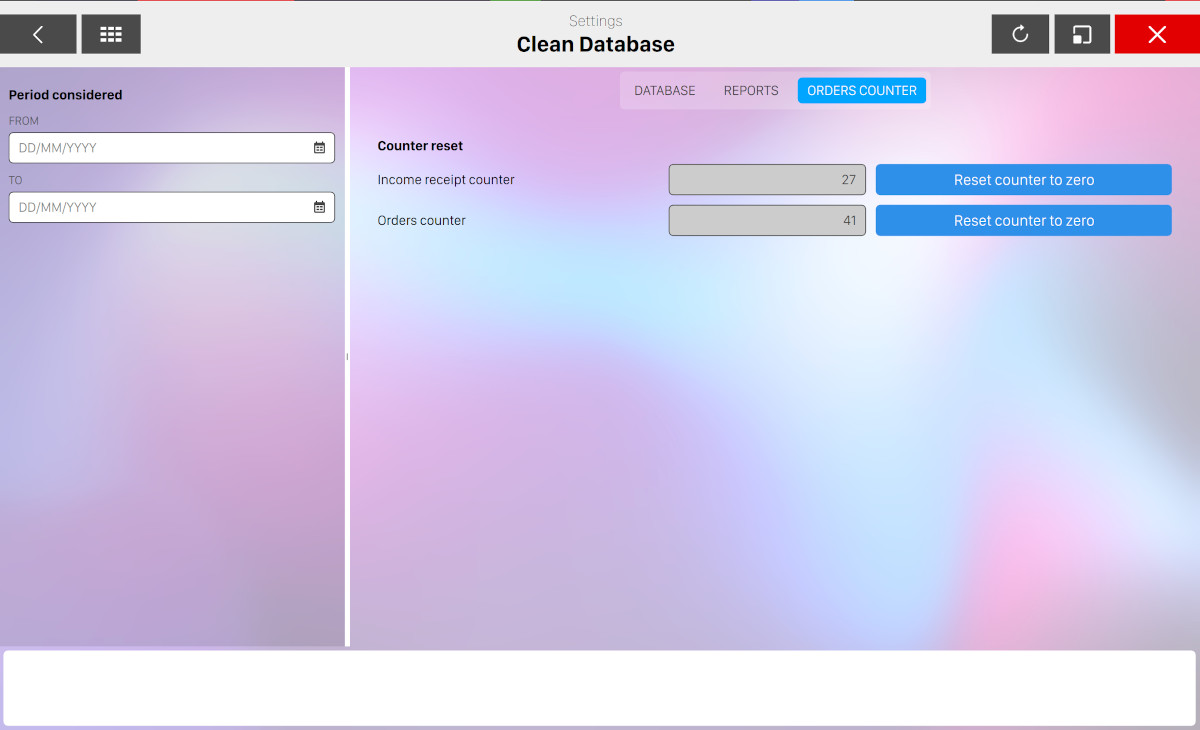
This page is used to zero the progressive numbers of the receipts and of the orders. The actual progressive number is shown in the related box. To reset the number, press the Reset counter to zero button.
17.27 Update management
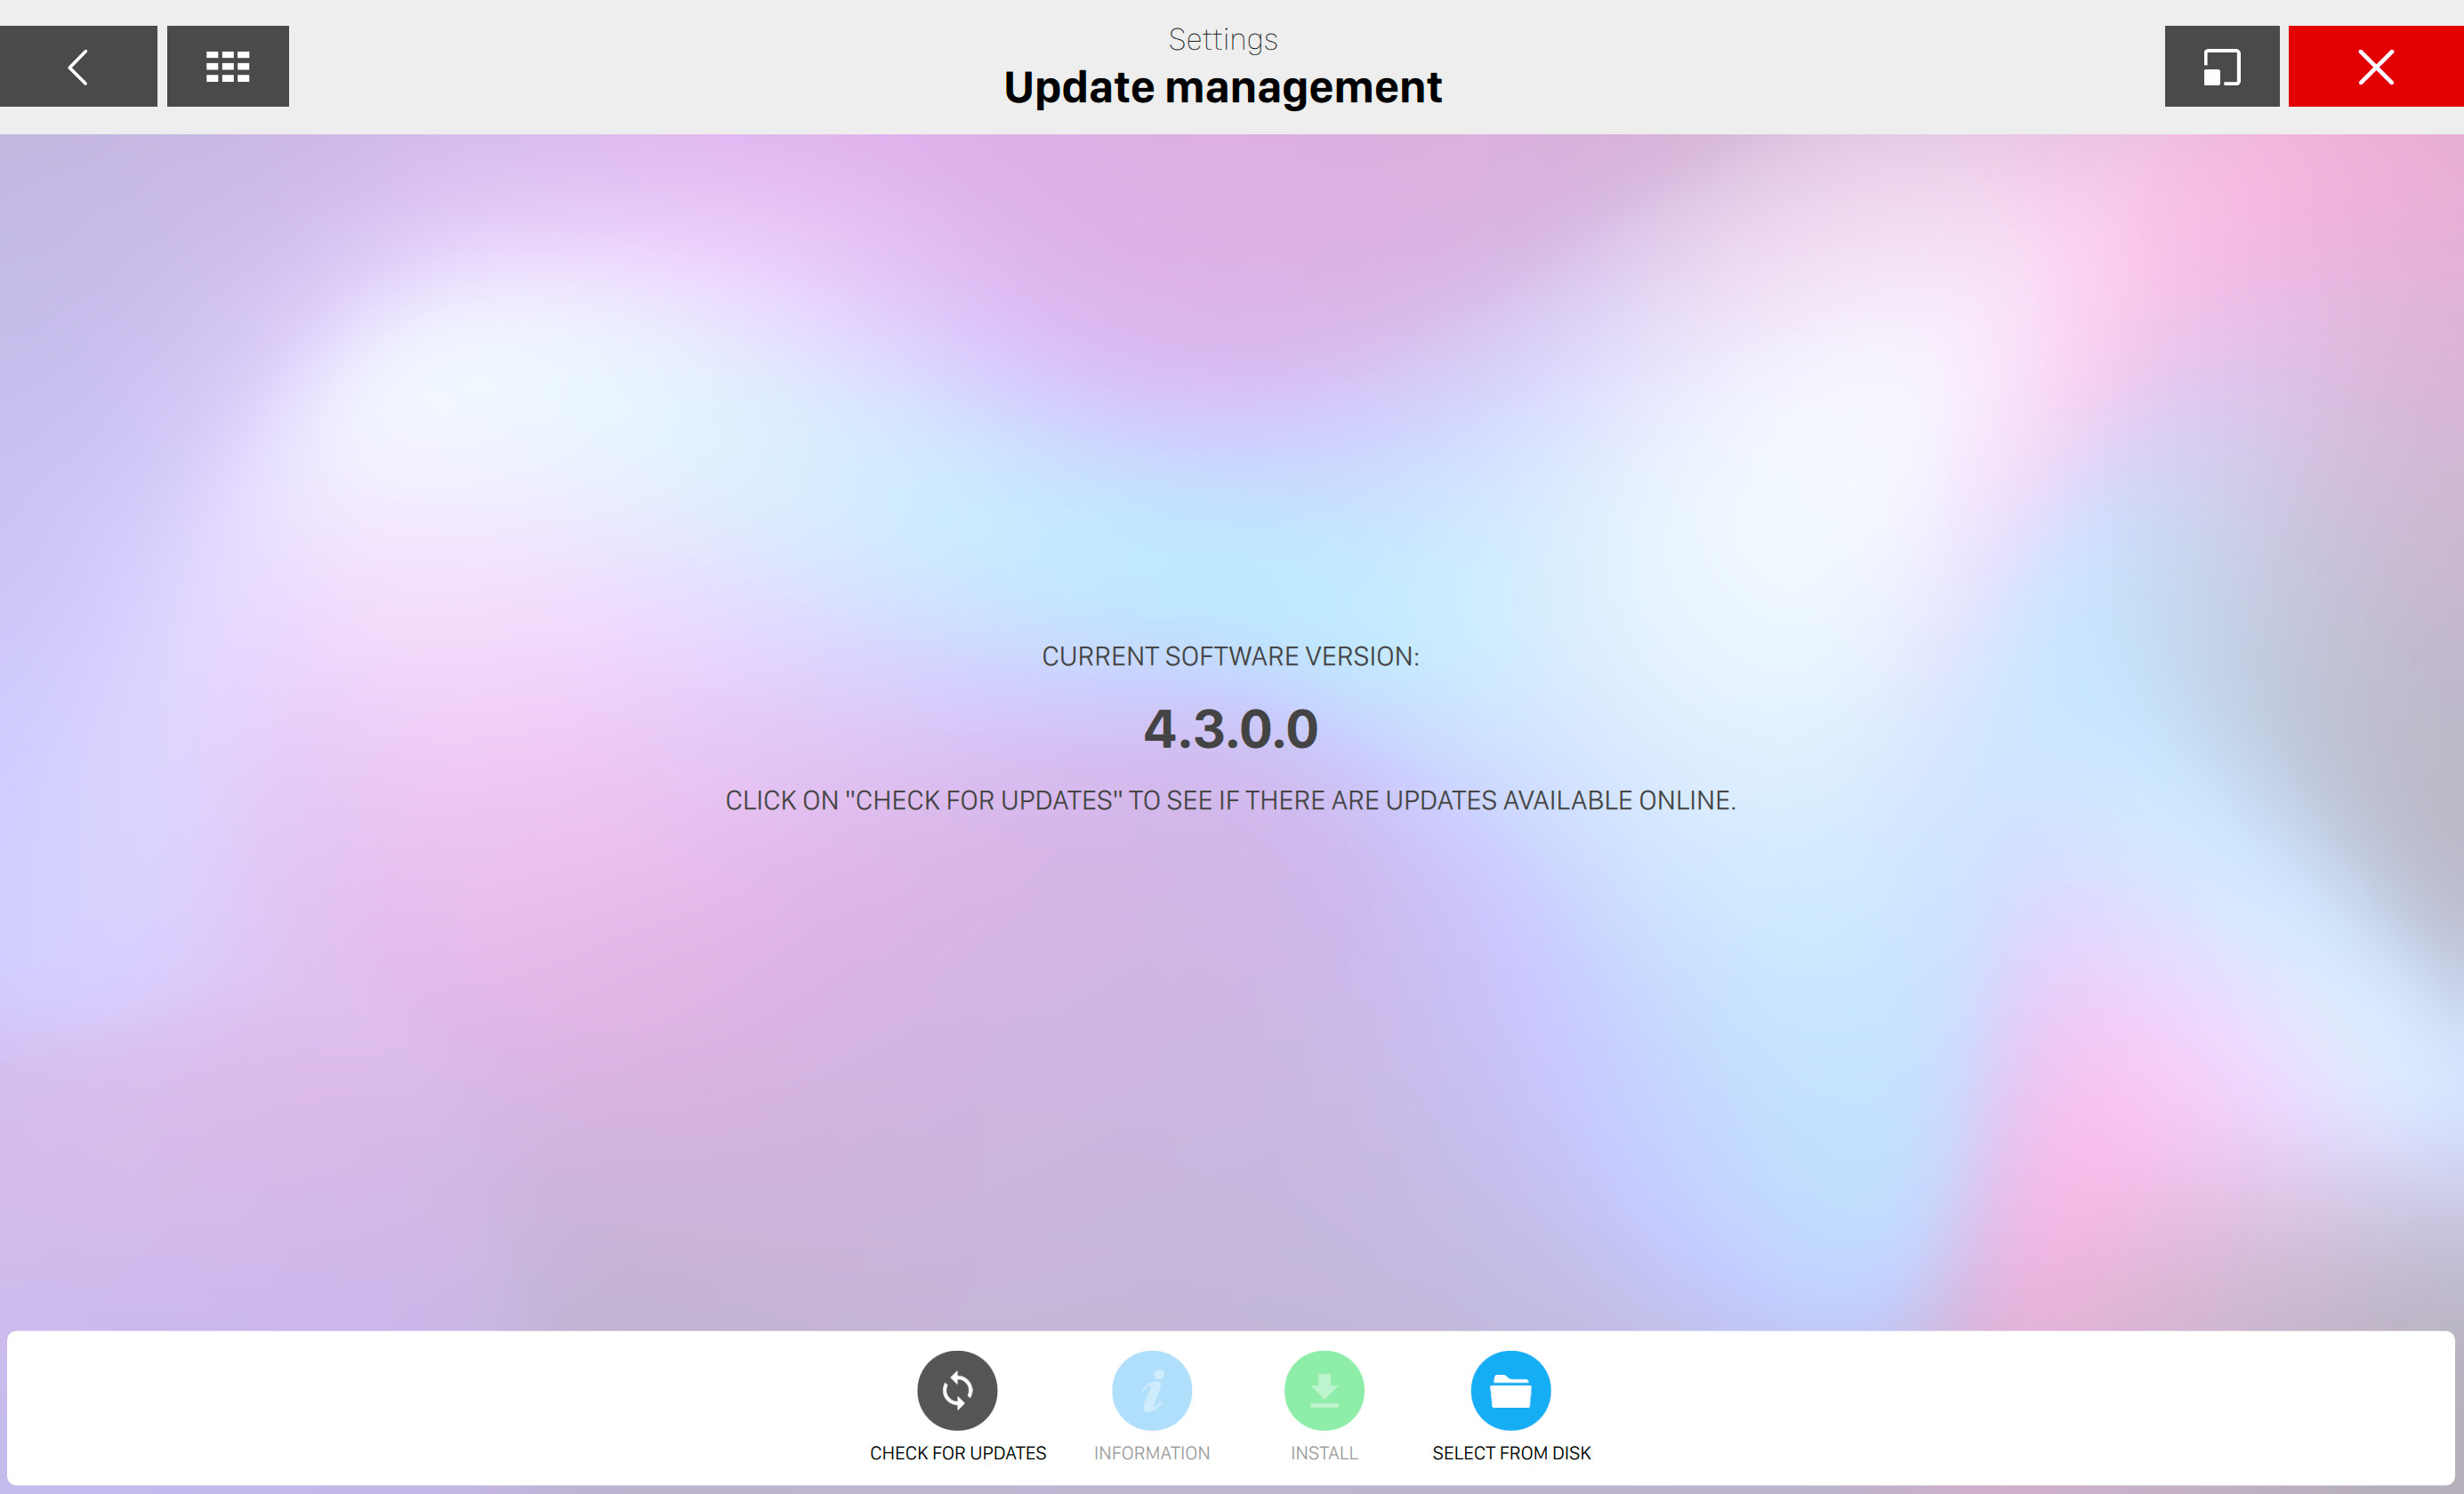
The software uses an automatic update system that downloads updates automatically from the internet. When an update has been downloaded, a message is sent to the screen. This window allows the software updates to be downloaded and installed as soon as new releases of the software are available. The current software version is displayed on the central area.
Warning: when an update is made the system will be restarted, so make sure that the system is not in use.
At the bottom of the screen you can find some buttons:
-
Check updates: checks for the availability of updates from the internet
-
Information: display information and changes about the selected update
-
Install: install the selected update
-
Select from disk: checks all removable memory (such as a USB memory stick) for the presence of update packages and displays them on screen. You can select from the list of suitable executable that have been found on the removable memory and execute the update of the software
17.28 Scheduled operations
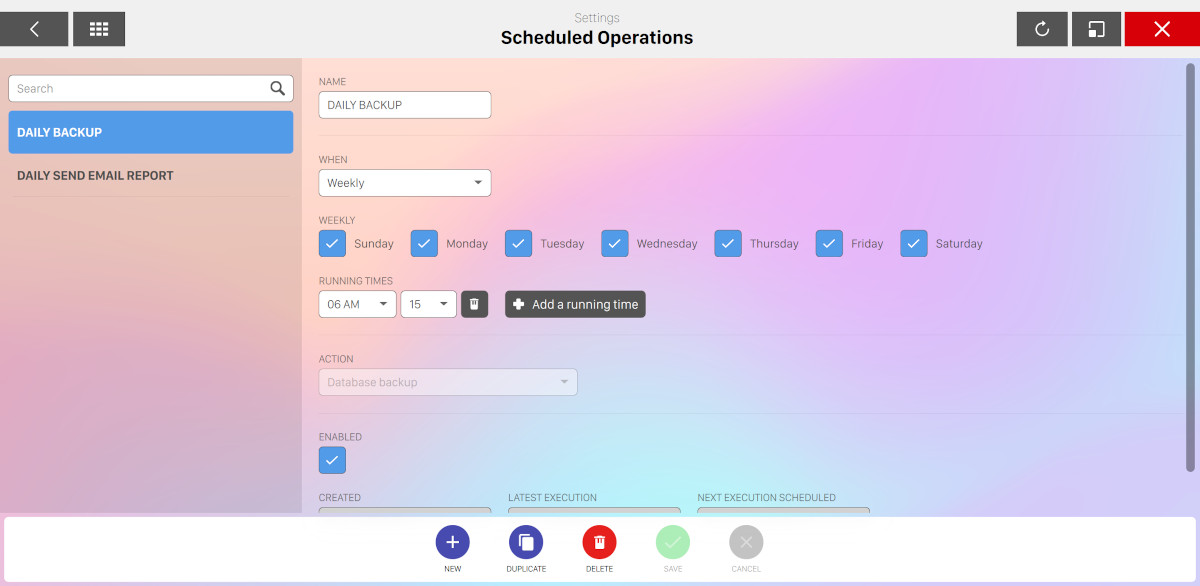
From this section you can manage the scheduled operations of your bowling center that will be run on background. You can add as many operation as you want, each with its own configuration.
On the left sidebar you can see the list of items that have already been created. Click on any row to show/edit the details of the selected scheduled operation.
Two default and permanent items are always present:
-
Daily backup
-
Daily send email report
On the bottom area you can find a list of button. Click on the New button to create a new scheduled operation.
-
Name: set the name of the scheduled operation
-
When: choose how frequently run the operation
-
Weekly: select the days of the week when you want the operation to be performed
-
Monthly: select the days of the month when you want the operation to be performed. Check last option to use the last day of the month
-
Once a month: select the first, second, third or fourth day of the week of the month (e.g. "First sunday of the month")
-
Time lapse: customize the time lapse by selecting the days, the hours and the minutes
-
-
Unless "time lapse" option has been selected on the previous step you can add one or more running times by pressing "add a running time" button and by selecting the hours and the minutes that you want the operation to be performed. Click on the trash on the right of each element to remove it
-
Action: select the action to be performed by selecting it from the list of available actions
-
Enabled: enable or disable the scheduled operation
-
Created: readonly field that shows when the scheduled operation has been created
-
Last execution: readonly field that shows the last date and time of when the operation has been performed
-
Next execution scheduled: readonly field that shows the next date and time of when the operation will be performed. Note that if the system is off and the scheduled operation is skipped then it will be executed at the next start of the system
Click on the save button to confirm the changes or click on the Cancel button to discard them.
Click on the duplicate button on the bottom area to create a new scheduled operation with the same configuration of currently selected item.
Click on the delete button to remove the scheduled operation. Note that the default items can not be removed.