This section allows you to manage orders for bowling, time games and restaurant or bar and provides a screen with the income table with the list of items to sell and the interface to pay.
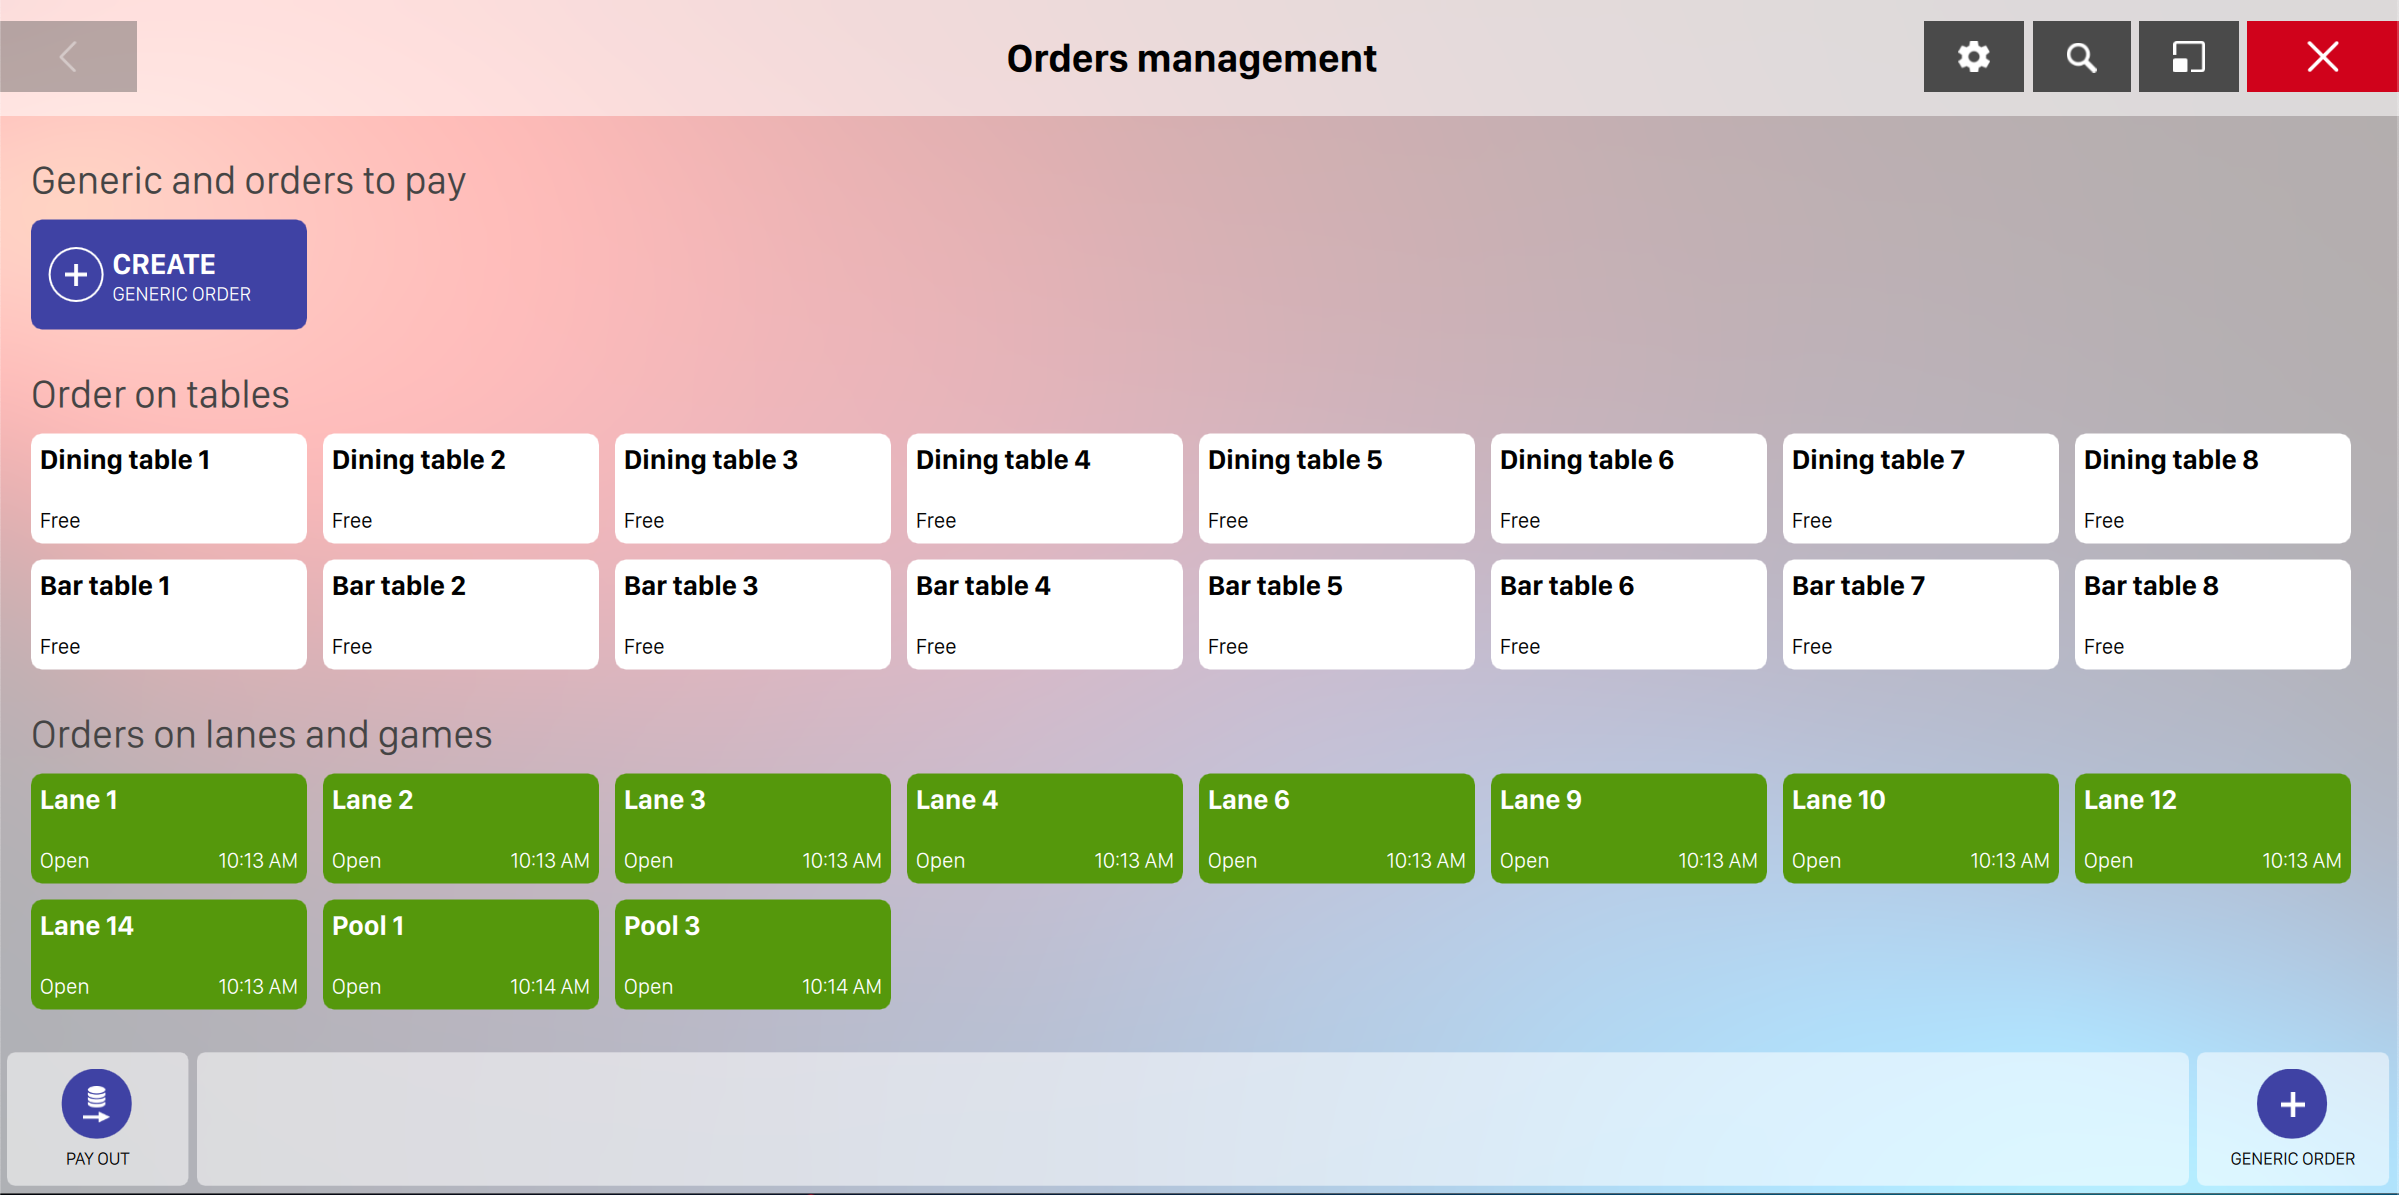
Once you land on the Orders Management page you will see a grid containing the list of resources where you can place an order of food, beverage or other items.
Click on a destination to see the available actions. Depending whether an order is already open or not you will see the following actions:
-
Customer Tab: allow you to open a Customer Tab and link the orders to it
-
Add new order: this action is available only when the selected resource does not have already an open order
-
Modify order: allows you to modify the existing order by adding/removing or updating the items
-
Show purchased items: it will open a dialog showing the items that have been purchased for the order on the selected destination
-
Collect: allows you to collect the money of the selected order
-
Close: allows you to close the selected order. If the order contains items that have not been paid then it will first ask you to collect the due money
It is also possible to switch to the list view of this page by clicking on the relative icon on the top right corner of the screen. The button will allow to switch from grid and list view mode:

On the bottom right of the screen you can find the button Generic order, which allows you to create a new order without setting a destination resource.
On the bottom left there’s the Pay out button, a shortcut to allow you to perform outgoing payments quickly.
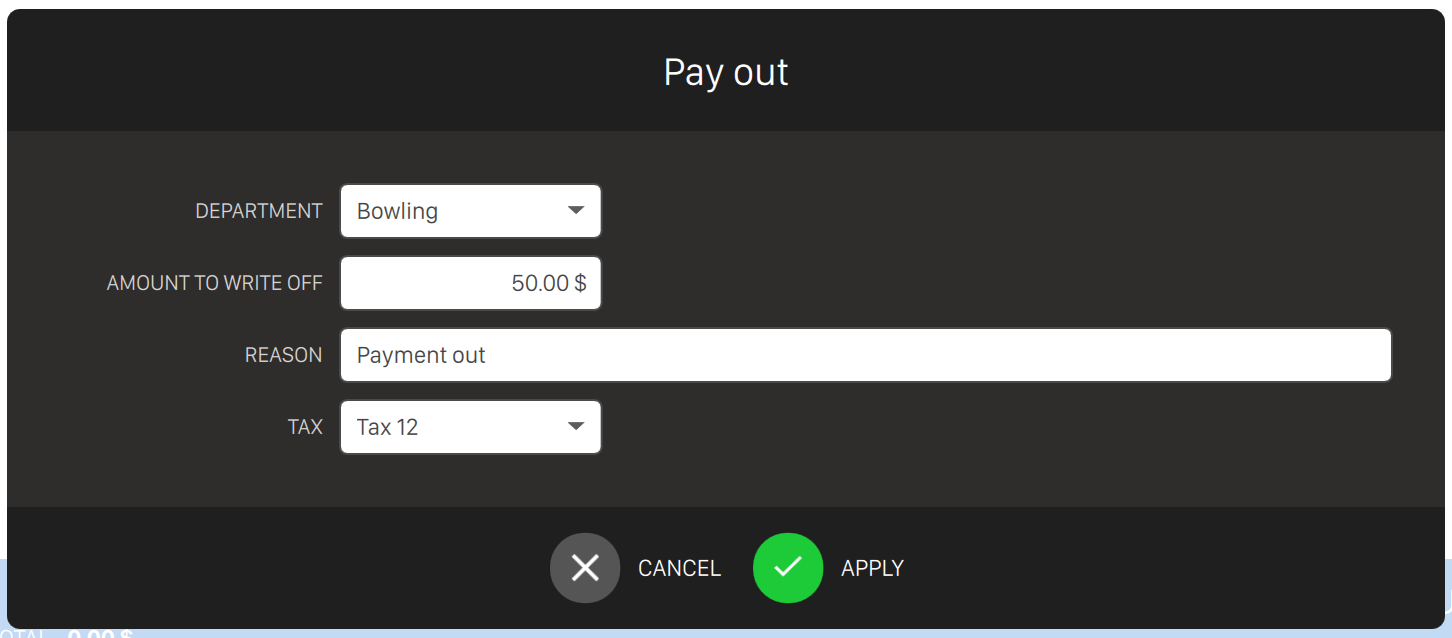
To make a pay out it is necessary to specify:
-
The department, by selecting it from the list of available departments
-
The amount to write off
-
The reason of the outgoing payment
-
The tax to be applied, by selecting the it from the list of available taxes
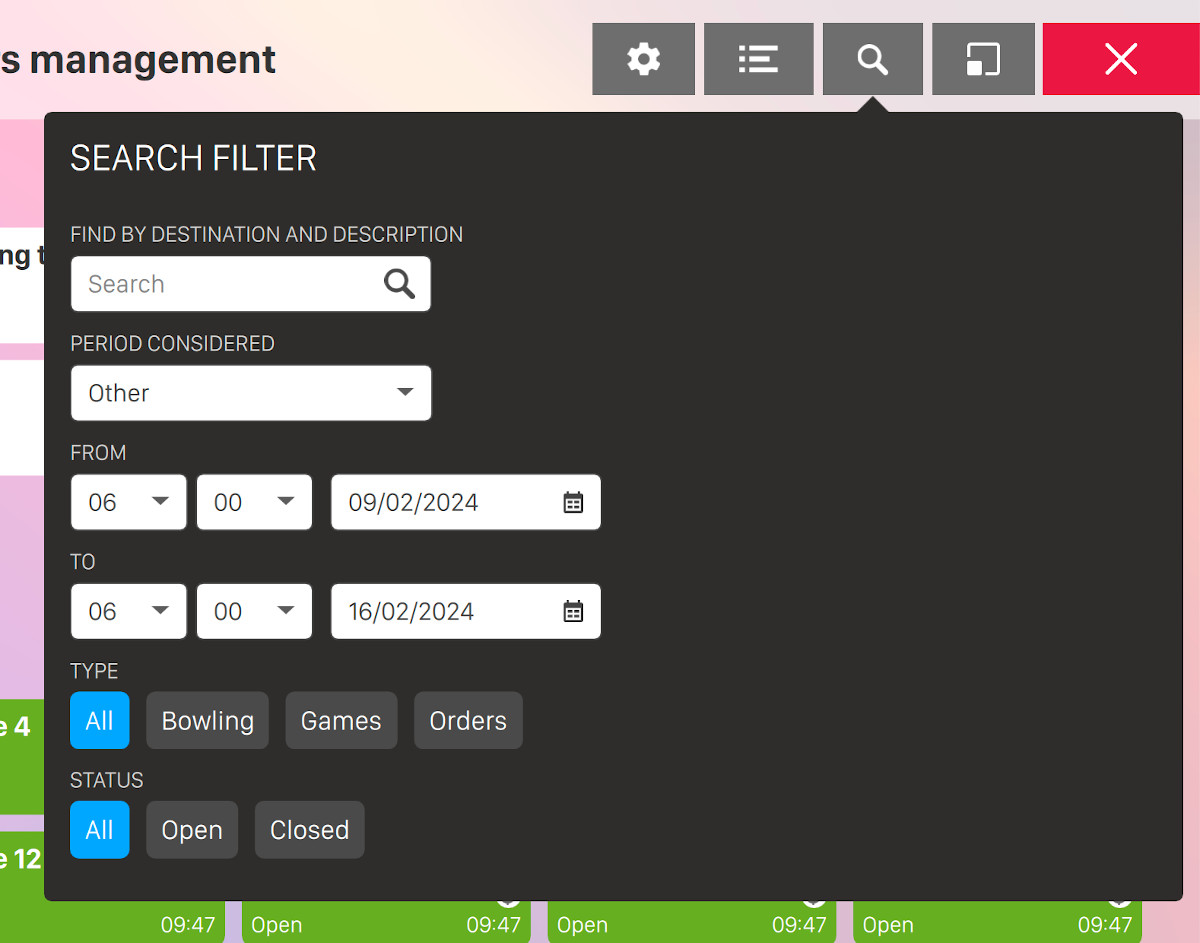
It is also possible to filter the orders view by clicking on the lens icon located on the top right of the screen:
-
Find by destination and description: enter some arbitrary text to filter the orders by the destination or by the description
-
Period considered: choose the period you want consider. It also possible to specify a starting and ending date and time
-
Type: filter by the type of order
-
Bowling: the type of order is related to bowling
-
Games: the type of order is related to time games
-
Orders: the type of order is related to generic orders
-
-
Status: filter by the order status
-
Open
-
Closed
-
7.1 Create new order
To create or edit orders you may click on the Orders button on the dock bar. This opens the window to manage orders
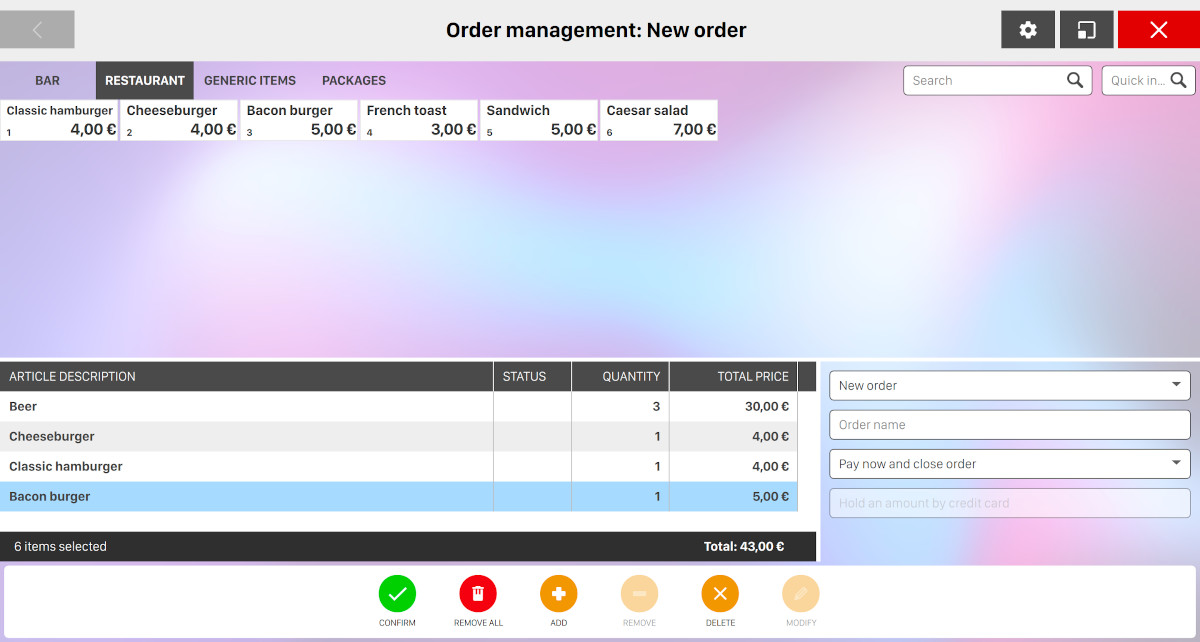
This window contains a grid with the items to sell in the top half, a list with the items set in the order, a box with the configuration of the order and a bottom bar with the buttons to perform actions on the items in the order.
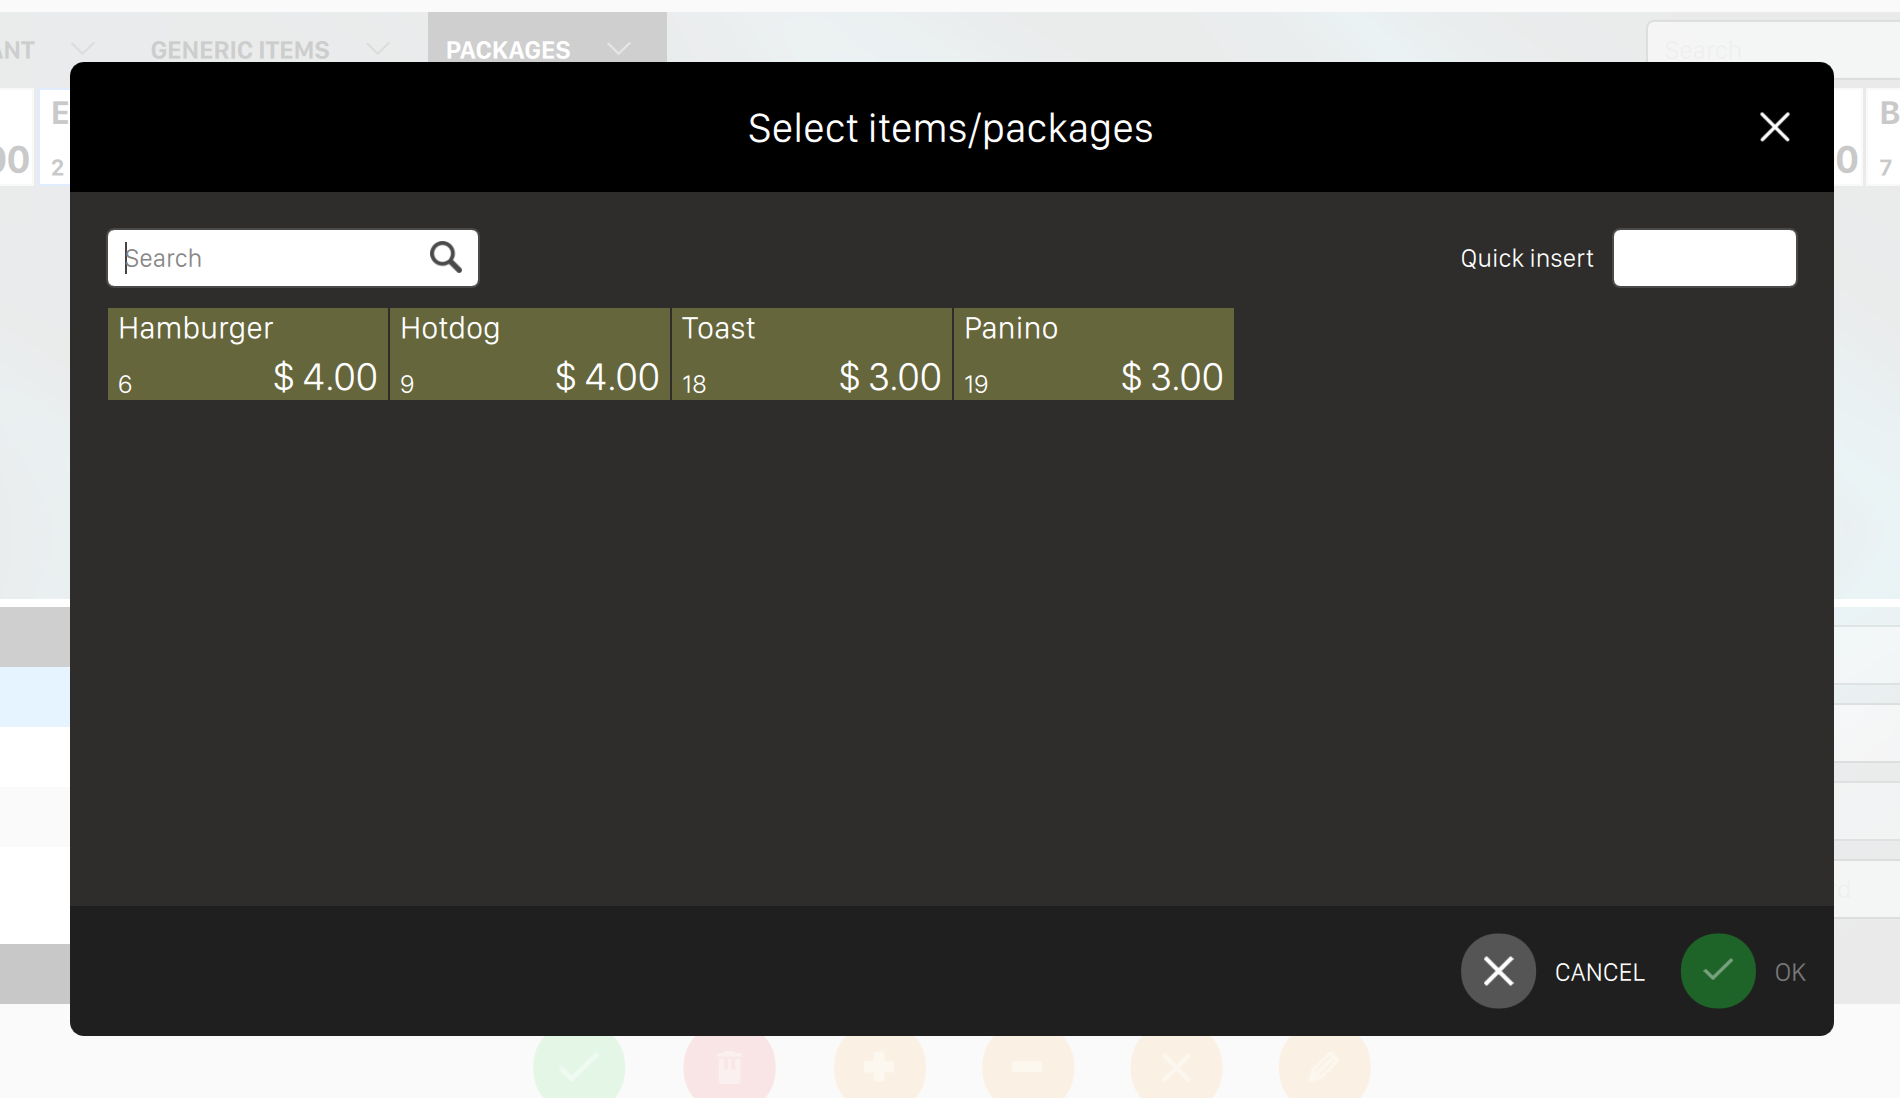
The product grid allows you to click on an article item and add it to the current order. It is organized into departments:
-
Bar: contains all the items defined on the bar department
-
Restaurant: contains all the items defined on the restaurant department
-
Generic items: contains all the generic articles
-
Packages: contains all the defined purchase packages
If at least two categories are defined on the department then you will see an arrow icon right to the department name. By clicking on the department tab you will be able to filter the product grid by a specific category. You can click on all to discard the filter.
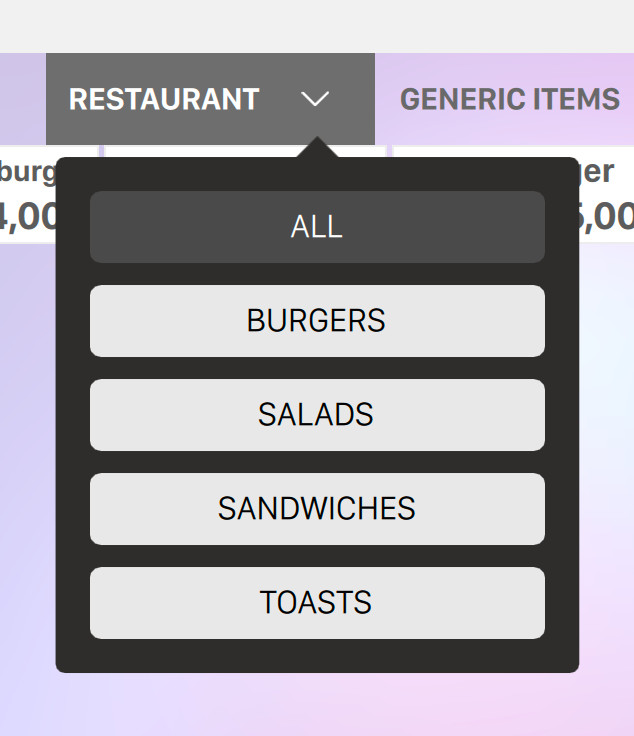
For more information about categories and items definition see Bar items definitions, Restaurant items definition and Generic items definition sections.
At the right side of the departments’ tab you can see two additional textfields that will allow you to filter the products grid:
-
Search: allows you to perform an arbitrary search on the products
-
Quick insert: allows you to enter the quick number of the article and automatically add it to the order once enter key is pressed
The number of rows and columns in the products grid is customizable using the gear button in the top right corner of the screen: as you can see in the following picture, clicking on this button will show a popup dialog that allow to specify those parameters.
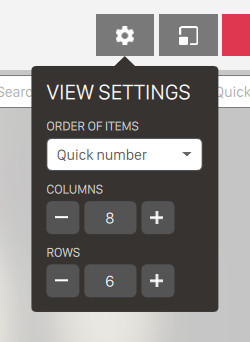
From this dialog it is also possible to change the order of items:
-
By quick number
-
By article name
At the bottom left section of the screen you can see the list of articles that have been added to the order. For each item you can see:
-
Article description: indicates the description of the article
-
Status: indicates whether the item has been already paid or not
-
Quantity: indicates the quantity of the article
-
Total price: indicates the total price of the article considering the quantity
At the bottom right side of the screen there’s a box to configure the order; the options are:
-
Destination: this dropdown menuy allows you to choose the destination of the items; it is possible to set them into a new order, an order already open or send them to a lane or a time game
-
Order name: allows you to change the order’s name. By default the order name is created from the order id
-
Payment type: allows you to select a payment mode:
-
Pay and close order: cashes the order and close it
-
Pay now and keep the order open: cashes the order and leaves it open for further additions
-
Pay later and keep the order open: cashes the order later and leaves it open for further additions
-
-
Hold an amount by credit card: (when available) allows you to cash later, but it charges a deposit on the customer credit card. This deposit will be returned after the payment
-
Amount to hold: allows you to set an amount of money as a deposit. This option is available only with credit cards
To manage the items of the order after their insertion in the list you must use the buttons set on the bar at the bottom of the window:
-
Confirm: allows to confirm the order and takes to the next screen; if a game is included in the order then the application takes to the Open a new game screen to configure it, otherwise it takes directly to the screens that shows a summary of the income and allows to pay (these screens are described in he following sections).
-
Remove all: removes all the items in the order.
-
Add: increases by one the quantity of the item selected.
-
Remove: decreases by one the quantity of the item selected.
-
Delete: removes the selected item from the list.
-
Modify: allows to modify some settings of the selected item; this button is enabled only for some packages and it is used to replace an item with another similar. Clicking this button opens a popup dialog as shown below.
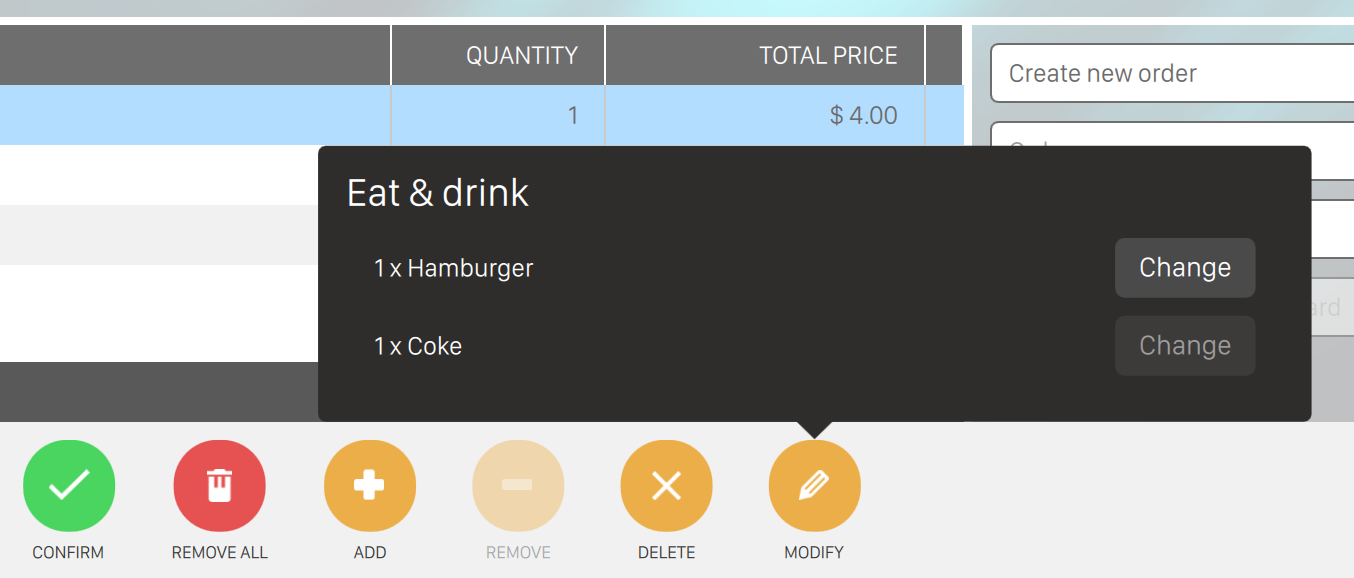
Near the items in the package that can be replaced, a Change button is enabled; pressing this button a popup window opens to allow the choice for the replacing item.
7.2 Income Table
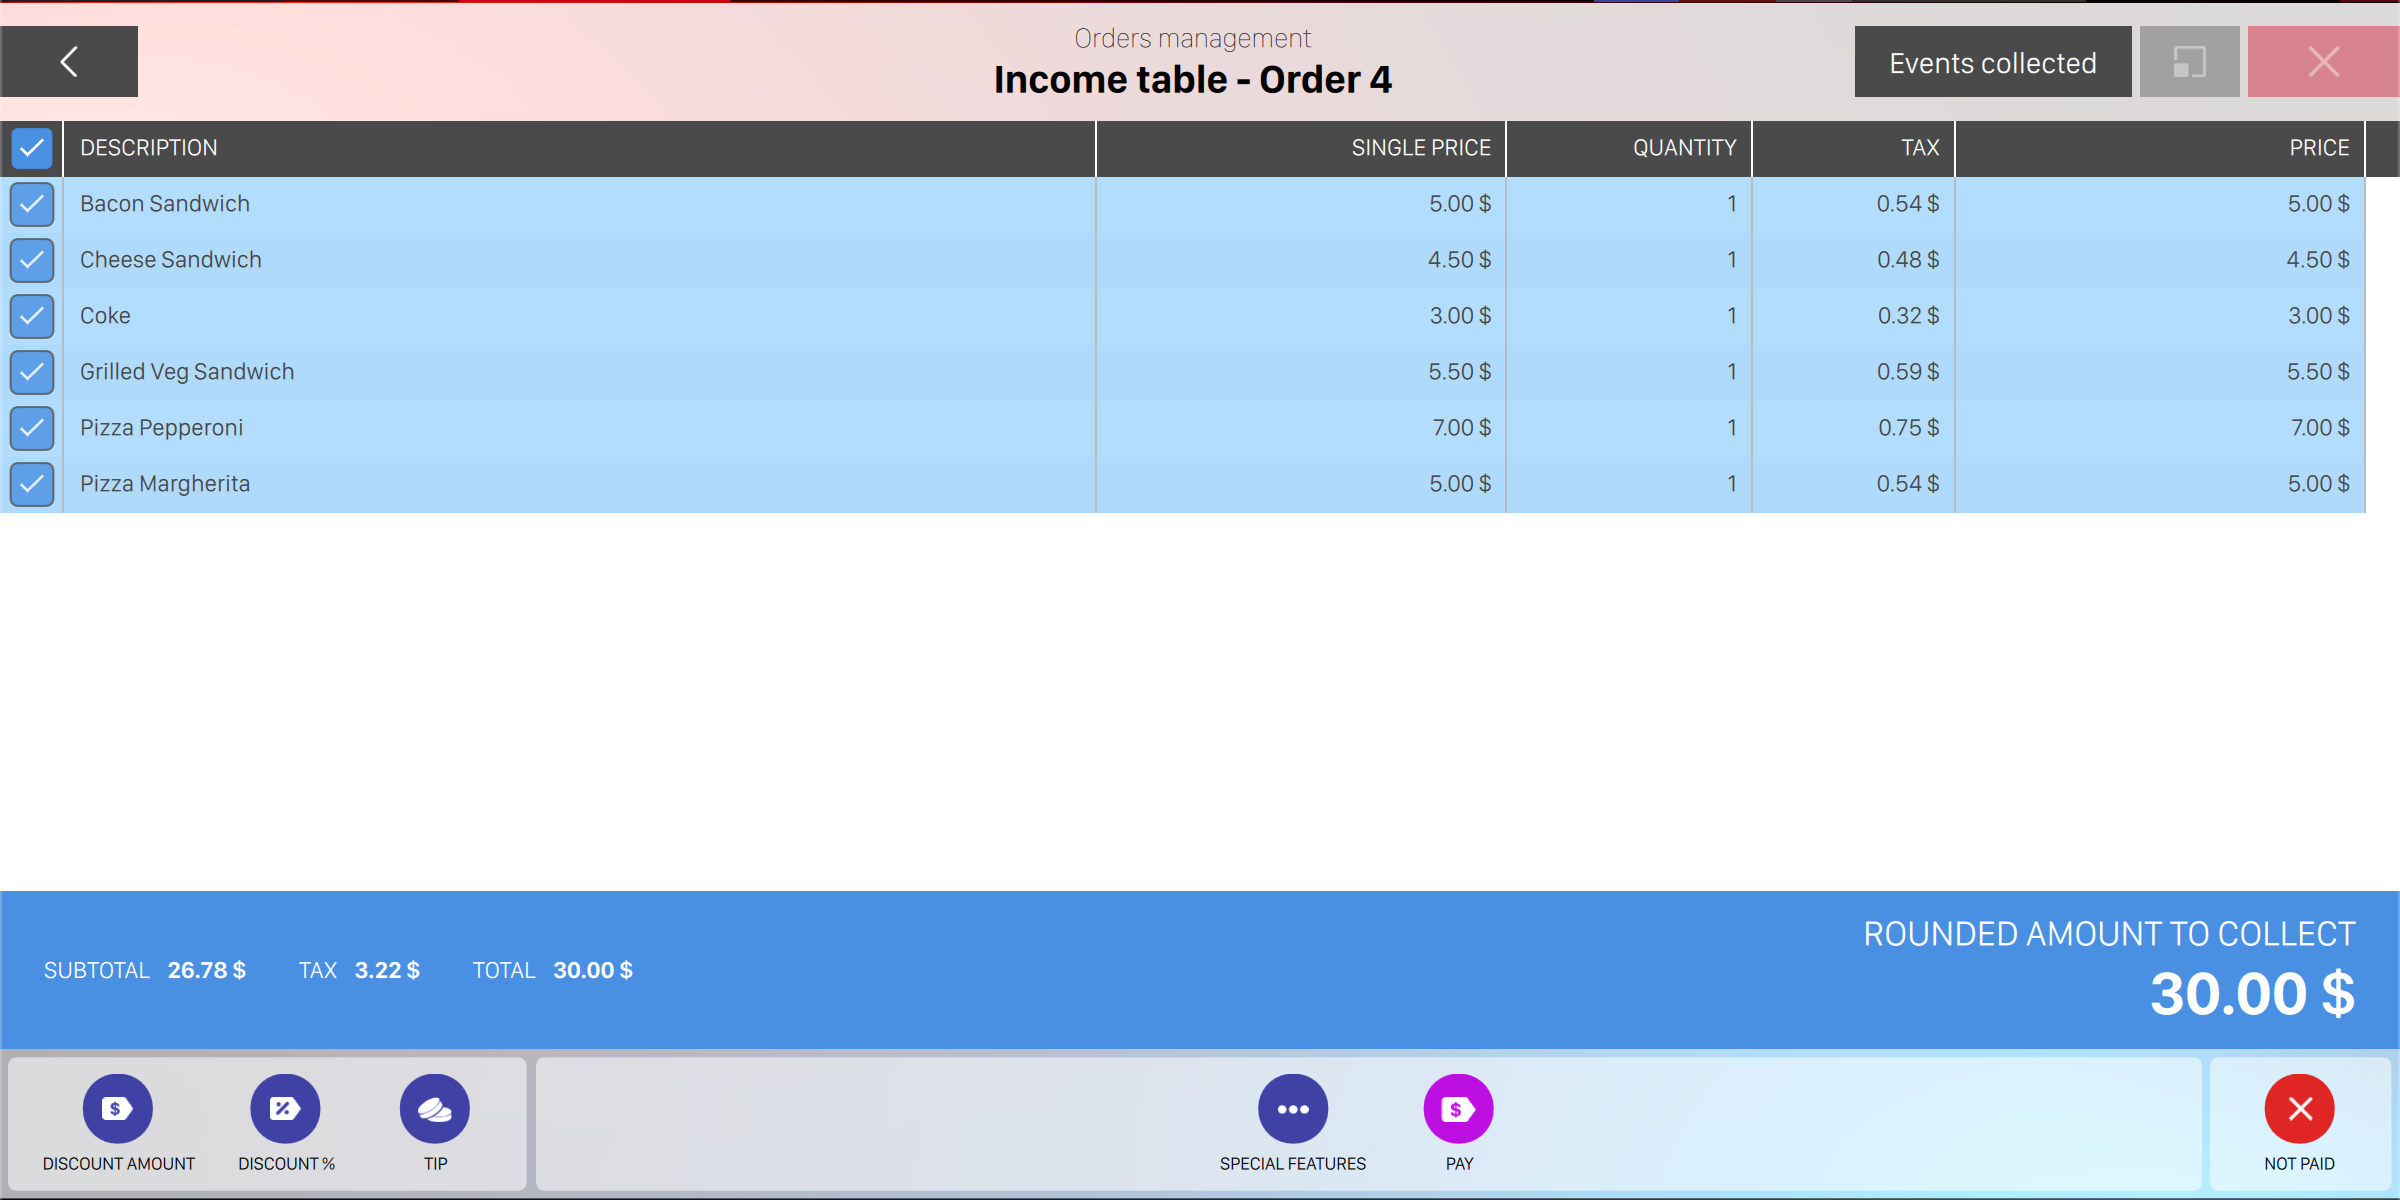
This window allows the operator to cash a list of items from an order. On the central area you can see the list of items to collect while at the bottom area there is a list of buttons that allow the operator to work on the items to cash.
On the top right section of the window you can see a switch button with two possible labels:
-
Events to collect: shows the list of all the events to be collected
-
Events collected: shows the list of all the events that have been already collected
For each order line item you can see:
-
Item description
-
The associated rate (if applicable)
-
The single item price
-
The quantity (pieces, games or minutes)
-
The tax name (if more than one kind of taxes is applied among all the items)
-
The amount of tax (if applicable)
-
The total price considering the single price and the quantity
At the end of the table you can find the summary of the order, which is another table with Total and Selected rows:
-
Selected-Pre-tax: displays the total or selected amount without considering taxes
-
Tax: displays the tax calculation for the total or selected amount
-
Gross: display the total or selected amount considering taxes
At the end of the row you can find the Rounded amount to collect value, which displays the total
amount to be paid, considering a round of two decimal places. You can customize the number of
decimal digits to visualize from International settings screen on Preferences. Furthermore it is
possible to specify how prices are rounded from Preferences > Advanced settings > Cost
Calculation.
7.2.1 Available Options
On the bottom area you can find a set of operation buttons that you can apply to all items or to the selected items:
-
Select/Unselect all: allows you to select/unselect all the items of the order
-
Discount percentage: allows you to apply a percentage discount to the order
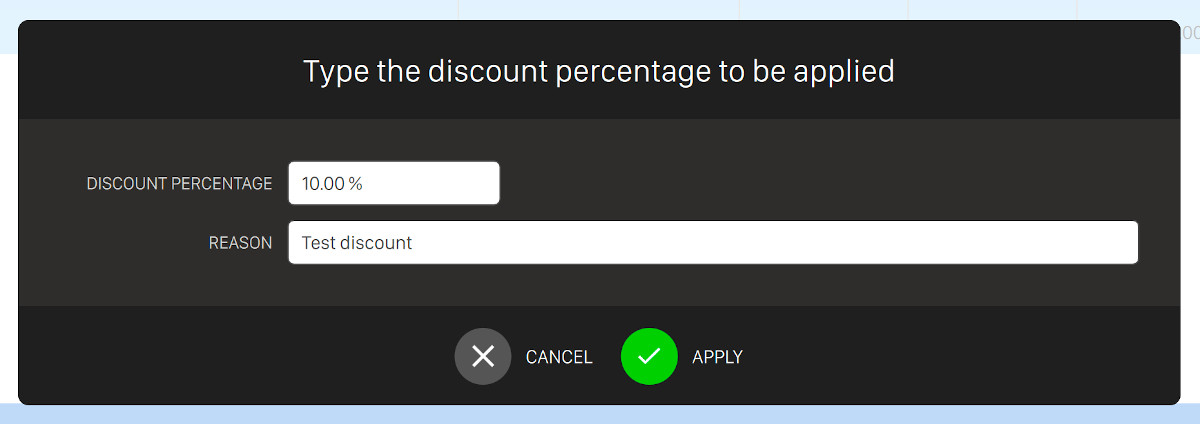
Enter the amount of percentage of the discount you want to add and click apply button to confirm it. A new line with the discount will be added to the list of items
-
Discount amount: click this button to apply an open amount discount to the order
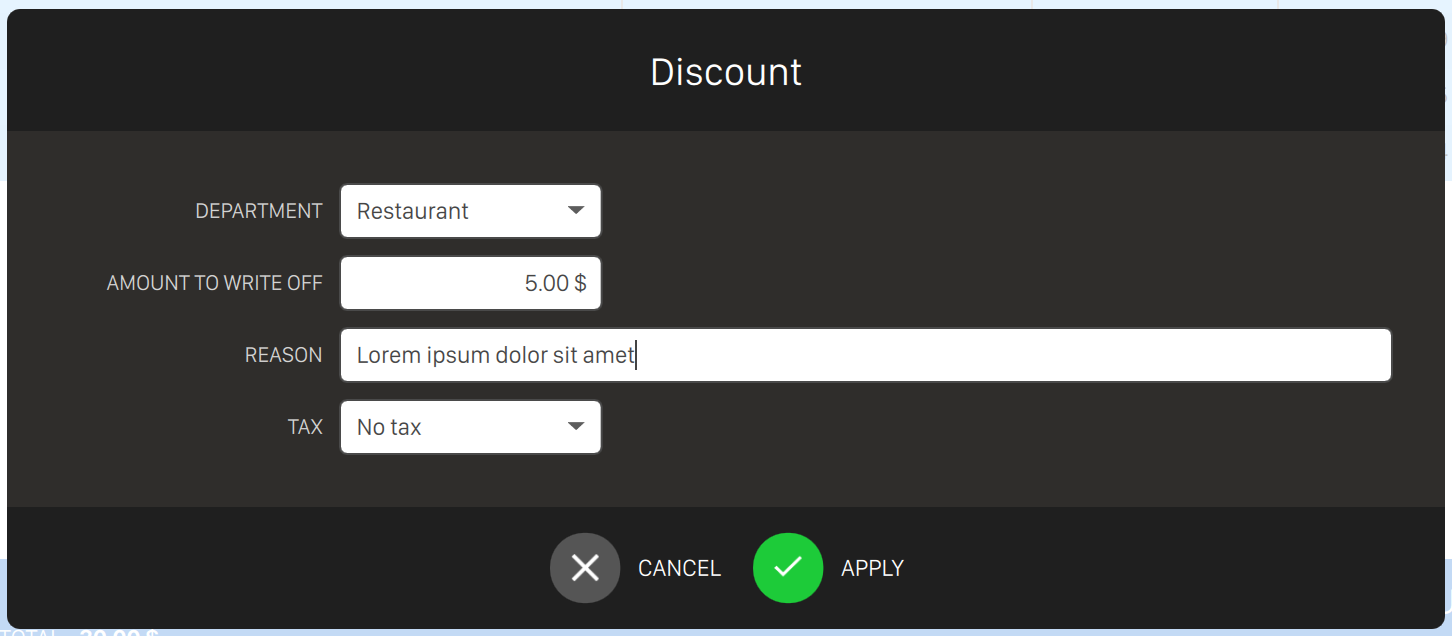
To make a discount it is necessary to specify:
-
The department, by selecting it from the list of available departments
-
The amount to write off
-
The reason of the discount
-
The tax to be applied to the discount, by selecting the it from the list of available taxes
Press Ok to confirm and apply the discount or Cancel to discard the operation. A new item will be added to the list on the income table
-
-
Cancel the discount: if one or more of the selected lines contains any discount then by pressing this button it is possible to remove them from the items
-
Join items: if two or more lines of the same item are selected then by pressing this button it is possible to merge the lines into a single line
-
Split items: if you have selected a line with a quantity greater than one then by pressing this button it possible to split the line into multiple lines, as much as the specified quantity
-
Print prereceipt: allows you to print a receipt in order to cash the order when it is sent to a table or to a lane
-
Special features: show a list of additional buttons
-
Group as a package: allows you to group items as a package. Items grouped are shown on the list as packages. See Packages section for more details
-
Divide in items: allows you to split packages in all their components
-
Score printout: allows you to print the bowling scores if the selected items include bowling games
-
Change rate: allows you to change the selected items rate. This button is available only for bowling games or time games
-
Change tax percentage: allows you to modify the tax percentage of the selected items
-
-
Pay with another software button is used to pay the selected items using the feature for external POS sales as described in the External POS sales section.
-
Pay button is used to cash the selected items. When this button is pressed, the software takes to the Income window, unless the option use payment screen in Advanced settings section is disabled
-
Not paid button allows to not cash the selected items, notifying the system that no money has been cashed. When this happens the system will ask to enter a justification that will be recorded into the database and shown on the detailed reports
7.3 Security Policy for Printed Orders
The system implements enhanced security measures to protect the integrity of orders that have been printed and sent to the kitchen or bar. These measures prevent accidental or unauthorized modifications and ensure complete traceability of all changes.
Permission Requirements
Removing items from printed orders requires:
-
Specific operator permission: The permission
GestioneOrdini_RimozioneArticoliInPostPagatomust be explicitly granted to the operator -
Mandatory justification: A written explanation must be provided for every removal
-
Audit logging: All modifications are logged with operator ID, timestamp, and justification
How It Works
When attempting to remove an item from a printed order:
-
The system checks if the order has been printed
-
If printed, the system verifies that the operator has the required permission
-
If permission is granted, a dialog appears requesting a justification
-
The operator must enter a clear explanation for the removal
-
The justification cannot be empty or contain only spaces
-
Once a valid justification is provided, the item is removed
-
The action is logged in the database with complete details
7.4 Income
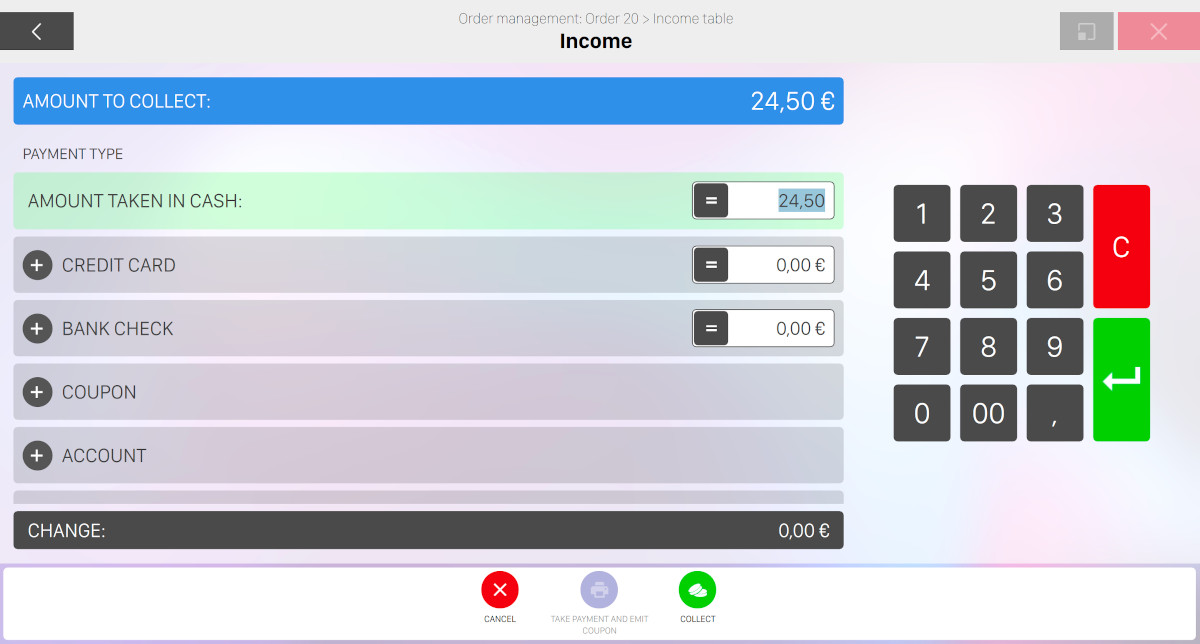
This window allows to specify how a sum of money is cashed. It ends the procedure of the income table window, unless the option use payment screen in Advanced settings is disabled.
On the top you can see the Amount to collect that shows the total amount to collect for the selected items.
Amount taken in cash allows to enter the amount of money that the customer pays in cash. If this amount is greater than the amount to collect, the change is shown on the lower line of the window.
The (=) button in the Amount Taken in Cash allows you to automatically enter the correct amount to collect in the amount taken in cash field. In this case the change will be 0 (zero).
7.4.1 Other Payment Types
You can specify one or more alternative methods of payment. If you click the ‘plus’ button then you can select another method, and usually it is necessary to add more details:
-
Credit card: it allows you to specify that the customer has paid with a credit card. Note: manually entry allows you to use the Mercury software, when available, instead of the credit card device.
Genie integrates a credit card payment system called Mercury, which allows to make economical transactions directly to the software. This system must be supplied separately and is not installed by default. In case Mercury is not installed Genie allows anyway to record credit card payments, asking the amount and other information related to the card or to the transaction that will be made from an external system.
In case Mercury is active then the amount to hold will be asked and the customer has the possibility to add some tips to the payment or pay in ‘manual entry’ mode. This one allows to bypass the Mercury system and it is used when the device is not available. A window will then appear where you can insert the amount and the credit card number to make the payment.
Once this option is enabled, the amount to collect will be automatically shown in the related field
-
Add tip (if available): allows to add a TIP

-
Tip receiver: allows you to tip a specific operator from the list of operators
-
Tip amount: allows you to define the amount of the tip
-
Datacap Manual Entry: When using Datacap payment provider, operators can manually enter card details on the payment terminal if the physical card cannot be read (damaged card, defective chip/stripe). This ensures transactions can be completed even with card reading issues.
-
-
Bank check: allows you to specify that the customer has paid with a check. Once this option is enabled, the amount to collect will be automatically shown in the related field
-
Information requires you to enter the check number or a note that you want to record on the database. This information will be printed on the detailed reports
-
-
If Embed, Sacoa, Intercard or Semnox services are available then you can swipe the card on the reader and make payment through their systems
-
You can select an account from the list of available accounts. These are related to members and can be created or recharged from the player archive section
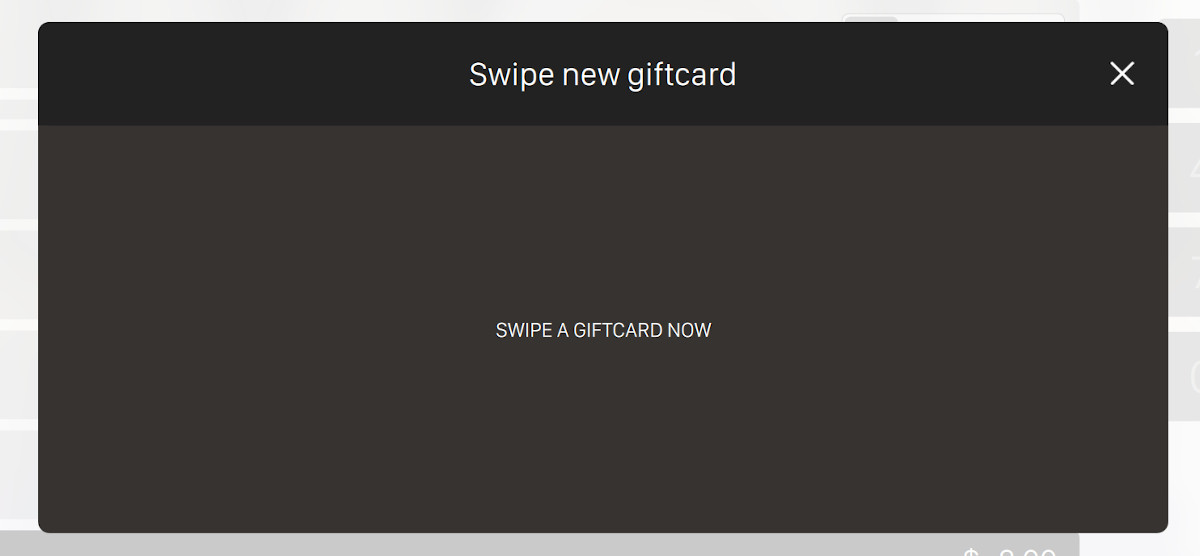
-
If at least one giftcard has been sold then the giftcard payment option will appear and will let you pay with a customer’s giftcard. Click on the ‘plus’ icon and a popup will appear:
-
It is possible to select a custom payment method that can be defined from
Preferences >
     Advanced settings > POS devices > Payment screen settings
. Customized payments allows to handle payments that do not belong to other categories (cash, credit cards, ...)
The change field shows the amount of change to give to the customer after the payment. If the amount collected is lower than the total to cash, the change shows a negative number.
It is possible to cash the required sum combining different types of payment, for instance it is possible to pay a part of the total with a check and to use cash for the balance.
The numeric keyboard on the screen allows you to enter the amount to collect. Select the field where to enter the amount, enter the required amount with the numeric keys; use the decimal symbol if required:
-
Canc button deletes the amount inserted in the selected field
-
Enter button confirms the inserted amount.
7.4.2 Available Options
-
Cancel button closes the window and deletes the current operation
-
Take payment and emit coupon button is enabled only when the money provided is greater than the amount to collect. It allows you to print a credit coupon to give it as change that can be redeemed later
-
Collect button allows you to cash. All the information related to the payment are recorded in the database. It is possible to print these information by the detailed reports. After cashing, a receipt will be printed by the thermal printer if the printing option is enabled in the enable receipt printer section in Advanced settings
7.4.3 Credit Coupon
Any operator can issue credit coupons instead of giving change and gives to the customer a coupon receipt. This receipt has a progressive number, a value, an expiring date (if wanted) and a note. Press Take payment and emit coupon button from the Income window.
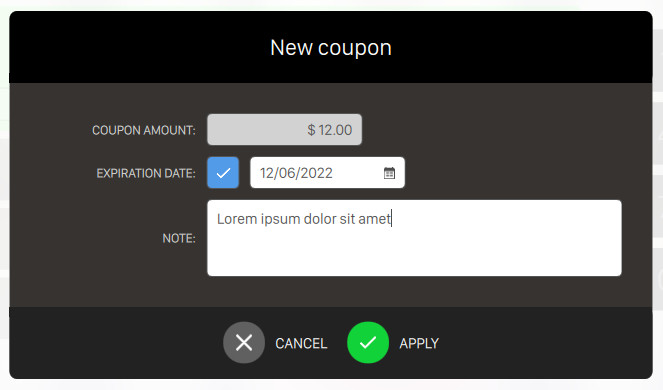
When you print a coupon it is necessary to enter a note to explain the reason for issuing it. It is possible to set an expiration date after which the coupon will be considered expired. A coupon can be used as cash when accepting a payment; to see more information go to Income section. All the data related to the creation and to the use of a coupon are recorded in the database and can be printed in the detailed reports or visualized in Coupon archive section in Archives.
7.5 External POS sales
This feature allows to sell bowling games by mean of third party devices. These devices must communicate to the application server the sales data and they can do it using REST APIs or putting data files in a particular directory inspected by the server.
7.5.1 Configuration
The configuration of the external POS sales is contained in the file externalpossale.ini, located in the main application directory. If the configuration file doesn’t exists when the server application starts, it is created automatically with a base configuration with the feature disabled. In order to enable it and configure its settings it is needed to edit that configuration file. Every time the configuration is changed the server must be restarted so that the changes take effect.
An example of the file with all the possible parameters is shown in the following:
[MAIN] enabled=true exchangeFolder=C:\ExternalPosSales\exchangeDir archiveFolder=C:\ExternalPosSales\archiveDir expiryDays=1 [item.ItemName01] numFrames=10 numMinutes=0 numShoesPairs=0 numSocksPairs=0 [item.ItemName02] numFrames=0 numMinutes=20 numShoesPairs=1 numSocksPairs=1
7.5.2 Settings
In order to use the sales made with the POS devices in the application, it’s important to ensure that the
payment method setting is correctly selected. The option to set can be found at Preferences ->
Advanced settings -> POS devices -> Payment screen settings -> Method of payment and
must be set to "Only accepts external payments" or "Cashier’s autonomous choice". This option
makes the Pay with another software button visible in the Income Table view; pressing
this button a window opens that allows to choose the external POS sales to use to pay the
games.
7.5.3 Using external orders
Once the configuration file is edited, the application started, the payment method correctly set and the external POS devices communicating sales data, the feature can be used. As soon as a POS device performs a sale, the data are sent to the application. Their number appears on the green button of the application top header; clicking on it makes the External Orders popup window to appear and show the list of the orders with their details.
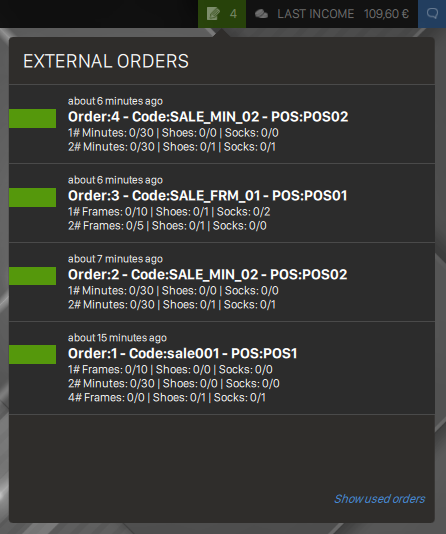
The orders shown in this window are the ones sent with targetStationId equal to 0 or to the Frontdesk number. Here it is possible to delete the orders; to do it click on the rectangle of the order to remove so that a red button appears on the right of the rectangle; clicking on it the application shows a dialog to confirm the action: if you click ’Yes’ the application ask to type a justification for the deletion and then, clicking on ’OK’, the order is deleted. Each order in the list has a state color: green for the new, orange for the partially used and grey for completed orders. A filter for the orders is present in the lower right corner of the window: it allows to show or hide the orders already used. After some orders are made, they can be used to pay bowling games in the Income Table. To do that, select the bowling items from the list and click on the Pay with another software button: the External Orders dialog appears and allows to select the orders to use.
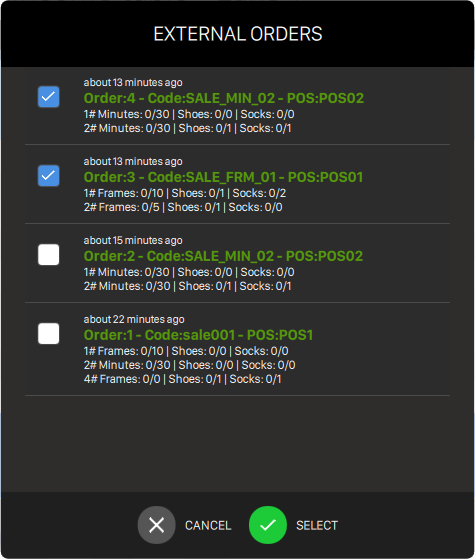
Pressing the Select button, the selected orders are processed and compared with the bowling game items to check for compatibility. The application shows an alert if the orders contain less game items than required and the games cannot start. A warning is shown if the orders contains more game items than required but in this case the games can start and some orders will result to be partially used. The payments made by mean of external orders are registered in the application and appears in the reports as External POS type financial movements.