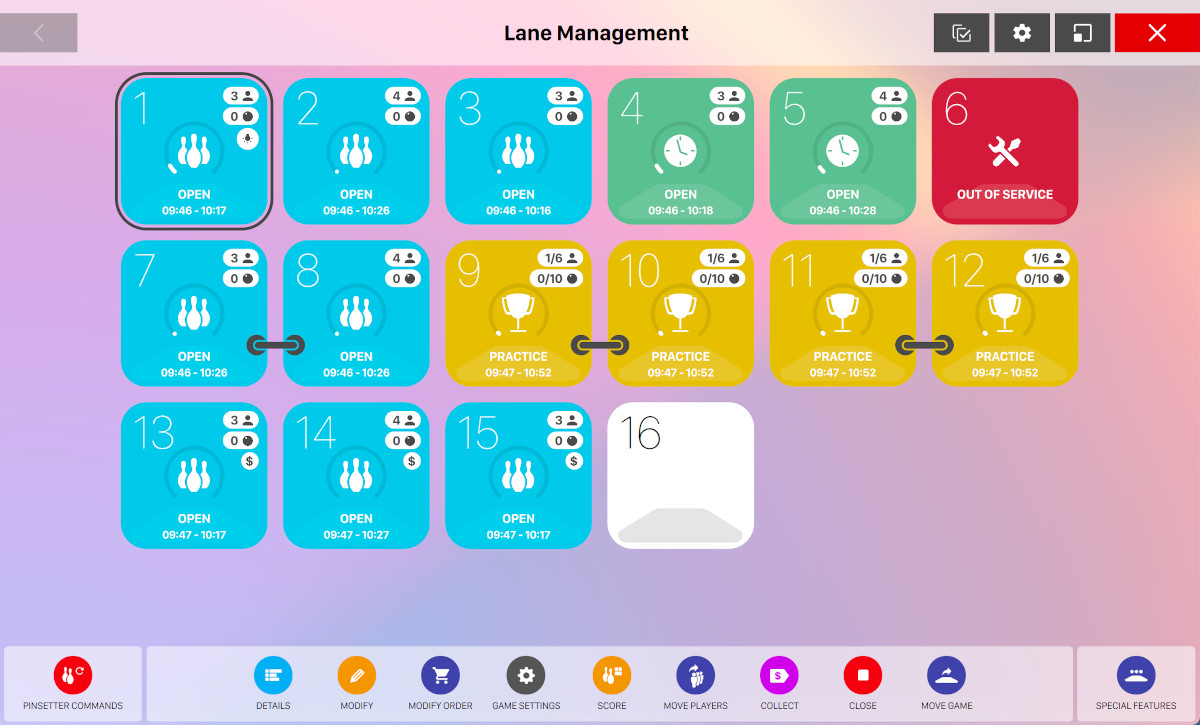
This is the main lane management window. Lanes are displayed on a grid as squares with rounded corners. Click on a lane icon to select it. If you want to select multiple lanes, click and hold on a lane icon, then move over the other squares. Press CTRL or SHIFT and click on a lane to select multiple lanes that are not consecutive. The selected lane icons are highlighted with a black frame.
If you want to resize grid elements you can click on the cog icon at the top-right of the window and a dropdown will appear:
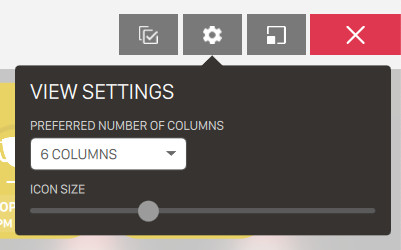
Swipe the bar from left to right or viceversa to increase or reduce the size of grid elements. It is also possible to change the preferred number of columns to dispose the lanes grid. Once applied the configuration will be persistent and the next time you come back to this window you will find the same view configuration.
5.1 Icon Symbols
Each lane icon can be different and each graphic has a specific meaning.
![]()
This icon shows that the lane is available for a new game.
![]()
This icon shows that the lane is open and somebody is playing on it in game mode. Inside the number of frames bowled considering all the players and the starting and closing time of the game.
Closing time, in case the duration is variable, is an esteem made by the software considering the
average duration of a game (by default 10 minutes and customizable from Preferences >
Advanced settings > Bowling parameters > Game duration in minutes) and the number of
players.
![]()
This icon shows that the lane is open and somebody is playing on it in time mode. In this case you can see the number of bowlers on the lane, the number of frames bowled considering all the players and the starting and closing time of the game.
![]()
This icon shows that a lane is available, but there is a pending booking. The label shows the start time for the reservation I.E. ‘Mario’, shall start at 11:45pm.
![]()
The link symbol shows that the lanes are used in league mode. The bowlers will bowl a frame on the left lane and the next frame will be played on the right lane of the pair.
![]()
This symbol shows that there is a tournament running on the selected lanes.
![]()
This symbol indicates that the lane is used in fixed duration mode, but credits are finished. In this case bowlers cannot bowl until they buy extra time/games. The message ‘ASK AT THE FRONT DESK TO CONTINUE’ appears on the lane monitor to inform bowlers that they must contact the frontdesk and buy new frames to continue playing.
![]()
This symbol shows that the lane is going to be opened by another operator from another frontdesk.
![]()
This symbol indicates that the current lane is out of service and it is not available for new games.
![]()
This symbol shows that there are communication problems with the lane hardware.
5.1.1 Symbols on the lane icons
![]()
This symbol shows that the lane is in game mode, so when bowlers go to pay, the system will count the number of played games to calculate the final amount.
![]()
This symbol shows that the lane is in time mode, so when bowlers go to pay the system will count the minutes played to calculate the final amount.
![]()
This symbol shows that the lane is in pre-paid mode, so players must pay the final amount before they start to bowl.
![]()
This symbol shows that on the current lane a tournament is being played.
![]()
This symbol indicates that the glow light is "on" on the current lane. This feature must be supported by the lane hardware.
![]()
This symbol indicates that two lanes are linked together. This means that on the lane a game is being played in league mode or that a tournament turn is being played.
![]()
This symbol indicates the number of played frames played on the selected lane.
![]()
This symbol indicates the number of players that are playing on the selected lane.
5.2 Available Options
At the bottom of the window you can find a group of buttons that can be used to perform operations on the selected lane(s). The visibility of buttons and functions depends on the ‘state’ of the selected lanes: if a button or a function are disabled, it means that the system has determined that the function can not be used on the selected lanes.
5.2.1 Pinsetter commands
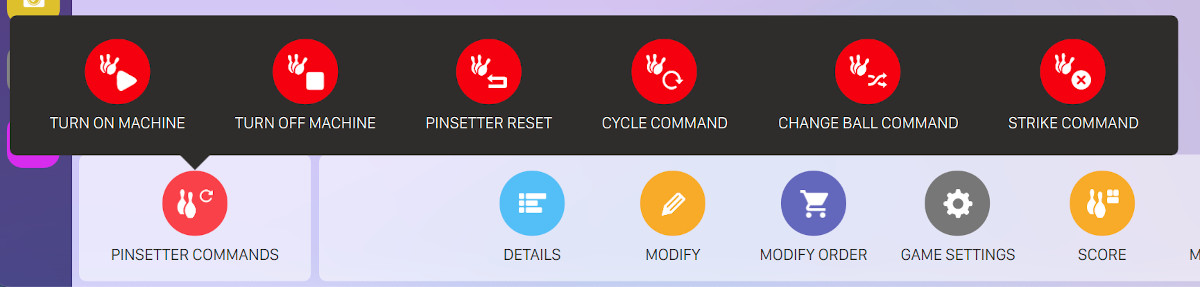
With this list of actions it is possible to send commands to the pinsetter machine of the selected lane(s).
-
Turn on machine: turns on the selected lane/machine
-
Turn off machine: turns off the selected lane/machine
-
Pinsetter reset: sends the command to spot a full rack of pins on the selected lane
-
Cycle command: cycles the selected machine
-
Change ball command: changes from 1st to 2nd ball or vice versa
-
Strike command: sends a strike cycle command to the selected machine
The machine behaviour depends on the type of the installed machine. Not all the commands are supported by all the machines.
!!!NOTE!!! It is VERY important to be sure that nobody is working or is close to the pinsetters before any command is sent to a lane.
5.2.2 Standard features

-
Start: open the Open new game screen
-
Start reservation: When a lane has an associated reservation, this button starts the reservation directly without navigating to the Reservations section.The system retrieves reservation details, validates game compatibility, checks player count, and applies package settings automatically.
-
Details: open the game details screen
-
Modify: open the Modify game screen
-
Modify order: allows you to edit the food/drinks order related to the bowling session running on the selected lane(s)
-
Game settings: open the Game settings screen
-
Score: open the Scores screen
-
Move players: it allows you to move the bowlers from a lane to another. See Move players section for more details
-
Extend game: it allows you to extend the duration of a finished game. See Extend game section for more details
-
Collect: open the Income table screen
-
Close: closes the game(s). In post-paid mode it open the Income table screen
-
Move game: it allows you to move a game from one lane to another. This feature is useful when there are technical problems on a lane. To move a game:
-
Click on the lane you want to move
-
Click on the Move game button
-
Click on the destination lane. If the lane is in use a dialog will appear and you will be asked to confirm the lane movement; if you confirm it, the lanes will swap
-
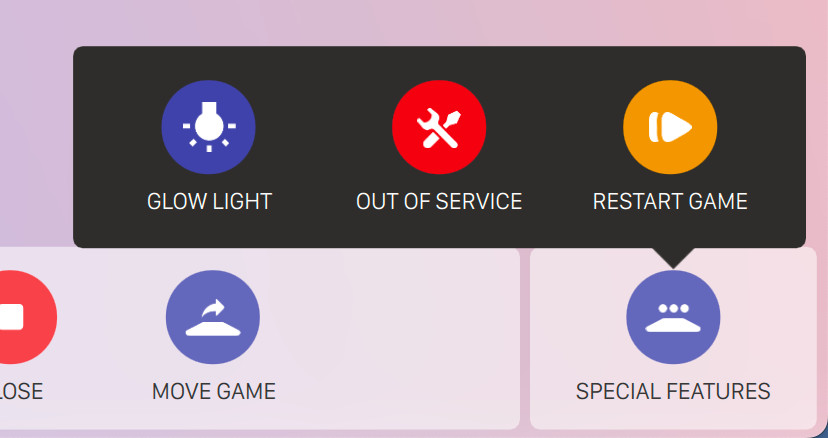
5.2.3 Special features
-
Glow light: turns on the glow light on the lane, if available
-
Out of service: takes the lane to ‘out of service’ mode. When a lane is already in the state ‘out of service’ the command will take the lane back in service. A lane that is out of service cannot be used until the ‘out of service’ message is on. When a lane is ‘out of service’ the lane monitors display the ‘out of service’ warning
-
Restart game: it allows you to close a game (even if it is not finished) and to start a new game
-
Cross lane/split lanes: this button allows you to group in cross lanes mode 2 adjacent lanes that are in Open mode, the players will move to the next lane to bowl a new frame. When 2 lanes are in cross lanes mode, the button allows you to separate them and and set the Open mode. When you try to join two separated games in cross lanes mode, the system performs a compatibility check to determine if there are the right conditions to make the join. For instance you can not join a game mode game with a time mode game
5.3 Open a New Game
To open a new game from the Lane management screen, select one or more lanes and click the Open button: the Open a new game screen will open and allow to configure and start a new bowling game.
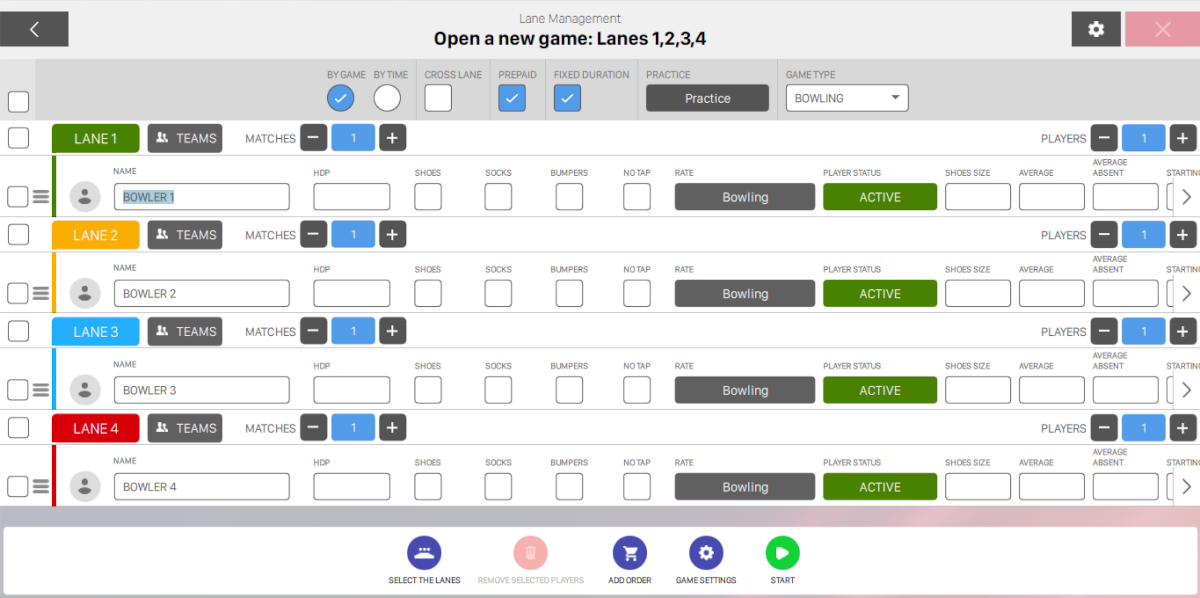
5.3.1 Game customizations
The first row of this screen contains some controls to configure the game options.

In order from left to right we can see:
-
The checkbox to select or deselect all the players listed below
-
Two radio buttons to select the game mode:
-
By game: the final price is calculated on the number of games played
-
By time: the final price is based on the amount of time played
-
-
Cross lane checkbox: activates the cross lane mode where the bowlers use a pair of lanes playing one frame on one and the next on the other lane. When this option is active it is also necessary to have two adjacent lanes. The first one must be an odd lane (1, 3, 5, ...). It is not possible for instance to have lane 4 and 5
-
Prepaid checkbox: enables the Pre-Paid mode that allows you to cash the income before the game starts. Each order added to a lane in Pre-Paid mode will be cashed at the time of sale. Note: once a game has started the payment method is not editable, however it is possible to set the default payment method and game type from the Advanced settings section
-
Fixed duration checkbox: in case of ‘by game’ mode indicates that the number of games to be played is set before the game starts. In case of ‘by time’ mode indicates that the time to be played is set before the game starts
-
Practice button: opens a popup that allows you to enable the practice time for the game:
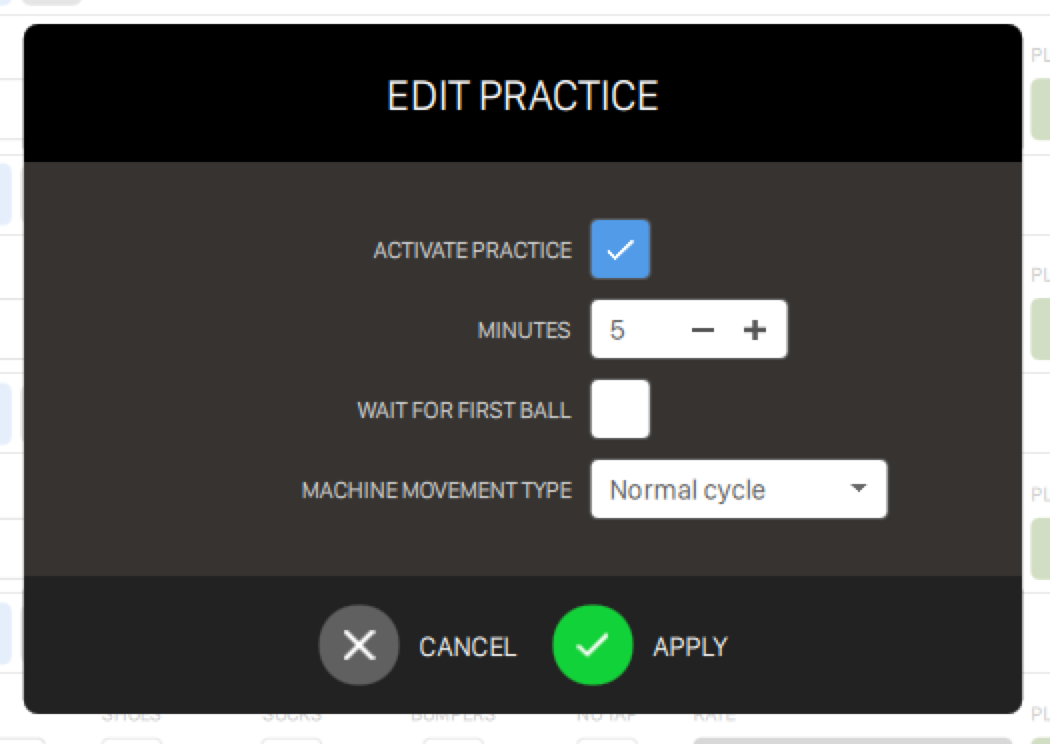
-
Activate practice: check this option to activate practice
-
Minutes: sets the minutes for practice
-
Wait for first ball: indicates to the system whether to start the practice time when the lane is open or to wait for the first ball
-
Machine movement type: indicates the type of practice time, the options are:
-
Strike cycle: the pinsetter spots 10 pins after each shot
-
Normal cycle: the pinsetter cycles after each shot like a normal frame
-
Pinsetter stopped: the pinsetter does not cycle
-
-
-
Game type combobox: allows to select the game type; the default type is ’Bowling’, the others are those defined in the Definition of bowling games section.
5.3.2 Players and lanes configuration
Below the game customization row you can find the players list. The players rows are grouped by lanes so that at the top of each group there is a lane row. You can customize the columns to be shown by clicking on the cog icon on the top right section of the screen:

Click on the checkboxes to show or hide the relative column.
Columns on the lane rows are respectively:
-
The checkbox to select or deselect all the players listed in the lane.
-
A colored label with the lane number: clicking on it opens a dialog window to select the lanes involved in the game. This functionality is available also from the action bar at the bottom of this screen, as described below.
-
The Teams button: if you press it then a popup dialog will appear and allow to manage teams:
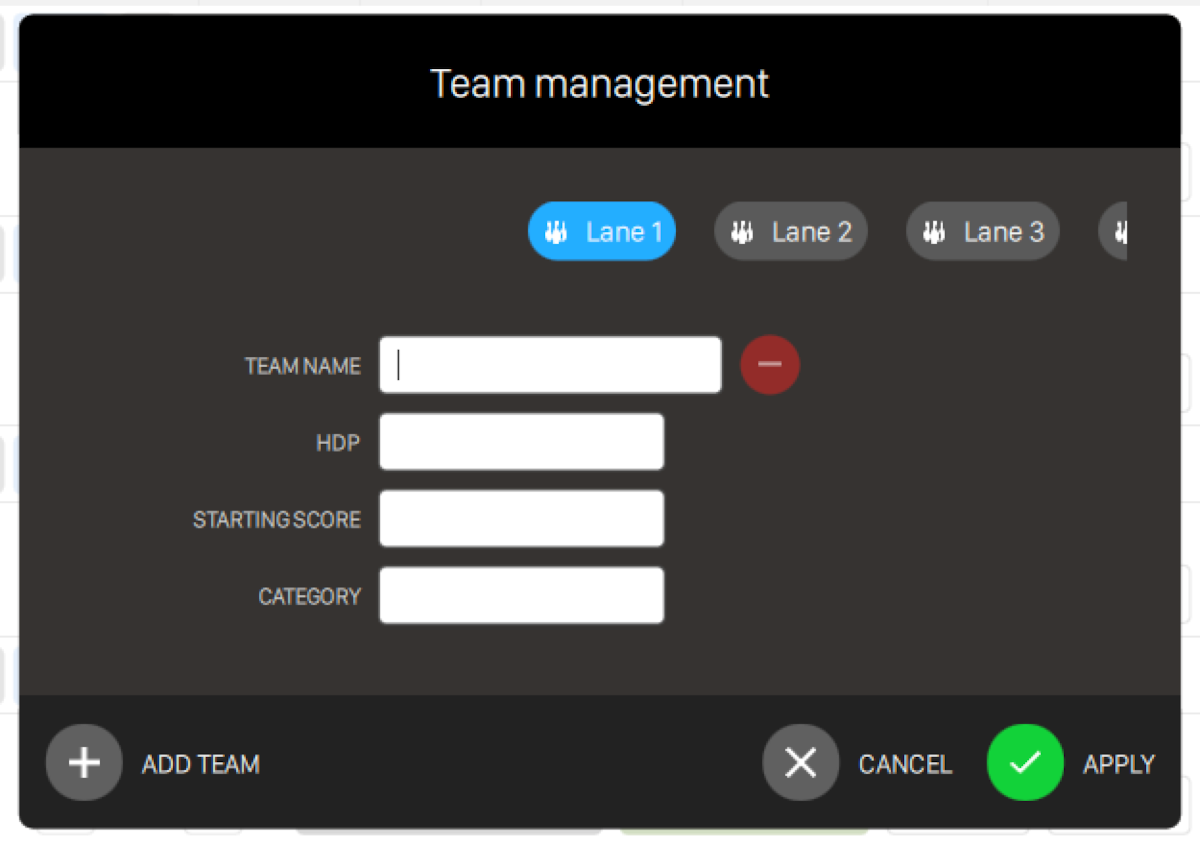
For each team you can define:
-
Team name: set the name of the team that will be visible on the lane monitors
-
Hdp: set an handicap for the team. If this field is left empty the system will calculate automatically the handicap by adding the handicap of players that belong to the same team
-
Starting score: this score is added automatically to the final score accumulated during the game
-
Category: this field is useful for grouping and filtering teams on reports
Click on Add team button to add a new team to the list. If two or more teams are present, you will also see the Remove team button, which will remove the team from the list. Removing a team will also move all the players of that team to another team
-
-
The Matches controls group: allows set the number of matches to play; the - and + buttons allow to add and remove matches, while the edit box allows to edit the number manually; this controls group is shown when the game mode is set as ’by game’ and the Fixed duration option is selected
-
The Minutes controls group: allows to set the number of minutes to play; the - and + buttons allow to add and remove minutes, while the edit box allows to edit the number manually; this controls group is shown when the game mode is set as ’by time’ and the Fixed duration option is selected
-
The controls group to set the number of players; the - and + buttons allow to add and remove players in the lane, while the edit box allows to edit the number manually
The controls in a player row are respectively:
-
The checkbox on the top-left allows you to select or deselect a player
-
The 3 bars icon under the checkbox allows you to drag-and-drop the bowler to another position, to another team or to another lane
-
The circle Member icon allows you to select or insert a bowler from the members’ archive
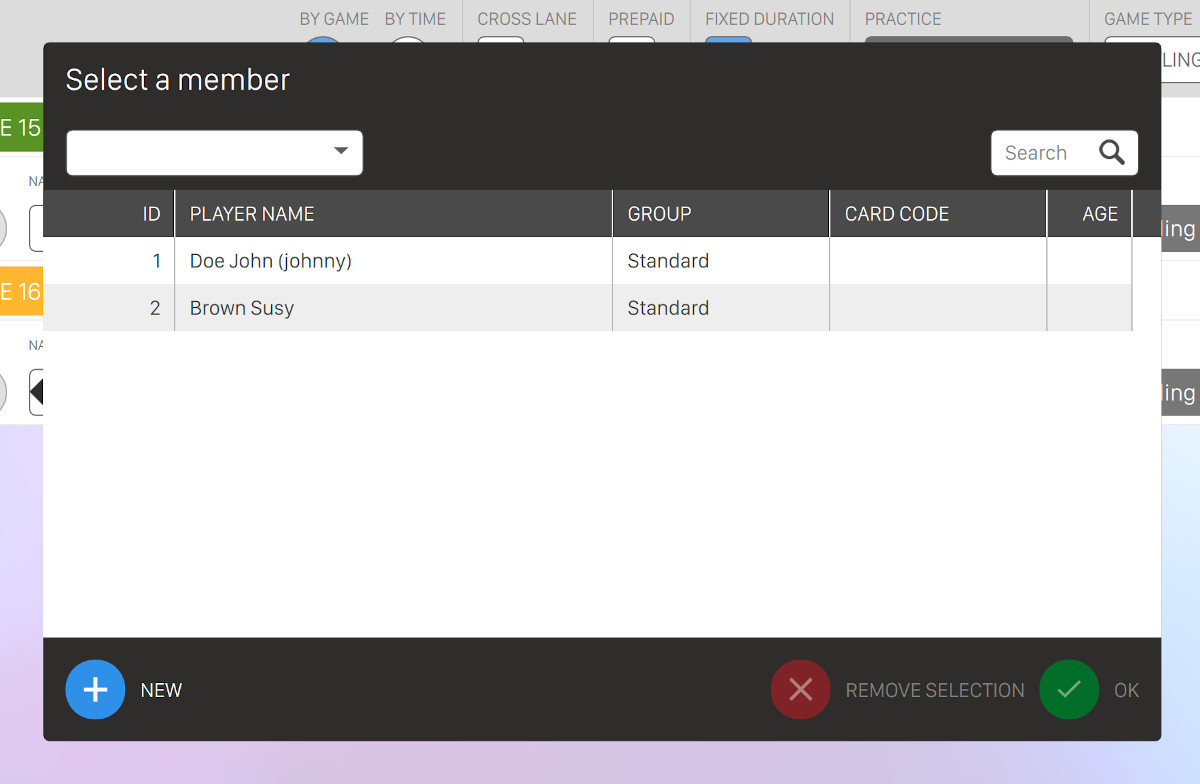
Click on any and then press Ok button to select the member. If a member is already selected you can click on Remove selection button to remove the selection. Select a member group from the dropdown or enter some arbitrary text on the search field to filter the members’ list. Below the filters you can find the members’ table:
-
Id: represents the unique identifier of the member
-
Player name: name and surname of the member
-
Group: indicates the group the member belongs to
-
Card code: indicates the code of the personal card
-
Age: indicates the age of the member if set
Click on New button to add a new member. A form will appear and you will be asked to enter the basic information of the new member:
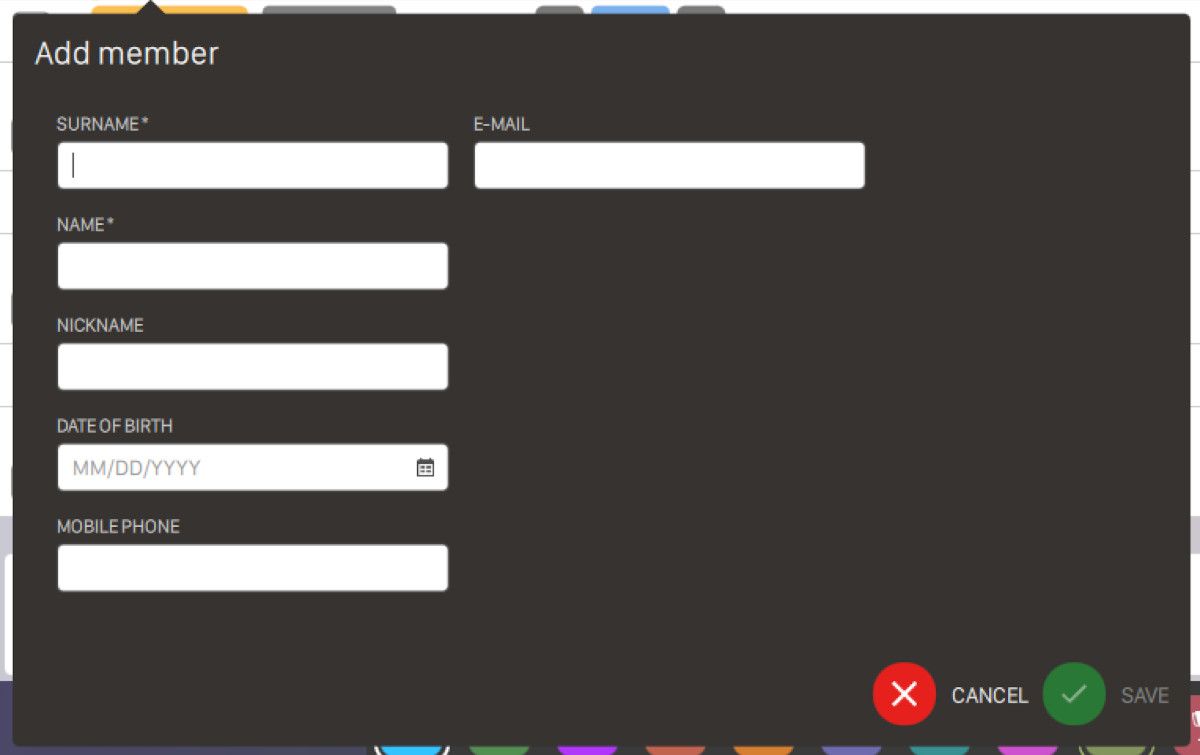
-
Surname: set the surname of the new member (required)
-
Name: set the name of the new member (required)
-
Nickname: set the nickname of the new member
-
Date of birth: by using the calendar widget set the date of birth of the new member
-
Mobile phone: set the mobile phone of the new member
-
Email: set the email address of the new member
Enter all the required information and click on Save button to proceed with the creation of the new member, otherwise click on Cancel button to discard the operation.
Once a player has been selected from the archive the row will be populated with the information fetched from the selected member.
-
-
The Name field allows you to enter the name or the nickname of the bowler
-
The HDP field allows you to specify the bowler’s handicap amount
-
The Shoes checkbox allows you to specify whether the bowler needs to rent the shoes or not. This action can be set by default from the Advanced settings section
-
The Socks checkbox allows you to specify whether the bowler needs socks or not. This action can be set by default from the Advanced settings section
-
The Bumpers checkbox allows you to activate the ‘bumpers’ feature for the bowler
-
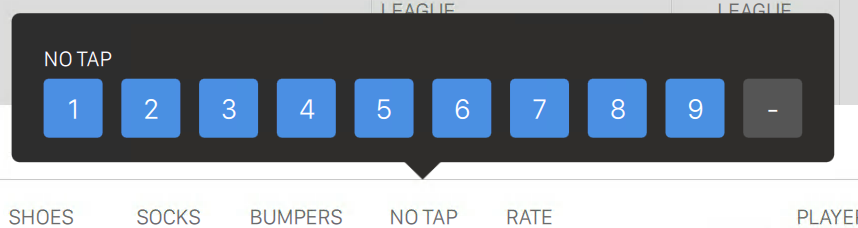
The No tap checkbox allows you to recall the No tap selection window
-
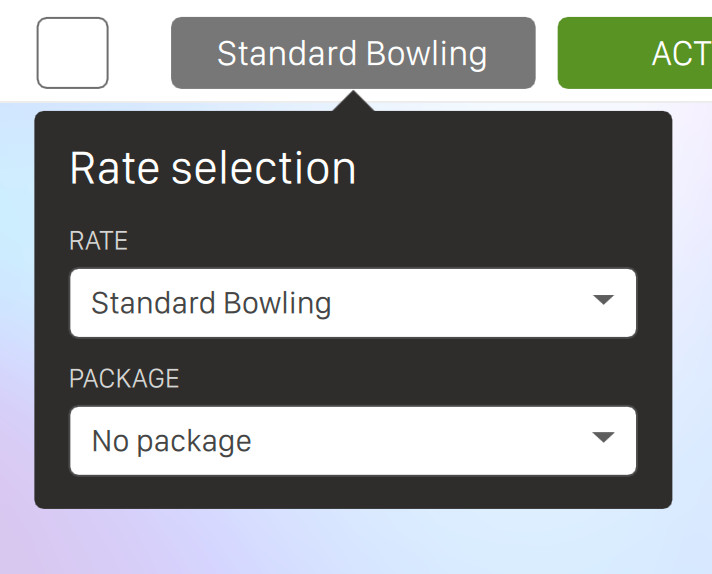
Rate button: will open the rate selection dropdown list where you can set:
-
The Rate to use for this bowler. The rate shown by the system is the one set by default in the rate definition section. To change the default rate settings see
Preferences > Rate definition > Set default rates -
Package (if at least one is defined): select a package from the list. The selected package will be applied to the selected player and will override the player rate. See the purchase package definition section for more information
-
-
The Player status allows you to recall the player status window
-
Shoes size: allows to edit the shoes size for the player
-
Average: allows to edit the average of the player. This feature is used in tournaments
-
Average absent: allows to edit the average used for the selected player in case the player is absent. This feature is used in tournaments
-
Starting score: allows you to add score that will be added automatically to the final score accumulated during the game
-
Purchased matches: visible in ’by game’ mode, allows to edit the number of matches to play; it is visible only if the Fixed duration option is selected
-
Paid matches: visible in ’by game’ mode, shows the number of matches that have been paid
-
Purchased minutes: visible in ’by time’ mode, allows to edit the number of game minutes to play; it is visible only if the Fixed duration option is selected
-
Paid minutes: visible in ’by time’ mode, shows the number of minutes that have been paid
Note that if multiple players are selected, by mean of the selection checkboxes on the left, the changes made to one player are also applied to all the others. There may be some exceptions when the propagation doesn’t make sense, for example for the player’s name.
5.3.3 Adding bowlers using the magnetic membership cards
If you swipe the magnetic card assigned to one or more bowlers, then you will see a window with the list of the bowlers to whom the card has been assigned. Click on the (+) key next to the bowlers you want to add. Any card can be assigned to one or more customers. This way bowlers are automatically added to the game.
5.3.4 Available actions
At the bottom of the window you can find some actions that you can perform on the game that you are currently opening.

-
Select the lanes: opens a popup where you can select the lanes for the current game; this popup is the same that opens from the lane colored button in the lane row.
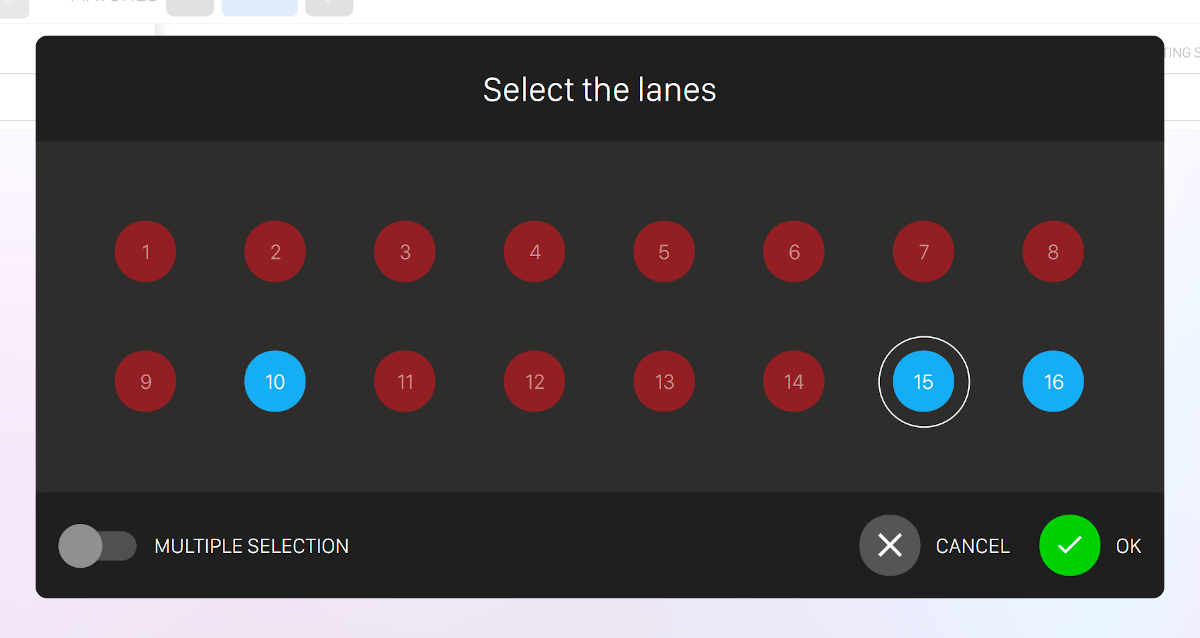
Select the lane where you want to move the current game or click on multiple selection to select more than one lane
-
Remove the selected players: click this button to remove the selected players from the list
-
Add order: takes to the Order management window
-
Game settings: takes to the Game Settings window
-
Open: open a game and close the screen. When the Pre-Paid mode has been selected, the Income table window will be opened
5.4 Modify Game
If you want to modify an existing game you need to access the Modify game screen, and you can do it in two ways:
-
From the Lane management window select a lane icon and click on the Modify button placed in the bottom bar. The game will be interrupted and a message will be displayed on the monitor
-
From the Lane management window, select a lane and click on the Details button to open the Game details screen and click on the Modify game button on the functions bar at the bottom.
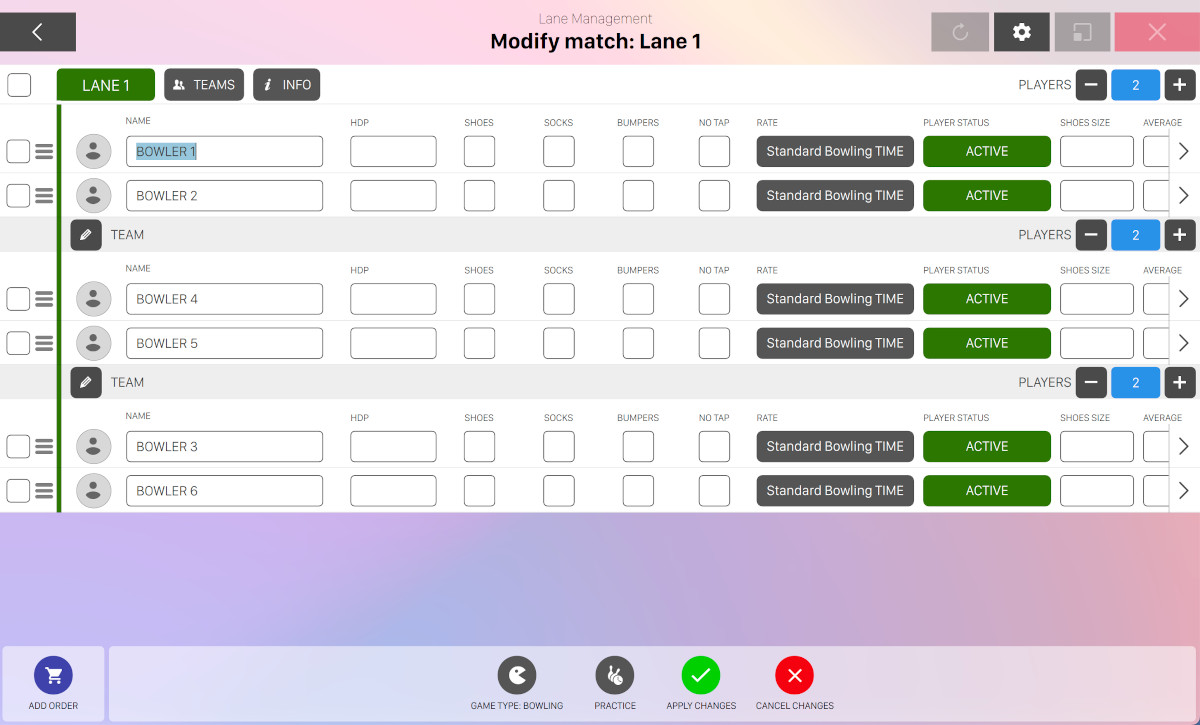
This window allows you to modify a bowling game that has been already started and add or remove players from the list.
The lanes rows in this screen are very similar to those seen in the opening of the games and the controls allows you to modify the number of frames or the number of game minutes. Note that there are some differences:
-
The lane button is not active: it is not possible to add or delete lanes when the game has been already started
-
You can increase/decrease the amount of frames or minutes (depending on the game type) if the game has been started in prepaid mode
-
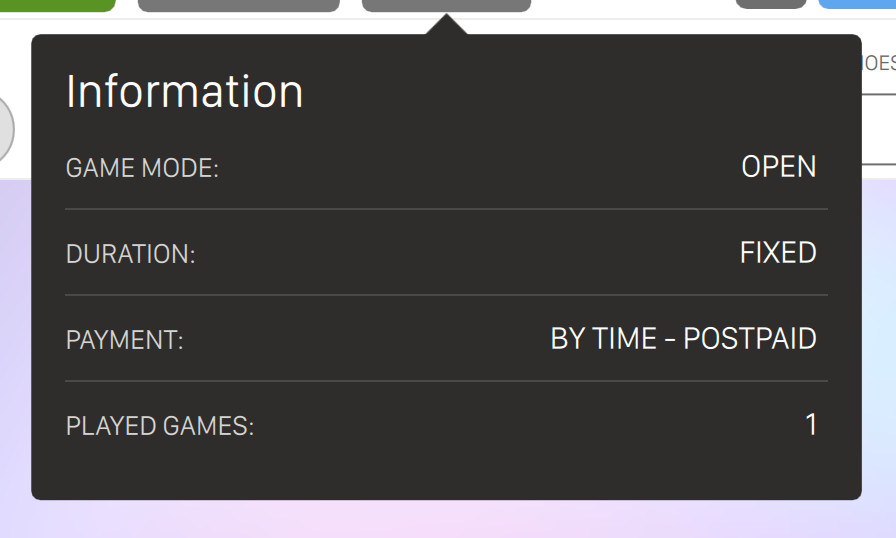
The Info button shows some information about the current game in a dropdown
Also the players rows are very similar to those in the game definition, the most of the options can be changed and it is possible to edit the number of the purchased frames in ’by game’ mode.
5.4.1 Player status
For each bowler you can set the status by clicking the button on the right of each player’s row.
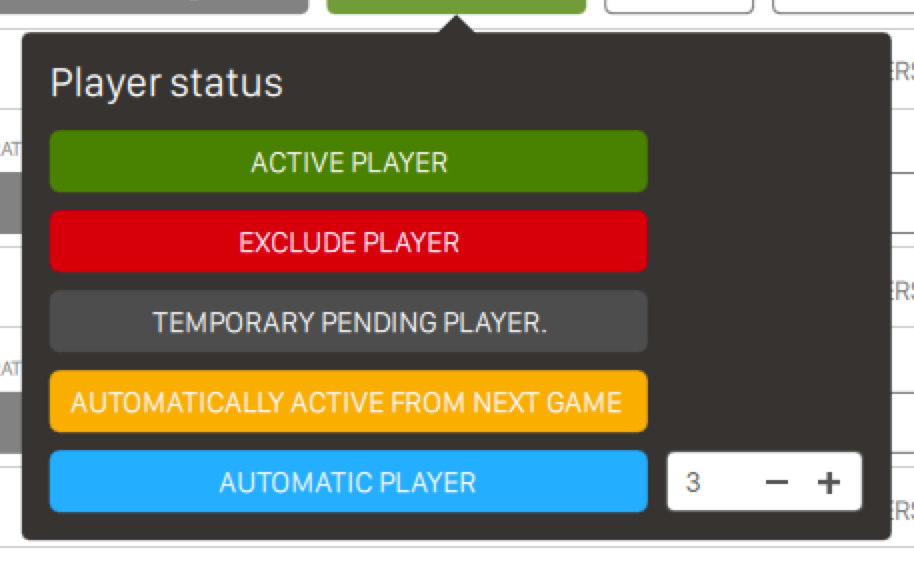
-
Active player means that the player is currently playing the game
-
Exclude player means that the player has been removed from the game
-
Temporary pending player means that the player is temporally suspended from the game but not removed. It will be possible to restore him at any time and he will recover lost frames of the current game until he reaches other players
-
Automatically active from the next game means that the player is not active and will be activated in the next game
-
Automatic player means that the player is a robot with a skill level. The skill level goes from 1 to 5 and determines the precision of the shots for the robot. For each level will be displayed a different robot image and the level corresponds to a game with an average number of pins that starts from 80/90 for level 1 up to 200/220 for level 5. The ROBOT players are not counted in the total amount to cash
5.4.2 Adding frames and time to the game
To add frames to a game in ’by game’ mode, use the Frames controls group: the frames set will be added to each player in the lane in the Frames purchased edit box. If you want to assign a different number of frames to one or more players, it is possible to edit the specific amount in the player row: this way the frames controls group will detect the different amounts and the number of frames will be grayed. It is also possible to add players and assign them frames. Instead of removing players, which is not allowed by the system, it is possible to set them as ’Not active’ changing their status, that is pressing the ’Player status’ button and choosing ’Exclude player’ from the popup. When a player is set as ’Not active’ the remaining frames are divided between the other players. Removing frames is not allowed.
To add time to a game in ’by time’ mode, use the Minutes controls group: the time to set will be added to each player in the lane in the Minutes purchased box. It is also possible to add players and assign them time: in this case all the time added is set to be payed by the last players added. Instead of removing players, which is not allowed by the system, it is possible to set them as ’Not active’ changing their status, that is pressing the ’Player status’ button and choosing ’Exclude player’ from the popup. When a player is set as ’Not active’ the remaining time is divided between the other players. Removing time is not allowed.
5.4.3 Available actions

In the action bar at the bottom of the window you can find some buttons that allow to modify the current game:
-
Add order: allows you to add an order to the current match on the current lane(s)
-
Game type: allows you to select a different game type by choosing from the list of available games. By default the standard bowling game will be selected but you can change the game type by choosing it from the list. For more information see the bowling games section
-
Practice: allows to change the practice settings
-
Remove selected players: this action allows you to remove the selected player(s) from the game. It is possible to remove only players that have not played or paid yet. If you want to remove players that have already played it is possible to change its status and select Exclude player option
-
Apply changes to save the current changes
-
Cancel changes to discard the current changes
5.5 Game Details
This window is shown by selecting a lane with an open game and pressing the Details button from the "Lane management" window. It allows you to view all the details of the current game without entering in "edit mode".
Note that entering the edit mode will freeze the current game, so the ’Details’ window is very useful if you want to collect some information or perform other operations without freezing the game.
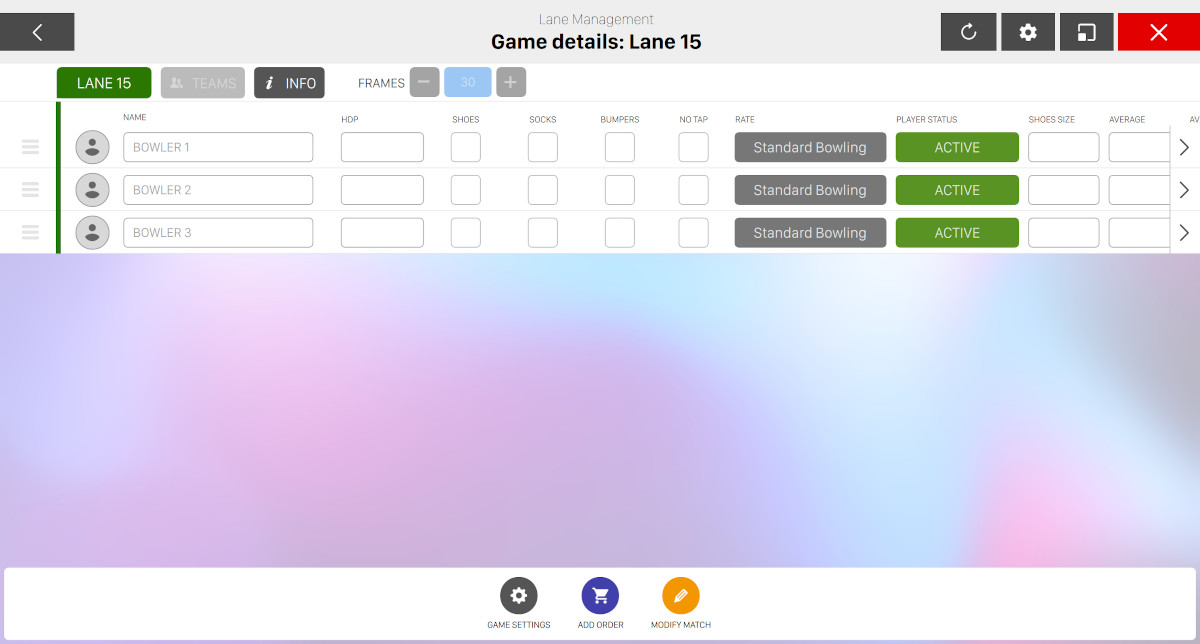
5.5.1 Available Actions
On the bottom bar of the screen you have some action buttons:
-
Game settings: takes to the Game settings window
-
Add order: opens the Order management window that allows you to add orders to the lane
-
Modify match: takes to the Modify game window and allows you to modify the game. During this operation the game on the lane is frozen
At the top right section of the window you can see an additional icon left to the "cog" icon that allows you to refresh the data of the current window:
![]()
5.6 Game Settings
From the "Lane management" window, select a lane and click on the Game settings button located at the bottom. You will be redirected to the relative window:
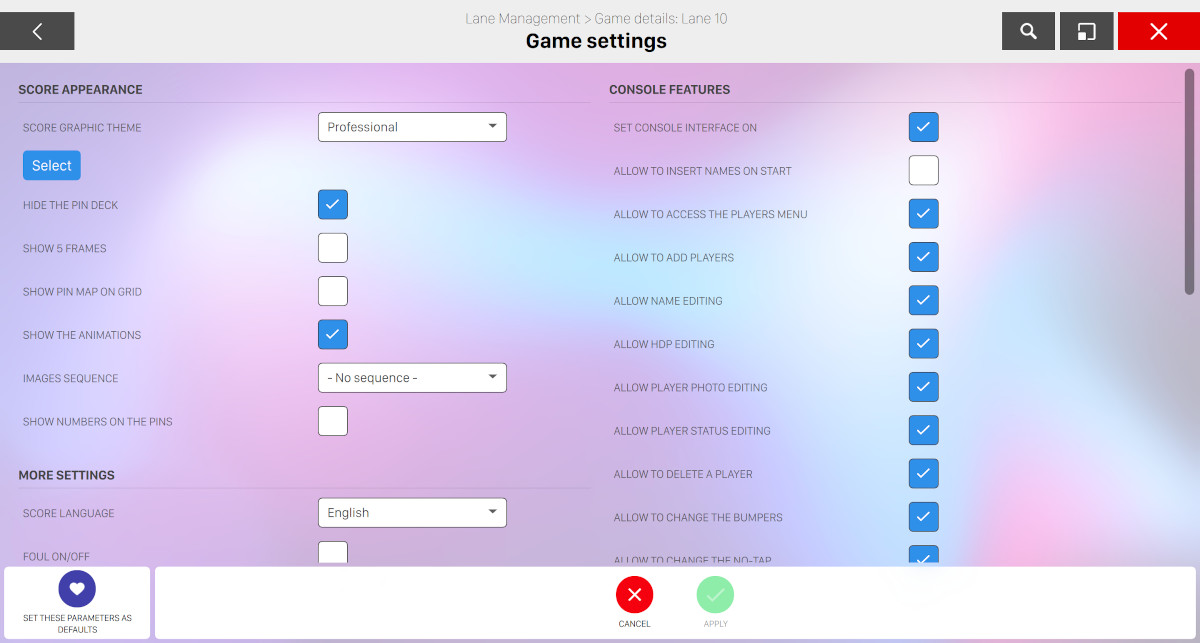
This window allows you to modify the game settings for the current game. The settings are organized into sections:
-
Score appearance
-
More settings
-
Console features
5.6.1 Score Appearance
This section allows you to change the appearance of the score grids and the graphics on the score viewer.
-
Score graphic theme: it allows you to select the graphic theme, which determines the style of the score viewer. You can either select a random theme by selecting the theme category from the dropdown list:
-
Any
-
Professional+standard
-
Professional
-
Standard
-
Funny
-
Leagues
You can also click on the select button to manually choose a specific theme and color. For more information on available themes see Graphic theme selection.
-
-
Hide the pin deck: it allows you to hide the pin deck
-
Show 5 frames: it allows you to show only the last 5 frames played on the monitors. This option will be applied only to the current player
-
Show pin map on grid: allows you to show the pin map on the score grid
-
Show the animations: allows you to activate the animations after each shot
-
Images sequence: it allows you to choose a sequence of images to display on the lane monitors. You can select the sequence from the list. Images will be displayed after each frame and are useful for advertising purposes. You can configure image sequences from the Slideshow definition section
-
Show numbers on the pins: shows the pin numbers over pin images if magnified view is disabled
-
Show Bowl App code: it displays the Bowl App code on the monitors so that players can use the app while they are playing
-
Use Shared photos as background: if Bowl App is enabled and configured it allows you to use the pictures taken on the lanes by the customers (previously approved by operators) on the monitors’ background
5.6.2 More Settings
It allows you to define other settings related to the visualization on lane monitors.
-
Score language: allows you to select the language to use on the lane’s menu screen
-
Foul On/Off: activates the foul line detector
-
Show the player picture: enables or disables the visualization of the bowler’s picture on the lane monitors.
-
Show ball speed: enables or disables the visualization of the ball speed on the lane monitors
-
Ball speed unit: it allows you to select Miles per hour (mph) or Kilometers per hour (kmh)
-
Autostrike on 3-6-9 frames: it allows you to convert any score got in the 3rd 6th and 9th frame into a Strike
-
Pin deck: allows you to set the pin deck if the pinsetter supports it. This option is available only if the game has been already started

Click on a pin to select/deselect it. Click on the respot a full rack button if you want to restore all the pins. Check the option valid for one shot only to make the current pin deck configuration valid for only one shot
-
Game type: it allows you to select the game type with the following options:
-
Classic 10 frames
-
8 frames
-
5 frames
-
3 frames
-
Olympic Bowling
-
Duckpin, where each frame has 3 shots and special pins are used instead of the normal ones
-
-
Olympic Bowling min frames: sets the minimum number of frames for the Olympic format if game type selected is "Olympic bowling"
-
Olympic Bowling max frames: sets the maximum number of frames for the Olympic format if game type selected is "Olympic bowling"
-
Frontdesk alarm for inactivity after: set the amount of time of lane inactivity (when a game is open) after which the frontdesk is notified that the game is proceeding slow. It is also possible to ignore the option
-
Lane alarm for inactivity after: set the amount of time of lane inactivity (when a game is open) after which the lane is notified that the game is proceeding slow. It is also possible to ignore the option
-
Assign a throw for inactivity after: indicates that after a certain amount of inactivity time (when a game is open) the current throw will be automatically scored with the option below
-
Type of the throw for inactivity: select the type of throw that will be automatically scored after the period of inactivity selected above. Available options are:
-
Foul
-
Null
-
5.6.3 Console features
Console features allow players to directly customize the aspect of the score viewer and/or perform some actions. You can customize what a player can and can not do within the console by settings the following parameters:
-
Set console interface on: enables or disables the Console functions. If this option is not selected, none of the functions below will be available
-
Allow to insert names on start: players can enter the names before starting a game. If this option is enabled then players will be able to choose a bowling game, if enabled
-
Allow to access the players menu: it allows you to enable or disable the menu on the console
-
Allow to add players: it allows you to add players
-
Allow name editing: it allows you to modify the names of the bowlers
-
Allow HDP editing: it allows you to modify the handicap points
-
Allow player photo editing: it allows you to edit the picture with the console
-
Allow player status editing: it allows you to modify the status I.E. active, absent, etc..
-
Allow to delete a player: it allows you to delete players
-
Allow to change the bumpers: it allows you to add/remove the bumpers option
-
Allow to change the no-tap: it allows you to add/remove the no-tap option
-
Allow to change the players order: it allows you to change the bowlers order
-
Allow score correction: enables or disables the score correction
-
Allow adding frames: it allows you to add frames
-
Allow removing frames: it allows you to remove frames
-
Allow game restart: enables or disables the game re-start function
-
Allow mechanic call: enables or disables the mechanic call function
-
Allow service call: enables or disables the bar service call function
-
Allow bar order: enables or disables the window to order items from the bar or restaurant
-
Allow graphic theme change: enables or disables the window for graphic theme selection
-
Allow use of Intercom: it allows you to activate the intercom function
-
Allow Bowl App guide: it allows you to show the Bowl App guide on the console
-
Allow to change languages: it allows you to change the menu’s language on the console
5.6.4 Special settings
These settings are normally hidden and you can view them by clicking on ‘Game settings’ button from the ‘Lane management’ window while pressing CTRL key.
-
Start demo mode: start a simulation of bowling games on the selected lanes. This is very useful for testing the behaviour of the system
5.6.5 Graphic Theme Selection
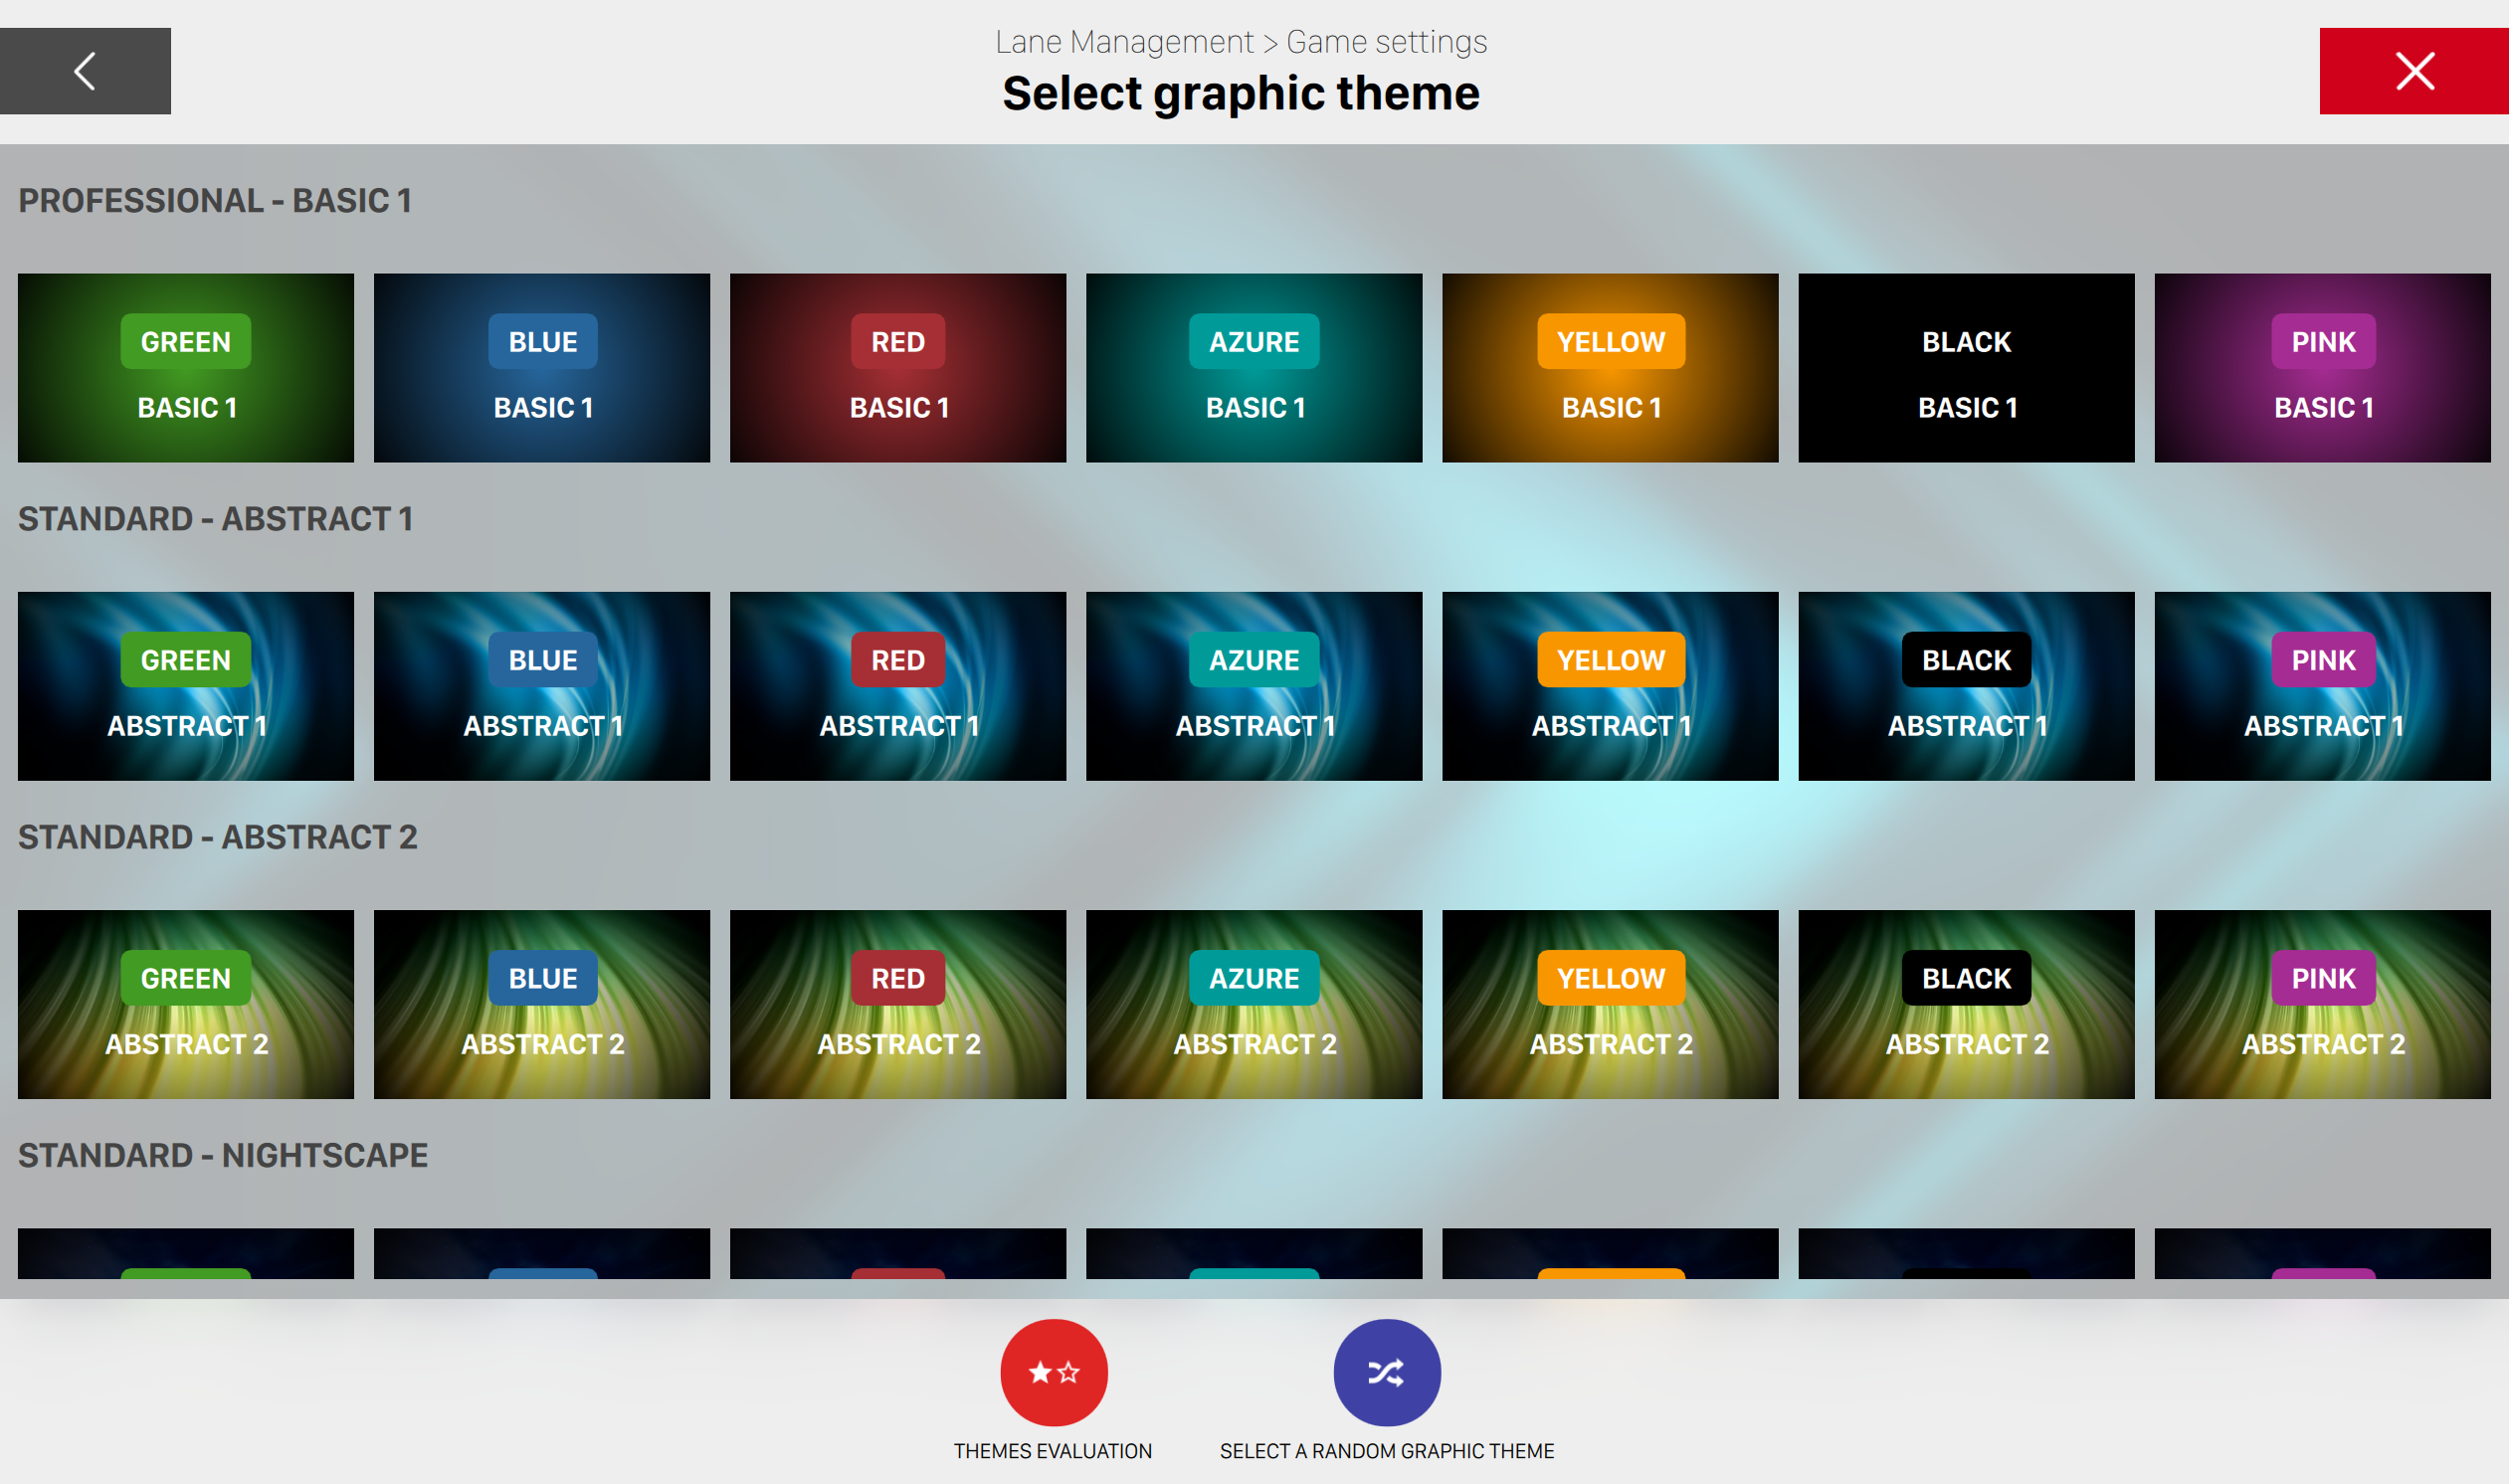
This window allows you to select the graphic theme to use on the lane monitors when the lanes are opened. The same theme will be used on the bowlers’ console, if available. The graphic themes are divided into groups and you can view all the themes and groups by scrolling the window. Click on a theme to select it.
You can also click the Select a random graphic theme button at the bottom right of the window and it allows the computer to select random theme for you.
The Evaluate themes button, at the bottom left of the window, allows you to instruct the computer to use more often some themes instead of other themes. When you click on the button a line of stars appears under each theme.
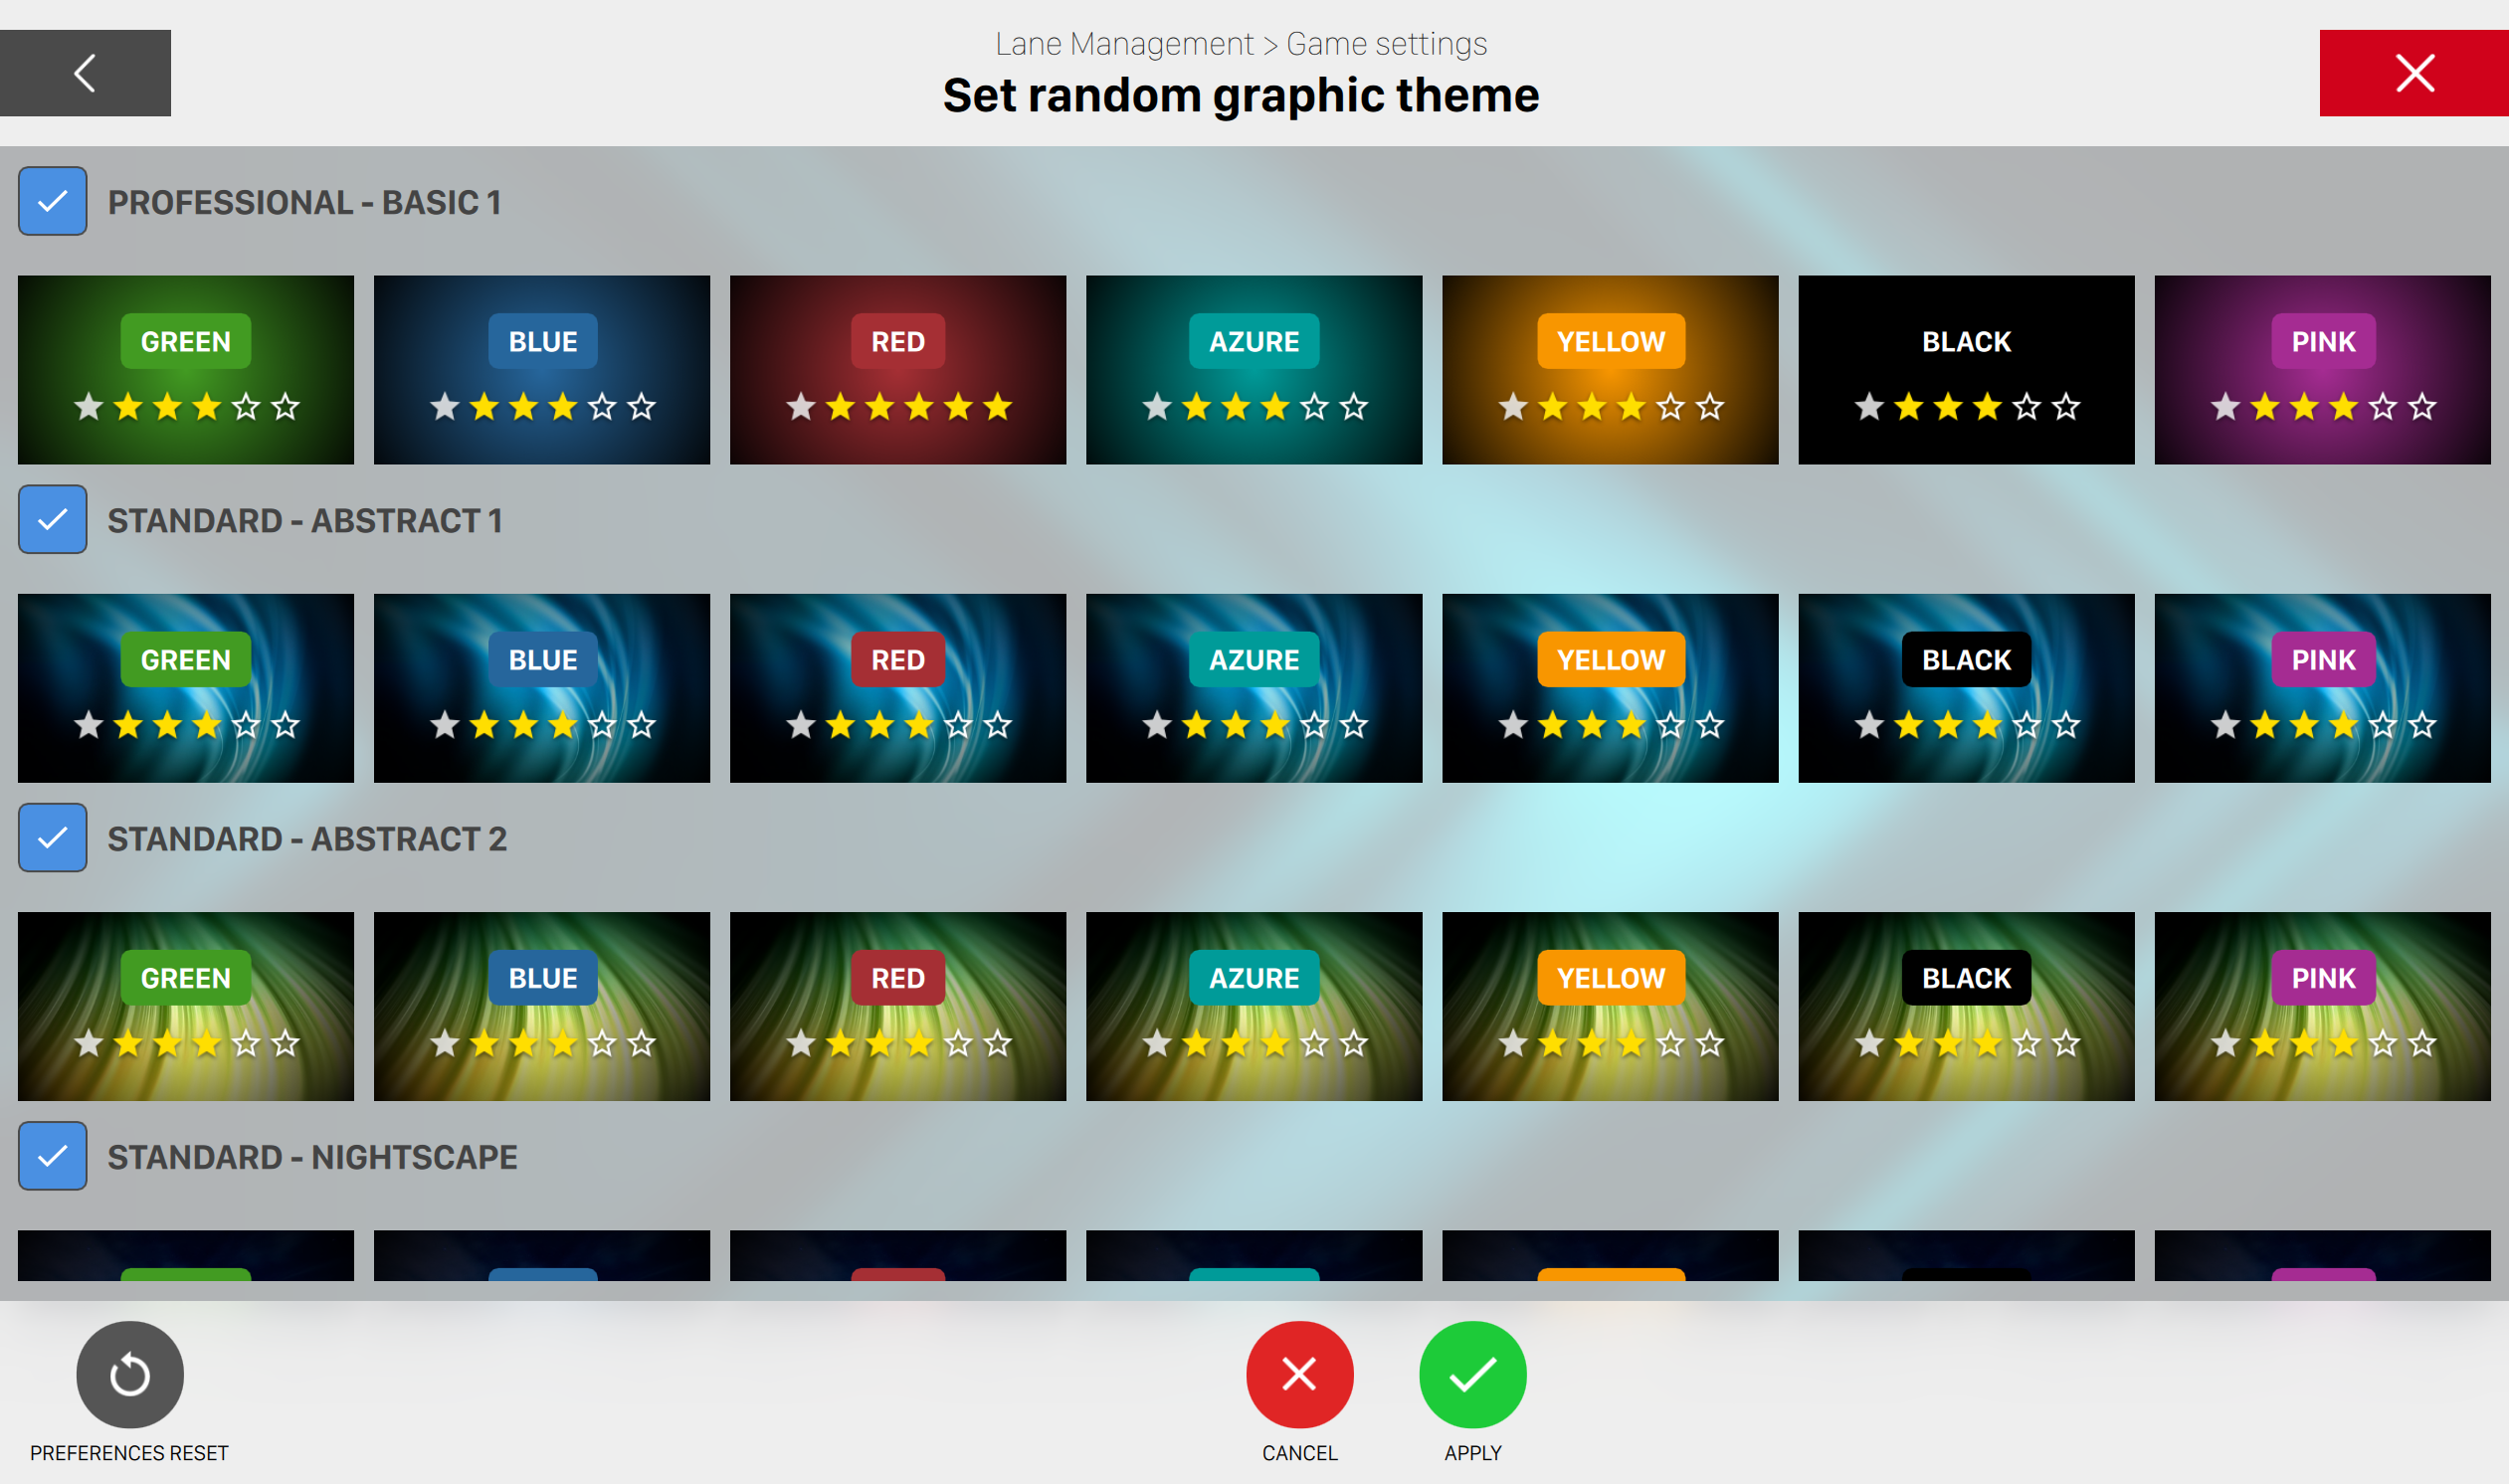
Click on the stars to set your preference for themes: more stars mean that more often the system will use the selected theme:
-
5 stars means that the theme is greatly preferred so the system will use that more often than the other themes
-
1 star shows that the theme is not very popular and so the system will seldom use it
-
If you do not like a theme turn off all the stars (grey color).
You can decide to check/uncheck the whole theme and if unchecked it will not be shown on the scoreviewer and the console.
The Preferences reset button will set the stars to the factory default value (3 stars for all the themes).
The Apply button confirms the changes and closes the window.
The Cancel button closes the window without saving the changes.
5.6.6 Apply changes
Once you are done with changes you can apply or discard them by clicking the two buttons on the bottom right section of the window:
-
Apply: apply the pending changes that you have made
-
Cancel: discard the changes that you have made
On the bottom left section of the window you can find the Set these parameters as default button. By clicking this option you will set the current parameters as default game settings for all other new games.
5.7 Game score
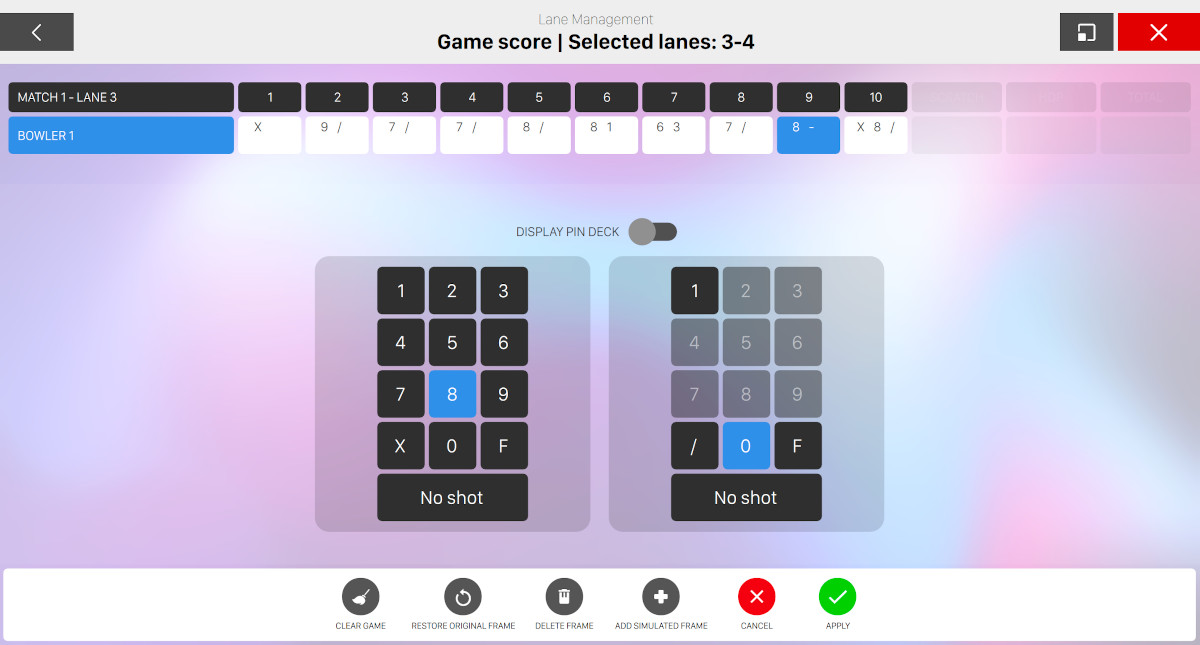
Pressing the Score button in the actions bar at the bottom of the Lane management screen, it is possible to access the Game score window that allows you to make score corrections of an existing bowling game. It displays the current scores, frame by frame, and contains a number of options and command buttons.
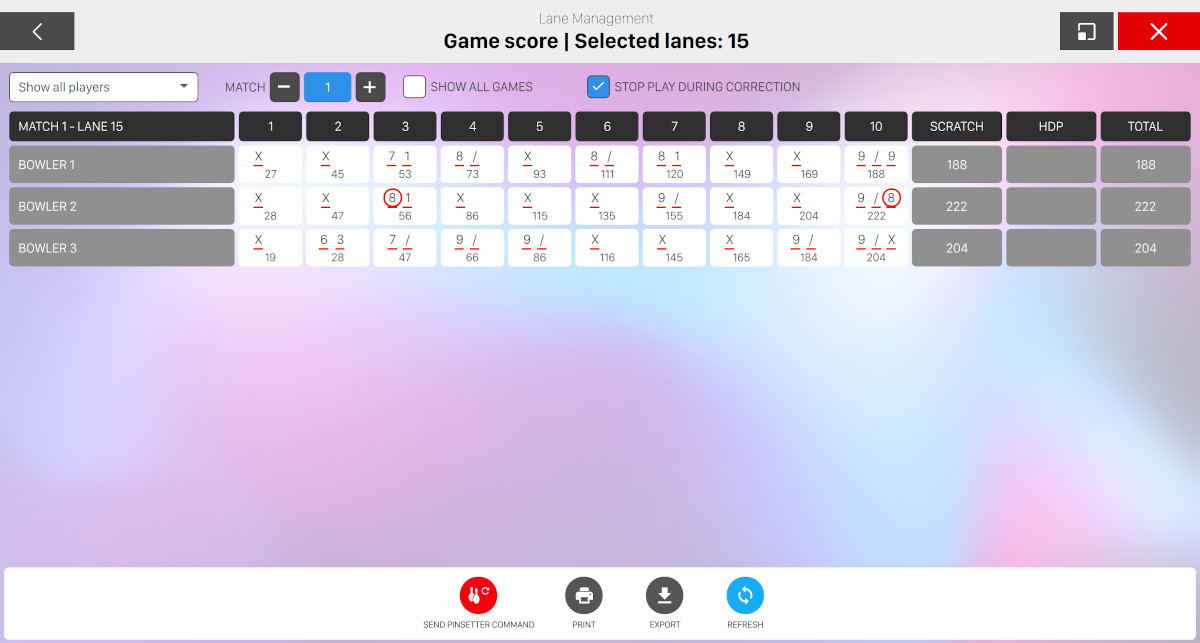
5.7.1 Score Filters
At the top of the window you can select some options to filter the current score view:
-
A dropdown menu to select a specific player or all the players
-
The Match controls group: it allows you to select a specific match. The system by default will display the last bowled matcgh. It is also possible to correct the scores of previously played matches
-
Show all games: allows to view all the played matches
-
Stop play during correction: this option defines whether the match should be stopped during correction and shows the ’game stopped’ message, to the bowlers on the lane, during the correction process. It is possible to turn this feature off and in this case the game on the lane will continue while correcting. When the system detects that during the correction process the scores on the lanes changed, it will ask to overwrite the scores with the most updated data
5.7.2 Functions
Using the buttons in the action bar at the bottom, it is possible to perform some operations:
-
Send pinsetter command: open the sub-menu to use the pinsetter commands. By clicking on a command you will send a request to the pinsetter. The sub-menu can include the Command destination dropdown menu and it allows to choose the lane if more than one are selected
-
Print: recalls the new score report screen which allows you to print the scores.
-
Export: exports the scores to disk or copies the scores to the clipboard

-
Refresh: reload the data
5.7.3 Score correction
To correct a score click on a frame.
The score correction window will appear and show the score grid with the frame to be corrected highlighted in light blue.
Under the score grid you can find the score panels used to correct the selected frame.
It is possible to correct the scores in 2 ways, a quick method using numbers and a slow but more accurate method using pins. The Display pin deck control allows to switch between the two methods.
Correction using numbers
This is the fastest of the 2 methods (see the picture above). The frame can be corrected by 2 small numeric keypads (3 keypads for the 10th frame correction), one for the 1st and one for the 2nd shot. To correct the score simply click on the number of pins for each ball.
The No shot button allows you to delete the frame so that it can be played again.
After editing the frames, click on the Apply button or discard by clicking on the Cancel button.
Correction using pins
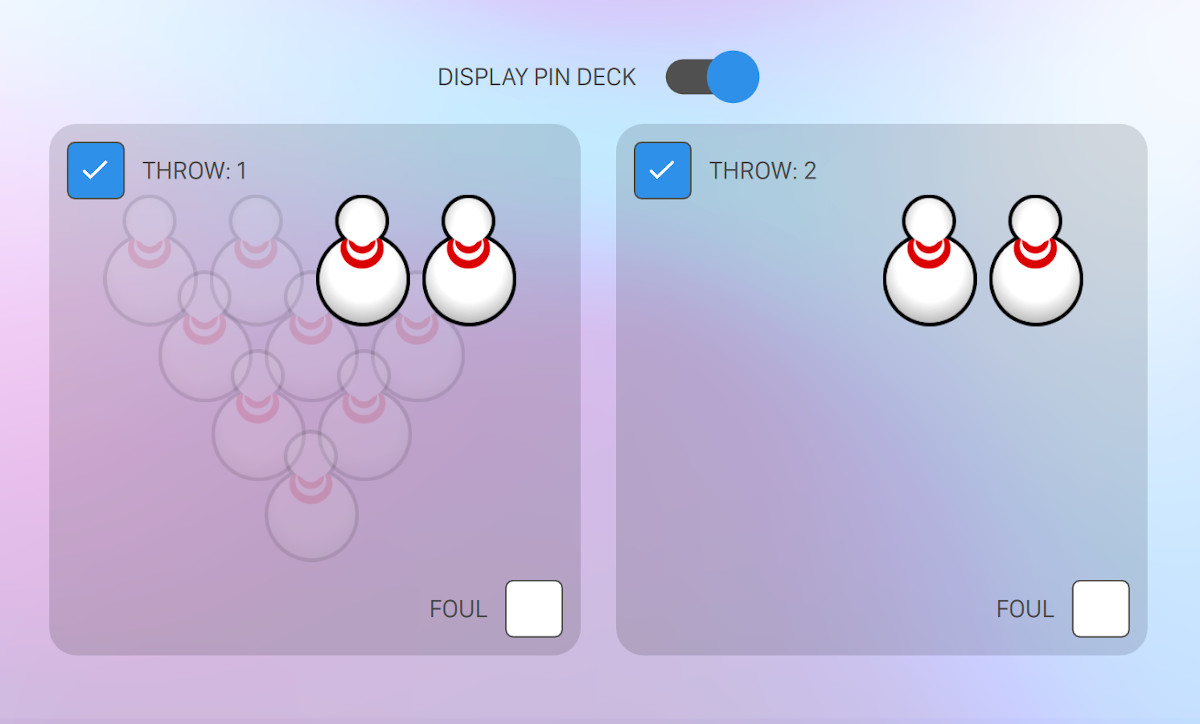
This second method requires that the scores is corrected using the pins knocked down or standing. The frame is divided into 2 pin decks (3 for the 10th frame correction), one for the 1st and one for the 2nd shot. To correct a score, click on the pins to toggle whether they are still standing or knocked down. To enable a shot select the Throw checkbox of the shot.
The Foul option is used to report a foul for a throw.
Other correction functions
On the bottom bar you can find a set of correction functions that you can apply to the frame or to the game:
-
Clear game: it allows you to delete all the frames and scores bowled in the game
-
Restore original frame: it allows you to cancel the corrections made to the selected frame and restore the previous
-
Delete frame: it allows you to delete the selected frame
-
Add simulated frame: it allows you to add a frame with random scores. This function can be useful when you carry out tests on the lane
-
Cancel: to cancel the changes
-
Apply: to apply the changes
Warning! During the score correction process, when one or more frames are deleted, the system will ask for an explanation, which will be recorded and displayed in the operator reports.
5.8 Move Players
From the Lane management window, select a game and click the Move players button at the bottom of the window.
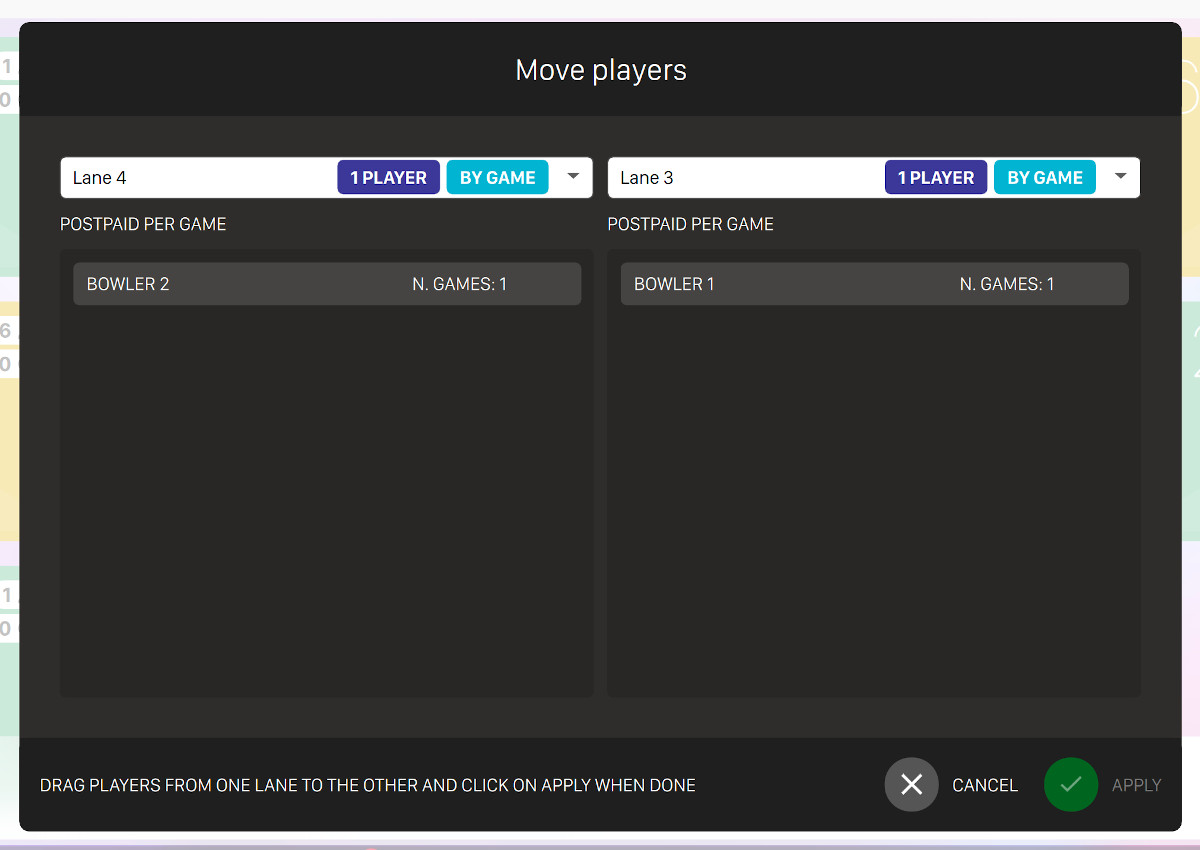
This window allows you to move players from a lane to another. On the left side you can find the players of the source lane and on the right players from the destination lane. Simply drag and drop players’ items from left to right or right to left to change the lane the player belongs to. Each lane shows the status and the payment mode (prepaid/postpaid, by game/by time).
It is possible to transfer players between the games that have the same status. It is not allowed to move a player from a postpaid to a prepaid game. It is possible to move players on a closed lane and in this case the lane will be automatically opened. When all the players are moved to another lane, the lane without players will be automatically closed.
Once you are done with the modifications simply click on the Apply button to confirm the changes or click on the Cancel button to discard them.
5.9 Extend game
From the Lane management window, select one or more games and click the Extend game button at the bottom of the window.
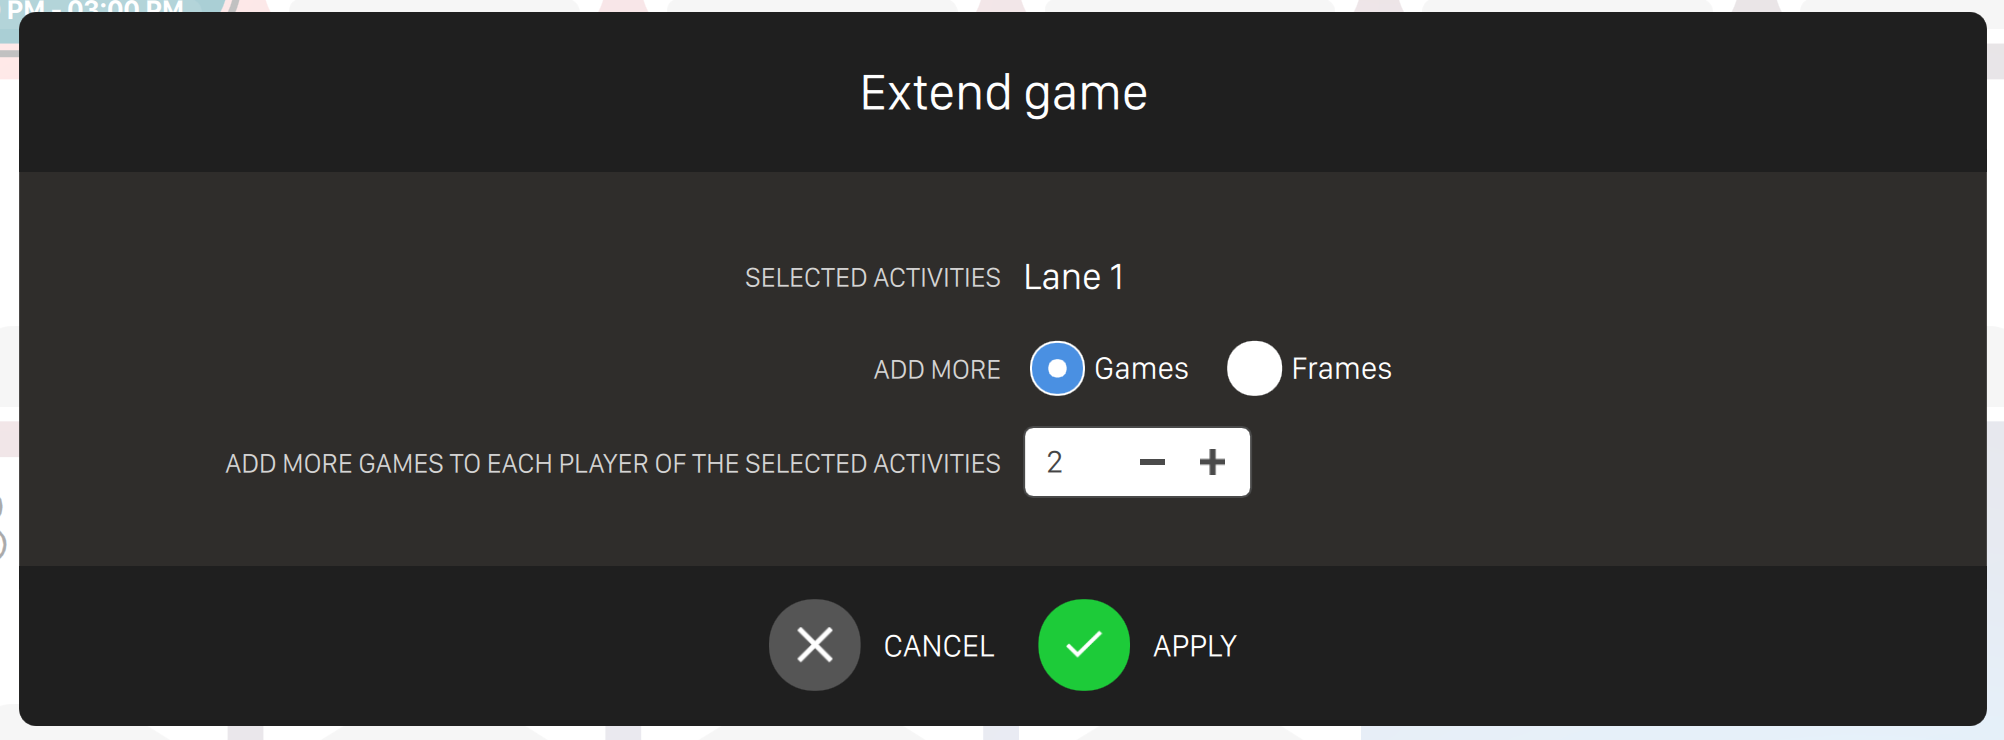
This panel allows you to extend the game on the selected lanes either by game or by time.
In the first case, you can add frames or entire games, otherwise you can decide how may minutes to add.