This macro section allows you to manage games inside your bowling center.
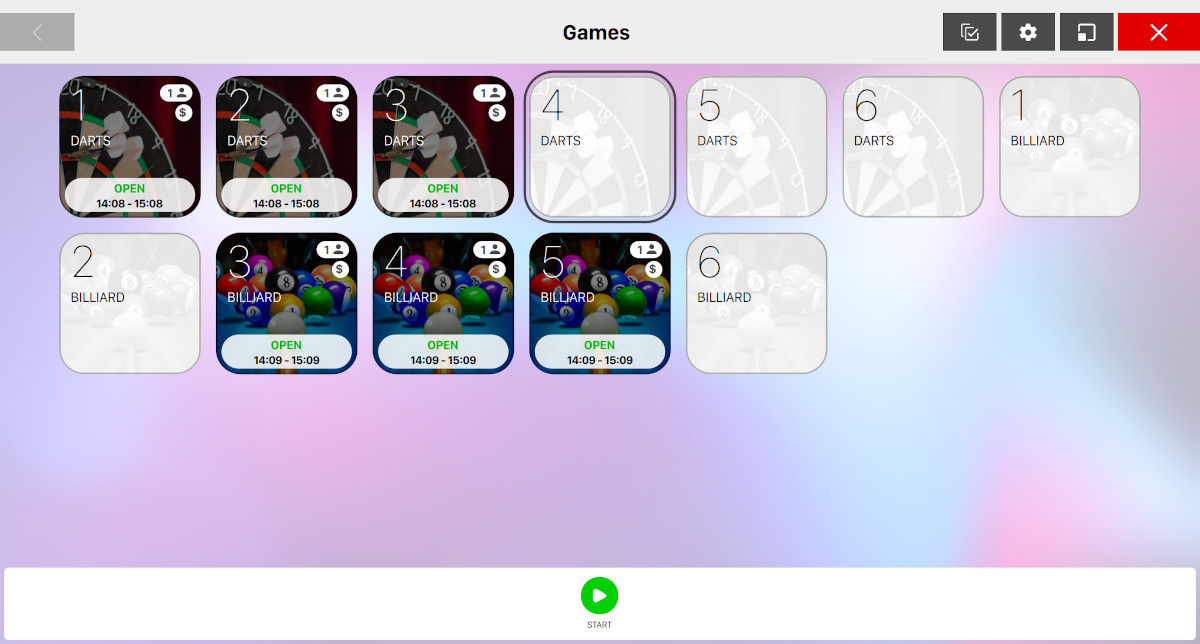
All the defined time games are shown on a grid with their specific image. Click on any item to select a time game. Click and drag the mouse to select multiple games. Hold CTRL or SHIFT key and click to select games not adjacent. The selected games are surrounded by a black border.
6.1 Icons symbols
Each icon shows the name and the ID number, and an image of the game. On the icons there are the following symbols with the following meaning:
6.1.1 Free
![]()
This icon shows that a game is available.
6.1.2 In use
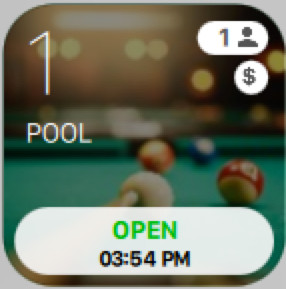
![]()
This icon indicates that a game is in use and shows the number of players and the time when the game was started.
6.1.3 Game with reservation
![]()
This icon shows an available game with a reservation.
6.1.4 Game to free
![]()
This icon shows that the game can be closed because the rental time for this game has expired.
6.1.5 Prepaid
This symbol, below the player icon, means that the game is opened in prepaid mode and that the payment has been cashed before the game started.
6.2 Available Functions
On the lower part of the window, there is a row of buttons that allows you to operate on the selected games. The availability of the buttons depends on the game status.

-
Customer Tab: allow you to open a Customer Tab and link the activities to it
-
Start: takes to the Open new game window
-
Details: takes to the Game details window
-
Modify: takes to the Modify game window
-
Collect: takes to the Income table window
-
Close: closes the current game and, in postpaid mode, it takes to the Income table window
-
Move game: allows to move a game from a position to a new one. This function is useful when a game has technical problems. To move a game:
-
Click on the game to move
-
Click on Move game button
-
Click on the new position (game). The new game must belong to the same game group of the moved game. If the new game is already in use, after a confirmation, the two games will be switched
-
6.3 Open New Game
Go to the ‘Game management’ section, click on an available game and then click the ‘Open’ button at the bottom of the window.
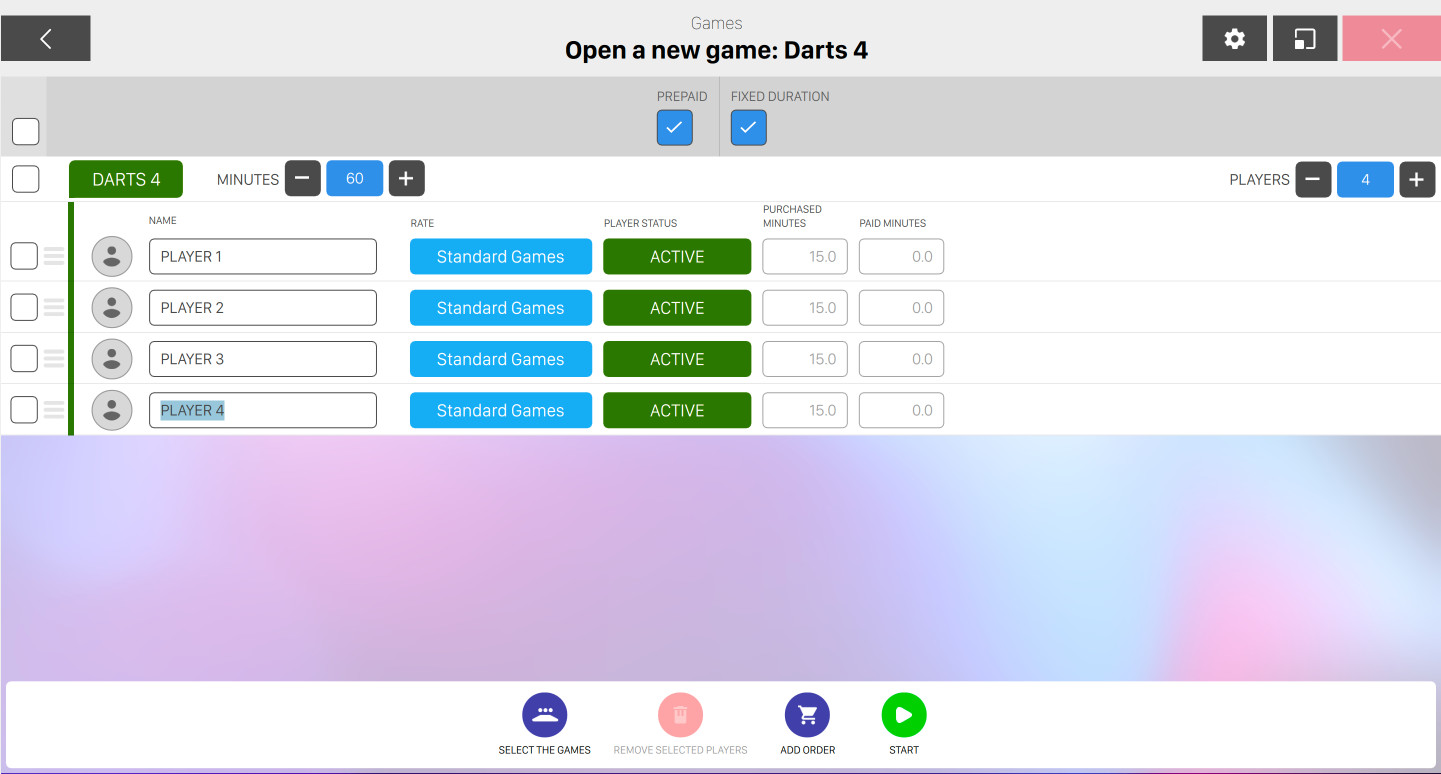
This window allows you to open a time game. It is possible to add a maximum of 12 players for each game. To add new players click on (+) button. It is also possible to add a player by pressing the Enter key when the mouse cursor is inside the player name field. To remove players click on (-) button.
For each player, there is a box that allows you to set the player’s options.

-
The checkbox on the left allows you to select/deselect the current player
-
The player name field allows you to update the player name
-
If you click on the player image then you can select a player from the members list
-
Click on rate button to select the rate for the current player. By default it shows the default system rate. For further information on how to set the default rate see
Preferences > Rate
     definition > Set default rates
. From this menu it is also possible to select a package for the player by selecting it from the list. The selected package will be applied to the selected player and will override the player rate. For more information see package definition section -
Click on player status button to activate or exclude him from the current time game session
-
Purchased minutes: readonly field that indicates the amount of minutes that have been purchased by the player
-
Paid minutes: readonly field that indicates the amount of minutes that have been paid by the player
-
Played minutes: readonly field that indicates the amount of minutes that have been played by the player
Swipe the magnetic card assigned to one or to more players to open the quick players addition window.
6.3.1 Available Actions
-
Select the games: opens the following window:
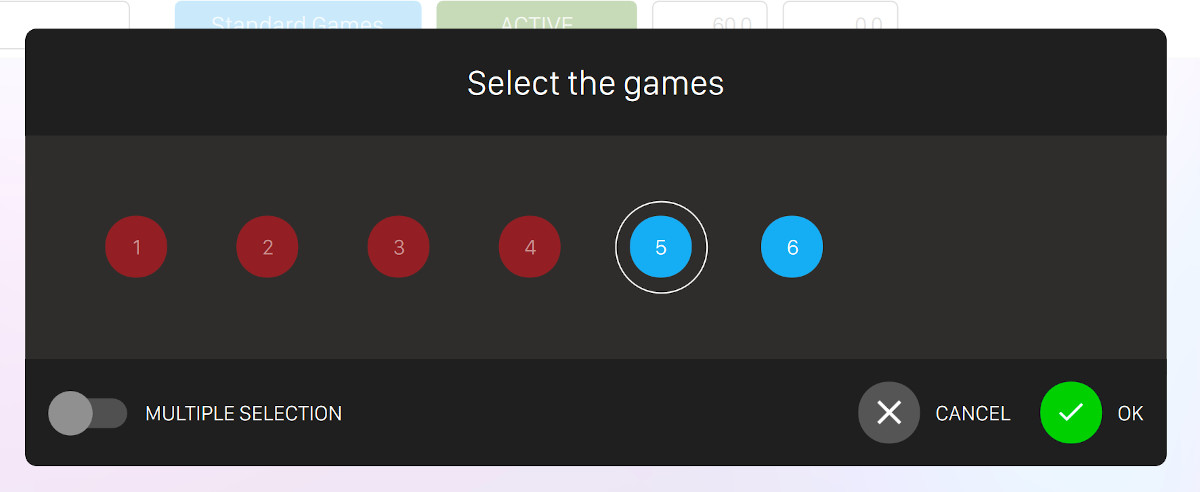
This window shows the available games of the same category and allows you to select one or more time game
-
Remove selected players: if one or more players are selected then this button allows you to remove them from the list
-
Add order: takes to the Order management window and allow you to make an order related to the current game
-
Open: open the selected game(s) with the current configuration
At the top of the window, just above the player list you can find two additional options:
-
Prepaid: enables the Pre-Paid mode that allows the operator to cash before the game starts. For the games opened in prepaid mode, any item added at a later stage will be cashed at the time of sale. Each item added to a game in Pre-Paid mode will be cashed at the time of sale
-
Fixed duration: indicates that the length of time to be played is set before the game starts. In this case you will be able to select for each game the amount of minutes of its fixed duration by clicking on the - or + buttons right after the game label
Note: it is possible to change the default settings of a game category from the Game category definition section.
6.3.2 Multiple open
In order to open more games at the same time, select the games dragging the mouse on the game icons or press the CTRL or SHIFT key and click to select games that are not adjacent. Note that this feature is available only for games that belong to the same category.
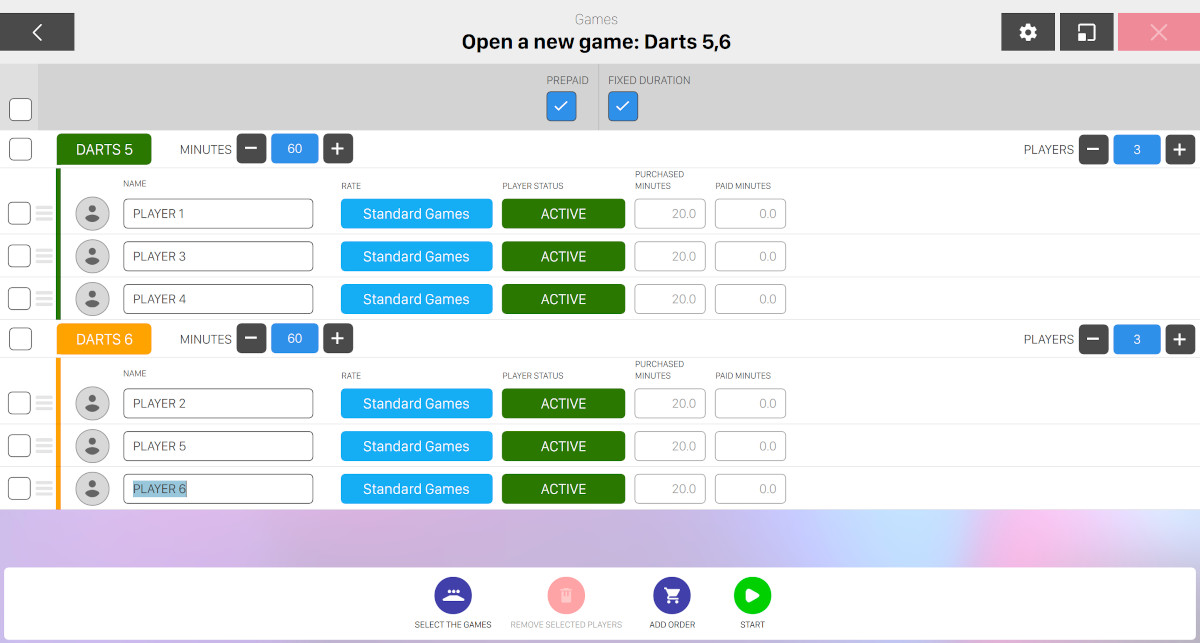
This window shows the multiple games opened. Each game allows you to add a maximum of 10 players. To add/remove new players click on the (+) or (-) button. The players will be assigned automatically to the games. It is possible to change the players position.
6.4 Modify game details
From the ‘Game management’ section select an open game. If you want to edit the selected game you can either click on Modify button at the bottom of the window. If you click Details button you will be redirected to the same window but you will need to press Modify game to enable any modifications.
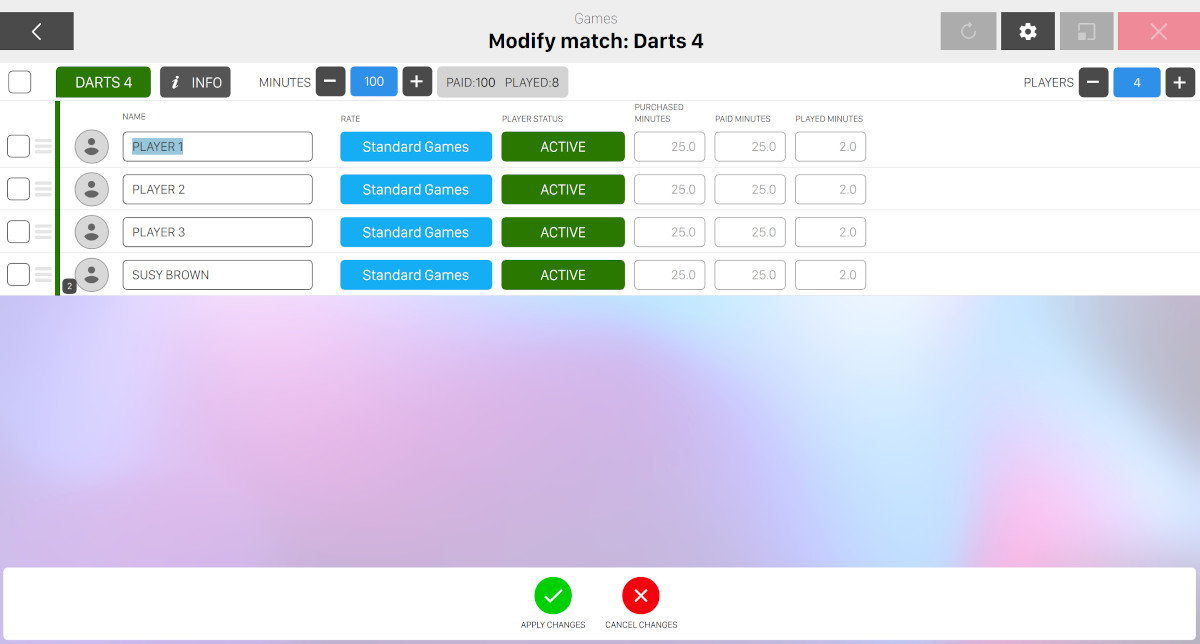
This window allows you to modify a time game already started.
For each player you can see / edit its configuration:
-
Click on the player picture to select or add a member
-
Name: allows you to update the player name
-
Rate: allows you to select a rate for the current player
-
Player status: allows you to select the status of the player: active or not active
If you select one or more players by using the checkbox on the left of each row then the remove selected players button will appear at the bottom of the page. If you click this button the the selected player(s) will be removed from the list.
If you want to add or remove minutes to the current game you can use the minutes modifier widget at the top of each game section. Click plus or minus button to increase or decrease.
Click on the info button to open the game information dropdown, which shows you a summary of the selected game:
Click on - or + buttons right after players label to remove or add players to the selected game.
6.4.1 Available Actions
At the bottom of the window you will see two buttons:
-
Cancel changes: discard the current changes and return to the game selection grid
-
Apply changes: apply the current changes and returns to the game selection grid. If the game is in prepaid mode and you have added any additional minutes to the game then you will be redirected to the income table page
6.4.2 Game details
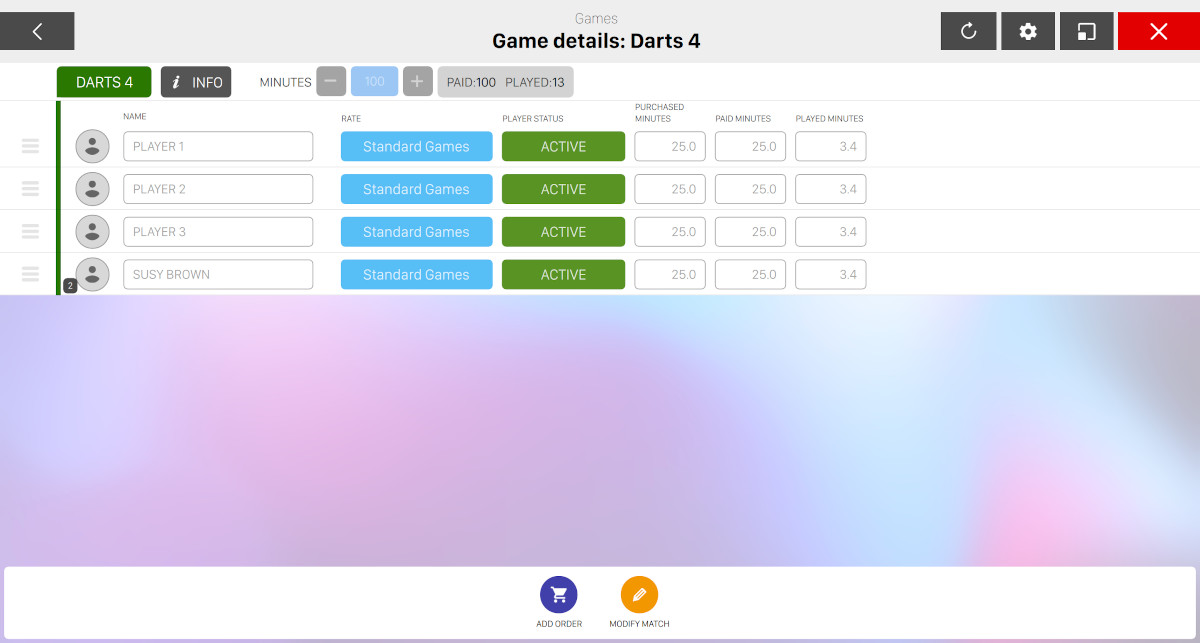
On this window you can see the information of the selected game. All the information on this window are read only, which means that you will not be able to apply any modification until you press Modiy game button, which will enable modifications.
At the bottom of the window you will see a list of actions:
-
Add order: redirects to the order management window, where you will be able to add an order to the current game
-
Modify game: allows you to edit the current game configuration