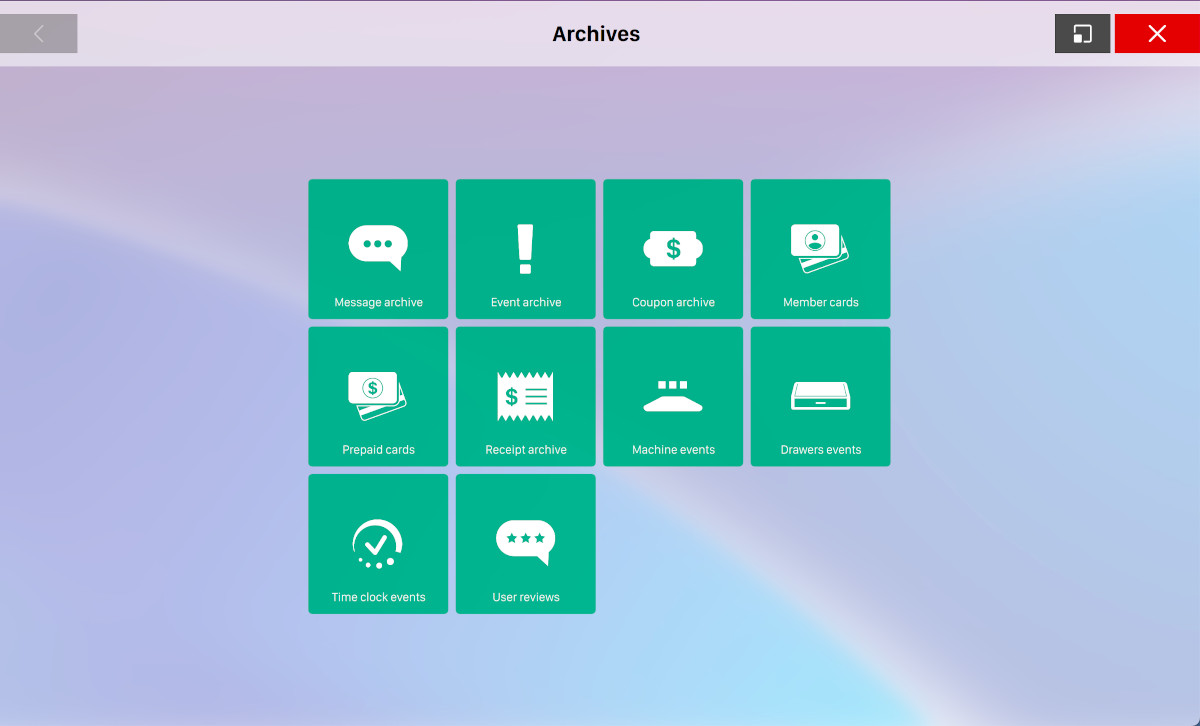
This window allows you access to the Genie archives. Click on any archive to open it. The available archives are:
-
Message archive
-
Event archive
-
Coupon archive
-
Card archive
-
Giftcard archive
-
Receipt archive
-
Machine events
-
Drawers events
-
TIme clock events
-
User reviews
-
Customer Tab
15.1 Message Archive
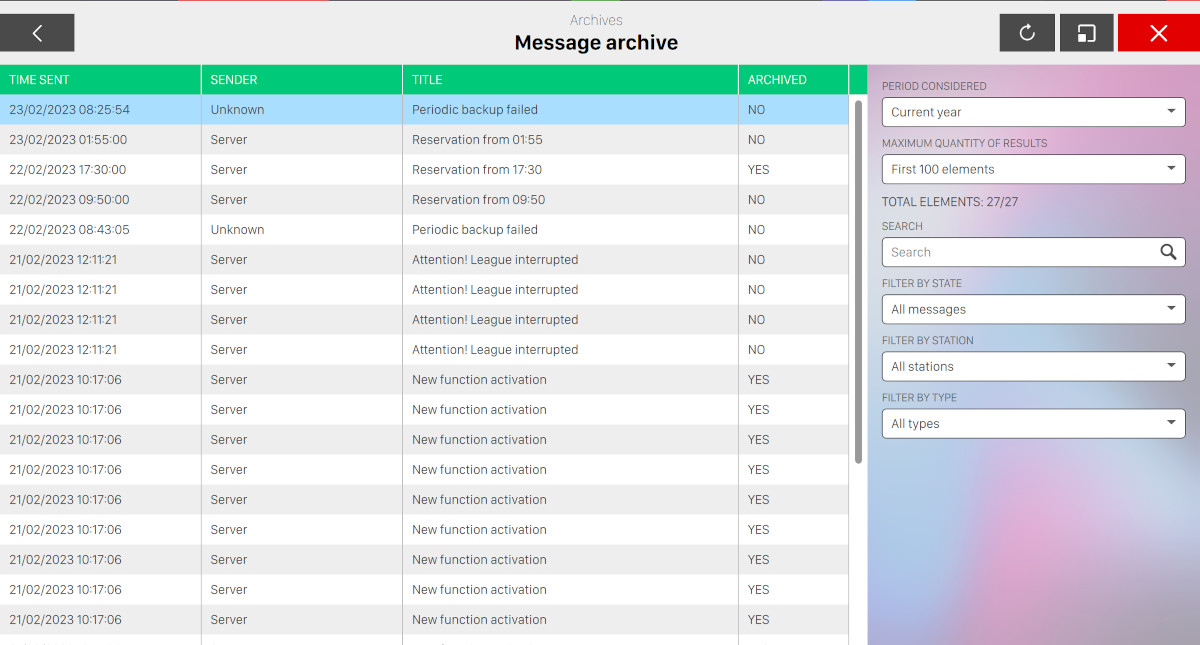
This window shows all the messages of the whole system. Messages are normally shown on the the top bar of the window as notifications, and once archived from the operator they are automatically added to this archive. The messages are shown on the left side. Click on any message to select it. The content of the message is shown below. The selected message will be highlighted. Click on Refresh button to update the current list. For more information on messages, see Messages section.
For each message on the table it is shown:
-
Time sent: the date and time the message was sent
-
Sender: the sender of the message
-
Title: the title of the message
-
Archived: indicates if the message has been archived or not
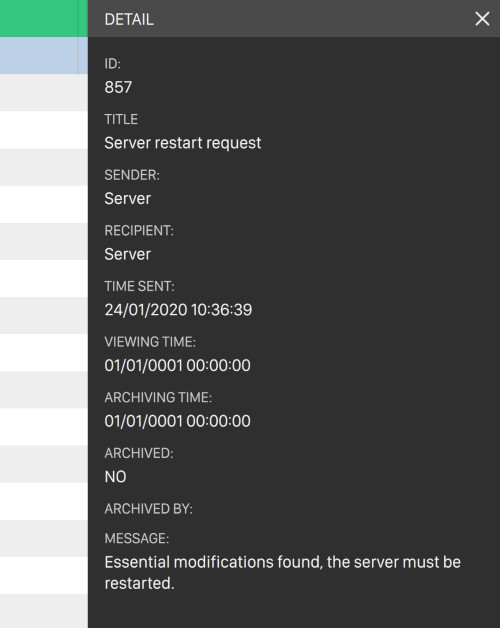
Click on any message item to see the details. A black sidebar will appear on the right side of the window:
-
Id: the message id
-
Title: the message title
-
Sender: the sender of the message
-
Recipient: the recipient of the message
-
Time sent: the date and the time of the delivery of the message
-
Viewing time: the date and the time the message was read for the first time by an operator
-
Archiving time: the date and the time the message was archived
-
Archived: indicates whether the message has been archived
-
Archived by: indicates the user who has archived the message
-
Message: the body of the message
On the right sidebar of the screen you can find a set of filters that you can apply on the messages table:
-
Period considered: You can select a time frame for the messages, for instance ‘Today’ or ‘Last month’. You can also set your custom time frame, defining the initial and final date/time
-
Maximum quantity of results: indicates the maximum number of messages to view on the result table
-
Search: Enter a keyword contained in the title or in the the text of the message
-
Filter by state: filter by archived or not archived messages
-
Filter by station: selects only the messages sent by a specific workstation or all workstations
-
Filter by type: filter messages by message type
15.2 Event Archive
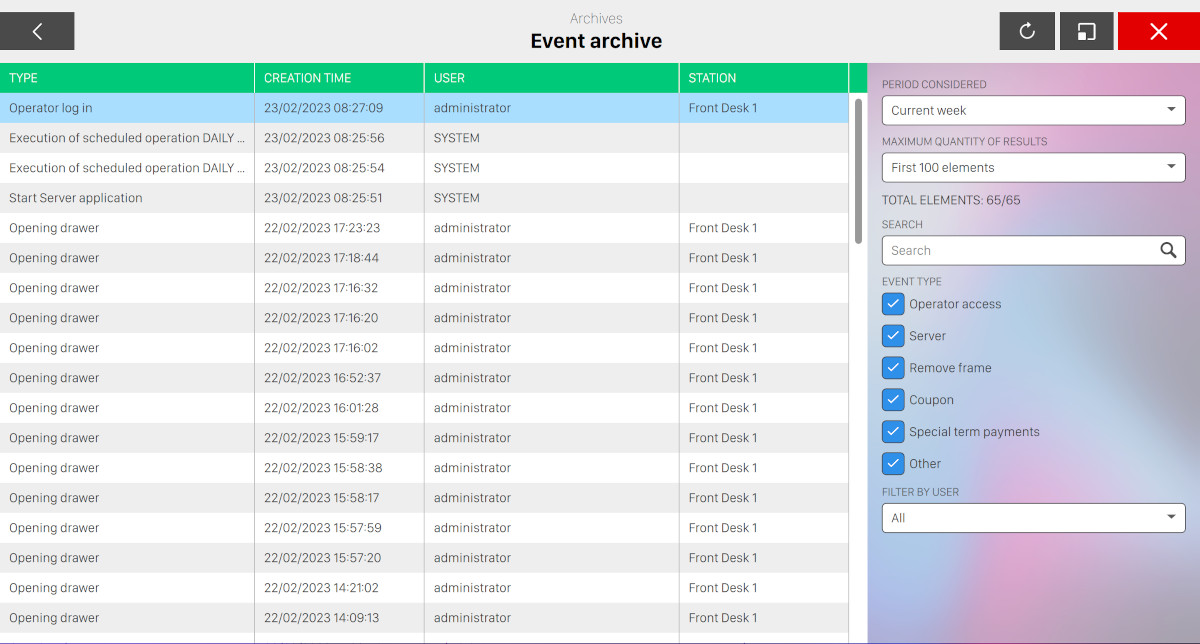
All the events stored in the system can be viewed from this window. The list on the left side displays the events. Click on any event to select it. The details of the event will be displayed below.
For each event, the list displays:
-
The event type
-
The creation date and time of the event
-
The user: when an event has been created by an operator, the operator name will be displayed; for any other event, system will be displayed
-
The station where the event was generated
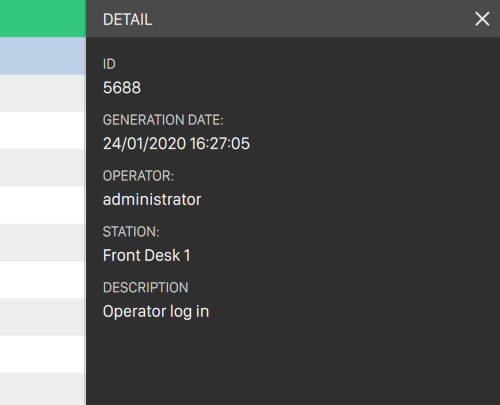
Click on any event to display the details on the right sidebar:
-
Id: indicates the numeric and unique identifier of the event
-
Generation date: the date and the time when the event was generated
-
Operator: the operator who generated the event or system if event was not generated by any operator
-
Station: the workstation where the event has been generated
-
Description: the description of the event
-
Amount: this is displayed only in case of events related to the use of coupons and it shows the value of the coupon
-
Number of frames removed: only if the event is a removal of frames, indicates the number of frames removed by the operator
-
Reason removed: only if the event is a removal of frames, indicates the reason why the operator has removed frames
Events can be easily found and viewed by applying filters on the right sidebar:
-
Period considered: You can select a time frame for the events, for instance ‘Today’ or ‘Last month’. You can also set your custom time frame, defining the initial and final date/time
-
Maximum quantity of results: indicates the maximum number of events to view on the result table
-
Search: Enter a keyword contained in the title or in the the text of the event
-
Filter by type: gives access to the following types of events:
-
Operator access: shows or hide the events related to the log in/out of the operators on the workstations
-
Server: shows or hide the events regarding the start up and shut down of the server
-
Removal frame: shows or hide events related to the removal of frames
-
Coupon: shows or hide events regarding the emission and the collection of coupons
-
Special term payments: shows or hide the ‘non conventional’ payments, for instance custom payments used in particular circumstances or discounts applied to a payment
-
Other: this is used to show or hide all other types of events
-
-
Filter by user: shows the events related to the operator who generated them. ‘All‘ option is also available.
15.3 Coupon Archive
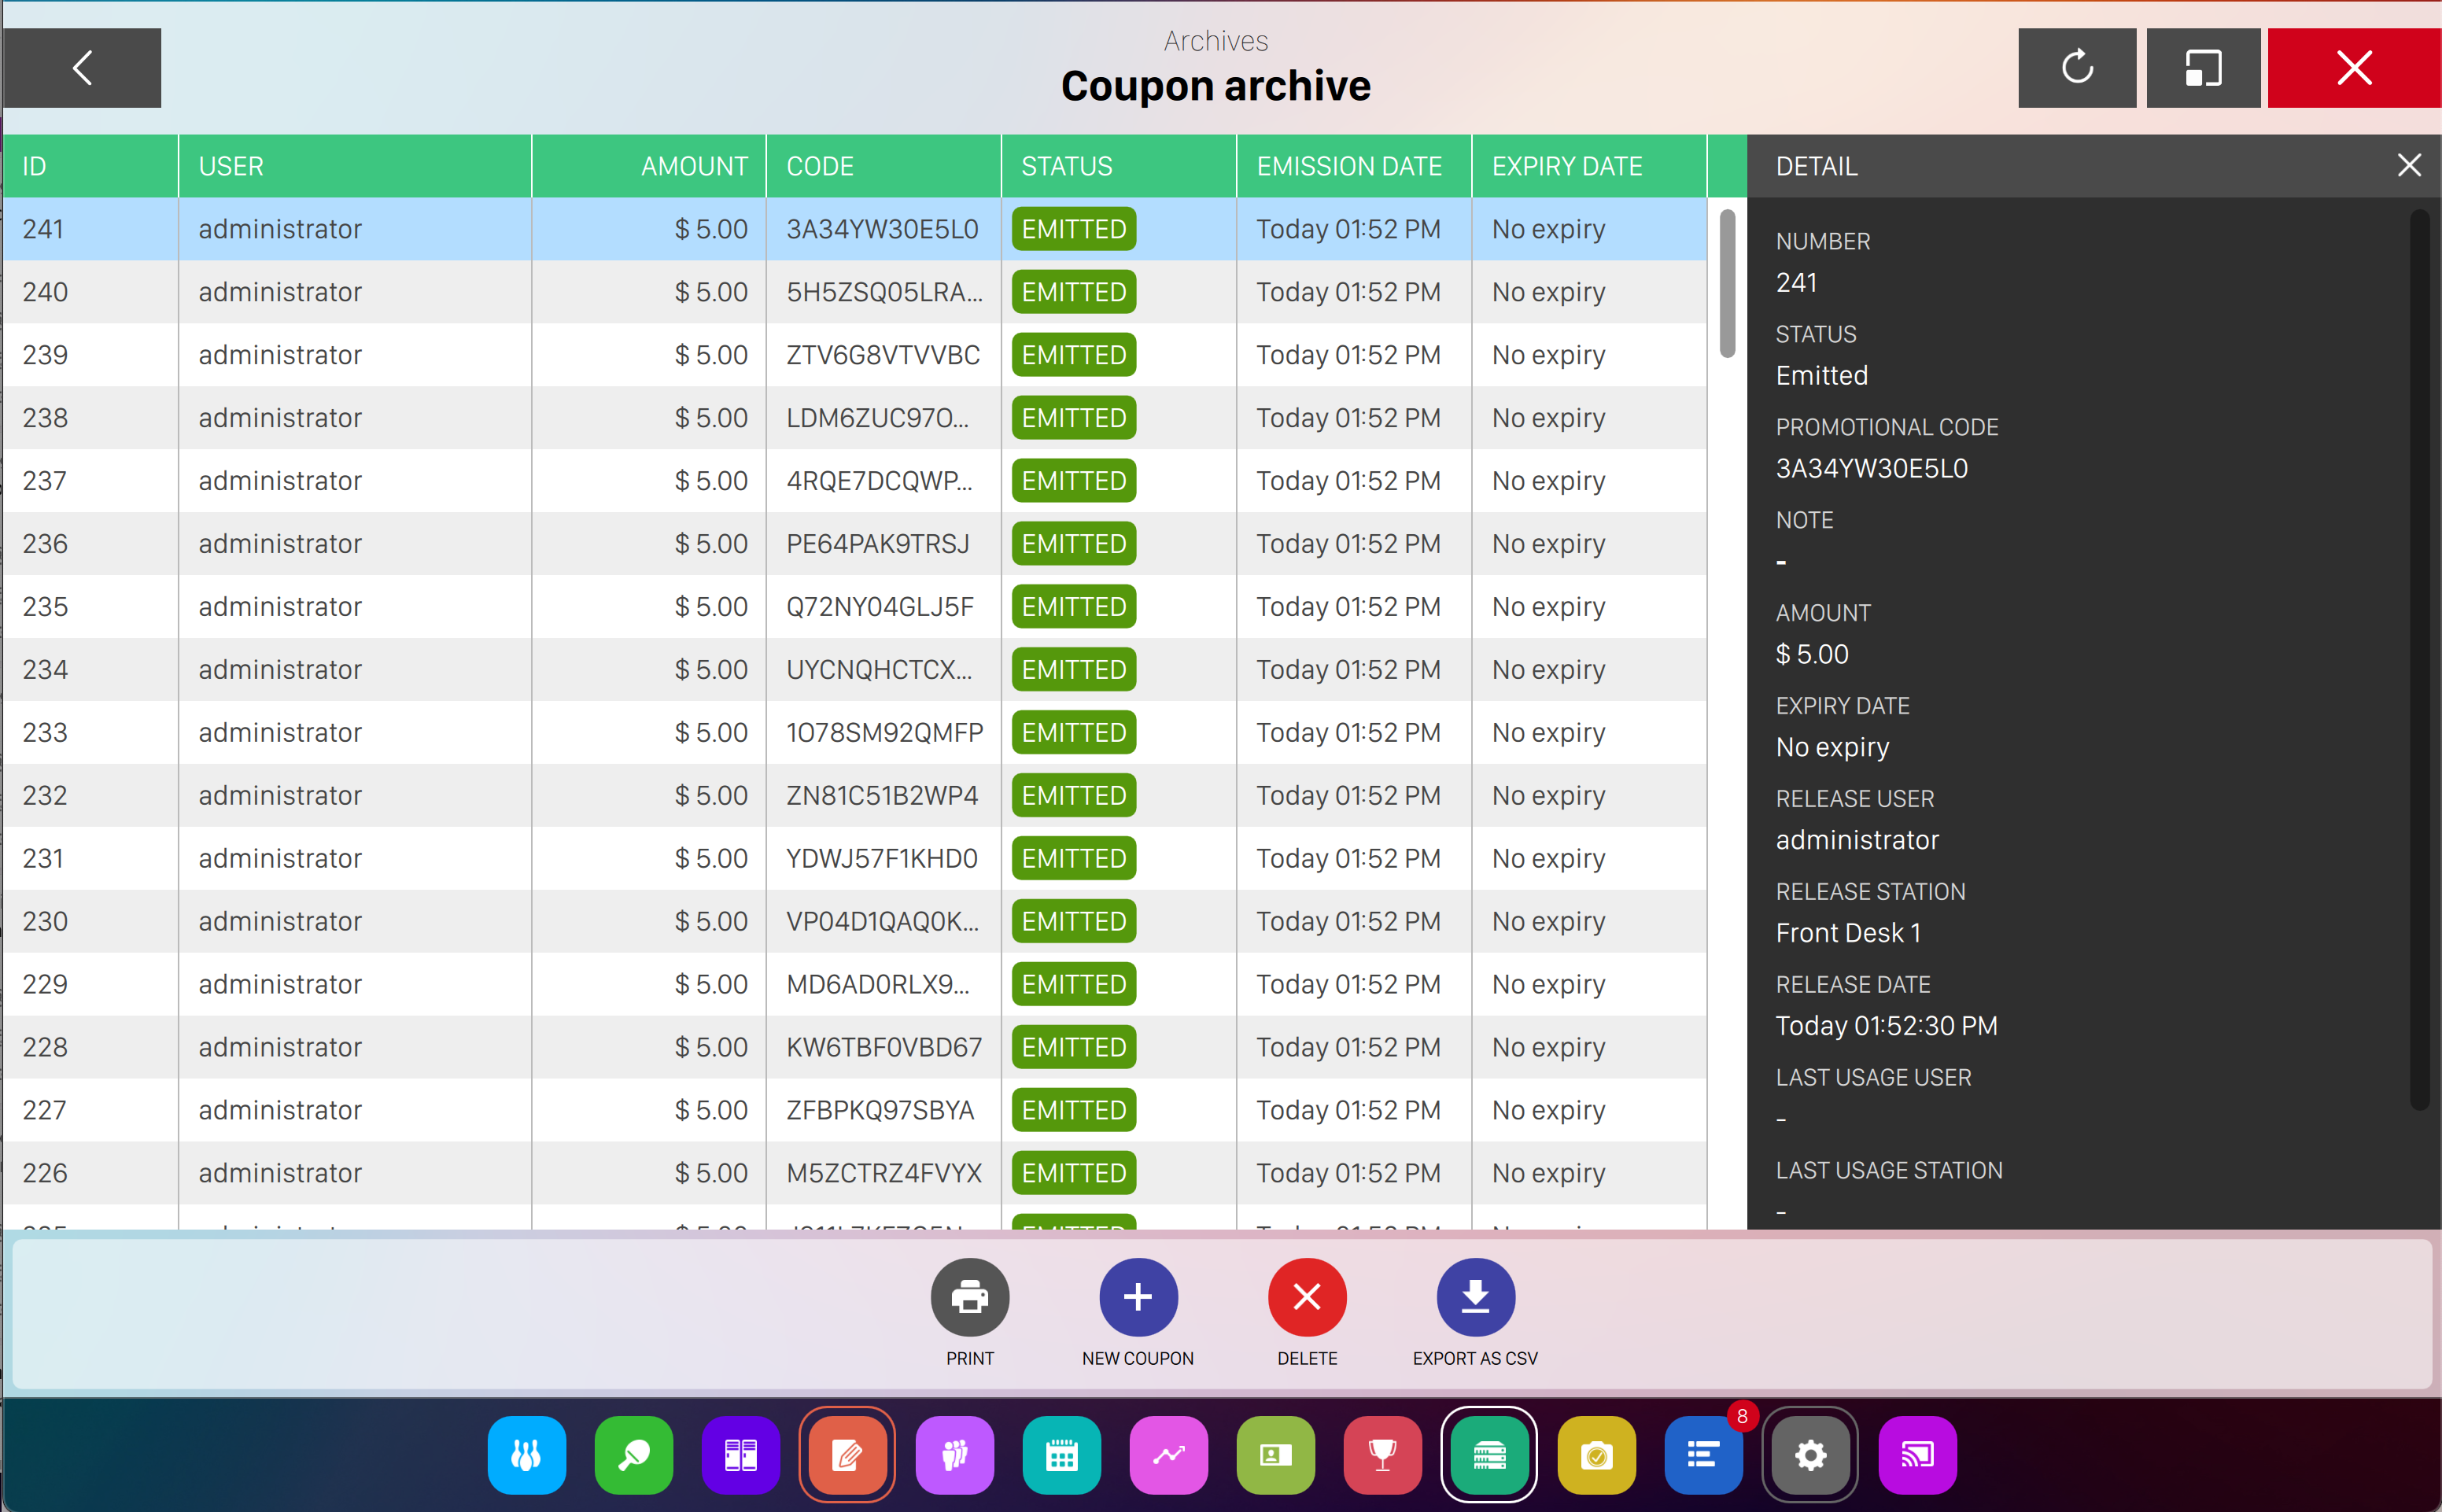
This window shows the coupons generated for credit purposes. Click on a row to display the coupon details. The details of the selected coupon are displayed on the right sidebar and the selected coupon will be highlighted.
Click on Refresh button located at the top right of the screen to update the current list. For more information on credit coupons see Credit coupon section from Order management window.
For each coupon the following information are displayed on the table row:
-
The id of the coupon, which represents its unique identifier
-
The name of the user who emitted the coupon
-
The code of the coupon
-
The status of the coupon
-
Emitted: the coupon has been emitted, has not been used yet
-
Used: the coupon has been used
-
Expired: the coupon has been expired
-
-
The date and time the coupon was emitted
-
The expiration date and time or the ‘no expiration’ time limit
For each coupon, the following details are listed on the right sidebar:
-
Number: the progressive number of the coupon
-
Status: the status of the coupon
-
Promotional code: the promotional code related to the coupon
-
Note: further information regarding the issue of the coupon
-
Amount: the amount of the coupon
-
Expiry date: expiration date and time or no expiration date if no time limit has been set
-
Release user: the name of the user who emitted the coupon
-
Release station: the name of the workstation where the coupon has been emitted
-
Release date: the date and time the coupon has been released
-
Last usage user: the last user that used the coupon
-
Last usage station: the last station that used the coupon
-
Last usage date: the last date and time the coupon has been used
15.3.1 Coupon filters
Filters can be used to select and view coupons:
-
Period considered: You can select a time frame for the events, for instance ‘Today’ or ‘Last month’. You can also set your custom time frame, defining the initial and final date/time
-
Maximum quantity of results: indicates the maximum number of events to view on the result table
-
Search: Enter a keyword contained in the title or in the the text of the event
-
Filter by state: coupons are selected according to their state
-
Used: show coupons that have been used
-
Expired: show coupons that are expired
-
Not Re-entered or expired: shows coupons that have not been re-entered or expired
-
-
Filter by user: coupons are selected according to the operator who issued them. ‘All’ option is available
15.3.2 Coupon actions
Below the filters on the bottom side you can find some actions that you can perform:
-
Print: allows you to print the selected coupon
-
New coupon: takes to the Coupon creation window
15.3.3 Coupon creation
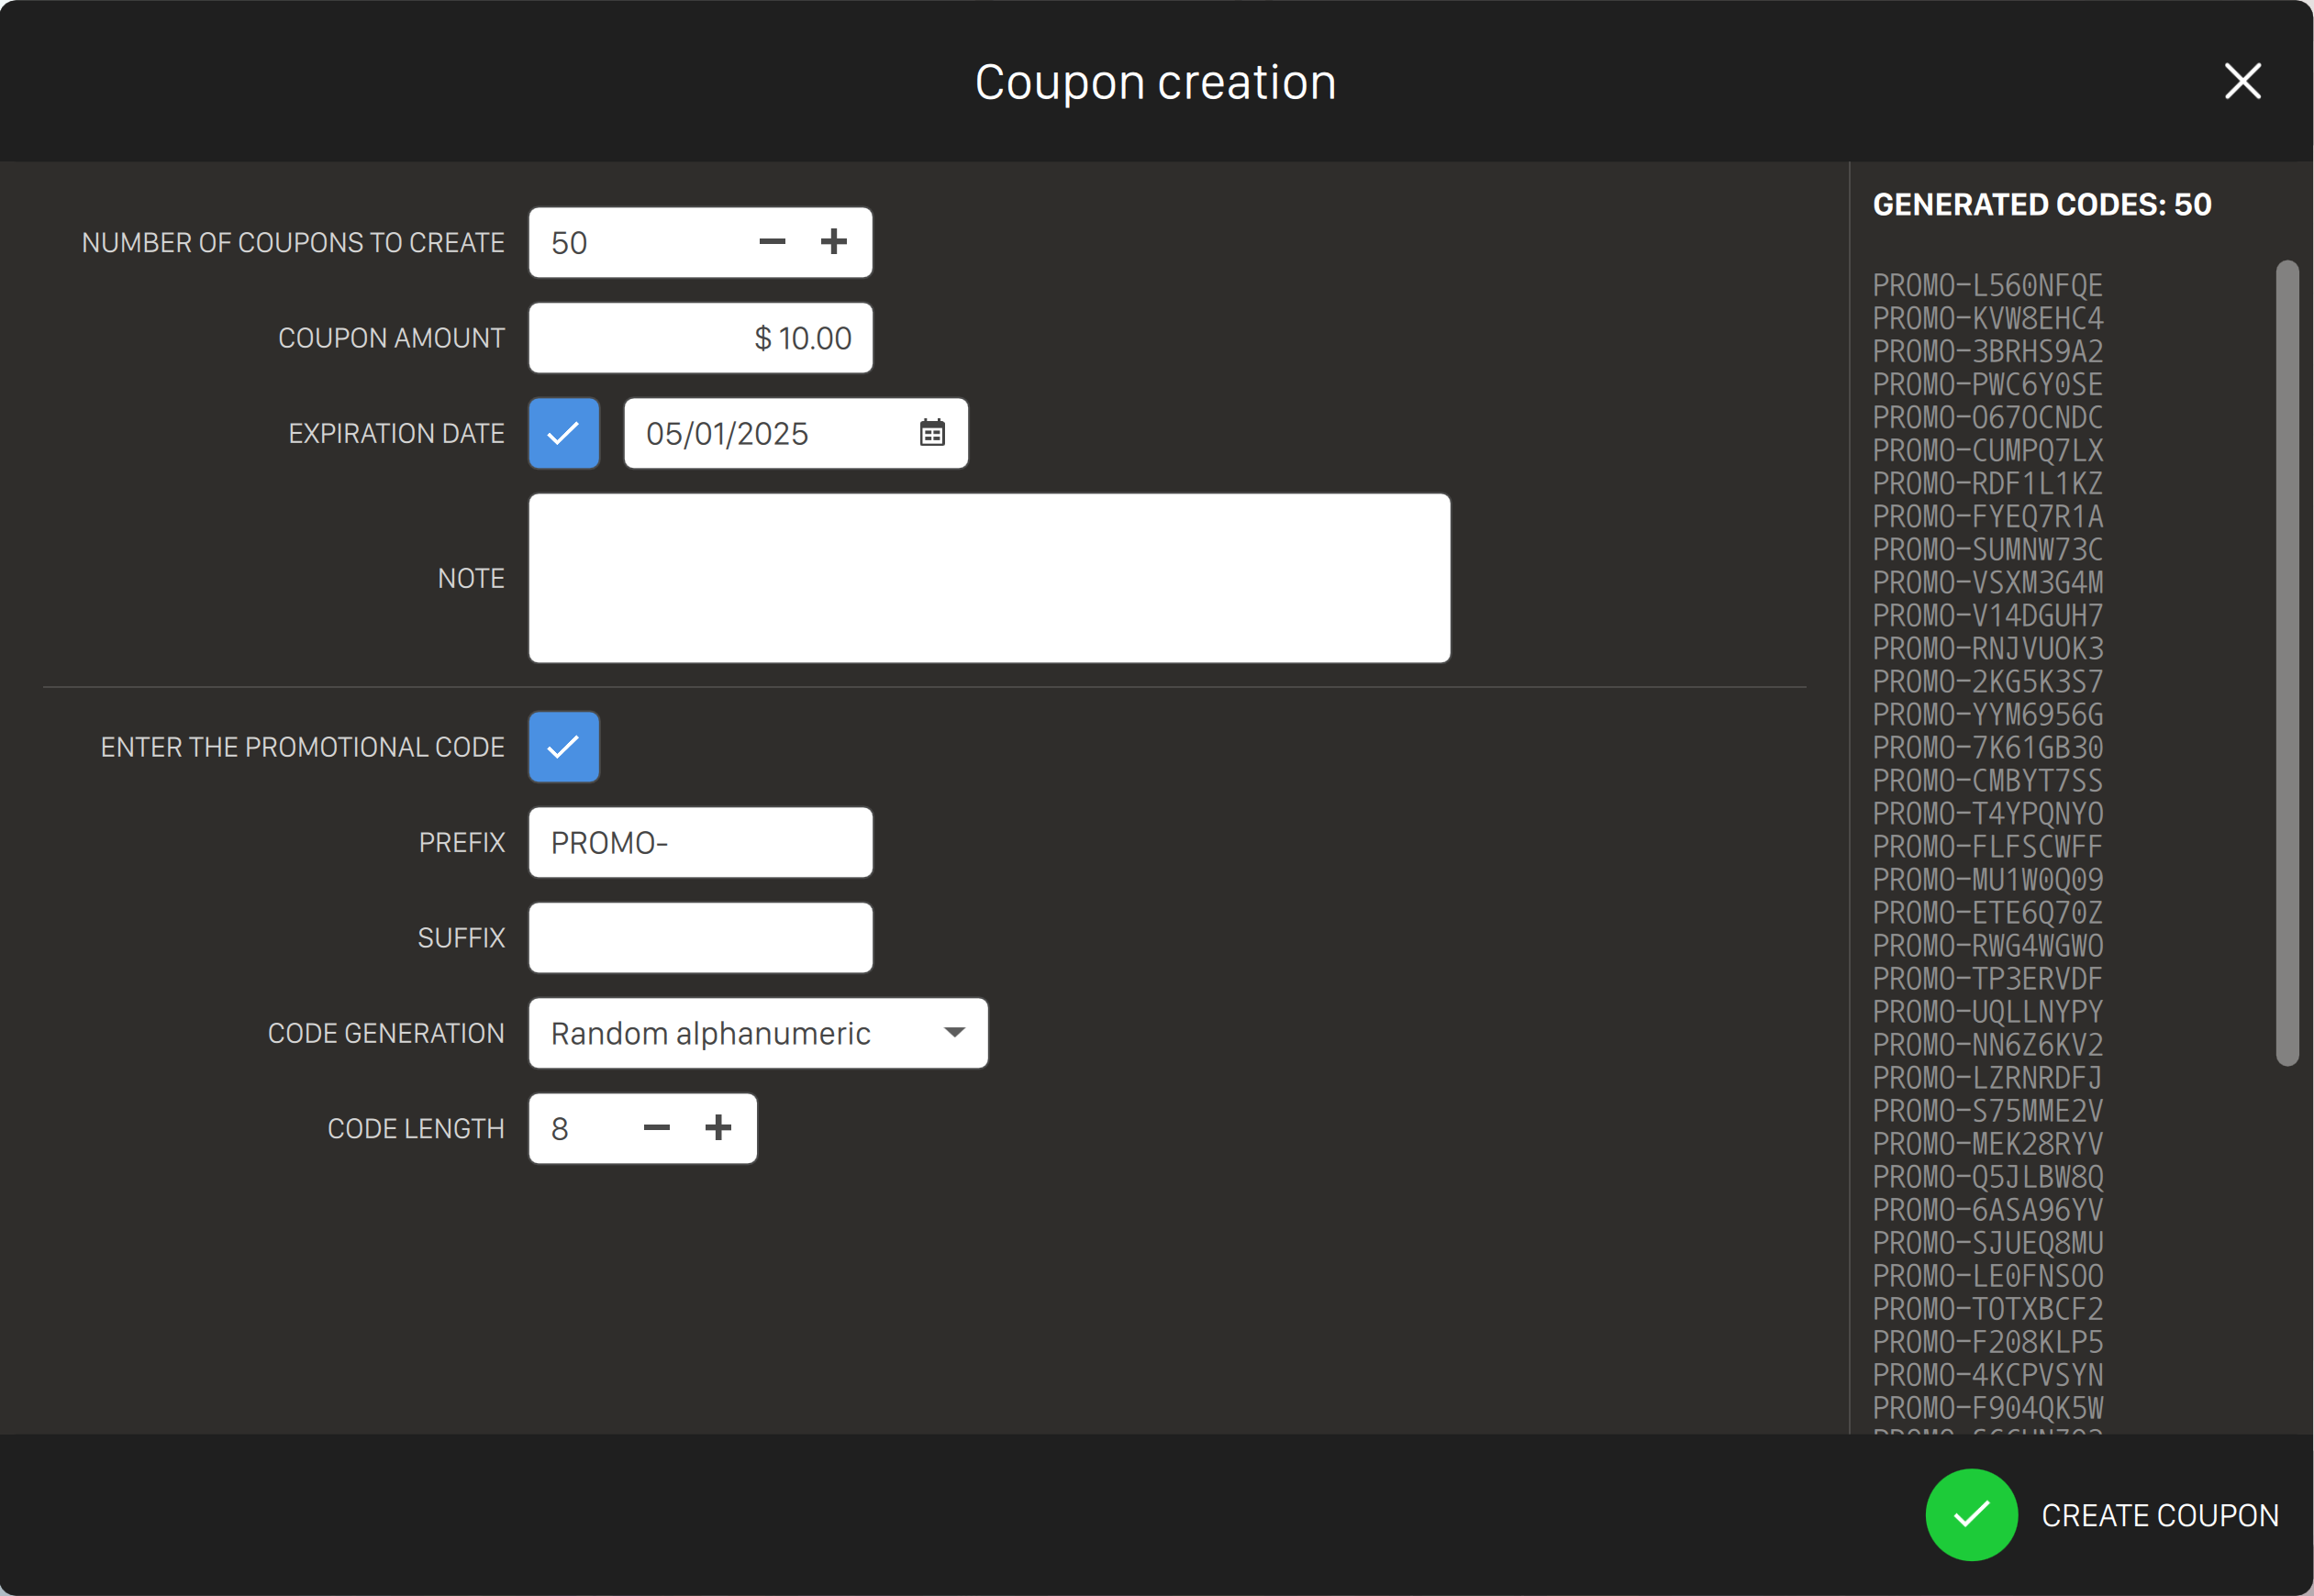
This window allows you to create one or more coupons from scratch. Set the following parameters to create a new coupon:
-
Number of coupons to create: indicates the total number of coupons that will be created. Min value is 1
-
Coupon amount: indicates the economical value of the coupon, considering the current currency
-
Expiration date: check this option if you want to set an expiration date for the coupon. The date can be selected using the calendar widget
-
Note: in this text box you can create some notes linked to the generated coupons
-
Promotional code: if checked it lets you enter the promotional code for the coupon, which is composed of three fields:
-
Prefix, which is composed of up to 4 letters or numbers that will be prepended to the numeric code
-
Suffix, one letter or number to append at the end of the numeric code
-
Code generation: it lets you choose the type of random code that will be generated
-
Code lenght: you can decide the lenght of the random code
-
Once you have finished with setting parameters you can click on Create coupon button, that will add the coupon(s) to the archive.
At this point you can either print the coupons (if the printer is available) or export them as csv.

15.4 Card Archive
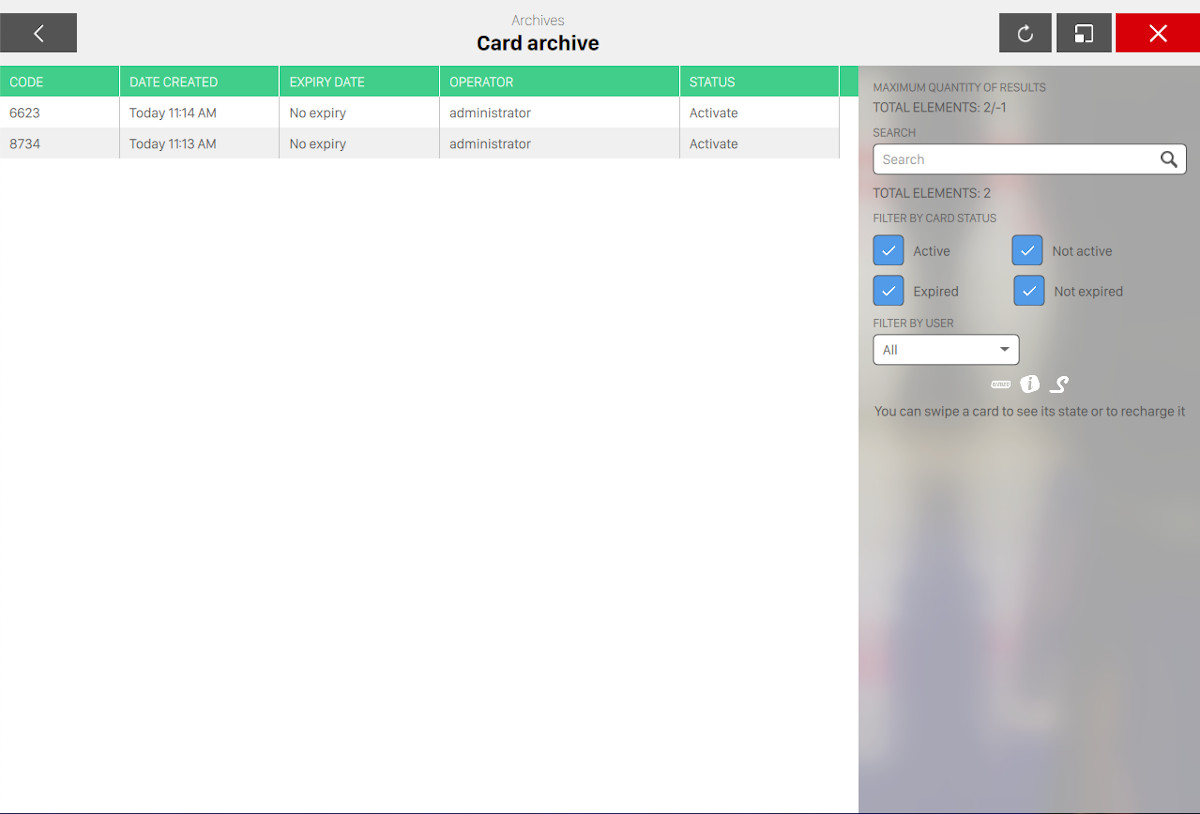
The card archive is displayed on this window. The cards are shown on the left. Click on any card to select it. The details of the selected card are displayed on the right sidebar and the selected card will be highlighted. To update the current list, click on ‘Refresh‘ button located at the top right of the window.
More information on the assignment of cards respectively to the members and to the staff can be found in member cards and Cards sections.
Each card on the list shows the following information:
-
The card code
-
The date and time the card was registered
-
The expiration date of the card
-
The operator that registered the card
-
The status of the card
When you select a card some details are shown on the right sidebar:
-
Code: shows the card code
-
Operator: the operator that registered the card
-
Date emitted: the date and time when the card was registered
-
Expiry date: the date and time when the card will expire
-
Card status: the status of the card
-
Account holders: the list of users that can use the card
When there is no selected card on the right sidebar of the window you can find some filters that you can apply:
-
Find membership cards by code entering some text on the search field
-
Filter by card status: you can filter cards by their status
-
Active: the list shows the cards that are active
-
Not active: the list shows the cards that are not active
-
Expired: the list shows the cards that are expired
-
Not expired: the list shows the cards that are not expired
-
-
Filter by user: filter cards by the operator that registered it
At the bottom of the filters you can find some information about usage of cards with Embed, Intercard, Sacoa and Semnox systems.
15.5 Giftcard archive
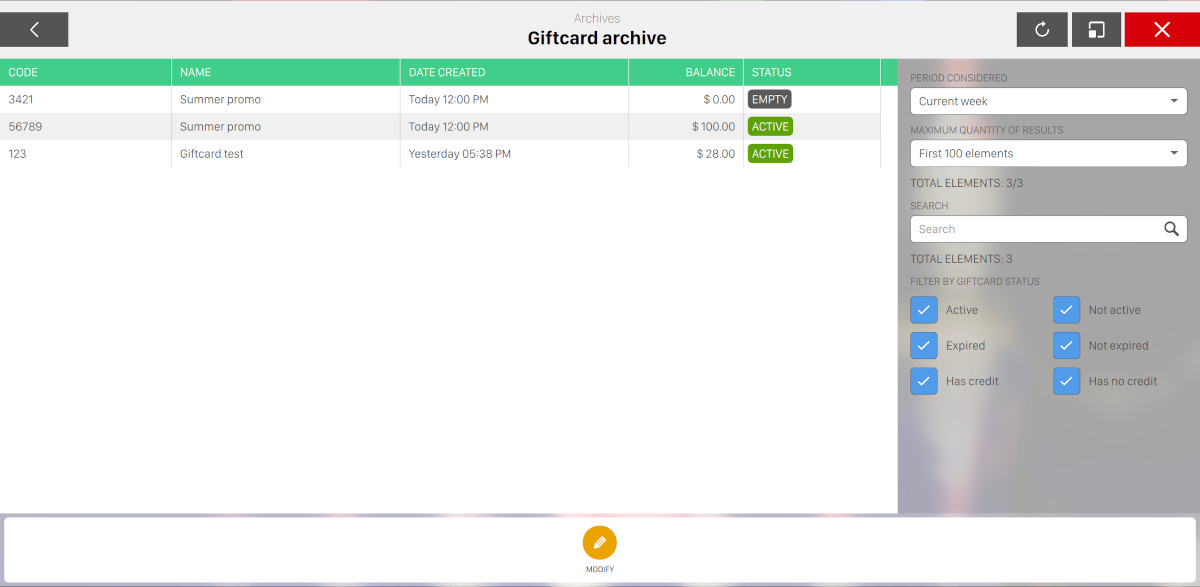
This windows shows the archive of the giftcards that have been sold to customers, with the possibility to filter the list and modify the items.
On the central area it is possibile to see the list of giftcards:
-
Code: the code related to the giftcard
-
Name: the name of the giftcard
-
Date created: the date and time of when the giftcard has been created
-
Balance: the current balance of the giftcard
-
Status: the current status of the giftcard
-
Active: indicates that the giftcard is active and ready to be used
-
Not active: indicates that the giftcard is not active and so can not be used
-
Expired: indicates that the giftcard is expired and so can not be used
-
Empty: indicates that the giftcard is empty, so the balance is zero
-
On the right sidebar you can see the list of available filters:
-
Period considered: choose a period from the dropdown
-
Maximum quantity of results: select the number of elements to be shown
-
Search: enter some arbitrary text to filter the list
-
Filter by giftcard status: check/uncheck the checkboxes
-
Active
-
Not active
-
Expired
-
Not expired
-
Has credit
-
Has no credit
-
Click on any row on the table: on the right sidebar you will see all the details of the selected item, including the operator who emitted the giftcard and all its movements.
Click on Modify button to edit a single giftcard:
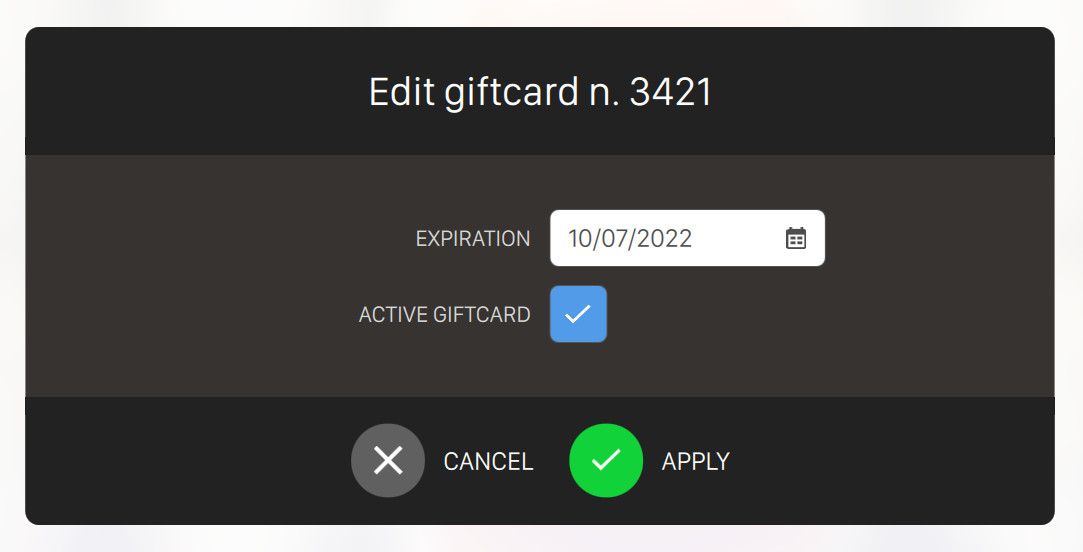
From this pop-up you can edit:
-
Expiration: set an expiration date by selecting it from the calendar
-
Active: set the card active or not active
Click on the Apply button to confirm the changes or click on the Cancel button to discard them.
15.6 Receipt Archive
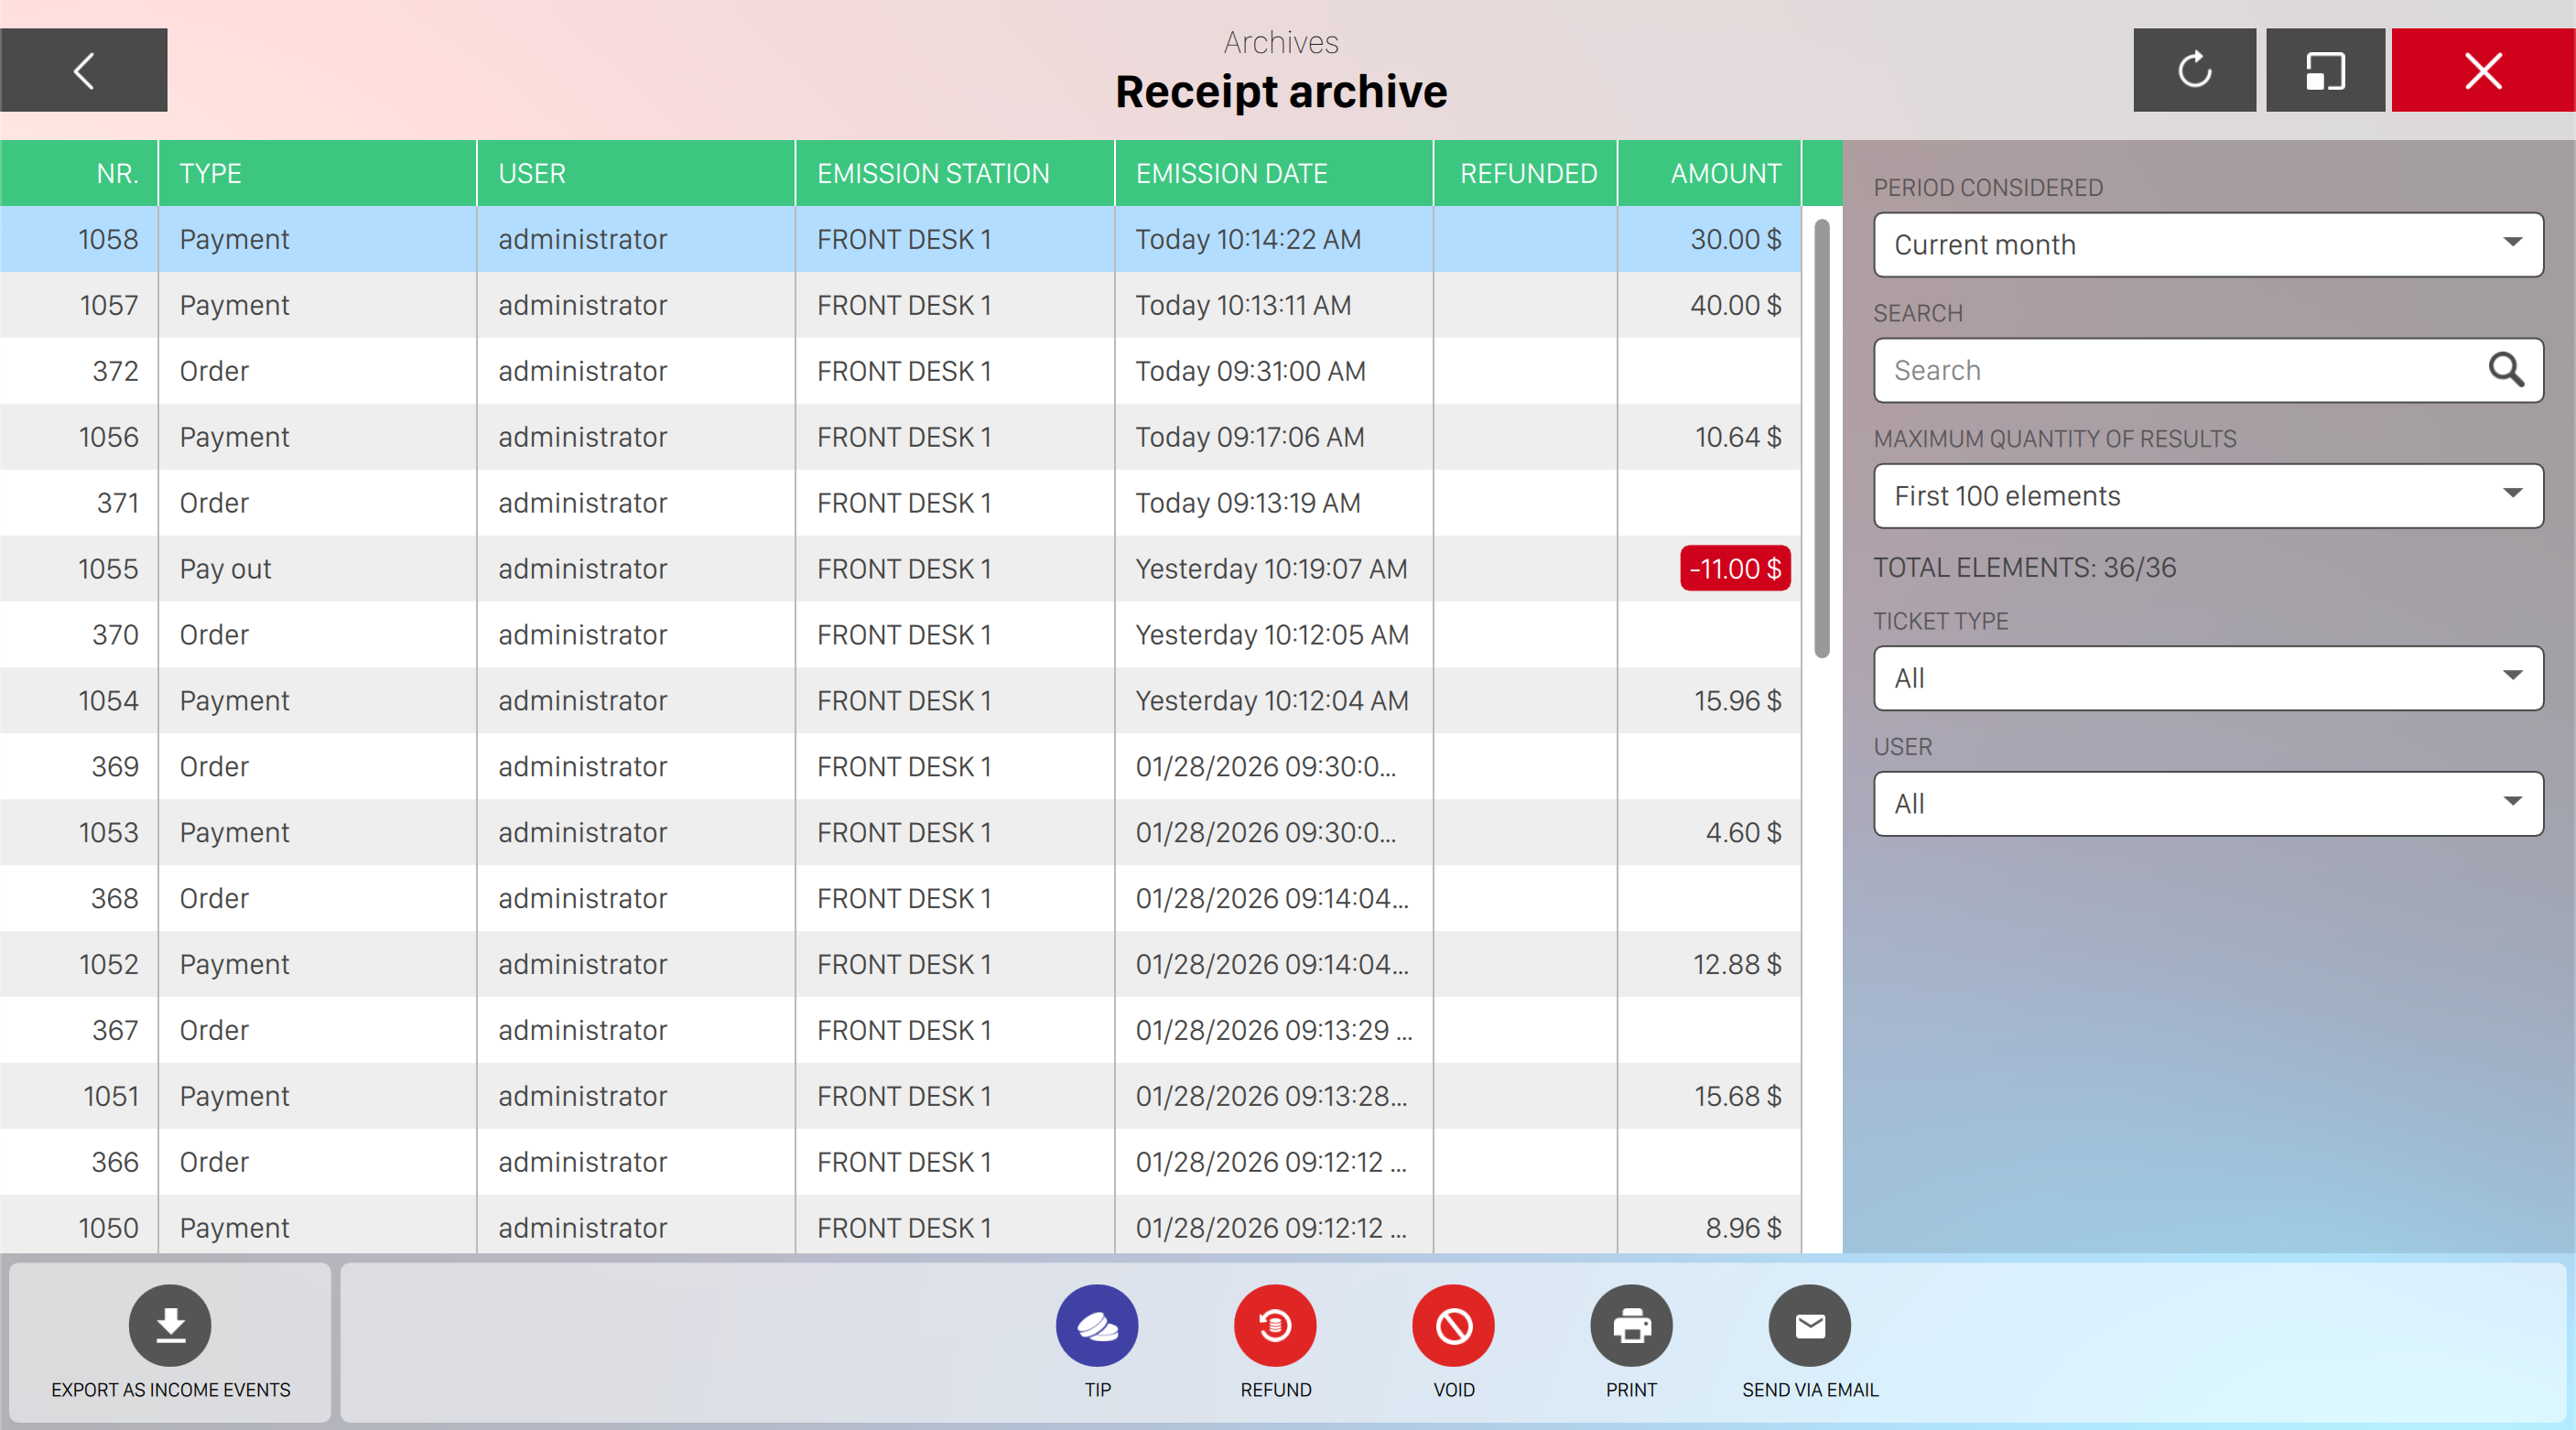
This window shows the details of each receipt issued. The list on the left shows the receipts. Click on a receipt to view it. The details of the selected receipt are displayed below and the selected receipt will be highlighted. To update the current list, click on ‘Refresh‘ button.
15.6.1 List of receipts
For each receipt, the following information are displayed:
-
The progressive number
-
The total amount
-
The name of the user who issued it
-
The station where it has been printed
-
The date and the time it has been emitted
-
The type of the receipt
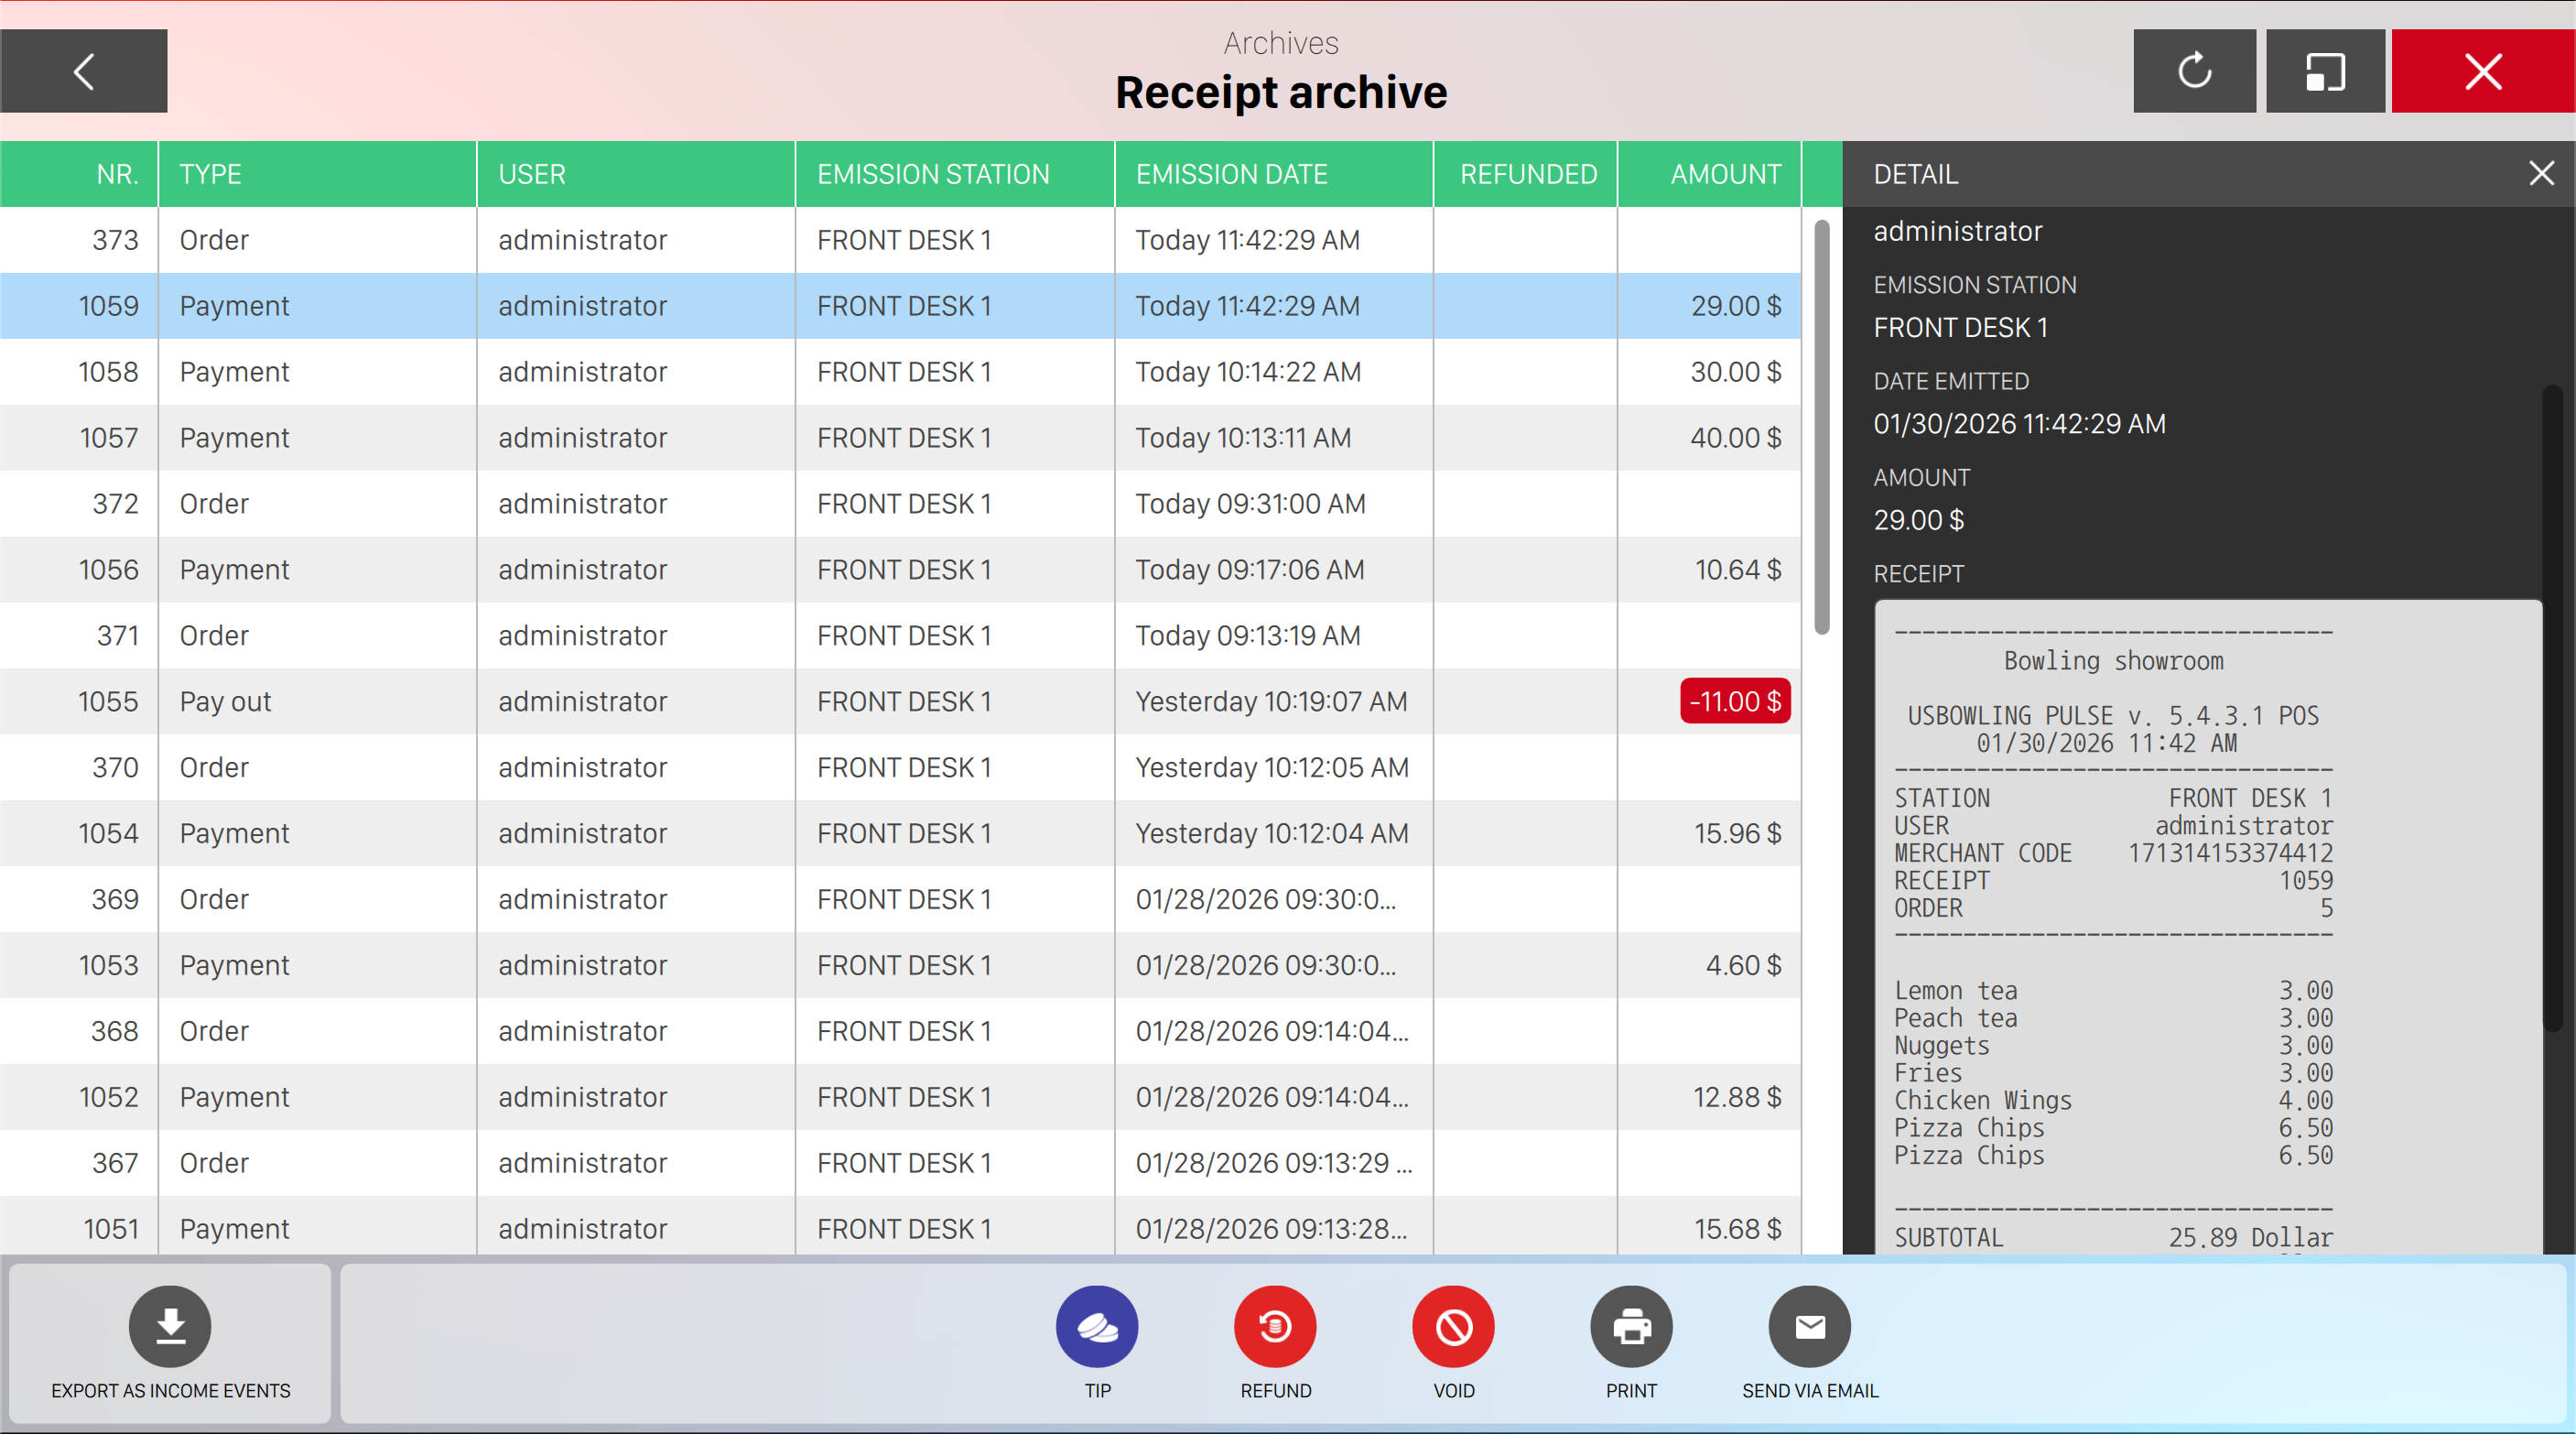
15.6.2 Receipt details
When you select a receipt all the details are shown below the list:
-
Receipt number: the progressive number of the receipt
-
Type: the type of receipt (payment or refund)
-
Operator emission: the operator who emitted the receipt
-
Station emission: the workstation from which the receipt has been emitted
-
Date emitted: the date and time when the receipt was emitted
-
Issuance shift: if daily shifts are enabled then it show the shift number related to the receipt emission
-
Issuance drawer: if drawers are enabled then it show the drawer number related to the receipt emission
-
Amount: the amount of money that has been paid
-
Tip amount: the amount of tip that was given by the customer
-
Tip receiver: the operator who received the tip
On the right side of the receipt details panel you can find a preview of the receipt that is going to be printed.
Below the same panel you can find some actions that you can perform on the selected receipt:
-
Add tip: if the payment was made with credit card it allows the customer to add a tip
-
Refund: refunds the amount of the selected receipt. See the Receipt refund section below for more information
-
Void: void the selected receipt. See the Receipt void section below for more information
-
Print: allows the operator to print a copy of the receipt on the thermal printer
-
Send via email: allows to send a copy of the receipt via email to one or more recepients
15.6.3 Receipt filters
On the right sidebar of the window you can find filters. They can be used to select and view some specific receipts. To use the generic filter, see Generic filters.
In addition to the generic filter, the receipts issued by an operator can be found and viewed by the operator name.
15.6.4 Export as income events
Under the filter section you can find the Export as income events button. If you press it it will download
on your filesystem a ZIP file containing detailed reports of the income events based on the time range
previously selected. The downloaded archive contains a list of CSV files (comma separated values) with
all the exported data organized in rows and columns.
15.6.5 Receipt refund
From the Receipts Archive you can perform total or partial refund of single receipts.
After clicking on one row of the archive you can click on the Refund button. A popup with the refund details will open.
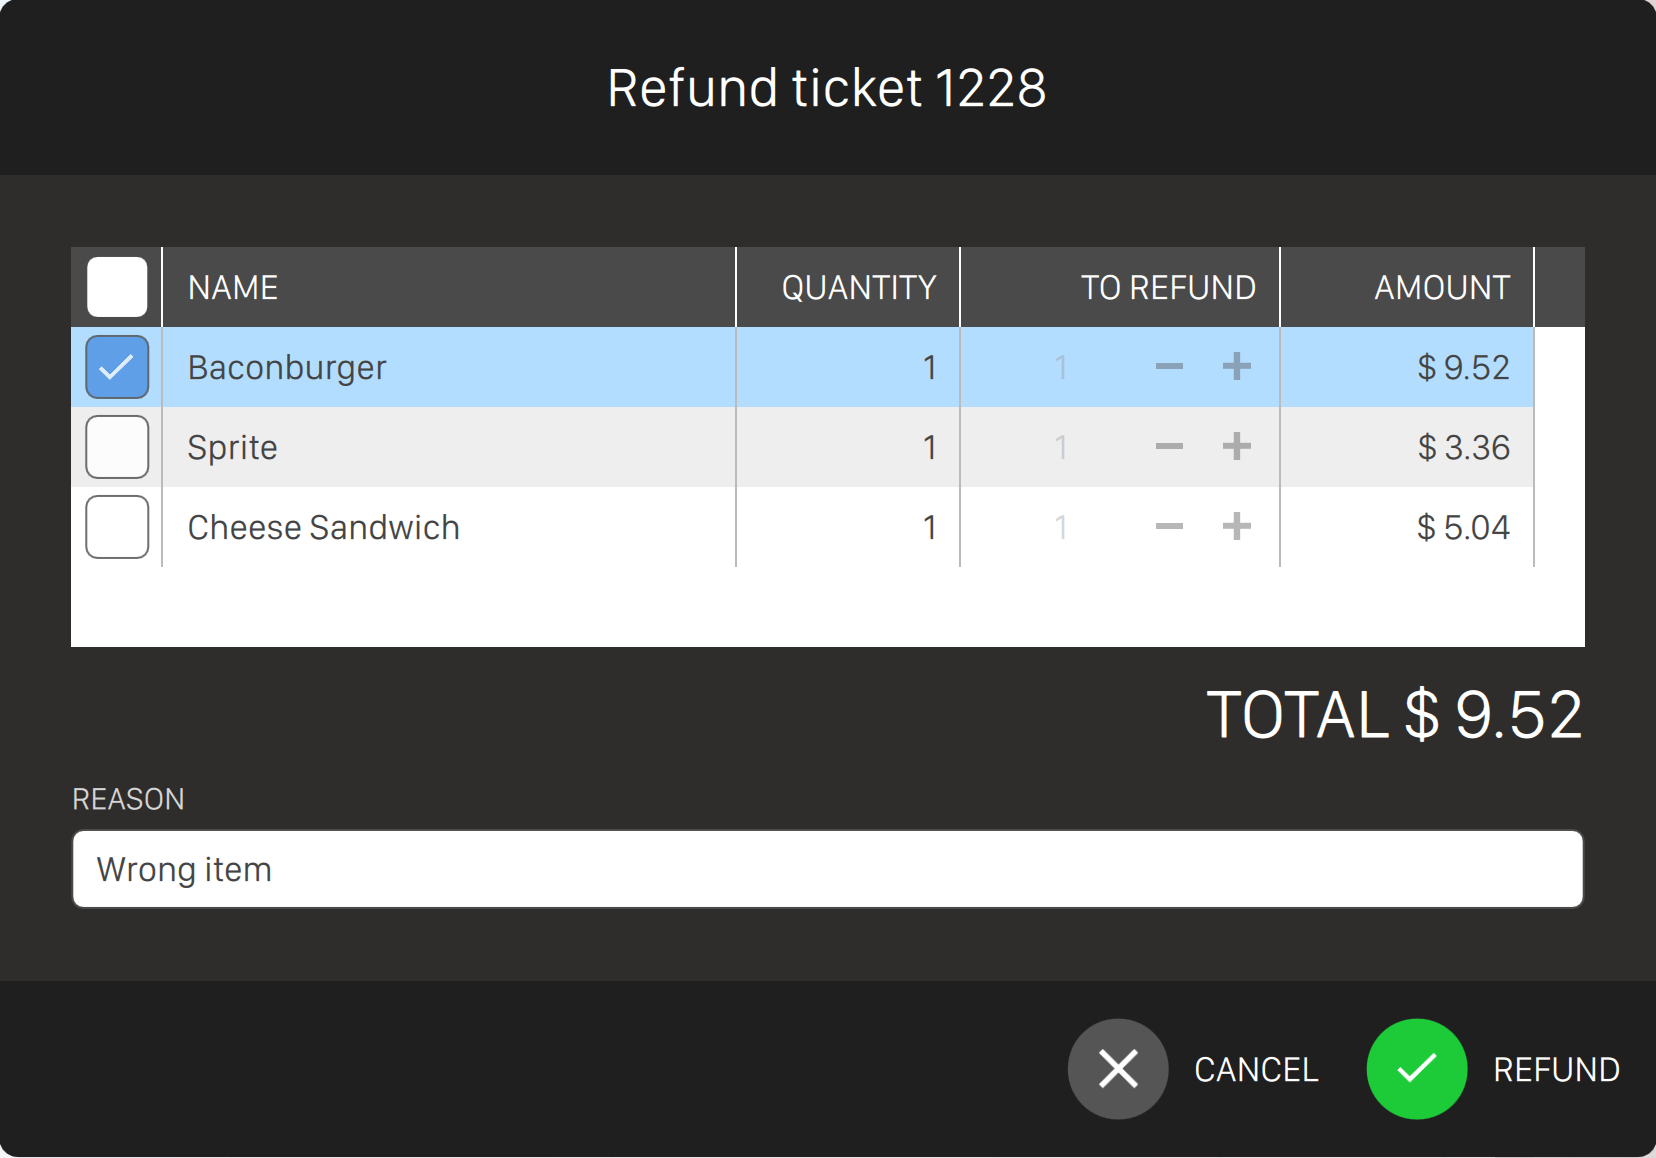
Here you can select which items to refund, if you want to refund certain quantity of an item. you will see the total amount of the refund. To confirm a refund you have to insert a reason. After clicking Refund you will have to choose the payment method to use.
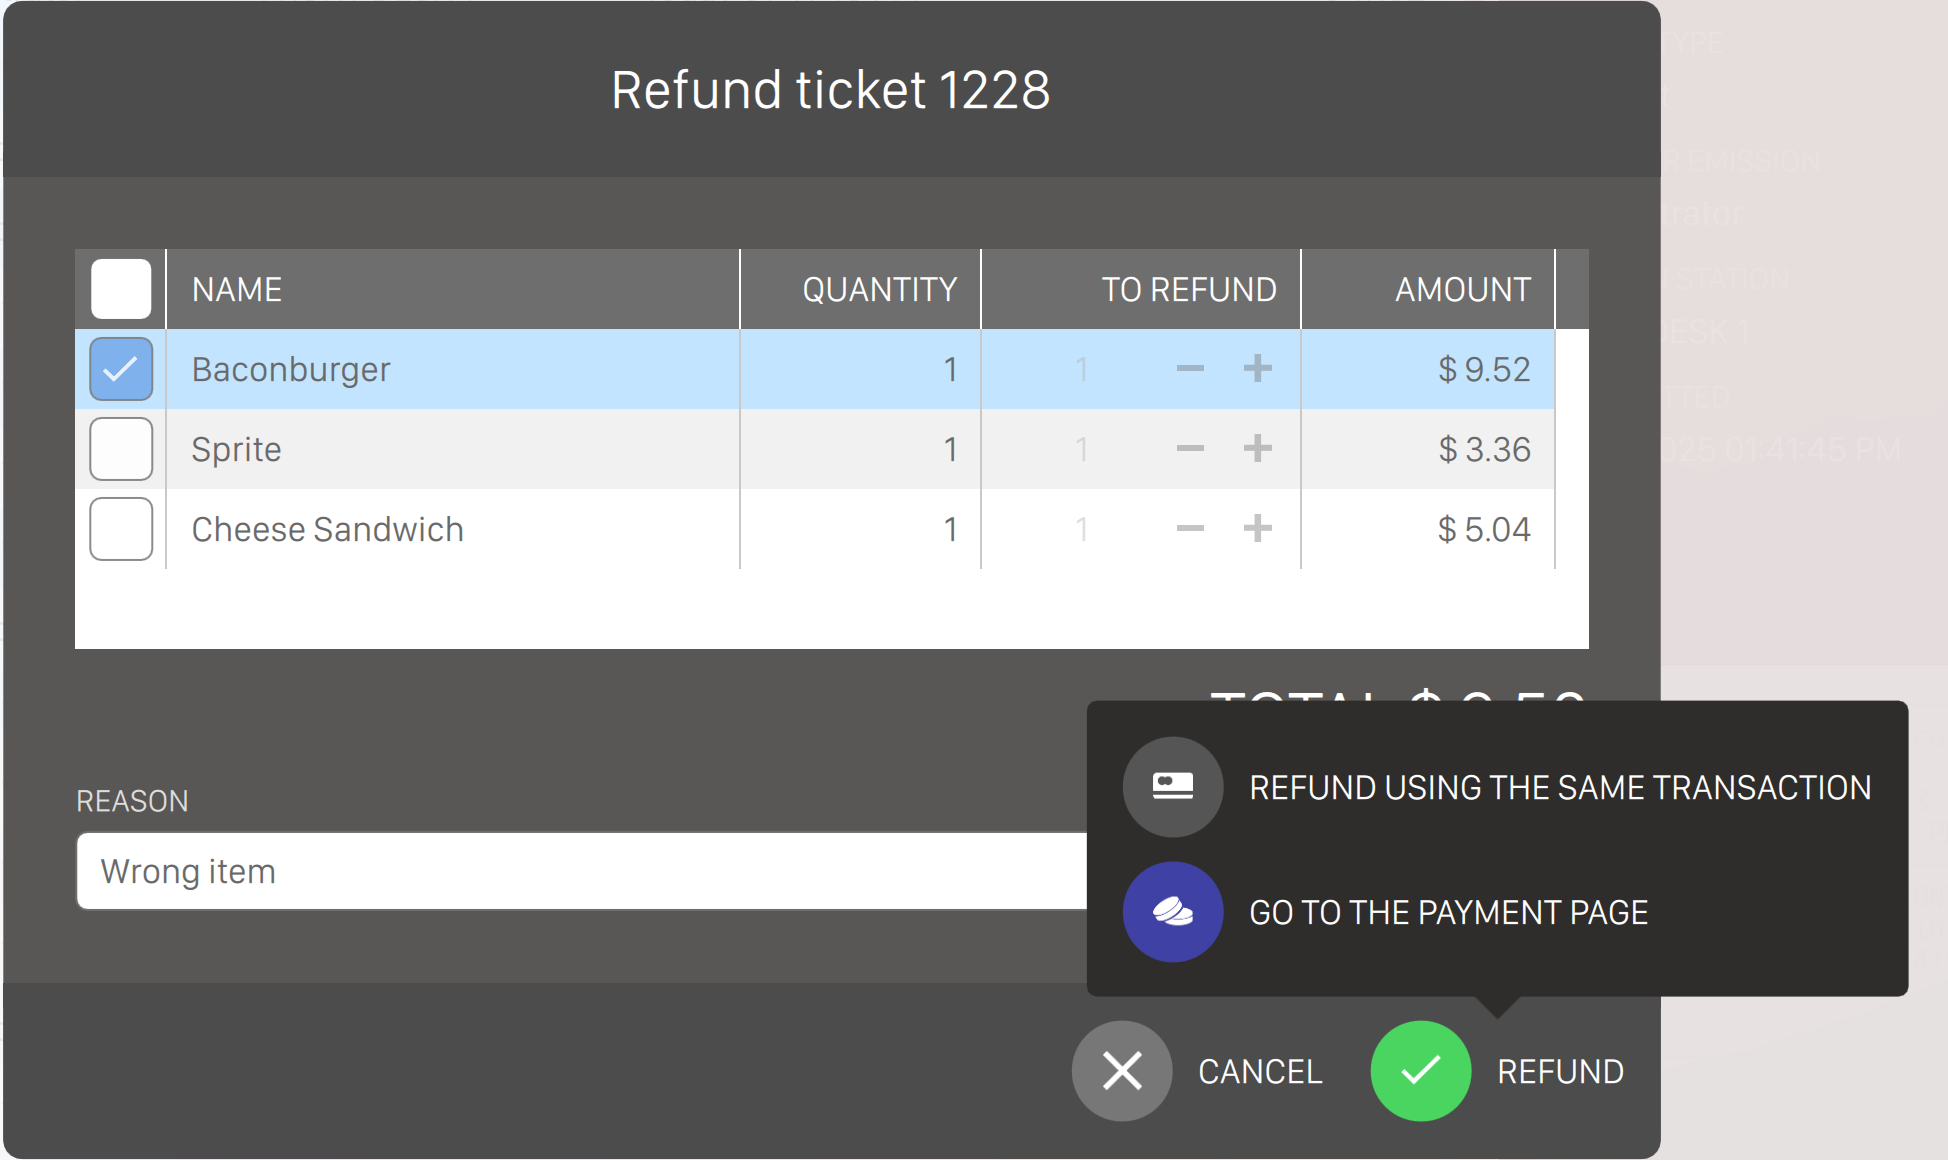
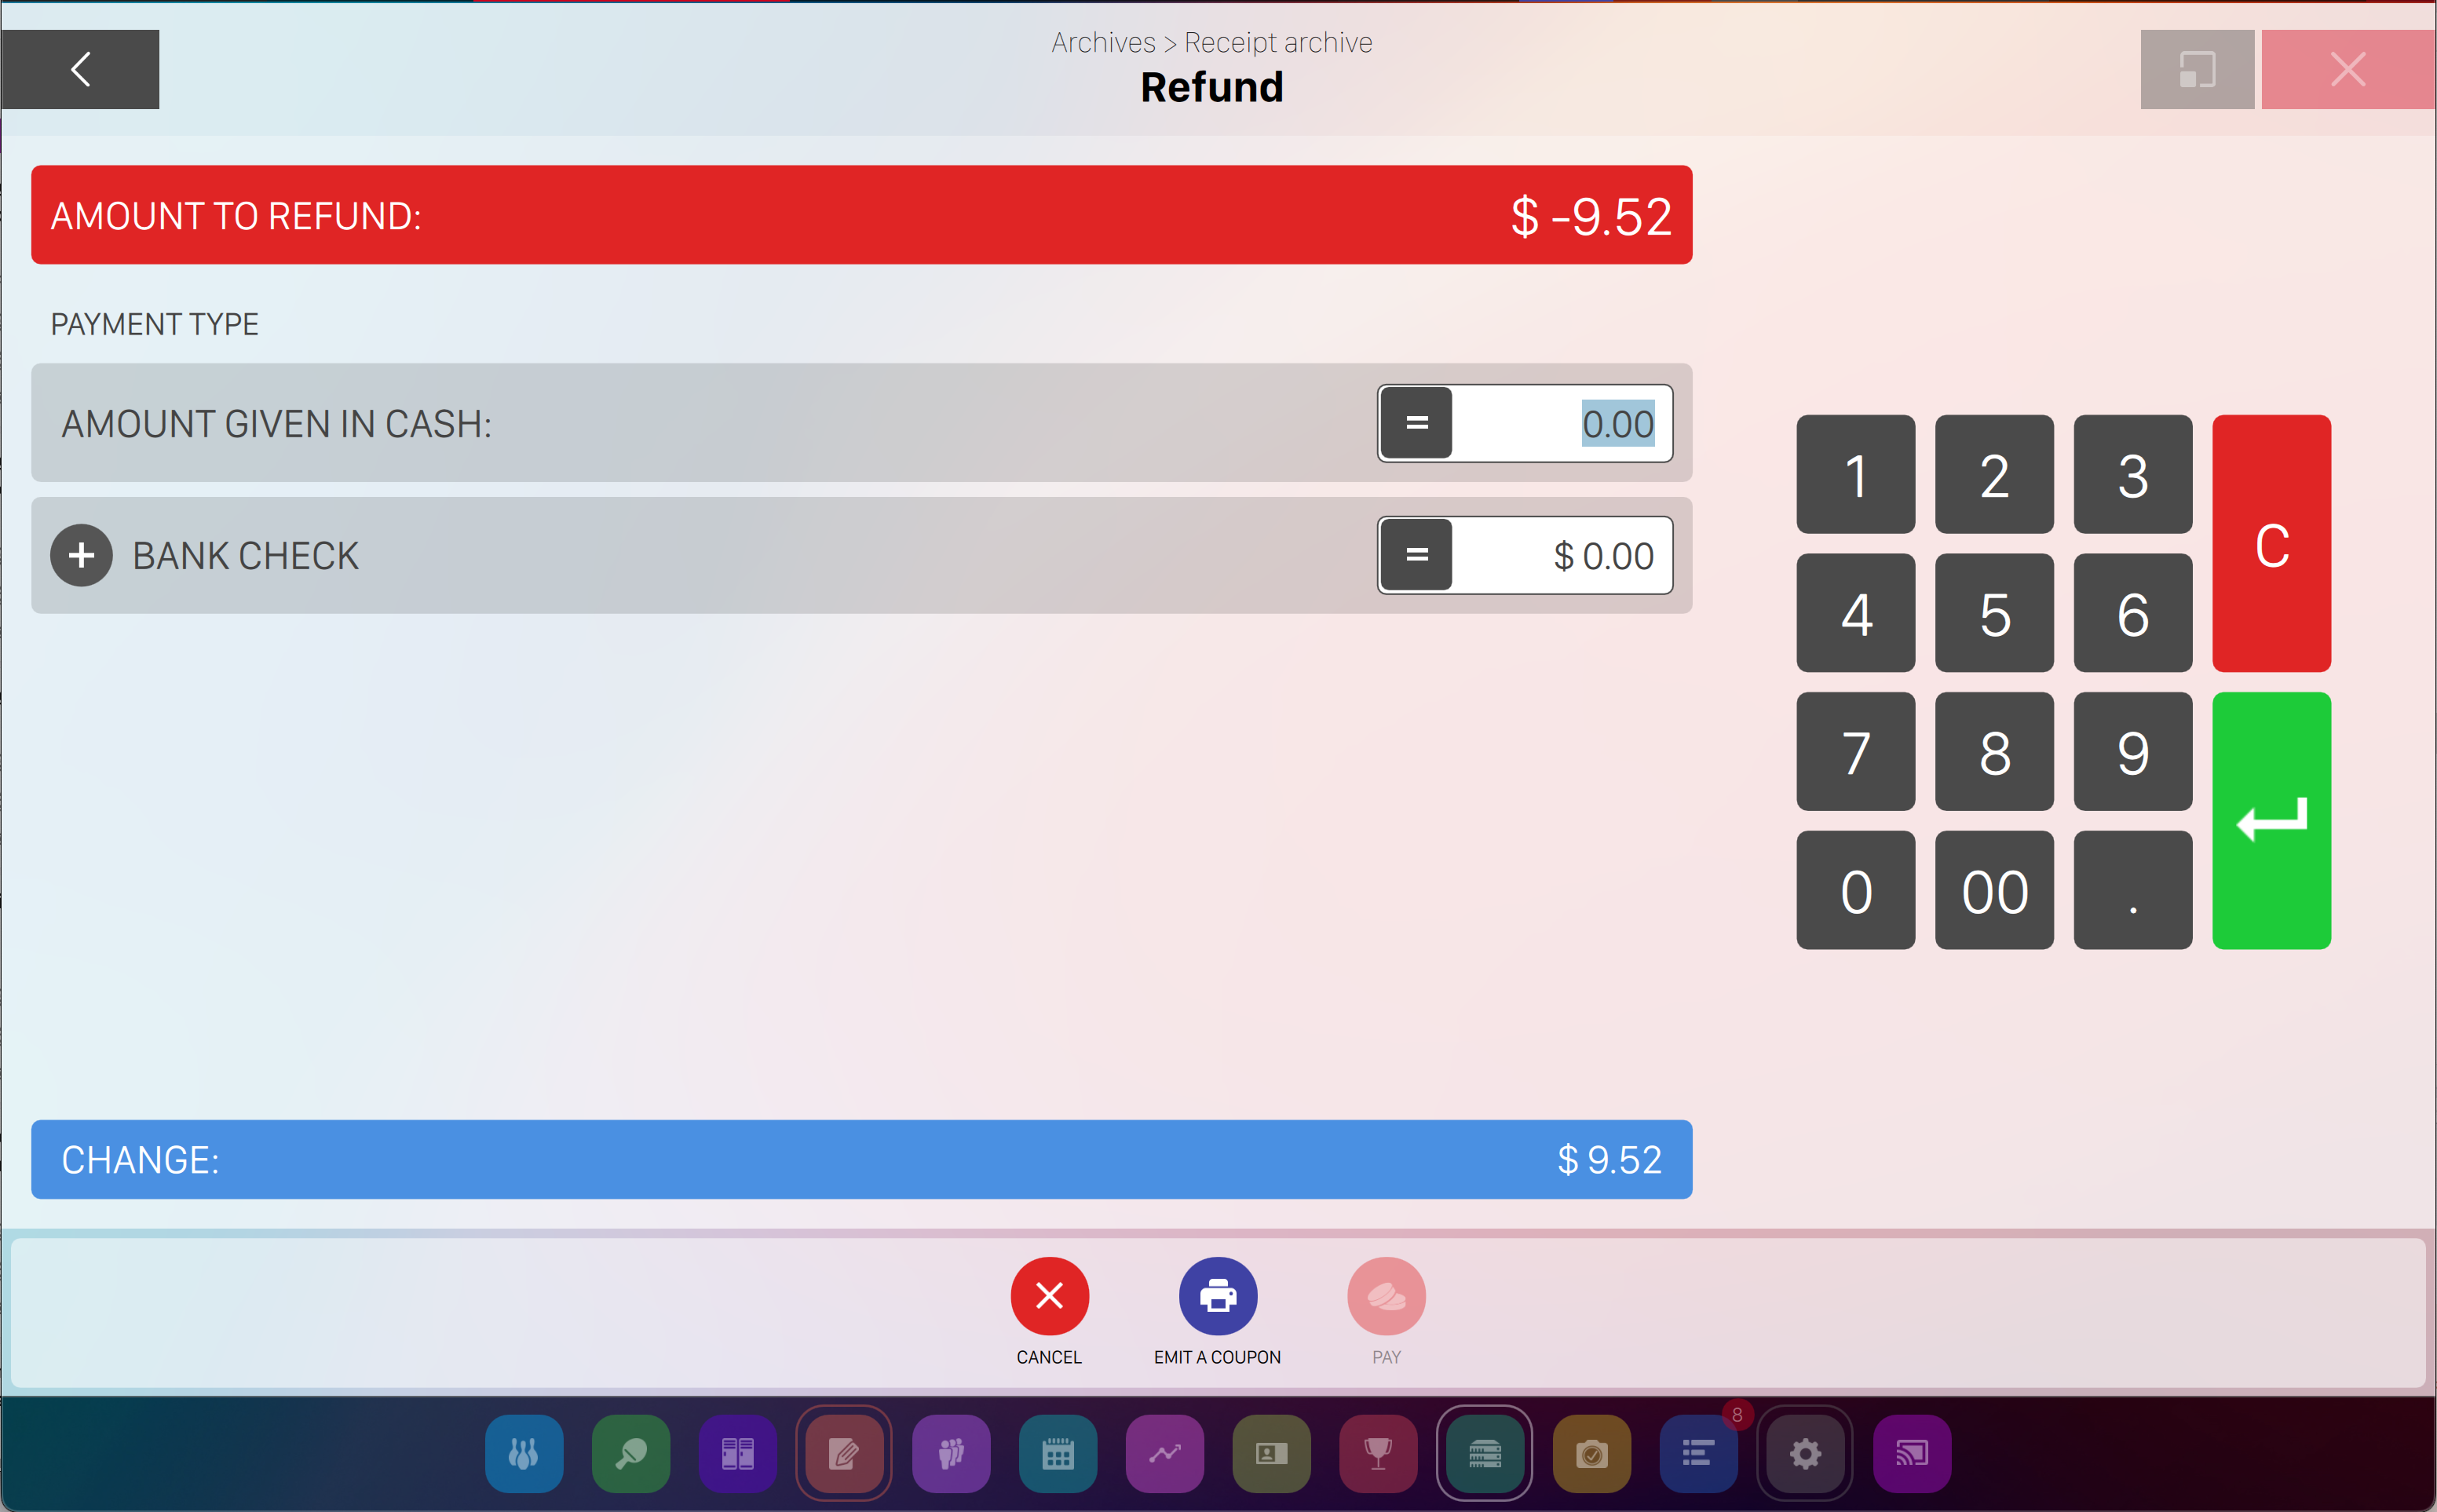
You can choose between the original payment method or to use another payment. If you choose to use another payment method you will have to specify it using the dedicated page.
The payment receipt includes a secure access code and QR code for the Web Console. Customers can scan the QR code displayed on their lane to access game controls on their smartphone using this code.
15.7 Automatic Refund Receipt Printing
When a refund is completed (Automatic or Manual), the system automatically prints a refund receipt on the configured thermal printer.
Process:
-
Operator completes refund procedure
-
System processes the refund
-
Receipt prints automatically
-
Operator provides receipt to customer
Receipt includes:
-
Refund ticket number and date/time
-
Original transaction reference
-
Operator identification
-
Refund amount and method
-
Customer information
-
Bowling center details
Benefits: Immediate documentation, no manual printing steps, complete audit trail, prevents omissions.
Printer setup: Ensure thermal printer is configured in Preferences > Advanced Settings > POS
Devices > Receipt Printer.
15.8 Void receipt
From the Receipts Archive you can also void receipts to address any error that might happen. This functionality voids the receipt and reverts the income lines, but it does not make any actual financial transaction. To perform a void you must insert a valid reason.
15.9 Machine events
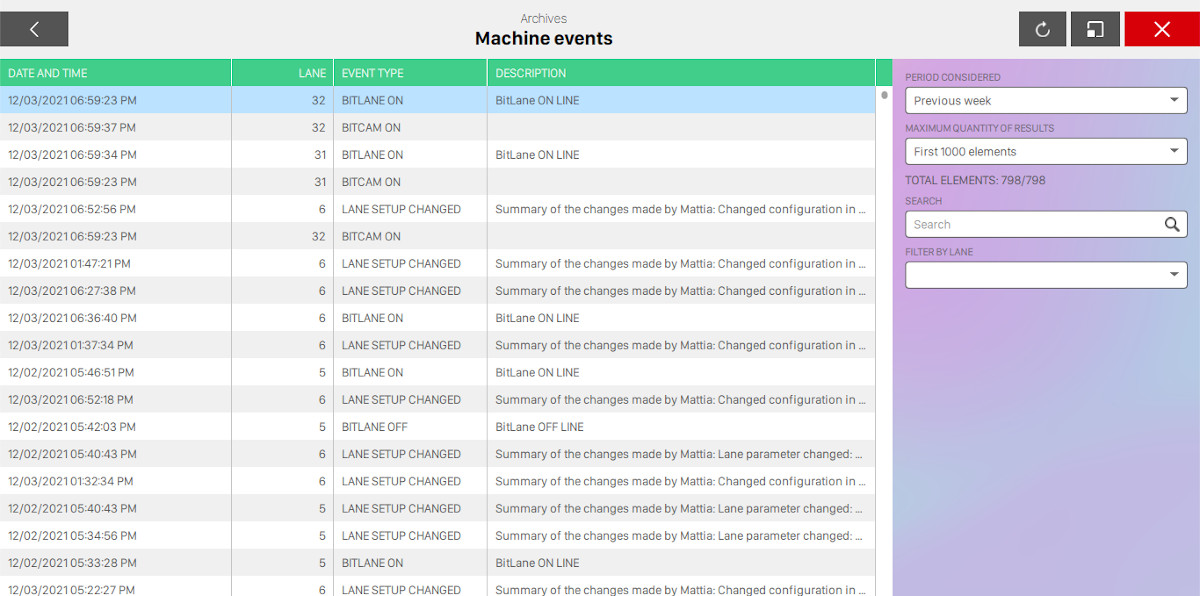
This sections shows all the events related to machines on the lanes. On the left side of the window you can see a table containing the events with the following fields:
-
Date and time when the event occurred
-
Lane number
-
Event type: the type of the event that occurred, for instance you can see when a pinsetter configuration has changed or when some alarms occurred. It is possible to see commands that have been manually sent to the pinsetter and visualize status changes, such as ‘Out of Serivice’ or ‘Machine Off’
-
A short description of the event, if available
Click on any item to see more details of the event, that will be displayed below the table:
-
Id of the event
-
Generation date: date and time when the event was generated
-
Lane: lane number where the event occurred
-
User: the operator that triggered the event, if available
-
Station: the workstation where the event occurred, if available
-
Event type: the type of the event
-
Alarm code: the code of the alarm, if the event is an alarm
-
Description: the summary description of the event
On the right sidebar of the window if no items is selected you can find some filters that you can apply to the view:
-
Period considered: choose the period to consider for the view (e.g. ‘Today’, ‘Current year’, ...). Custom date is also available and you can choose the starting and the ending date
-
You can choose maximum quantity of elements to be displayed
-
You can use the search field to search for events by typing some text
-
You can choose the lane where the event occurred from the list
Click on Refresh button to update the view with the applied filters.
15.10 Drawers events
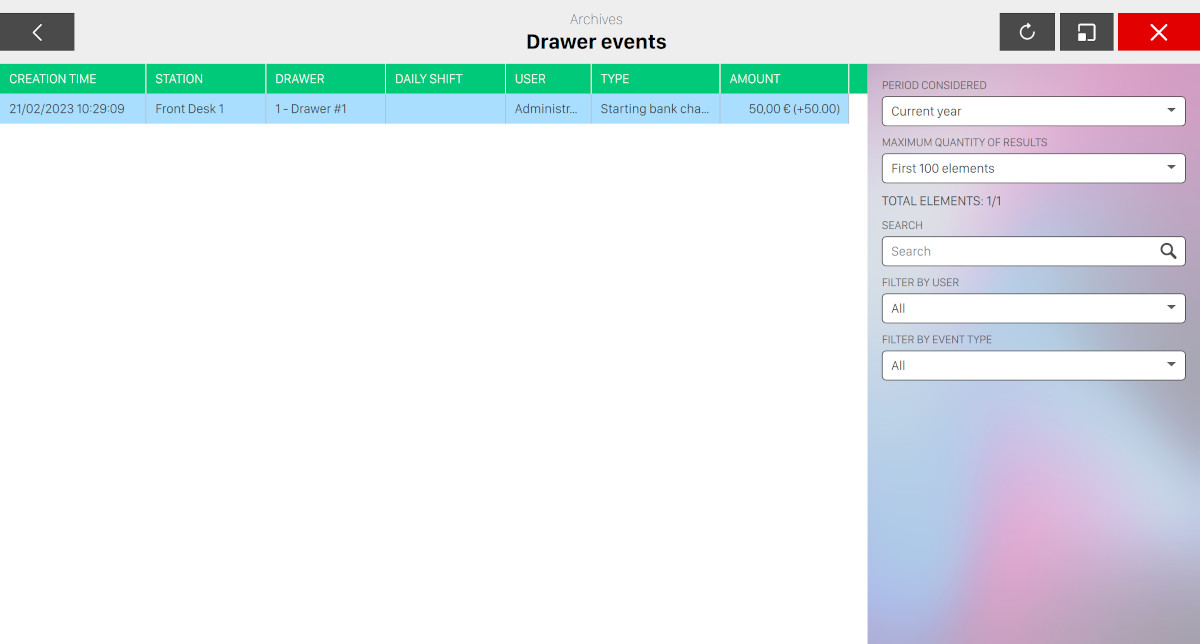
This section shows all the events related to drawers. On the left side of the window you can see a table containing the events containing the following fields:
-
Creation time: date and time when the event was fired
-
Station: the workstation of the event
-
Drawer: the drawer of the event
-
Daily shift: the daily shift related to the event
-
Operator: the operator that was logged when the event was fired
-
Type: the type of the event
-
Amount: the amount of the event and eventually the difference between the amount in the drawer at closing time and the drawer’s starting bank. If the difference is negative then the text color will be red
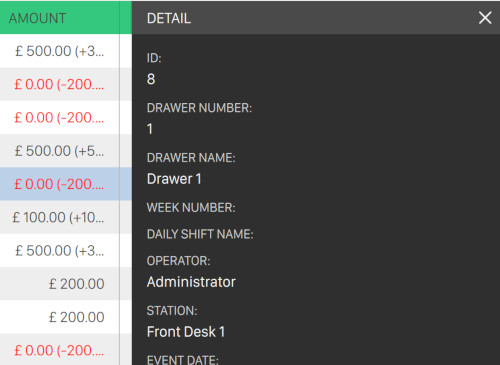
Click on any event to toggle the right sidebar with all the details:
-
Id: the unique identifier number of the drawer event
-
Drawer number: the number of the drawer
-
Drawer name: the name of the drawer
-
Daily shift number: the number of the daily shifts related to the drawer event
-
Daily shift name: the name of the daily shifts related to the drawer event
-
User: the operator who triggered the event
-
Station: the workstation the event was triggered from
-
Event date: the date and time the event was triggered
-
Event type: the type of the event
-
Initial starting bank: the initial starting bank of the drawer
-
Final starting bank: the final starting bank of the drawer
-
Starting bank difference: the difference between the initial and final starting bank
-
Closing amount: the amount of the drawer at closing time
-
Amount calculated: the amount of the drawer calculated by the system
-
Amount difference: the difference between the final amount and the amount calculated by the system
-
Note: some note related to the event
-
Receipt: the receipt of the drawer event. Click on Reprint button to print it again
On the right sidebar of the window you can find some filters that you can apply to the view:
-
Period considered: indicates the time frame of the view
-
Maximum quantity of results: indicates the maximum number of items to be shown on the table
-
Text search: enter some arbitrary text to filter the table considering all the columns
-
Filter by user: select the username from the dropdown list to filter the view by the selected user
-
Filter by event type: select the type of the event from the dropdown list to filter the view by the selected event type
15.11 Time clock events
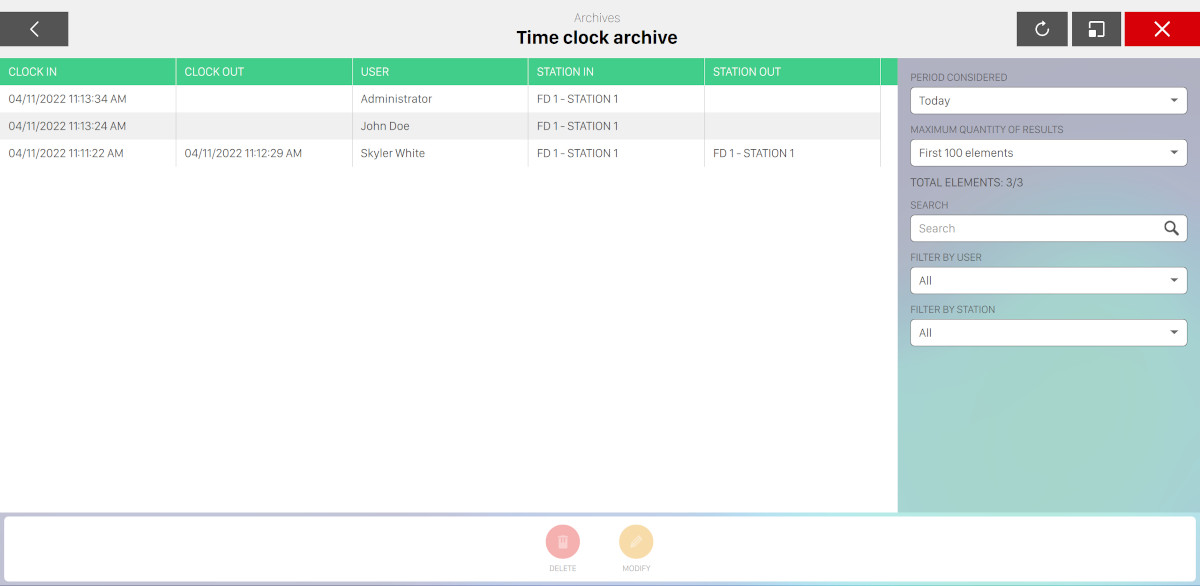
From this section you can see the archive of all events related to time clock. Note that this archive page is available only if time clock feature has been enabled from the preferences.
On the central area you can see the list of events represented on a table:
-
Clock in: date and time of the clock in
-
Clock out: date and time of the clock out
-
User: username of the operator who performed the operation
-
Station in: the name of the station where the clock in operation has been performed
-
Station out: the name of the station where the clock out operation has been performed
On the right side of the screen you can see the list of available filters:
-
Period considered: select the period from the dropdown
-
Maximum quantity of results: select the maximum number of items to show
-
Search: enter some arbitrary text to search among the events
-
User: select the user from the list
-
Station: select the station
15.12 User reviews
From this section it is possible to see the archive of all the reviews that have been written by customers that decided to leave a review to the Smart Biowl Kiosk service. For each item you can see:
-
Date created: the date and time of when the item has been created
-
Reservation code: the unique code of the reservation
-
Name: the name of the lead of the review
-
Rating: the rating of the review
-
Type: indicates whether the feedback is related to a reservation or to an order
-
Comment: indicates the review comment
On the right sidebar of the scren you can see the list of available filters:
-
Period considered: choose the period filter by selecting an option from the dropdown menu
-
Search: enter some arbitrary text to filter among the textual fields of the review
-
Maximum quantity of results: choose the maximum quantity of the resulting items by choosing an option from the list
-
Filter by feedback type: choose between two options
-
Order: choose reviews related to orders
-
Reservation: choose reviews related to reservations
-
15.13 Customer Tab
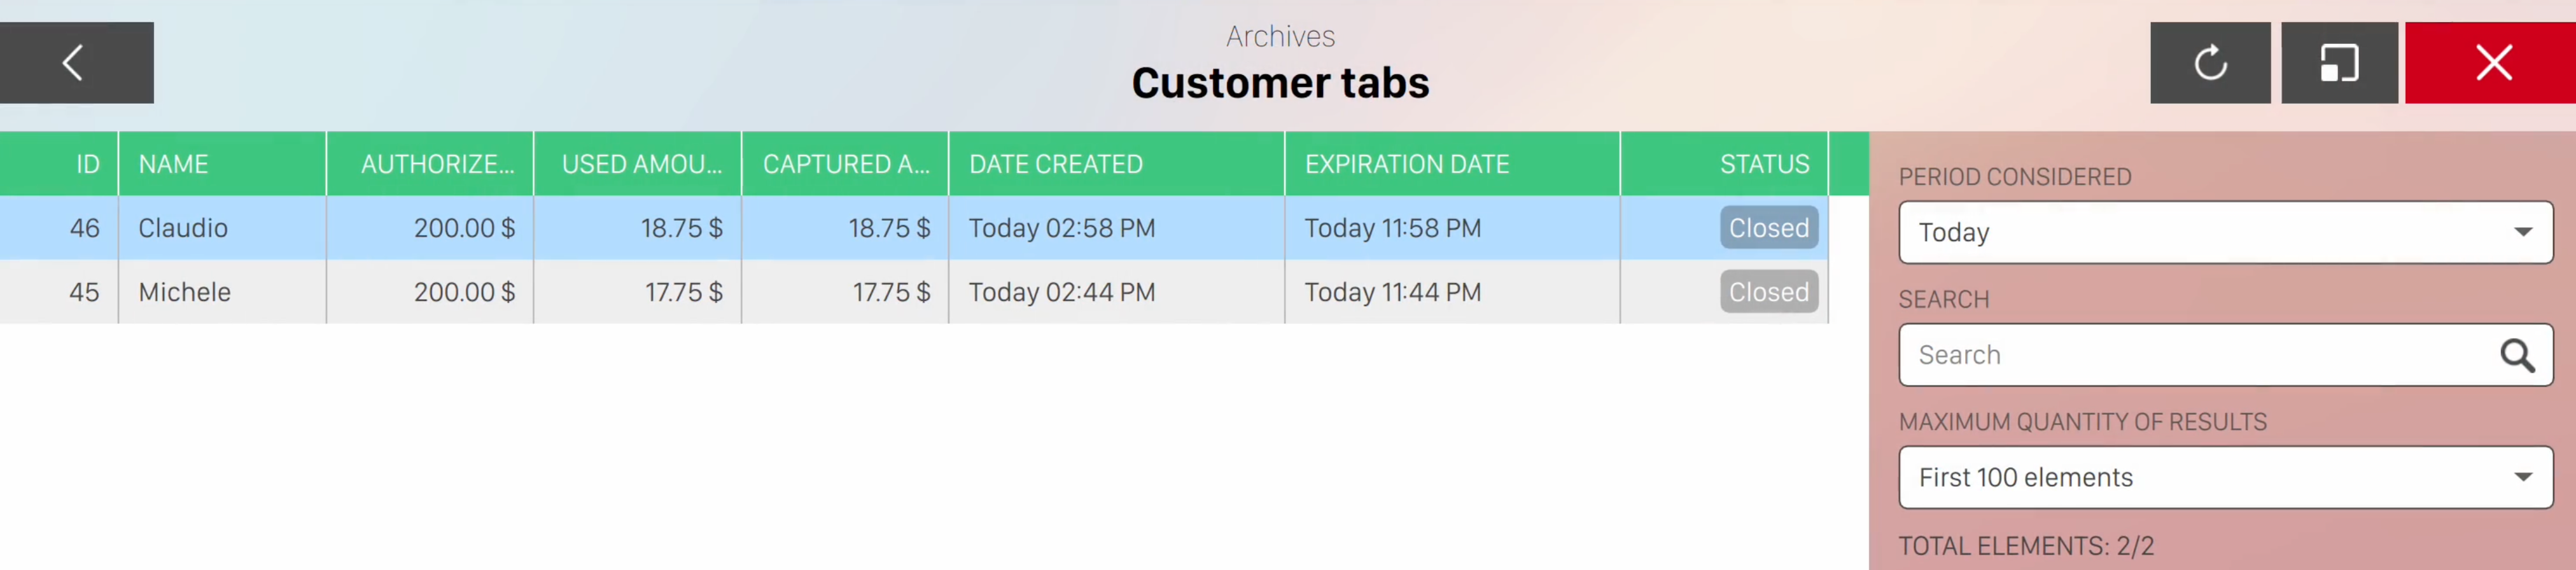
From this section it is possible to see the archive of all the Customer Tab opened and closed during the chosen time period
-
Id: the identification number of the Customer Tab
-
Name: the name of the Customer Tab client
-
Authorized Amount: the pre-authorized money amount
-
Used Amount: the amount used from the pre-authorized total but still not taken from the customer account
-
Captured Amount: the amount taken from the customer account. It should always be the same of the used amount when the Customer Tab is closed.
-
Date Created: the creation date of the Customer Tab
-
Expiration Date: the expiration date of the Customer Tab
-
Status: the status of the Customer Tab
On the right sidebar of the scren you can see the list of available filters:
-
Period considered: choose the period filter by selecting an option from the dropdown menu
-
Search: enter some arbitrary text to filter among the textual fields of the review
-
Maximum quantity of results: choose the maximum quantity of the resulting items by choosing an option from the list